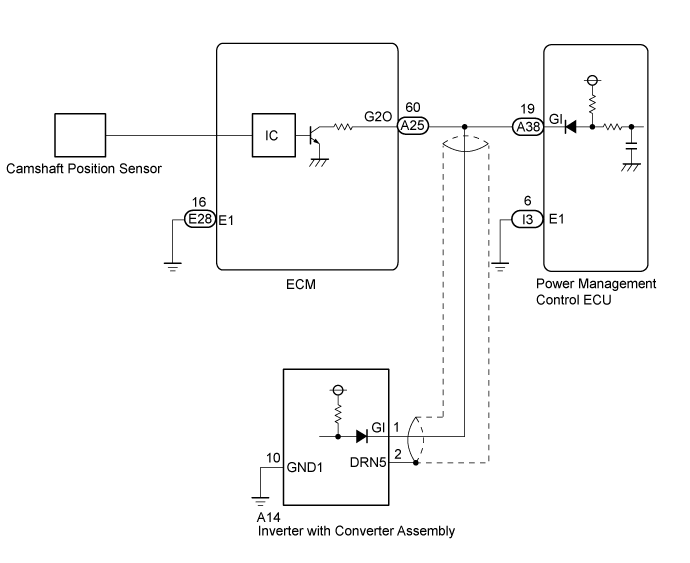
DTC P0340-886 Camshaft Position Sensor "A" Circuit |
| DTC No. | INF Code | DTC Detection Condition | Trouble Area |
| P0340 | 886 | Malfunction in the engine speed sensor (GI signal) circuit |
|
| 1.CHECK DTC OUTPUT (HYBRID CONTROL) |
Connect the intelligent tester to the DLC3.
Turn the power switch on (IG).
Enter the following menus: Powertrain / Hybrid Control / DTC.
Check if DTCs are output.
| Result | Proceed to |
| P0340-886 only is output. | A |
| P0343-747 is also output. | B |
Turn the power switch off.
|
| ||||
| A | |
 |
| 2.CHECK CONNECTOR CONNECTION CONDITION (ECM CONNECTOR) |
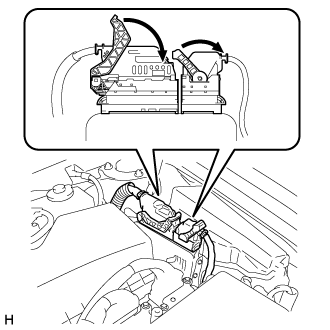 |
Check the connector connections and contact pressure of the relevant terminals for the ECM connectors (Click here).
|
| ||||
| OK | |
|
| 3.CHECK CONNECTOR CONNECTION CONDITION (POWER MANAGEMENT CONTROL ECU CONNECTOR) |
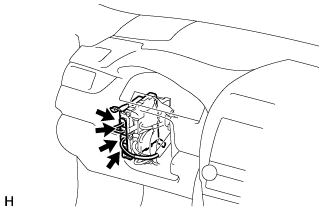 |
Check the connector connections and contact pressure of the relevant terminals for the power management control ECU connectors (Click here).
|
| ||||
| OK | |
|
| 4.CHECK POWER MANAGEMENT CONTROL ECU (CHECK WAVEFORM) |
Connect an oscilloscope between the power management control ECU terminals specified in the table below.
Turn the power switch on (READY).
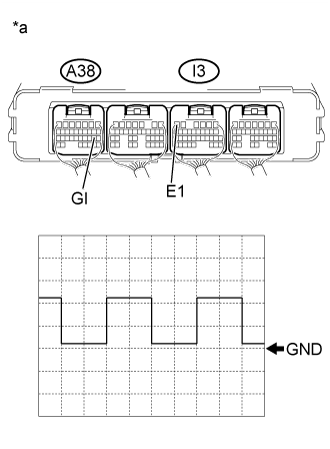 |
Measure the waveform.
| Item | Content |
| Terminal | A38-19 (GI) - I3-6 (E1) |
| Equipment Setting | 5 V/DIV., 20 ms./DIV. |
| Condition | Power switch on (READY), with engine running |
| *a | Component with harness connected (Power Management Control ECU) |
| Result | Proceed to |
| Normal | A |
| Waveform is flat, and is stuck on the +B side. | B |
| Waveform is flat, and is stuck on the GND side. | C |
Turn the power switch off.
|
| ||||
|
| ||||
| A | |
|
| 5.CHECK FOR INTERMITTENT PROBLEMS |
|
| ||||
| OK | ||
 | ||
| ||
| 6.CHECK HARNESS AND CONNECTOR (POWER MANAGEMENT CONTROL ECU) |
Check that the service plug grip is not installed.
Disconnect connector A25 from the ECM.
Disconnect connector A14 from the inverter with converter assembly.
Connect the cable to the negative (-) auxiliary battery terminal.
Turn the power switch on (IG).
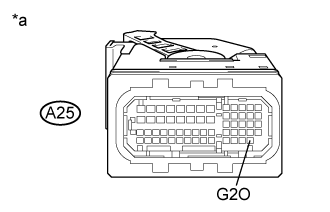 |
Measure the voltage according to the value(s) in the table below.
| Tester Connection | Switch Condition | Specified Condition |
| A25-60 (G2O) - Body ground | Power switch on (IG) | 11 to 14 V |
| *a | Front view of wire harness connector (to ECM) |
Turn the power switch off.
Disconnect the cable from the negative (-) auxiliary battery terminal.
Connect the inverter with converter assembly connector.
Connect the ECM connector.
|
| ||||
| OK | ||
| ||
| ||
| 7.CHECK HARNESS AND CONNECTOR (ECM - POWER MANAGEMENT CONTROL ECU, INVERTER WITH CONVERTER) |
Check that the service plug grip is not installed.
Disconnect connector A25 from the ECM.
Disconnect connector A38 from the power management control ECU.
Disconnect connector A14 from the inverter with converter assembly.
Connect the cable to the negative (-) auxiliary battery terminal.
Turn the power switch on (IG).
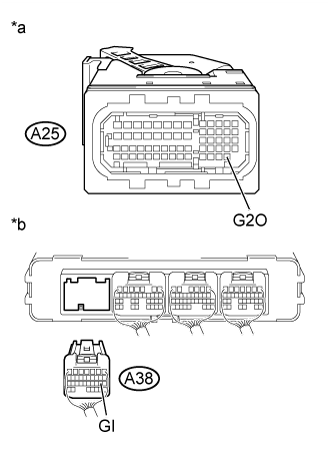 |
Measure the voltage according to the value(s) in the table below.
| Tester Connection | Switch Condition | Specified Condition |
| A25-60 (G2O) or A38-19 (GI) - Body ground | Power switch on (IG) | Below 1 V |
| *a | Front view of wire harness connector (to ECM) |
| *b | Rear view of wire harness connector (to Power Management Control ECU) |
Turn the power switch off.
Measure the resistance according to the value(s) in the table below.
| Tester Connection | Switch Condition | Specified Condition |
| A25-60 (G2O) or A38-19 (GI)- Body ground | Power switch off | 10 kΩ or higher |
Disconnect the cable from the negative (-) auxiliary battery terminal.
Connect the ECM connector.
Connect the power management control ECU connector.
Connect the inverter with converter assembly connector.
|
| ||||
| OK | |
|
| 8.CHECK POWER MANAGEMENT CONTROL ECU |
Disconnect all the connectors from the power management control ECU.
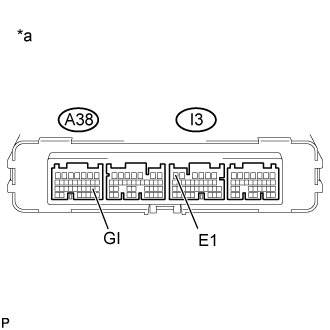 |
Measure the resistance according to the value(s) in the table below.
| Tester Connection | Switch Condition | Specified Condition |
| A38-19 (GI) - I3-6 (E1) | Power switch off | 10 kΩ or higher |
| *a | Component without harness connected (Power Management Control ECU) |
Connect the power management control ECU connectors.
|
| ||||
| OK | |
|
| 9.CHECK INVERTER WITH CONVERTER ASSEMBLY |
Check that the service plug grip is not installed.
Disconnect connector A14 from the inverter with converter assembly.
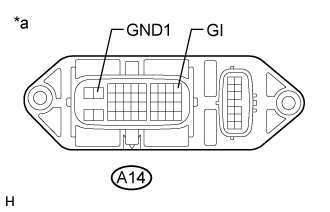 |
Measure the resistance according to the value(s) in the table below.
| Tester Connection | Switch Condition | Specified Condition |
| A14-1 (GI) - A14-10 (GND1) | Power switch off | 10 kΩ or higher |
| *a | Component without harness connected (Inverter with Converter Assembly) |
Connect the inverter with converter assembly connector.
|
| ||||
| OK | ||
| ||
| ||

