 |
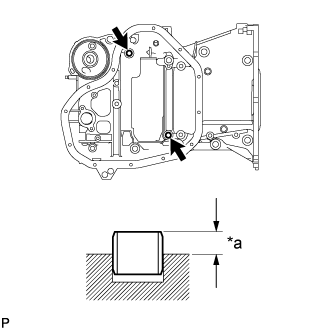
Using a plastic-faced hammer, tap in 2 ring pins until they stop.
| *a | Protrusion Height |
- Standard protrusion height:
- 4.3 to 5.3 mm (0.169 to 0.209 in.)
ENGINE UNIT > REASSEMBLY |
| 1. INSTALL RING PIN |
|
Using a plastic-faced hammer, tap in 2 ring pins until they stop.
| *a | Protrusion Height |
| 2. INSTALL ENGINE BALANCER ASSEMBLY |
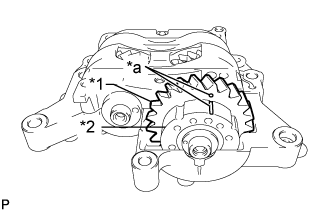 |
Check that the alignment marks of the balance shaft damper cover and balance shaft driven gear are aligned.
| *1 | Driven Gear |
| *2 | Damper Cover |
| *a | Alignment Mark |
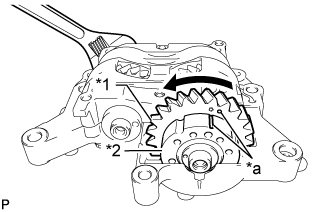 |
Place a wrench on the rear cutout part of the No. 2 balance shaft and secure the shaft in place.
| *1 | Driven Gear |
| *2 | Damper Cover |
| *a | Alignment Mark |
Rotate the balance shaft driven gear of the No. 1 balance shaft counterclockwise to align the alignment mark of the balance shaft driven gear with the alignment mark of the balance shaft damper cover.
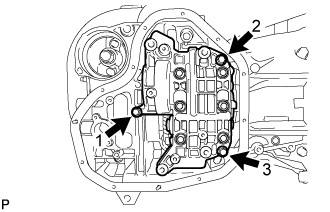 |
Install the engine balancer assembly to the stiffening crankcase with the 3 bolts, and tighten the bolts in the sequence shown in the illustration.
| 3. INSTALL STUD BOLT |
Using an E5 and E8 "TORX" socket wrench, install the 3 stud bolts.
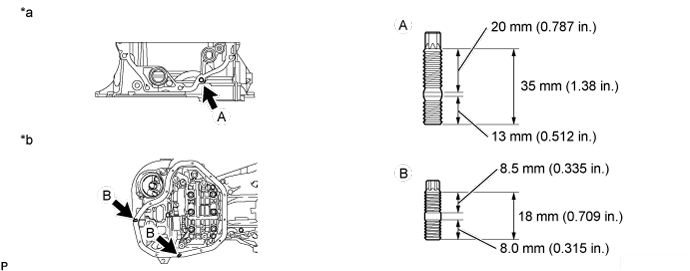
| *a | Front Side | *b | Lower Side |
| 4. INSTALL STIFFENING CRANKCASE ASSEMBLY |
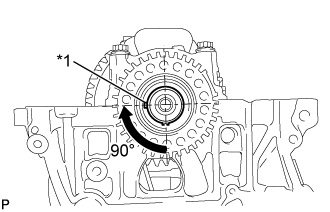 |
Rotate the crankshaft clockwise so that the crankshaft key is at the position 90° from the bottom as shown in the illustration.
| *1 | Key |
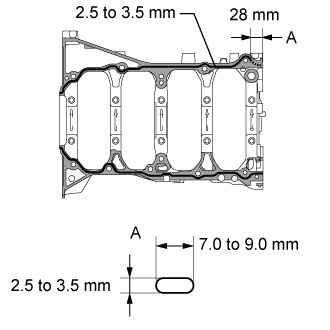 |
Apply seal packing in a continuous line as shown in the illustration.
 | Stiffening Crankcase |
 | Cylinder Block |
| Area | Specified Condition |
| Continuous Line | 2.5 to 3.5 mm (0.0984 to 0.138 in.) |
| Dashed Line | 7.0 to 9.0 mm (0.276 to 0.354 in.) wide and 2.5 to 3.5 mm (0.0984 to 0.138 in.) thick |
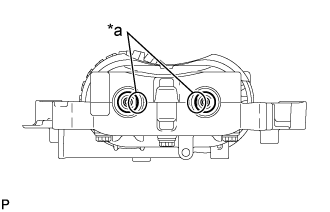 |
Check that the rear cutout parts are as shown in the illustration.
| *a | Cutout |
Clean the bolts and their installation holes.
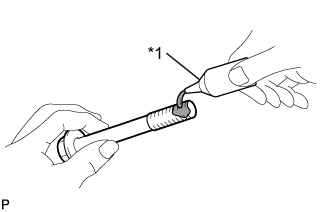 |
Apply adhesive to 3 or more threads of the ends of bolts A.
| *1 | Adhesive |
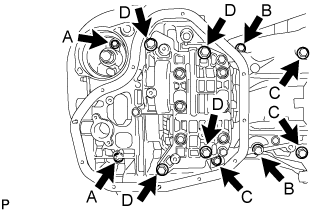 |
Temporarily install the stiffening crankcase with the 11 bolts.
| Item | Length |
| Bolt A | 65 mm (2.56 in.) |
| Bolt B | 35 mm (1.38 in.) |
| Bolt C | 125 mm (4.92 in.) |
| Bolt D | 165 mm (6.50 in.) |
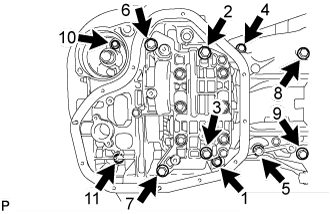 |
Tighten the 11 bolts in the sequence shown in the illustration to install the stiffening crankcase
| 5. INSTALL NO. 1 OIL PAN BAFFLE PLATE |
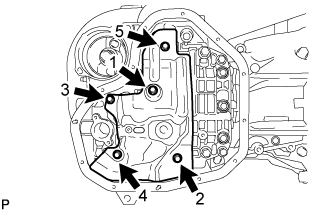 |
Install the No. 1 oil pan baffle plate and uniformly tighten the 5 bolts in several steps, in the sequence shown in the illustration.
| 6. INSTALL OIL STRAINER SUB-ASSEMBLY |
Apply a light coat of engine oil to a new gasket.
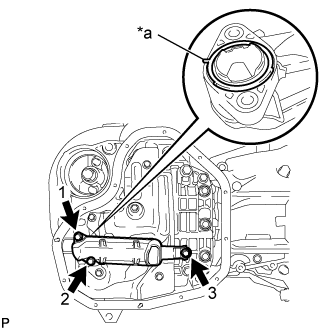 |
Align the protrusion of the gasket with the cutout of the oil strainer, and install the gasket to the oil strainer sub-assembly.
| *a | Protrusion |
Install the oil strainer sub-assembly with the 3 bolts in several steps, in the sequence shown in the illustration.
| 7. INSTALL OIL PAN SUB-ASSEMBLY |
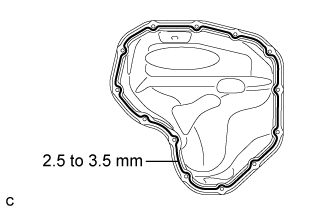 |
Apply seal packing in a continuous line as shown in the illustration.
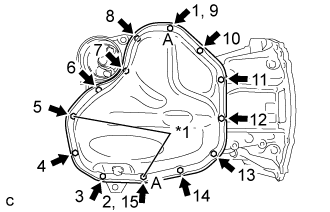 |
Install the oil pan with the 11 bolts and 2 nuts in several steps, in the sequence shown in the illustration.
| *1 | Nut |
| 8. INSTALL OIL PAN DRAIN PLUG |
Install a new gasket and oil pan drain plug to the oil pan sub-assembly.
| 9. INSTALL OIL FILTER CAP ASSEMBLY |
Clean the inside of the oil filter cap, threads and O-ring groove.
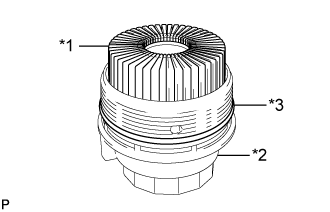 |
Apply a small amount of engine oil to a new O-ring and install it to the oil filter cap.
| *1 | Oil Filter Element |
| *2 | Oil Filter Cap |
| *3 | O-ring |
Set a new oil filter element into the oil filter cap.
Remove any dirt or foreign matter from the installation surface of the engine.
Apply a small amount of engine oil to the O-ring again and temporarily install the oil filter cap.
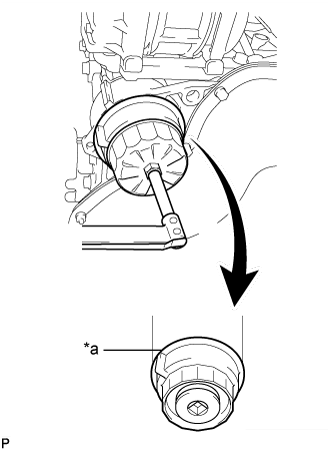 |
Using SST, tighten the oil filter cap.
| *a | No Clearance |
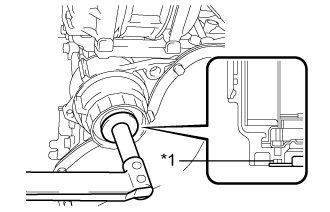 |
Apply a small amount of engine oil to a new O-ring, and install it to the oil filter cap.
| *1 | O-ring |
Install the oil filter drain plug.
| 10. INSTALL REAR ENGINE OIL SEAL |
Apply MP grease to the lip of a new oil seal.
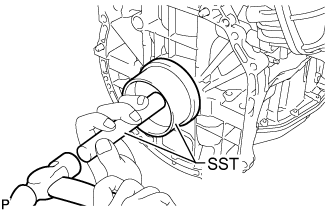 |
Using SST and a hammer, tap in the oil seal until its surface is flush with the edges of the cylinder block and crankcase.
| 11. INSTALL CYLINDER BLOCK WATER JACKET SPACER |
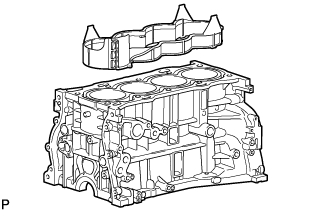 |
Install the cylinder block water jacket spacer to the cylinder block.
| 12. INSTALL CYLINDER HEAD GASKET |
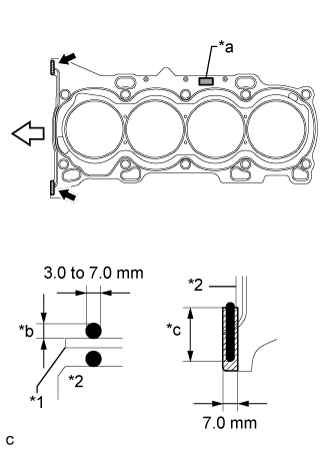 |
Clean the cylinder block sub-assembly and cylinder head sub-assembly with solvent.
| *1 | Cylinder Head Gasket |
| *2 | Cylinder Block Sub-assembly |
| *a | Lot No. |
| *b | 3.0 mm or more |
| *c | 20 mm or more |
 | Seal Packing |
 | Front |
Apply a continuous line of seal packing to a new cylinder head gasket as shown in the illustration.
Place the new cylinder head gasket on the cylinder block sub-assembly surface with the Lot No. stamp facing upward.
| 13. INSTALL CYLINDER HEAD SUB-ASSEMBLY |
Place the cylinder head sub-assembly on the cylinder block sub-assembly.
Install the 10 plate washers to the 10 cylinder head bolts.
Apply a light coat of engine oil to the threads and under the heads of the cylinder head bolts.
Step 1:
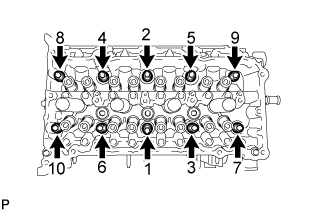 |
Using a 10 mm bi-hexagon wrench, install and uniformly tighten the 10 cylinder head bolts in several steps, in the sequence shown in the illustration.
Step 2:
Tighten the cylinder head bolts again in the sequence shown in the illustration to make sure that they are tightened to the specified torque.
Step 3:
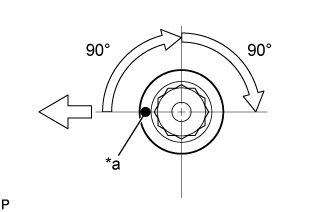 |
Mark each cylinder head bolt head with paint as shown in the illustration.
| *a | Paint Mark |
| Front |
Tighten the cylinder head bolts by 90° in the sequence shown in step 1.
Step 4:
Tighten the cylinder head bolts by another 90° in the sequence shown in step 1.
Check that the paint marks are now facing rearward.
| 14. INSTALL CAMSHAFT BEARING CAP SETTING RING PIN |
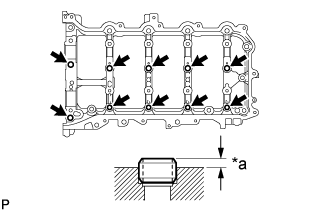 |
Using a plastic-faced hammer, tap in 10 camshaft bearing cap setting ring pins to the camshaft housing sub-assembly.
| *a | Protrusion Height |
| 15. INSTALL STRAIGHT PIN |
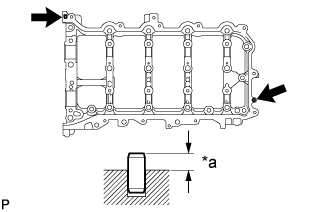 |
Using a plastic-faced hammer, tap in 2 straight pins to the camshaft housing sub-assembly.
| *a | Protrusion Height |
| 16. INSTALL STUD BOLT |
When reusing the stud bolt.
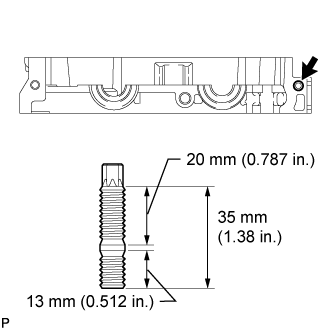 |
Using an E8 "TORX" socket wrench, install the camshaft housing stud bolt.
| 17. INSTALL NO. 1 CAMSHAFT BEARING |
Clean the No. 1 camshaft bearing.
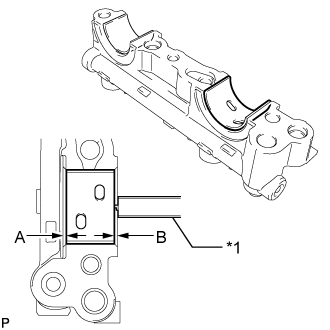 |
Install the No. 1 camshaft bearing to the No. 1 camshaft bearing cap.
| *1 | Vernier Caliper |
Using a vernier caliper, measure the distance between the No. 1 camshaft bearing cap edge and the No. 1 camshaft bearing edge.
| 18. INSTALL NO. 2 CAMSHAFT BEARING |
Clean the No. 2 camshaft bearing.
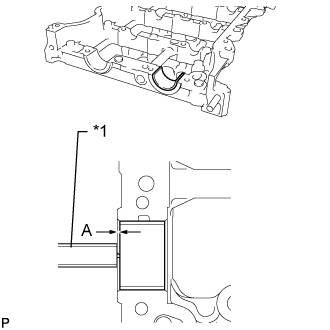 |
Install the No. 2 camshaft bearing to the camshaft housing sub-assembly.
| *1 | Vernier Caliper |
Using a vernier caliper, measure the distance between the camshaft housing edge and the No. 2 camshaft bearing edge.
| 19. INSTALL OIL CONTROL VALVE FILTER |
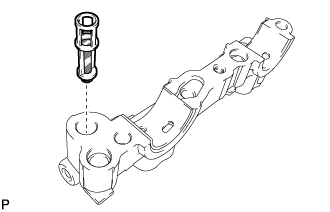 |
Install the oil control valve filter to the No. 1 camshaft bearing cap.
| 20. INSTALL CAMSHAFT |
Clean the camshaft journals, camshaft housing sub-assembly and camshaft bearing caps.
Apply a light coat of engine oil to the camshaft journal, camshaft housing sub-assembly and camshaft bearing caps.
Install the camshaft and No. 2 camshaft to the camshaft housing sub-assembly.
| 21. INSTALL CAMSHAFT BEARING CAP |
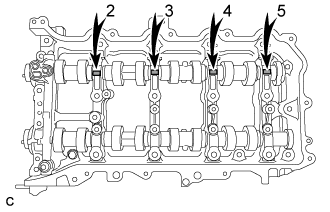 |
Confirm the marks and numbers on the No. 1 camshaft bearing cap, No. 2 camshaft bearing cap, and 3 No. 3 camshaft bearing caps and place them in their proper positions and directions.
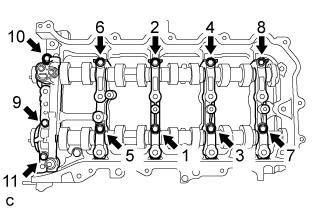 |
Install the 11 bolts in the order shown in the illustration.
| 22. INSTALL VALVE STEM CAP |
Apply a light coat of engine oil to the valve stem ends.
Install the 16 valve stem caps to the cylinder head sub-assembly.
| 23. INSTALL VALVE LASH ADJUSTER ASSEMBLY |
Inspect the valve lash adjuster assemblies before installing them .
Install the 16 valve lash adjuster assemblies to the cylinder head sub-assembly.
| 24. INSTALL NO. 1 VALVE ROCKER ARM SUB-ASSEMBLY |
Apply engine oil to the valve lash adjuster assembly tips and valve stem caps.
Install the 16 No. 1 valve rocker arm sub-assemblies as shown in the illustration.
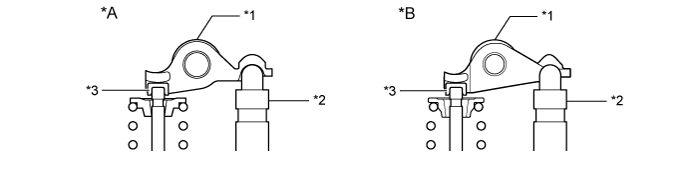
| *A | Type A | *B | Type B |
| *1 | No. 1 Valve Rocker Arm Sub-assembly | *2 | Valve Lash Adjuster Assembly |
| *3 | Valve Stem Cap | - | - |
| 25. INSTALL CAMSHAFT HOUSING SUB-ASSEMBLY |
Check that the No. 1 valve rocker arm sub-assemblies are installed as shown in the illustration.
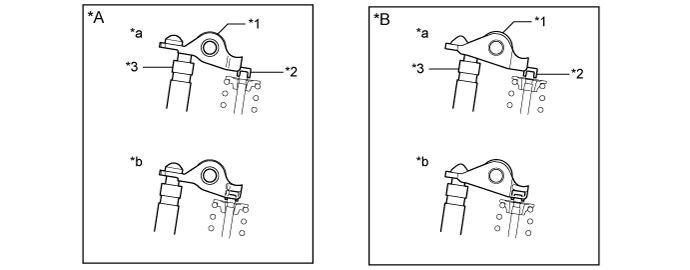
| *A | Type A | *B | Type B |
| *1 | No. 1 Valve Rocker Arm Sub-assembly | *2 | Valve Stem Cap |
| *3 | Valve Lash Adjuster Assembly | - | - |
| *a | INCORRECT | *b | CORRECT |
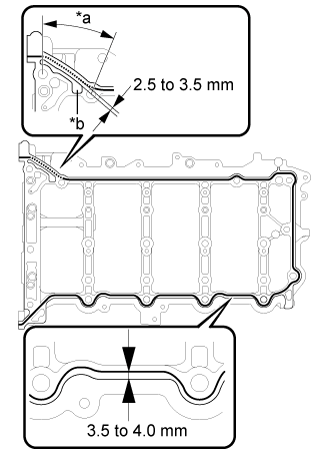 |
Apply seal packing in a continuous line as shown in the illustration.
| *a | Dashed Line |
| *b | Groove |
| Area | Seal Packing Diameter | Application Position |
| Continuous Line | 3.0 to 4.0 mm (0.118 to 0.157 in.) | Distance from edge of camshaft housing sub-assembly to center of seal packing: 3.5 to 4.0 mm (0.138 to 0.157 in.) |
| Dashed Line | Distance from outside edge of groove to center of seal packing: 2.5 to 3.5 mm (0.0984 to 0.138 in.) |
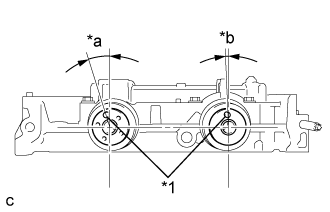 |
Position the knock pins of the camshaft and No. 2 camshaft as shown in the illustration.
| *1 | Knock Pin |
| *a | Approximately 17° |
| *b | Approximately 2° |
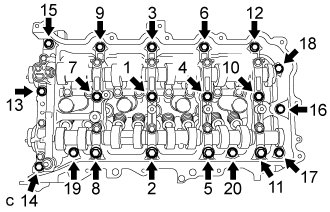 |
Install the camshaft housing sub-assembly, and then install the 20 bolts in the order shown in the illustration.
| 26. INSTALL CAMSHAFT TIMING GEAR ASSEMBLY |
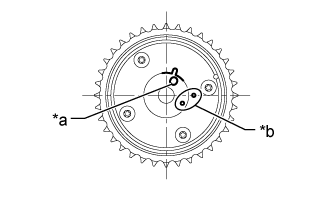 |
Check the camshaft timing gear assembly position.
| *a | Knock Pin Hole |
| *b | Alignment Mark |
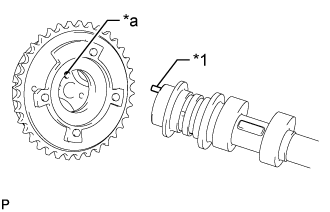 |
Align and insert the knock pin of the camshaft with the pin hole of the camshaft timing gear assembly.
| *1 | Knock Pin |
| *a | Pin Hole |
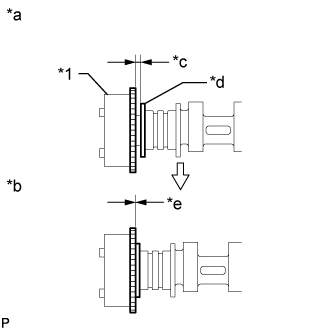 |
Check that there is no clearance between the camshaft timing gear assembly and camshaft flange.
| *1 | Camshaft Timing Gear Assembly |
| *a | Incorrect |
| *b | Correct |
| *c | Clearance |
| *d | Camshaft Flange |
| *e | No Clearance |
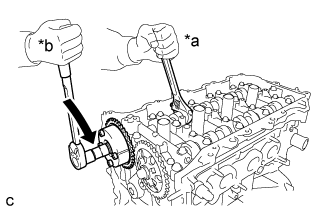 |
Using a wrench to hold the hexagonal portion of the camshaft, install the bolt.
| *a | Hold |
| *b | Turn |
| 27. INSTALL CAMSHAFT TIMING SPROCKET |
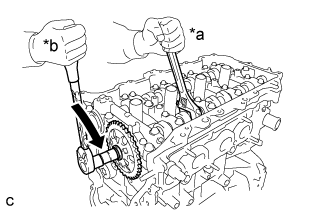 |
Using a wrench to hold the hexagonal portion of the No. 2 camshaft, install the camshaft timing sprocket with the bolt.
| *a | Hold |
| *b | Turn |
| 28. INSTALL CRANKSHAFT TIMING SPROCKET |
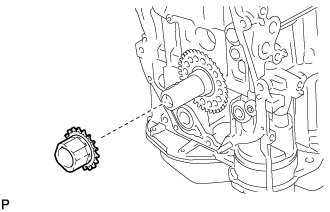 |
Install the crankshaft timing sprocket to the crankshaft.
| 29. ADD ENGINE OIL |
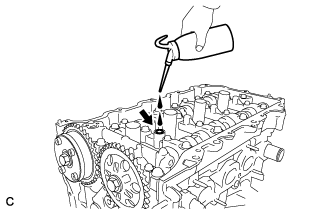 |
Add 50 cc (3.1 cu. in) of engine oil into the oil hole shown in the illustration.
| 30. INSTALL NO. 1 CHAIN VIBRATION DAMPER |
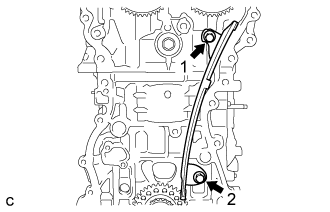 |
Install the No. 1 chain vibration damper with the 2 bolts in the order shown in the illustration.
| 31. SET NO. 1 CYLINDER TO TDC/COMPRESSION |
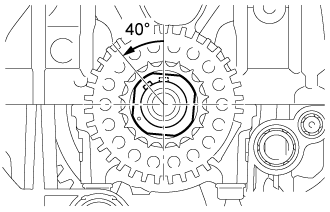 |
Temporarily install the crankshaft pulley bolt.
Rotate the crankshaft 40° counterclockwise to position the crankshaft pulley key as shown in the illustration.
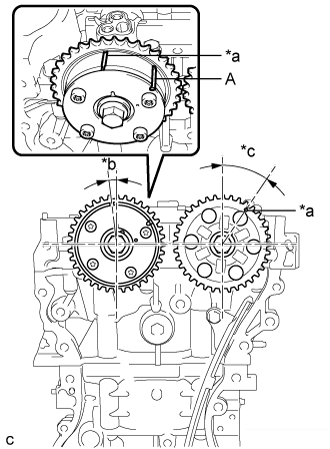 |
Check that the timing marks of the camshaft timing gear assembly and camshaft timing sprocket are as shown in the illustration.
| *a | Timing Mark |
| *b | Approximately 7° |
| *c | Approximately 32° |
| 32. INSTALL CHAIN SUB-ASSEMBLY |
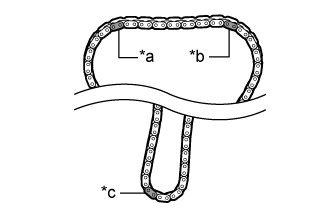 |
| *a | for Intake Side |
| *b | for Exhaust Side |
| *c | for Crankshaft |
| Type of Chain Sub-assembly | for Exhaust Side | for Intake Side | for Crankshaft |
| Type A | Yellow | Yellow | Pink |
| Type B | Gold | Gold | Gold |
| Type C | Orange | Orange | Yellow |
Place the chain sub-assembly onto the camshaft timing gear assembly, camshaft timing sprocket and crankshaft timing sprocket.
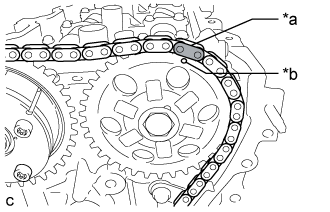 |
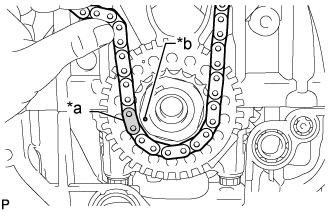
Align the mark plate (for Exhaust Side) of the chain sub-assembly with the timing mark of the camshaft timing sprocket and install the chain sub-assembly to the camshaft timing sprocket.
| *a | Mark Plate (for Exhaust Side) |
| *b | Timing Mark |
 |
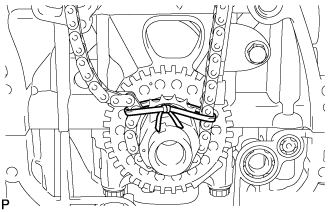
Align the mark plate (for Crankshaft) of the chain sub-assembly with the timing mark of the crankshaft timing sprocket and install the chain sub-assembly to the crankshaft timing sprocket.
| *a | Mark Plate (for Crankshaft) |
| *b | Timing Mark |
 |
Tie a string above the crankshaft timing sprocket so that the chain sub-assembly is secure.
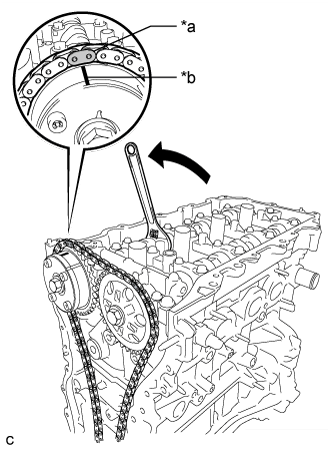 |
Using the hexagonal portion of the camshaft, rotate the camshaft counterclockwise with a wrench, align the timing mark of the camshaft timing gear assembly with the mark plate (for Intake Side) of the chain sub-assembly and install the chain sub-assembly to the camshaft timing gear assembly.
| *a | Mark Plate (for Intake Side) |
| *b | Timing Mark |
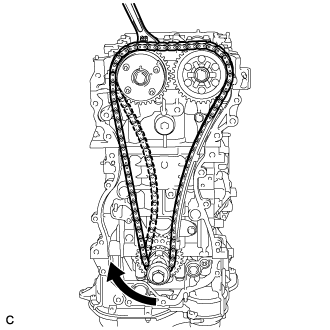 |
Remove the string above the crankshaft timing sprocket, rotate the crankshaft clockwise, and loosen the chain sub-assembly so that the chain tensioner slipper can be installed.
| 33. INSTALL CHAIN TENSIONER SLIPPER |
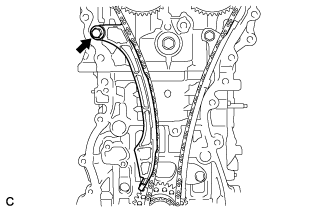 |
Install the chain tensioner slipper with the bolt.
| 34. INSTALL NO. 1 CHAIN TENSIONER ASSEMBLY |
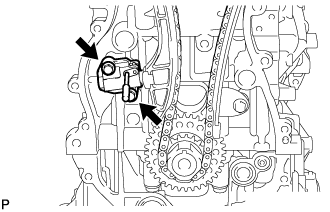 |
Install a new gasket and the No. 1 chain tensioner assembly with the 2 bolts.
Remove the pin from the stopper plate.
| 35. INSTALL TIMING CHAIN GUIDE |
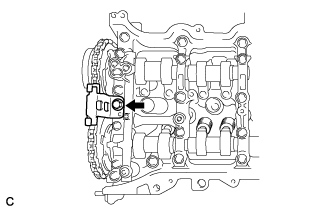 |
Install the timing chain guide with the bolt.
| 36. SET NO. 1 CYLINDER TO TDC/COMPRESSION |
|
Temporarily install the crankshaft pulley bolt.
Rotate the crankshaft 40° counterclockwise to position the crankshaft pulley key as shown in the illustration.
|
Check that the timing marks of the camshaft timing gear assembly and camshaft timing sprocket are as shown in the illustration.
| *a | Timing Mark |
| *b | Approximately 7° |
| *c | Approximately 32° |
| 37. INSTALL TIMING CHAIN COVER PLATE |
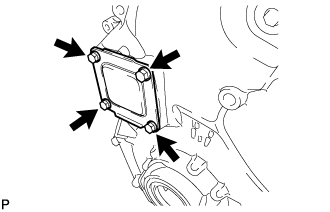 |
Install a new gasket and the timing chain cover plate with the 4 bolts.
| 38. INSTALL OIL PUMP RELIEF VALVE PLUG |
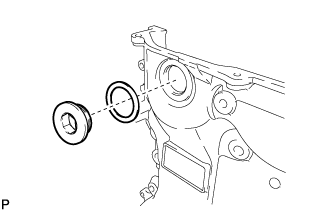 |
Using a 14 mm hexagon wrench, install a new gasket and the oil pump relief valve plug.
| 39. INSTALL TIMING CHAIN COVER SUB-ASSEMBLY |
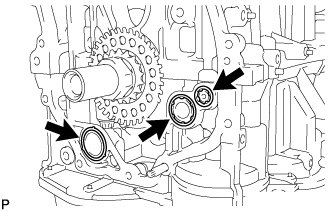 |
Apply a light coat of engine oil to 2 new oil pump gaskets and a new oil hole cover gasket.
Install the 2 oil pump gaskets and oil hole cover gaskets to the stiffening crankcase assembly.
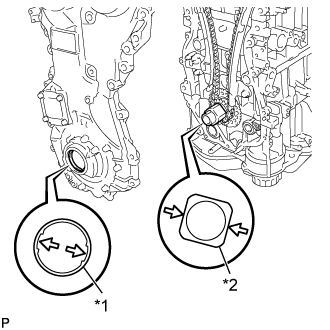 |
Align the drive rotor spline and the crankshaft timing sprocket as shown in the illustration.
| *1 | Drive Rotor Spline |
| *2 | Crankshaft Timing Sprocket |
Apply seal packing in a line to the timing chain cover sub-assembly as shown in the following illustration.
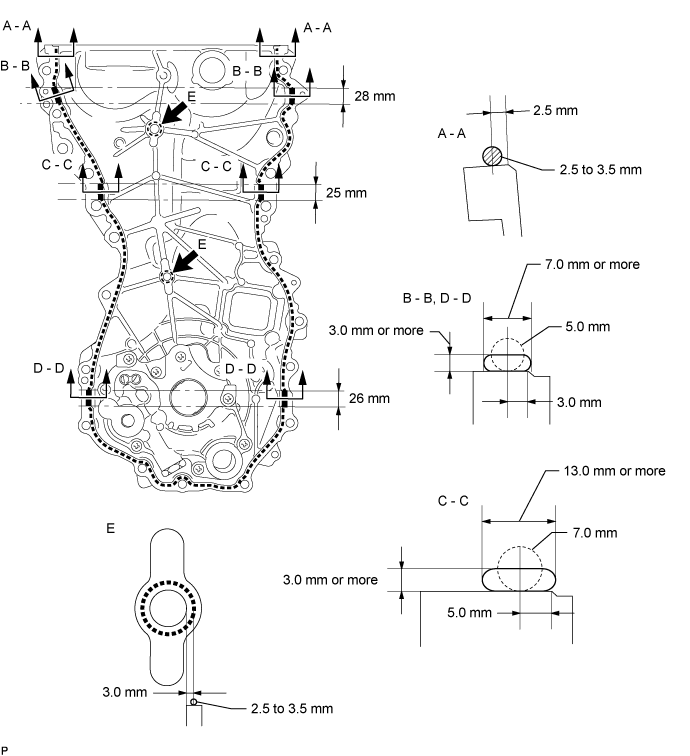
| Area | Seal Packing Diameter (Round) | Distance from Edge of Cover to Center of Seal Packing | Seal Packing Application Length |
| Seal Pacing Dimension (Flat) | |||
| Dashed Line | 2.5 to 3.5 mm (0.0984 to 0.138 in.) | 2.5 mm (0.0984 in.) | - |
| - | |||
| A - A | 2.5 to 3.5 mm (0.0984 to 0.138 in.) | 2.5 mm (0.0984 in.) | - |
| - | |||
| B - B | 5.0 mm (0.197 in.) | 3.0 mm (0.118 in.) | 28 mm (1.10 in.) |
| 7.0 mm (0.276 in.) or wider and 3.0 mm (0.118 in.) or thicker | |||
| C - C | 7.0 mm (0.276 in.) | 5.0 mm (0.197 in.) | 25 mm (0.984 in.) |
| 13.0 mm (0.512 in.) or wider and 3.0 mm (0.118 in.) or thicker | |||
| D - D | 5.0 mm (0.197 in.) | 3.0 mm (0.118 in.) | 26 mm (1.02 in.) |
| 7.0 mm (0.276 in.) or wider and 3.0 mm (0.118 in.) or thicker | |||
| E | 2.5 to 3.5 mm (0.0984 to 0.138in.) | 3.0 mm (0.118 in.) | - |
| - |
Temporarily install the timing chain cover sub-assembly with the 17 bolts and 2 nuts.
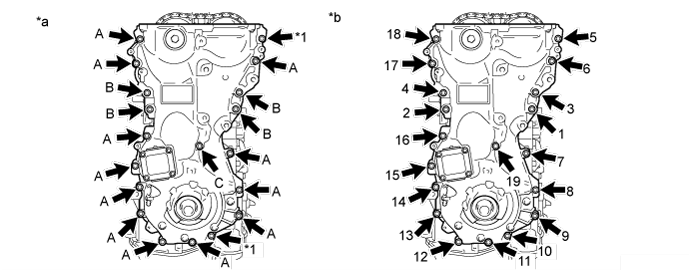
| *1 | Nut | - | - |
| *a | Torque | *b | Tightening Order |
| Item | Length | Thread Diameter |
| Bolt A | 30 mm (1.18 in.) | 8 mm (0.315 in.) |
| Bolt B | 35 mm (1.38 in.) | 10 mm (0.394 in.) |
| Bolt C | 45 mm (1.77 in.) | 8 mm (0.315 in.) |
Tighten the 17 bolts and 2 nuts in several steps, in the sequence shown in the illustration.
| 40. INSTALL ENGINE MOUNTING BRACKET RH |
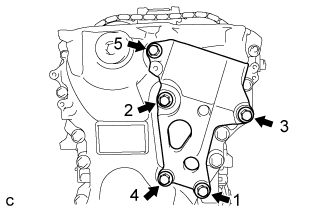 |
Install the engine mounting bracket RH with the 5 bolts in the order shown in the illustration.
| 41. INSTALL TIMING CHAIN COVER OIL SEAL |
Apply MP grease to the lip of a new oil seal.
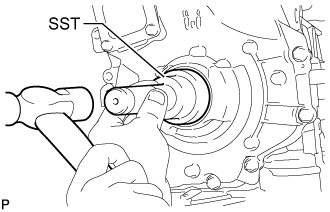 |
Using SST and a hammer, tap in the oil seal until its surface is flush with the timing chain cover edge.
| 42. INSTALL SPARK PLUG TUBE GASKET |
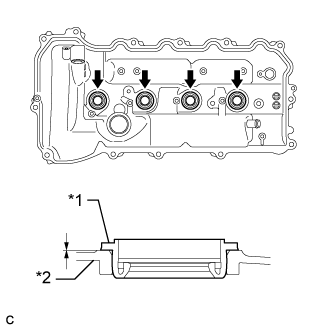 |
Tap in the 4 new spark plug tube gaskets to the cylinder head cover sub-assembly.
| *1 | Spark Plug Tube Gasket |
| *2 | Cylinder Head Cover Sub-assembly |
| 43. INSTALL STUD BOLT |
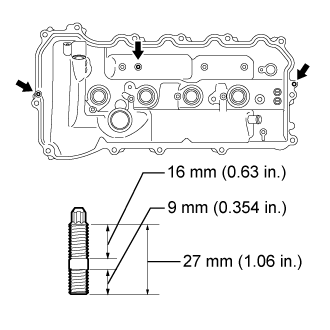 |
Using an E6 "TORX" socket wrench, install the 3 stud bolts.
| 44. INSTALL CYLINDER HEAD COVER SUB-ASSEMBLY |
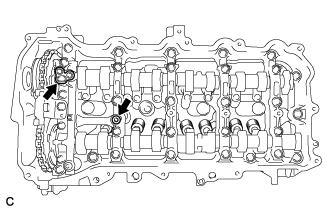 |
Apply a light coat of engine oil to 2 new gaskets.
Install the 2 gaskets to the camshaft bearing caps.
Install a new gasket to the cylinder head cover sub-assembly.
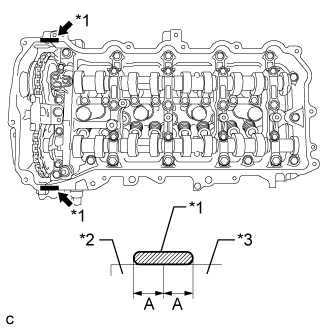 |
Apply seal packing as shown in the illustration.
| *1 | Seal Packing |
| *2 | Timing Chain Cover |
| *3 | Camshaft Housing |
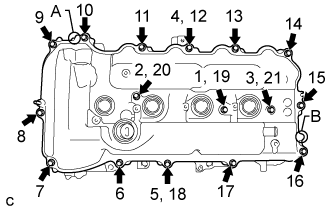 |
Align the cylinder head cover with pin A. Then align the cylinder head cover with pin B and install the cylinder head cover sub-assembly.
Install 3 new seal washers and the 16 bolts, and then tighten the bolts in the order shown in the illustration.
| 45. INSTALL CRANKSHAFT PULLEY |
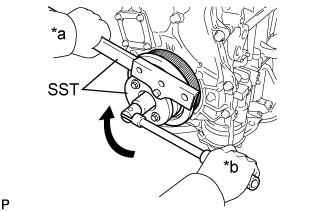 |
Align the pulley set key with the key groove of the crankshaft pulley.
| *a | Hold |
| *b | Turn |
Using SST, hold the crankshaft pulley and install the pulley bolt.
| 46. INSTALL CRANKSHAFT POSITION SENSOR |
Clean and degrease the threads of the bolt for the crankshaft position sensor.
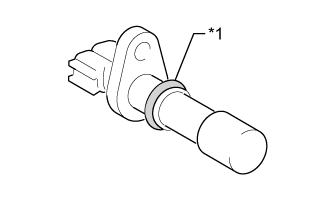 |
Apply a light coat of engine oil to the O-ring of the sensor.
| *1 | O-ring |
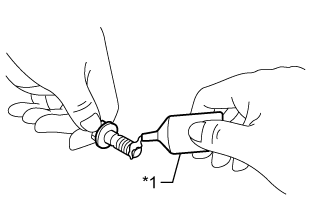 |
Apply adhesive to 2 or 3 threads of the bolt.
| *1 | Adhesive |
Install the sensor with the bolt.
Connect the sensor connector.
| 47. INSTALL SEPARATOR CASE |
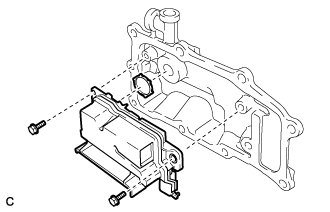 |
Apply a light coat of engine oil to a new gasket.
Install the gasket to the separator case.
Install the separator case with the 2 bolts.
| 48. INSTALL VENTILATION CASE SUB-ASSEMBLY |
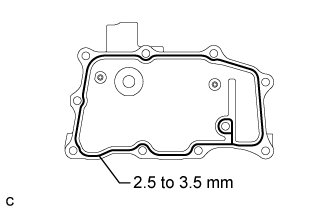 |
Apply seal packing in a continuous line as shown in the illustration.
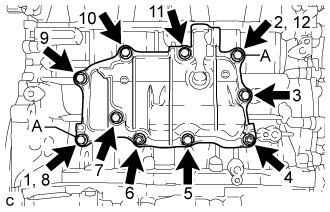 |
Install the ventilation case sub-assembly, and install the 8 bolts and 2 nuts in the order shown in the illustration.
| 49. INSTALL VENTILATION VALVE SUB-ASSEMBLY |
Apply adhesive to 2 or 3 threads of the ventilation valve sub-assembly.
Using a 19 mm deep socket wrench, install the ventilation valve sub-assembly.
Install the No. 2 ventilation hose.
| 50. INSTALL CAMSHAFT POSITION SENSOR |
Clean and degrease the threads of the bolt for the camshaft position sensor.
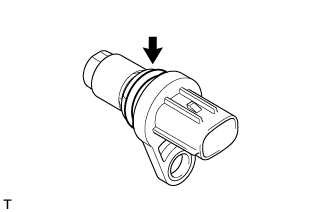 |
Apply a light coat of engine oil to the O-ring of the sensor.
Install the sensor with the bolt.
Connect the sensor connector.
| 51. INSTALL CAMSHAFT TIMING OIL CONTROL VALVE ASSEMBLY |
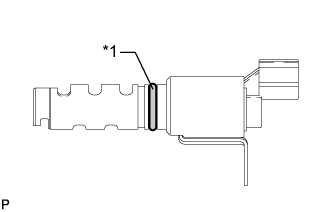 |
Apply a light coat of engine oil to a new O-ring, and install it to the oil control valve.
| *1 | New O-ring |
Install the oil control valve with the bolt.
Connect the oil control valve connector.
| 52. INSTALL OIL FILLER CAP GASKET |
Install a new oil filler cap gasket to the oil filler cap sub-assembly.
| 53. INSTALL OIL FILLER CAP SUB-ASSEMBLY |
Install the oil filler cap sub-assembly to the cylinder head cover sub-assembly.
| 54. INSTALL ENGINE OIL PRESSURE SWITCH ASSEMBLY |
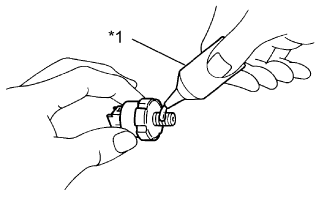 |
Apply adhesive to 2 or 3 threads of the oil pressure switch.
| *1 | Adhesive |
Using a 24 mm deep socket wrench, install the oil pressure switch.
Connect the connector.
| 55. INSTALL ENGINE COOLANT TEMPERATURE SENSOR |
Install a new gasket to the engine coolant temperature sensor.
Using a 19 mm ball joint lock nut wrench, install the engine coolant temperature sensor.
Connect the engine coolant temperature sensor connector.
Install the wire harness with the 2 bolts.
Connect the ventilation hose to the cylinder head cover.
| 56. INSTALL KNOCK CONTROL SENSOR |
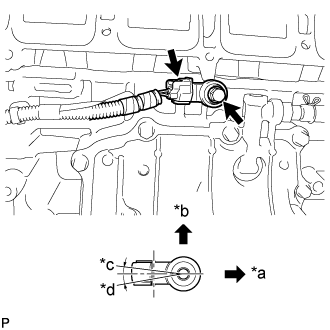 |
Install the sensor with the bolt so that the sensor is angled as shown in the illustration.
| *a | Front of Engine |
| *b | Up |
| *c | 7° |
| *d | 10° |
Connect the sensor connector.
| 57. INSTALL SPARK PLUG |
Using a spark plug wrench, install the 4 spark plugs.
| 58. INSTALL ENGINE COVER JOINT |
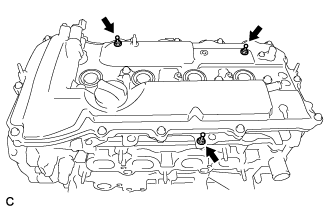 |
Install the 3 engine cover joints.