
DTC P314A-828 Inverter Coolant Pump Speed Signal |
| DTC No. | INF Code | DTC Detection Condition | Trouble Area |
| P314A | 828 | When either of the following conditions is met:
|
|
| DTC No. | Active Test |
| P314A-828 | Activate the Water Pump*1 |
| 1.CLEAR DTC |
Connect the intelligent tester to the DLC3.
Turn the power switch on (IG).
Enter the following menus: Powertrain / Hybrid Control / DTC.
Clear DTCs and freeze frame data.
Turn the power switch off.
| NEXT | |
|
| 2.PERFORM ACTIVE TEST USING INTELLIGENT TESTER (ACTIVATE THE WATER PUMP) |
Connect the intelligent tester to the DLC3.
Turn the power switch on (IG).
Enter the following menus: Powertrain / Hybrid Control / Active Test / Activate the Water Pump.
Perform the Activate the Water Pump Active Test.
Touch the inverter water pump assembly and check that it is operating (vibrating).
Turn the power switch off.
|
| ||||
| OK | |
|
| 3.CHECK CONNECTOR CONNECTION CONDITION (POWER MANAGEMENT CONTROL ECU CONNECTOR) |
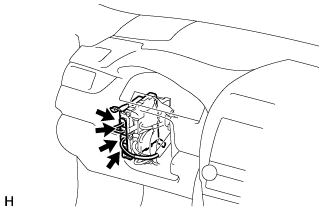 |
Check the connector connections and contact pressure of the relevant terminals for the power management control ECU connectors (Click here).
|
| ||||
| OK | |
|
| 4.CHECK CONNECTOR CONNECTION CONDITION (INVERTER WATER PUMP ASSEMBLY CONNECTOR) |
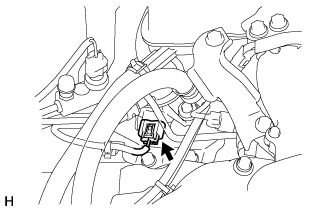 |
Check the connector connections and contact pressure of the relevant terminals for the power management control ECU connectors (Click here).
|
| ||||
| OK | |
|
| 5.CHECK HARNESS AND CONNECTOR (POWER MANAGEMENT CONTROL ECU - INVERTER WATER PUMP ASSEMBLY) |
Disconnect connector A38 from the power management control ECU.
Disconnect connector A50 from the inverter water pump assembly.
Measure the resistance according to the value(s) in the table below.
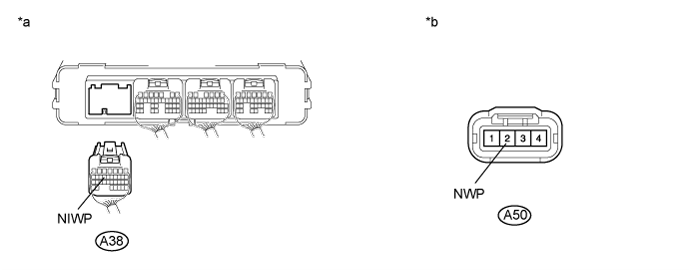
| *a | Rear view of wire harness connector (to Power Management Control ECU) | *b | Front view of wire harness connector (to Inverter Water Pump Assembly) |
| Tester Connection | Switch Condition | Specified Condition |
| A38-14 (NIWP) - A50-2 (NWP) | Power switch off | Below 1 Ω |
| A38-14 (NIWP) or A50-2 (NWP) -Body ground and other terminals | Power switch off | 10 kΩ or higher |
Connect the power management control ECU connector.
Connect the inverter water pump assembly connector.
|
| ||||
| OK | |
|
| 6.CHECK POWER MANAGEMENT CONTROL ECU |
Disconnect connector A50 from the inverter water pump assembly.
Turn the power switch on (IG).
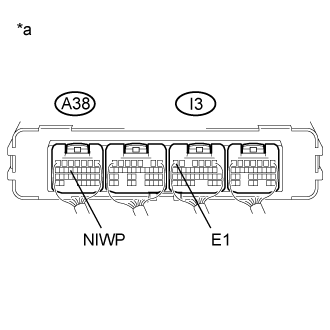 |
Measure the voltage according to the value(s) in the table below.
| Tester Connection | Switch Condition | Specified Condition |
| A38-14 (NIWP) - I3-6 (E1) | Power switch on (IG) | 11 to 14 V |
| *a | Component with harness connected (Power Management Control ECU) |
Turn the power switch off.
Connect the inverter water pump assembly connector.
|
| ||||
| OK | |
|
| 7.CLEAR DTC |
Connect the intelligent tester to the DLC3.
Turn the power switch on (IG).
Enter the following menus: Powertrain / Hybrid Control / DTC.
Clear DTCs and freeze frame data.
Turn the power switch off.
| NEXT | |
|
| 8.PERFORM ACTIVE TEST USING INTELLIGENT TESTER (ACTIVATE THE WATER PUMP) |
Connect the intelligent tester to the DLC3.
Turn the power switch on (IG).
Enter the following menus: Powertrain / Hybrid Control / Active Test / Activate the Water Pump.
Perform the "Activate the Water Pump" Active Test.
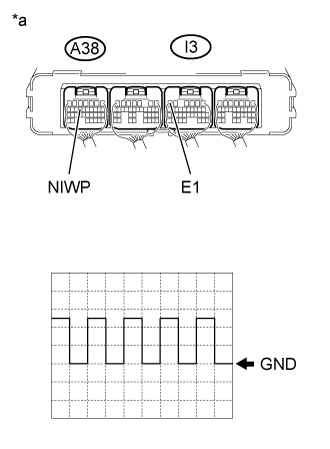 |
Connect an oscilloscope between the power management control ECU terminals specified in the table below, and measure the waveform.
| Item | Content |
| Terminal | A38-14 (NIWP) - I3-6 (E1) |
| Equipment Setting | 5 V/DIV., 100 ms./DIV. |
| Condition | Power switch on (IG), during Active Test |
| *a | Component with harness connected (Power Management Control ECU) |
Turn the power switch off.
|
| ||||
| OK | ||
 | ||
| ||
| 9.CHECK CONNECTOR CONNECTION CONDITION (INVERTER WATER PUMP ASSEMBLY CONNECTOR) |
|
Check the connector connections and contact pressure of the relevant terminals for the power management control ECU connectors (Click here).
|
| ||||
| OK | |
|
| 10.CHECK INSTALLATION CONDITION (INV W/PMP RELAY) |
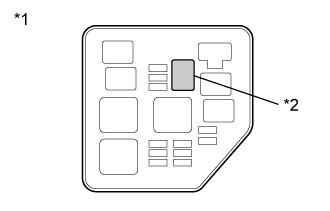 |
Check installation condition of the INV W/PMP relay.
| *1 | No. 2 Engine Room Relay Block |
| *2 | INV W/PMP Relay |
|
| ||||
| OK | |
|
| 11.CHECK HARNESS AND CONNECTOR (IGCT RELAY - INV W/PMP RELAY) |
Remove the IGCT relay and INV W/PMP relay from the No. 2 engine room relay block.
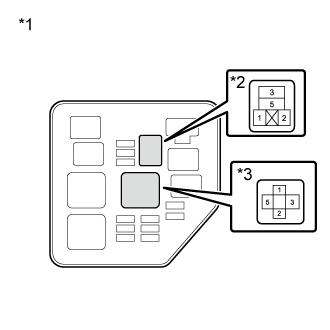 |
Measure the resistance according to the value(s) in the table below.
| Tester Connection | Switch Condition | Specified Condition |
| 5 (IGCT relay) - 1 (INV W/PMP relay) | Power switch off | Below 1 Ω |
| *1 | No. 2 Engine Room Relay Block |
| *2 | INV W/PMP Relay |
| *3 | IGCT Relay |
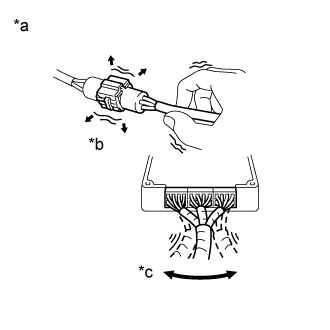
| *a | Example |
| *b | Shake Slightly |
| *c | Vibrate Slightly |
Install the INV W/PMP relay and IGCT relay.
|
| ||||
| OK | |
|
| 12.INSPECT RELAY (INV W/PMP) |
|
Remove the INV W/PMP relay from the No. 2 engine room relay block.
| *1 | No. 2 Engine Room Relay Block |
| *2 | INV W/PMP Relay |
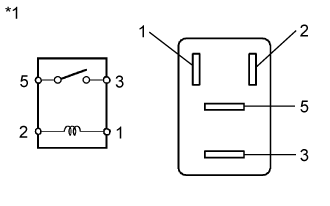 |
Measure the resistance according to the value(s) in the table below.
| Tester Connection | Condition | Specified Condition |
| 3 - 5 | Auxiliary battery voltage is not applied between terminals 1 and 2 | 10 kΩ or higher |
| Auxiliary battery voltage is applied between terminals 1 and 2 | Below 1Ω |
| *1 | INV W/PMP Relay |
Install the INV W/PMP relay.
|
| ||||
| OK | |
|
| 13.CHECK HARNESS AND CONNECTOR (INVERTER WATER PUMP ASSEMBLY - BODY GROUND) |
Disconnect the A50 inverter water pump assembly connector.
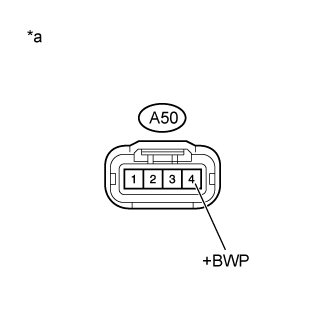 |
Measure the voltage according to the value(s) in the table below.
| Tester Connection | Switch Condition | Specified Condition |
| A50-4 (+BWP) - Body ground | Power switch on (IG) | 11 to 14 V |
| *a | Front view of wire harness connector (to Inverter Water Pump Assembly) |
| *a | Example |
| *b | Shake Slightly |
| *c | Vibrate Slightly |
Connect the inverter water pump assembly connector.
|
| ||||
| OK | |
|
| 14.CHECK HARNESS AND CONNECTOR (INVERTER WATER PUMP ASSEMBLY - BODY GROUND) |
Disconnect connector A50 from the inverter water pump assembly.
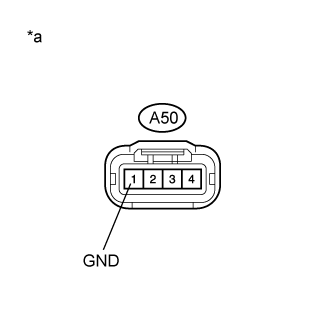 |
Measure the resistance according to the value(s) in the table below.
| Tester Connection | Switch Condition | Specified Condition |
| A50-1 (GND) - Body ground | Power switch off | Below 1 Ω |
| *a | Front view of wire harness connector (to Inverter Water Pump Assembly) |
Connect the inverter water pump assembly connector.
|
| ||||
| OK | ||
| ||
| ||
| 15.CHECK INSTALLATION CONDITION (INV W/PMP FUSE) |
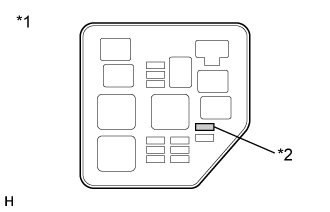 |
Check installation condition of the INV W/PMP fuse.
| *1 | No. 2 Engine Room Relay Block |
| *2 | INV W/PMP Relay |
|
| ||||
| OK | |
|
| 16.INSPECT RELAY (INV W/PMP) |
|
Remove the INV W/PMP relay from the No. 2 engine room relay block.
| *1 | No. 2 Engine Room Relay Block |
| *2 | INV W/PMP Relay |
|
Measure the resistance according to the value(s) in the table below.
| Tester Connection | Condition | Specified Condition |
| 3 - 5 | Auxiliary battery voltage is not applied between terminals 1 and 2 | 10 kΩ or higher |
| Auxiliary battery voltage is applied between terminals 1 and 2 | Below 1Ω |
| *1 | INV W/PMP Relay |
Install the INV W/PMP relay.
|
| ||||
| OK | |
|
| 17.CHECK HARNESS AND CONNECTOR (INVERTER WATER PUMP ASSEMBLY - NO. 2 ENGINE ROOM RELAY BLOCK) |
Remove the INV W/PMP relay from the No. 2 engine room relay block.
Disconnect connector A50 from the inverter water pump assembly.
Measure the resistance according to the value(s) in the table below.
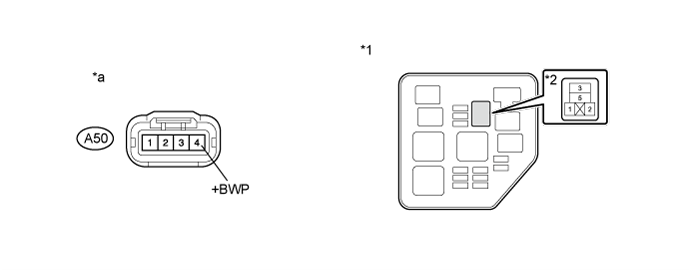
| *1 | No. 2 Engine Room Relay Block | *2 | INV W/PMP Relay |
| *a | Front view of wire harness connector (to Inverter Water Pump Assembly) | - | - |
| Tester Connection | Switch Condition | Specified Condition |
| A50-4 (+BWP) - 3 (INV W/PMP relay) | Power switch off | Below 1Ω |
| A50-4 (+BWP) or 3 (INV W/PMP relay) - Body ground and other terminals | Power switch off | 10 kΩ or higher |
Install the INV W/PMP relay.
Connect the inverter water pump assembly connector.
|
| ||||
| OK | |
|
| 18.CHECK FUSE (INV W/PMP) |
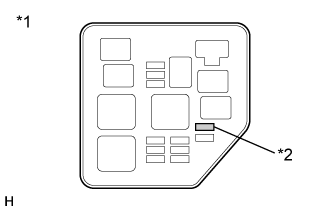 |
Remove the INV W/PMP fuse from the No. 2 engine room relay block.
Measure the resistance according to the value(s) in the table below.
| Tester Connection | Condition | Specified Condition |
| INV W/PMP fuse | Always | Below 1Ω |
| *1 | No. 2 Engine Room Relay Block |
| *2 | INV W/PMP Fuse |
Install the INV W/PMP fuse.
|
| ||||
| OK | ||
| ||
| ||
| 19.REPLACE INVERTER WATER PUMP ASSEMBLY |
| NEXT | ||
| ||
| ||
| 20.CHECK RELAY HOLDER TERMINAL (INV W/PMP RELAY) |
Check the terminals of the INV W/PMP relay holder.
|
| ||||
| OK | |
|
| 21.CHECK FUSE (INV W/PMP RLY) |
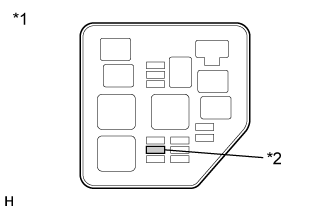 |
Remove the INV W/PMP RLY fuse from the No. 2 engine room relay block.
Measure the resistance according to the value(s) in the table below.
| Tester Connection | Condition | Specified Condition |
| INV W/PMP RLY fuse | Always | Below 1Ω |
| *1 | No. 2 Engine Room Relay Block |
| *2 | INV W/PMP RLY Fuse |
Install the INV W/PMP RLY fuse.
|
| ||||
| OK | ||
| ||
| ||
| 22.REPLACE RELAY (INV W/PMP) |
| NEXT | ||
| ||
| ||
| 23.CHECK RELAY HOLDER TERMINAL (INV W/PMP RELAY) |
Check the terminals of the INV W/PMP relay holder.
|
| ||||
| OK | ||
| ||
| ||
| 24.CHECK FUSE (INV W/PMP RLY) |
|
Remove the INV W/PMP RLY fuse from the No. 2 engine room relay block.
Measure the resistance according to the value(s) in the table below.
| Tester Connection | Condition | Specified Condition |
| INV W/PMP RLY fuse | Always | Below 1Ω |
| *1 | No. 2 Engine Room Relay Block |
| *2 | INV W/PMP RLY Fuse |
Install the INV W/PMP RLY fuse.
|
| ||||
| OK | |
|
| 25.REPAIR OR REPLACE HARNESS OR CONNECTOR (INV W/PMP RELAY HOLDER TERMINAL) |
| NEXT | ||
| ||
| ||
| 26.REPAIR OR REPLACE HARNESS OR CONNECTOR (INV W/PMP RELAY HOLDER TERMINAL) |
| NEXT | ||
| ||
| ||
| 27.REPAIR OR REPLACE HARNESS OR CONNECTOR (INV W/PMP RELAY HOLDER TERMINAL) |
| NEXT | |
|
| 28.REPLACE FUSE (INV W/PMP RLY) |
| NEXT | ||
| ||
| ||
| 29.CHECK INSTALLATION CONDITION (INV W/PMP RLY FUSE) |
|
Check installation condition of the INV W/PMP RLY fuse.
| *1 | No. 2 Engine Room Relay Block |
| *2 | INV W/PMP RLY Fuse |
|
| ||||
| OK | |
|
| 30.CHECK FUSE (INV W/PMP RLY) |
|
Remove the INV W/PMP RLY fuse from the No. 2 engine room relay block.
Measure the resistance according to the value(s) in the table below.
| Tester Connection | Condition | Specified Condition |
| INV W/PMP RLY fuse | Always | Below 1Ω |
| *1 | No. 2 Engine Room Relay Block |
| *2 | INV W/PMP RLY Fuse |
Install the INV W/PMP RLY fuse.
|
| ||||
| OK | ||
| ||
| ||
| 31.CHECK FUSE HOLDER TERMINAL (INV W/PMP RLY FUSE) |
Check the terminals of the INV W/PMP RLY fuse holder.
|
| ||||
| OK | ||
| ||
| ||
| 32.REPAIR OR REPLACE HARNESS OR CONNECTOR (INV W/PMP RLY FUSE HOLDER TERMINAL) |
| NEXT | ||
| ||
| ||
| 33.INSPECT RELAY (INV W/PMP) |
|
Remove the INV W/PMP relay from the No. 2 engine room relay block.
| *1 | No. 2 Engine Room Relay Block |
| *2 | INV W/PMP Relay |
|
Measure the resistance according to the value(s) in the table below.
| Tester Connection | Condition | Specified Condition |
| 3 - 5 | Auxiliary battery voltage is not applied between terminals 1 and 2 | 10 kΩ or higher |
| Auxiliary battery voltage is applied between terminals 1 and 2 | Below 1Ω |
| *1 | INV W/PMP Relay |
Install the INV W/PMP relay.
|
| ||||
| OK | ||
| ||
| ||
| 34.INSPECT RELAY (INV W/PMP) |
|
Remove the INV W/PMP relay from the No. 2 engine room relay block.
| *1 | No. 2 Engine Room Relay Block |
| *2 | INV W/PMP Relay |
|
Measure the resistance according to the value(s) in the table below.
| Tester Connection | Condition | Specified Condition |
| 3 - 5 | Auxiliary battery voltage is not applied between terminals 1 and 2 | 10 kΩ or higher |
| Auxiliary battery voltage is applied between terminals 1 and 2 | Below 1Ω |
| *1 | INV W/PMP Relay |
Install the INV W/PMP relay.
|
| ||||
| OK | ||
| ||
| ||
| 35.REPLACE RELAY (INV W/PMP) |
| NEXT | ||
| ||
| ||
| 36.REPLACE RELAY (INV W/PMP) |
| NEXT | ||
| ||
| ||

