Home › Brake › BRAKE SYSTEM (OTHER) › BRAKE BOOSTER PUMP (for LHD)

BRAKE BOOSTER PUMP (for LHD) > INSTALLATION

for Preparation Click here


1. INSTALL BRAKE BOOSTER PUMP ASSEMBLY


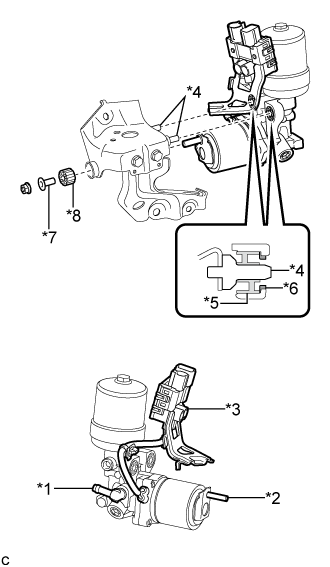
    C245596E01
  1. Insert the stud of the brake booster pump assembly to the hole of the brake actuator bracket assembly, and insert the 2 pins of the brake actuator bracket assembly to the 2 brake booster pump bushings (*5).
    Text in Illustration 
    *1
    Union
    *2
    Stud
    *3
    Connector Box and Wire Harness
    *4
    Pin
    *5
    Brake Booster Pump Bushing
    *6
    Brake Booster Pump Collar
    *7
    Brake Actuator Case Collar
    *8
    Brake Booster Pump Bushing

    NOTICE:
    1. Do not carry the brake booster pump assembly by the parts shown in bold (*1, *2 and *3) in the illustration.
    2. Do not drop the brake booster pump assembly when carrying it.
    3. Be careful not to allow any brake fluid to enter the connector.
    4. When installing the brake booster pump assembly to the brake actuator bracket assembly, confirm that the 2 brake booster pump collars (*6) and 2 brake booster pump bushings (*5) are installed on the brake booster pump assembly.
    5. Do not remove the hole plugs before installing a new brake booster pump assembly because the brake booster pump assembly is filled with brake fluid.

  1. Install the brake actuator case collar (*7), brake booster pump bushing (*8) and brake booster pump assembly to the brake actuator bracket assembly with the nut.

    Torque:
    5.4 N*m{ 55 kgf*cm , 48 in.*lbf }

  1. Engage the wire harness clamp to the brake actuator bracket assembly.


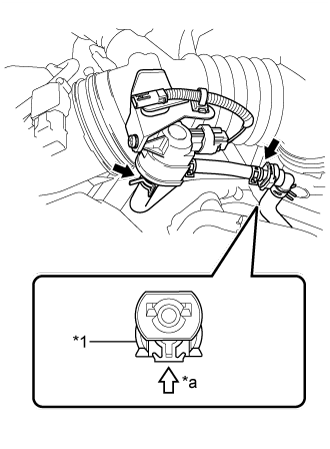
2. INSTALL NO. 1 BRAKE ACTUATOR HOSE


    C245597E01
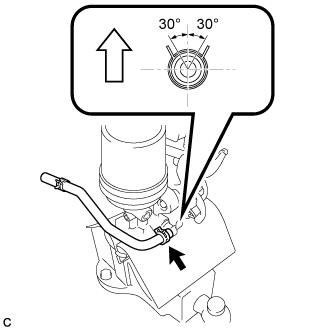
  1. Install the No. 1 brake actuator hose to the brake booster pump assembly with the clip.
    Text in Illustration 
    V100136
    Up

    NOTICE:
    1. Match the identification mark of the No. 1 brake actuator hose and the rib of the brake booster pump assembly.
    2. Install the clip within the range shown in the illustration.


3. INSTALL BRAKE BOOSTER PUMP ASSEMBLY WITH BRACKET


    C242717E02
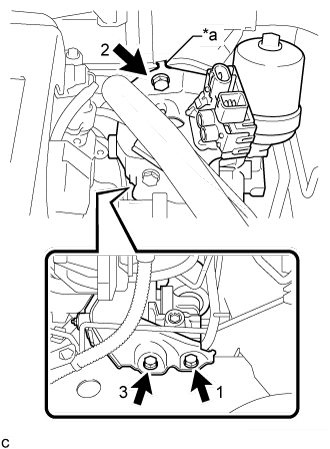
  1. Engage the claw to set the brake booster pump assembly with bracket to the vehicle body.
    Text in Illustration 
    *a
    Claw

    NOTICE:
    Do not kink or damage the brake line, suction pipe sub-assembly or air conditioning tube and accessory assembly.

  1. Install the 3 bolts to secure the brake booster pump assembly with bracket to the vehicle body.

    Torque:
    19 N*m{ 194 kgf*cm , 14 ft.*lbf }

    NOTICE:
    Tighten the 3 bolts in the order shown in the illustration.


    C242714E02
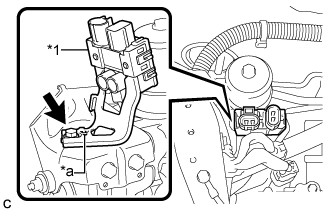
  1. Engage the claw to set the connector box to the brake actuator bracket assembly.
    Text in Illustration 
    *1
    Connector Box
    *a
    Claw

  1. Install the bolt to secure the connector box to the brake actuator bracket assembly.

    Torque:
    8.0 N*m{ 82 kgf*cm , 71 in.*lbf }

  1. Connect the 2 connectors to the brake booster pump assembly.


4. CONNECT FRONT NO. 1 BRAKE TUBE
  1. Using a union nut wrench, connect the front No. 1 brake tube to the brake booster pump assembly.

    Torque:
    15 N*m{ 155 kgf*cm , 11 ft.*lbf }

    NOTICE:
    Use the formula to calculate special torque values for situations where the union nut wrench is combined with a torque wrench (Click here).


5. CONNECT NO. 1 BRAKE ACTUATOR HOSE


    C245598E01
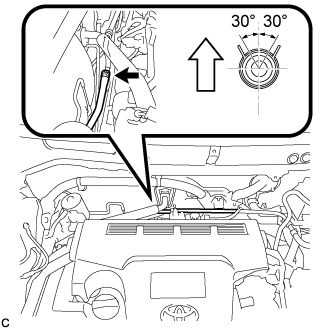
  1. Connect the No. 1 brake actuator hose to the No. 1 brake actuator tube with the clip.
    Text in Illustration 
    V100136
    Up

    NOTICE:
    1. Match the identification mark of the No. 1 brake actuator hose and No. 1 brake actuator tube.
    2. Install the clip within the range shown in the illustration.


6. BLEED NO. 1 BRAKE ACTUATOR TUBE
  1. Add brake fluid into the brake master cylinder reservoir assembly.


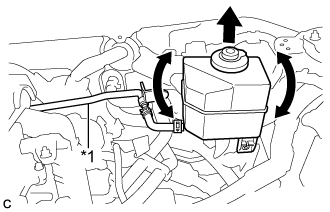
    C245595E01
  1. Lift up the brake master cylinder reservoir assembly as far as possible and rock it back and forth to bleed air from the reservoir tube assembly.
    Text in Illustration 
    *1
    No. 1 Brake Actuator Tube

    NOTICE:
    1. Do not damage the hoses or tubes.
    2. Do not spill the brake fluid.
    3. Continue this procedure until only a minor amount of air remains in the No. 1 brake actuator tube.


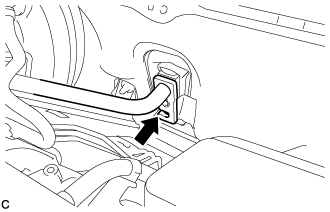
7. INSTALL NO. 1 BRAKE ACTUATOR TUBE
  1. Install the No. 1 brake actuator tube to the vehicle body with the nut.

    Torque:
    8.5 N*m{ 87 kgf*cm , 75 in.*lbf }

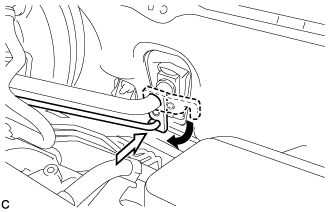
  1. Install the nut and engage the clamp.

    Torque:
    8.5 N*m{ 87 kgf*cm , 75 in.*lbf }


8. INSTALL BRAKE MASTER CYLINDER RESERVOIR ASSEMBLY
  1. Install the brake master cylinder reservoir assembly to the reservoir bracket with the 2 bolts.

    Torque:
    8.5 N*m{ 87 kgf*cm , 75 in.*lbf }


9. INSTALL SUCTION PIPE SUB-ASSEMBLY
  1. Remove the vinyl tape from the openings of the disconnected parts.

  1. Sufficiently apply compressor oil to a new O-ring, the fitting surface of the suction pipe sub-assembly and air conditioning unit.

    Compressor oil:
    ND-OIL 11 or equivalent

  1. Install the O-ring to the suction pipe sub-assembly.

    NOTICE:
    Keep the O-ring and O-ring fitting surfaces free from dirt or any foreign matter.


    C239887
  1. Insert the suction pipe sub-assembly to the air conditioning unit.

    NOTICE:
    1. Insert the pipe joint into the fitting hole securely.
    2. Do not deform the piping.
    3. Do not damage the plastic clamp.


10. INSTALL AIR CONDITIONER TUBE AND ACCESSORY ASSEMBLY
  1. Remove the vinyl tape from the openings of the disconnected parts.

  1. Sufficiently apply compressor oil to a new O-ring, the fitting surface of the air conditioning tube and accessory assembly and air conditioning unit.

    Compressor oil:
    ND-OIL 11 or equivalent

  1. Install the O-ring to the air conditioning tube and accessory assembly.

    NOTICE:
    Keep the O-ring and O-ring fitting surface free from dirt or any foreign matter.


    C239873
  1. Insert the air conditioning tube and accessory assembly to the air conditioning unit.

    NOTICE:
    Insert the pipe joint into the fitting hole securely.

  1. Turn the hook connector and install the bolt.

    Torque:
    9.8 N*m{ 100 kgf*cm , 87 in.*lbf }


11. FILL RESERVOIR WITH BRAKE FLUID


12. CONNECT CABLE TO NEGATIVE AUXILIARY BATTERY TERMINAL


13. BLEED BRAKE SYSTEM
  1. Remove the front outer cowl top panel sub-assembly.

    1. for LHD: Click here
    2. for RHD: Click here


  1. Bleed the brake system.


      C245585E01
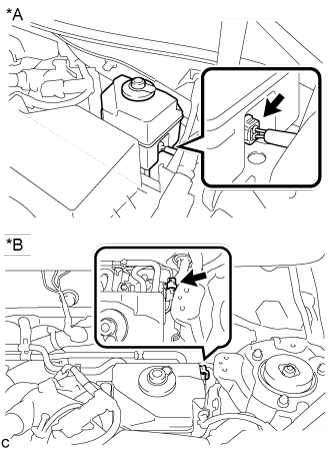
    1. Wait at least 2 minutes with the power switch off, and disconnect the reservoir level switch connector.
      Text in Illustration 
      *A
      for LHD
      *B
      for RHD

      NOTICE:
      Do not depress the brake pedal or open/close the doors until the reservoir level switch connector is disconnected.

      HINT:
      This procedure is not required if the reservoir level switch connector has been disconnected.


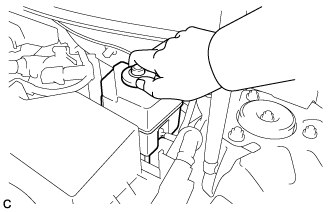
    2. C239900
    3. Remove the brake master cylinder reservoir filler cap assembly.

    4. Add brake fluid into the reservoir between the MAX and MIN level on the brake fluid reservoir.

      Brake fluid:
      SAE J1703 or FMVSS No. 116 DOT3

    5. Connect the intelligent tester to the DLC3 and turn the power switch on (IG).

    6. Turn the intelligent tester on and enter the following menus: Chassis / ABS/VSC/TRC / Air Bleeding.

    7. Select "ABS actuator has been replaced" on the intelligent tester display, and bleed air from the brake fluid following the instructions on the intelligent tester.

      NOTICE:
      Before following the instructions on the intelligent tester to perform linear valve offset calibration, release the parking brake. When calibration is complete, immediately apply the parking brake.


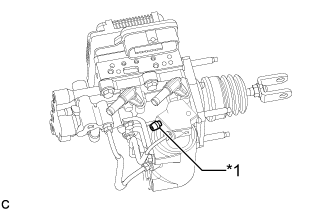
    8. C209151E01
    9. After air bleeding, tighten each bleeder plug.

      Torque:
      disc brake cylinder bleeder plug:
      8.3 N*m{ 85 kgf*cm , 73 in.*lbf }
      stroke simulator bleeder plug:
      8.5 N*m{ 87 kgf*cm , 75 in.*lbf }

      HINT:
      The stroke simulator bleeder plug is positioned as shown in the illustration.

      Text in Illustration 
      *1
      Stroke Simulator Bleeder Plug

    10. Clear the DTCs (Click here).

    11. Turn the intelligent tester off and turn the power switch off.
  1. Install the brake master cylinder reservoir filler cap.

  1. Inspect for brake fluid leaks.

  1. Install the outer cowl top panel sub-assembly.

    1. for LHD: Click here
    2. for RHD: Click here


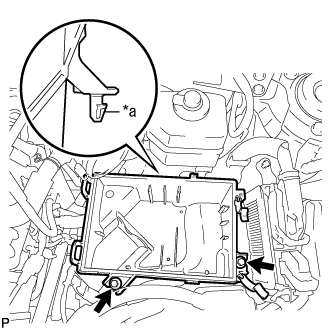
14. INSTALL AIR CLEANER CASE SUB-ASSEMBLY


    A259768E03
  1. Insert the projection of the air cleaner case sub-assembly to the hole of the No. 2 air cleaner bracket as shown in the illustration.
    Text in Illustration 
    *a
    Projection

  1. Tighten the 2 bolts.

    Torque:
    5.0 N*m{ 51 kgf*cm , 44 in.*lbf }


15. INSTALL AIR CLEANER FILTER ELEMENT SUB-ASSEMBLY


16. INSTALL AIR CLEANER CAP SUB-ASSEMBLY
  1. Install the air cleaner hose with the hose clamp.


    A259685E01
  1. Connect the 2 fuel vapor feed hoses.
    Text in Illustration 
    *1
    Retainer
    *a
    Push

    NOTICE:
    1. Check that there are no scratches or foreign matter around the connected part of the fuel tube connector and pipe before performing this work.
    2. Connect the quick connector and push the retainer in until the retainer makes a "click" sound to lock the claws of the retainer.
    3. After connecting the fuel vapor feed hose to the fuel tube connector, check that the fuel vapor feed hose is securely connected by pulling on the fuel tube connector and the fuel vapor feed hose.

  1. Install the air cleaner cap sub-assembly with the 2 clamps.

  1. Connect the connector.

  1. Connect the ventilation hose to the cylinder head cover.

  1. Connect the mass air flow meter connector and wire harness clamp to the air cleaner cap sub-assembly.


17. INSTALL INLET AIR CLEANER ASSEMBLY
  1. Install the inlet air cleaner with the 2 bolts.

    Torque:
    8.0 N*m{ 82 kgf*cm , 71 in.*lbf }


18. INSTALL COOL AIR INTAKE DUCT SEAL
  1. Install the cool air intake duct seal with the 9 clips.


19. CHARGE AIR CONDITIONING SYSTEM WITH REFRIGERANT
  1. Perform vacuum purging using a vacuum pump or appropriate equipment.


  1. Charge the air conditioning system with refrigerant.

    Refrigerant type:
    HFC-134a (R134a)


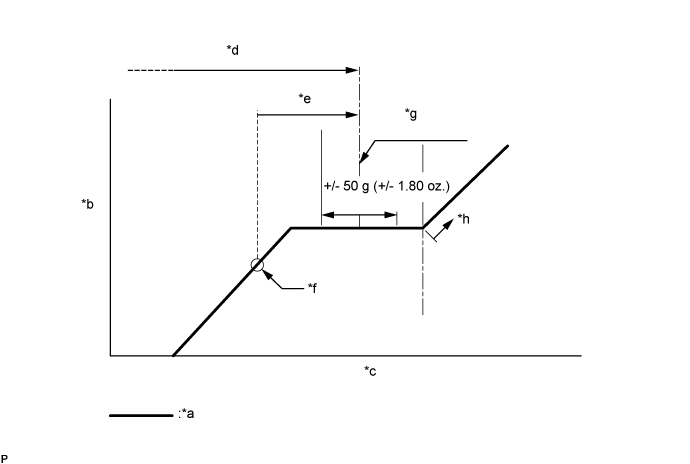
    E143108E11


    Text in Illustration 
    *a
    Sub-cool System
    *b
    High Pressure
    *c
    Refrigerant Amount
    *d
    Standard charge amount
    *e
    Charge additional 100 g (3.5 oz.)
    *f
    Point where bubbles disappear
    *g
    Mean value in proper range
    *h
    Overcharged

    Standard charge amount:
    480 to 580g (16.9 to 20.4oz.)

    SST
    09985-20010   (09985-02010, 09985-02050, 09985-02060, 09985-02070, 09985-02080, 09985-02090, 09985-02110, 09985-02130, 09985-02140, 09985-02150)

    NOTICE:
    1. Do not turn the A/C switch on before charging the air conditioning system with refrigerant. Doing so may cause the compressor to work without refrigerant, resulting in overheating of the compressor.
    2. The refrigerant amount should be checked by quantity (weight).

    HINT:
    Ensure that sufficient refrigerant is available to recharge the system when using a refrigerant recovery unit. Refrigerant recovery units are not always able to recover 100% of the refrigerant from an air conditioning system.


20. WARM UP COMPRESSOR
  1. Keep the A/C switch on for at least 2 minutes to warm up the compressor.

    NOTICE:
    To prevent damage to the compressor, be sure to warm up the compressor when turning the air conditioning on after removing and installing air conditioning system lines (including the compressor).


21. INSPECT FOR REFRIGERANT LEAK
  1. After recharging the air conditioning system with refrigerant, inspect for refrigerant leaks using a halogen leak detector.

  1. Carry out the test under the following conditions:

    1. Power switch off.
    2. Secure good ventilation (the halogen leak detector may react to volatile gases which are not refrigerant, such as gasoline vapor and exhaust gas).
    3. Repeat the inspection 2 or 3 times.
    4. Measure the pressure to make sure that there is some refrigerant remaining in the air conditioning system.
      Pressure when the compressor is off: approx. 392 to 588 kPa (3.9 to 5.9 kgf/cm2, 57 to 85 psi)


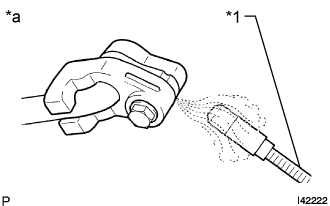
    I042222E40
  1. Using a halogen leak detector, inspect for refrigerant leaks from the air conditioning system.
    Text in Illustration 
    *1
    Halogen Leak Detector
    *a
    Inspect for Leak


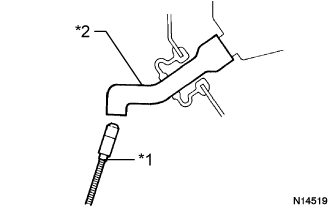
    N014519E08
  1. Bring the halogen leak detector close to the drain hose with the detector power off, and then turn the detector on.
    Text in Illustration 
    *1
    Halogen Leak Detector
    *2
    Drain Hose

    HINT:
    1. After the blower motor has stopped, leave the cooling unit for more than 15 minutes.
    2. Bring the halogen leak detector sensor under the drain hose.
    3. When bringing the halogen leak detector close to the drain hose, make sure that the halogen leak detector does not react to volatile gases. If it is not possible to avoid interference from volatile gases, the vehicle should be lifted up to allow checking for leaks.

  1. If a refrigerant leak is not detected from the drain hose, remove the blower motor control from the cooling unit. Insert the halogen leak detector sensor into the unit and check for a leak.

  1. Disconnect the pressure sensor connector and leave it for approximately 20 minutes. Bring the halogen leak detector close to the pressure sensor and check for a leak.

    HINT:
    When checking for leaks, the presence of oily dirt at a joint can indicate a leak.


22. INSTALL FRONT OUTER COWL TOP PANEL SUB-ASSEMBLY
  1. Install the front outer cowl top panel sub-assembly with the 10 bolts.

    Torque:
    10 N*m{ 102 kgf*cm , 7 ft.*lbf }

  1. Engage the 2 clamps to install the wire harness to the front outer cowl top panel sub-assembly.


23. INSTALL WINDSHIELD WIPER MOTOR AND LINK ASSEMBLY