REPAIR INSTRUCTION > CUSTOMIZE PARAMETERS |
| 1. CUSTOMIZE TOYOTA PARKING ASSIST-SENSOR SYSTEM |
Customizing with the intelligent tester
Connect the intelligent tester to the DLC3.
Turn the power switch on (IG).
Turn the clearance sonar main switch on.
Turn the intelligent tester on.
Enter the following menus: Body / Clearance Sonar / Utility / Customize.
Select the setting by referring to the table below.
| Display | Default | Content | Setting | Relevant ECU |
| Rr Sensor Onset Range | Wide | Sets the buzzer activation range for the rear center sensors. | Narrow or Wide
| Clearance warning ECU assembly |
| Keep Sense Buzzer | Avail | Sounds the buzzer when the distance between the vehicle and obstacle does not change for more than 3 seconds. | Not Avail or Avail
| Clearance warning ECU assembly |
| Fr & Rr Buzzer Volume | M2 | Changes the buzzer volume setting. | L, M1, M2, M3 or H
| Clearance warning ECU assembly |
| Display | Default | Content | Setting | Relevant ECU |
| Sensor Condition N | Avail | Makes the front sensors available when the shift lever is in N. | Not Avail or Avail
| Clearance warning ECU assembly |
| Reverse Range Front Sensor | F | Changes the operation setting for the front sensors when the shift lever is in R. | F or F Stop
| Clearance warning ECU assembly |
| Non P/R Range Rear Sensor | R Stop | Changes the operation setting for the rear sensors when the shift lever is in any position other than P or R. | R, Rcrn or R Stop
| Clearance warning ECU assembly |
| 2. CUSTOMIZE POWER DOOR LOCK CONTROL SYSTEM |
Customizing with the intelligent tester
Connect the intelligent tester to the DLC3.
Turn the power switch on (IG).
Turn the intelligent tester on.
Enter the following menus: Body / Main Body / Utility / Customize / Door Lock.
Select the setting by referring to the table below.
| Display | Default | Content | Setting | Relevant ECU |
| Unlock Key Twice | OFF | Function that unlocks only the driver door when the driver door key cylinder is turned to unlock once, and unlocks all doors when it is turned to unlock twice. For the OFF setting, turning it once unlocks all doors. | OFF or ON | Main body ECU (Multiplex network body ECU) |
| Auto Lock | ON | Function that locks all doors when the vehicle speed reaches a certain level. | OFF or ON | Main body ECU (Multiplex network body ECU) |
| Auto Lock/Shift | OFF | Function that locks all doors when the shift lever is moved out of P with the power switch on (IG) and all doors closed. | OFF or ON | Main body ECU (Multiplex network body ECU) |
| Auto Unlock/Shift | OFF | Function that unlocks all doors when the shift lever is moved to P from any position other than P with the power switch on (IG). | OFF or ON | Main body ECU (Multiplex network body ECU) |
| All Unlock/Open-Close | OFF | Function that unlocks the other doors when the driver door is opened within 10 seconds after the power switch is turned off. | OFF or ON | Main body ECU (Multiplex network body ECU) |
Customizing with the Multi-display (w/ Audio and Visual System (for Radio and Display Type))
Turn the power switch on (IG).
Enter the following menus: SETUP / Vehicle.
Select the setting by referring to the table below.
| Display | Default | Content | Setting | Relevant ECU |
| Speed sensitive auto lock | On | Function that locks all doors when the vehicle speed reaches a certain level. | On or Off | Main body ECU (Multiplex network body ECU) |
| Shift-linked auto lock | Off | Function that locks all doors when the shift lever is moved out of P with the power switch on (IG) and all doors closed. | On or Off | Main body ECU (Multiplex network body ECU) |
| Shift-linked auto unlock | Off | Function that unlocks all doors when the shift lever is moved to P from any position other than P with the power switch on (IG). | On or Off | Main body ECU (Multiplex network body ECU) |
| 3. CUSTOMIZE WIRELESS DOOR LOCK CONTROL SYSTEM |
Customizing with the intelligent tester
Connect the intelligent tester to the DLC3.
Turn the power switch on (IG).
Turn the intelligent tester on.
Enter the following menus: Body / Main Body / Utility / Customize / Wireless Door Lock.
Select the setting by referring to the table below.
| Display | Default | Content | Setting | Relevant ECU |
| Wireless Control | ON | Function that turns wireless door lock on or off | OFF or ON | Main body ECU (Multiplex network body ECU) |
| Hazard Answer Back | ON | When the doors are locked by wireless operation, the hazard warning lights flash once. When the doors are unlocked by wireless operation, the hazard warning lights flash twice. | OFF or ON | Main body ECU (Multiplex network body ECU) |
| Open Door Warning | ON | The buzzer sounds when lock is pressed when any of the doors are ajar. | OFF or ON | Main body ECU (Multiplex network body ECU) |
| Unlock 2 Operation | OFF | Function that unlocks driver door when unlock switch on electrical key transmitter sub-assembly is pressed once, and unlocks all doors when pressed twice. If setting is OFF, pressing unlock switch once makes all doors unlock. | OFF or ON | Main body ECU (Multiplex network body ECU) |
| Trunk Lid Operation | Long1 | Function to change the operation method of opening the luggage compartment door by the electrical key transmitter sub-assembly. 1tim ON: Push the luggage open switch once 2tim ON: Push the luggage open switch twice Long1: Push the luggage open switch for 0.8 seconds Long2: Push the luggage open switch for 1.6 seconds Prohibit: Wireless luggage compartment door open function is off | 1tim ON, 2tim ON, Long1, Long2 or Prohibit | Main body ECU (Multiplex network body ECU) |
| Auto Lock Time | 30 s | Function that regulates the interval between unlocking and automatic relocking of doors | 30 s, 60 s or 120 s | Main body ECU (Multiplex network body ECU) |
| Wireless Buzzer Resp | ON | Wireless door lock buzzer response | OFF or ON | Main body ECU (Multiplex network body ECU) |
| P/W Wireless Ope Buzz | ON | Wireless power window buzzer response | OFF or ON | Main body ECU (Multiplex network body ECU) |
| Wireless Buzzer Vol | Level 5 | Wireless door lock buzzer volume | Level7, Level6, Level5, Level4, Level3, Level2, Level1 or Level0 | Main body ECU (Multiplex network body ECU) |
Customizing with the multi-display (w/ Audio and Visual System (for Radio and Display Type))
Turn the power switch on (IG).
Enter the following menus: SETUP / Vehicle.
Select the setting by referring to the table below.
| Display | Default | Content | Setting | Relevant ECU |
| Remote 2-press unlock | Off | Function that unlocks driver door when unlock switch on electrical key transmitter sub-assembly is pressed once, and unlocks all doors when pressed twice. If setting is Off, pressing unlock switch once makes all doors unlock. | On or Off | Main body ECU (Multiplex network body ECU) |
| Lock feedback volume | 5 | Wireless door lock buzzer volume | 0, 1, 2, 3, 4, 5, 6 or 7 | Main body ECU (Multiplex network body ECU) |
| 4. CUSTOMIZE SMART ENTRY AND START SYSTEM (for Entry Function) |
Customizing with the intelligent tester
Connect the intelligent tester to the DLC3.
Turn the power switch on (IG).
Turn the intelligent tester on.
Enter the following menus: Body / Main Body or Entry&Start / Utility / Customize / Wireless Door Lock, Entry&Start or Warning.
Select the setting by referring to the table below.
| Display | Default | Content | Setting | Relevant ECU |
| Hazard Answer Back | ON | When the doors are locked by entry function, the hazard warning lights flash once. When the doors are unlocked by entry function, the hazard warning lights flash twice. | OFF or ON | Main body ECU (multiplex network body ECU) |
| Open Door Warning | ON | The buzzer sounds when the lock sensor on the door outside handle assembly is touched to perform entry lock with a door open. | OFF or ON | Main body ECU (multiplex network body ECU) |
| Auto Lock Time | 30 s | Function that regulates the interval between unlocking and automatic relocking of doors. | 30 s, 60 s or 120 s | Main body ECU (multiplex network body ECU) |
| Wireless Buzzer Resp | ON | Function that sounds the answer-back buzzer when an entry lock or unlock operation is performed. | OFF or ON | Main body ECU (multiplex network body ECU) |
| Wireless Buzzer Vol | Level 5 | Buzzer answer back volume | Level 7, Level 6, Level 5, Level 4, Level 3, Level 2, Level 1 or Level0 | Main body ECU (multiplex network body ECU) |
| Display | Default | Content | Setting | Relevant ECU |
| Park Wait Time (Waiting time to permit unlocking door after locking) | 2.5s | Function that sets the period of time (lock confirmation time) that the door is prevented from being unlocked by operating the front door outside handle assembly after an entry lock operation is performed. | 0.5s, 1.5s, 2.5s or 5s | Certification ECU (smart key ECU assembly) |
| Ignition Available Area (Entry ignition available area) | All | Function that sets the area that the key must be in before the power switch can be operated. | Front or All | Certification ECU (smart key ECU assembly) |
| Trunk Open Mode | ON | Function that opens the luggage compartment door when the driver has the electrical key transmitter sub-assembly and presses the luggage door opening switch assembly. | OFF or ON | Certification ECU (smart key ECU assembly) |
| Door Unlock Mode2 | All | Function that chooses the doors to be operated by entry unlock operation. | All or Driver | Certification ECU (smart key ECU assembly) |
| Auto Entry Cancel SW | OFF | Function that enables or disables the smart entry and start system. | OFF or ON | Certification ECU (smart key ECU assembly) |
| Touch Activation Over Threshold | Active | The function that limits the consecutive entry lock operation to only 2 times can be changed between Active and Not Active. When in Not Active mode, there is no limit for the number of times that the consecutive entry lock operation can be performed. | Active or Not Active | Certification ECU (smart key ECU assembly) |
| Engine Start Indicator | ON | Function that turns the smart warning light on the combination meter assembly on or off. | OFF or ON | Certification ECU (smart key ECU assembly) |
| Display | Default | Content | Setting | Relevant ECU |
| Key Low Battery Warning (Warn when key battery becomes weak) | ON | Enables or disables the sounding of the buzzer when the transmitter battery is low and the power switch is turned off after being on (IG) for 20 minutes or more. | OFF or ON | Certification ECU (smart key ECU assembly) |
Customizing with the multi-display (w/ Audio and Visual System (for Radio and Display Type))
Turn the power switch on (IG).
Enter the following menus: SETUP / Vehicle / Vehicle settings.
Select the setting by referring to the table below.
| Display | Default | Content | Setting | Relevant ECU |
| Select doors to unlock | All Doors | Function that sets which doors are unlocked by the entry unlock function. | All Doors or Driver's Door | Certification ECU (smart key ECU assembly) |
| Entry and start system | On | Function that enables or disables the smart entry and start system. | On or Off | Certification ECU (smart key ECU assembly) |
Entry unlock mode switching function (manual operation)
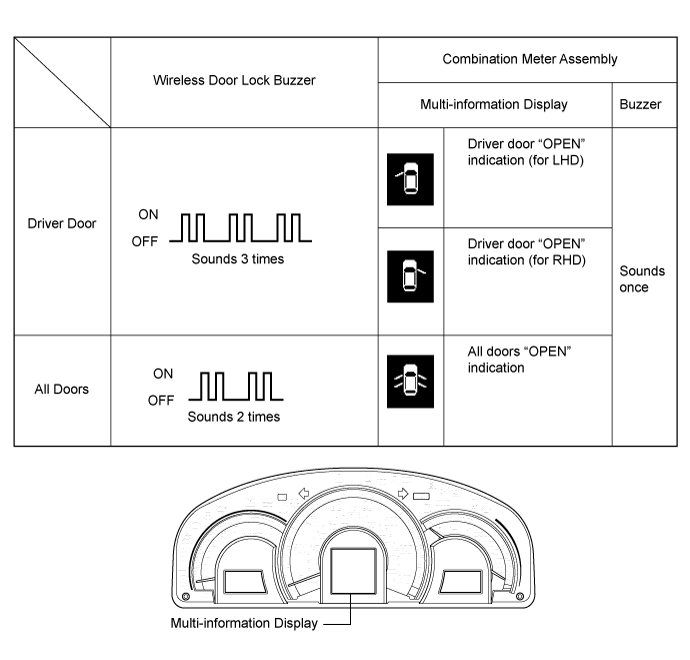
The following entry unlock modes can be selected when using the entry unlock mode switching function.
When customizing through manual operation:
| Currently Selected Mode | Answer-back (Wireless Buzzer) | Answer-back (Buzzer in Combination Meter Assembly) |
| All door unlock mode | Buzzer sounds twice (short beeps) | Buzzer sounds once |
| Driver door unlock mode | Buzzer sounds 3 times (short beeps) | Buzzer sounds once |

Entry cancel function (manual operation)
The following functions are disabled when the smart entry and start system is canceled.
When canceling the system through manual operation:
Perform the following procedure to restore the smart entry and start system to the active state from the canceled state.
| 5. CUSTOMIZE SMART ENTRY AND START SYSTEM (for Start Function) |
Customizing with the intelligent tester
Connect the intelligent tester to the DLC3.
Turn the power switch on (IG).
Turn the intelligent tester on.
Enter the following menus: Body / Entry&Start / Utility / Customize / Entry&Start or Warning.
Select the setting by referring to the table below.
| Display | Default | Content | Setting | Relevant ECU |
| Ignition Available Area (Entry ignition available area) | All | Function that sets the area that the electrical key transmitter sub-assembly must be in before the power switch can be operated. | Front or All | Certification ECU (smart key ECU assembly) |
| Auto Entry Cancel SW | OFF | Function that enables or disables the smart entry and start system. | OFF or ON | Certification ECU (smart key ECU assembly) |
| Engine Start Indicator | ON | Function that turns the smart warning light on the combination meter assembly on or off. | OFF or ON | Certification ECU (smart key ECU assembly) |
| Display | Default | Content | Setting | Relevant ECU |
| Key Low Battery Warning (Warn when key battery becomes weak) | ON | Enables or disables the sounding of the buzzer when the transmitter battery is low and the power switch is turned off after being on (IG) for 20 minutes or more. | OFF or ON | Certification ECU (smart key ECU assembly) |
Customizing with the multi-display (w/ Audio and Visual System (for Radio and Display Type))
Turn the power switch on (IG).
Enter the following menus: SETUP / Vehicle / Vehicle settings.
Select the setting by referring to the table below.
| Display | Default | Content | Setting | Relevant ECU |
| Entry and start system | On | Function that enables or disables the smart entry and start system. | On or Off | Certification ECU (smart key ECU assembly) |
Entry cancel function (manual operation)
The following functions are disabled when the smart entry and start system is canceled.
When canceling the system through manual operation:
Perform the following procedure to restore the smart entry and start system to the active state from the canceled state.
| 6. CUSTOMIZE LIGHTING SYSTEM (INT) |
Customizing using the intelligent tester
Connect the intelligent tester to the DLC3.
Turn the power switch to on (IG).
Turn the intelligent tester on.
Enter the following menus: Body / Main Body / Utility / Customize / Illuminated Entry.
Select the setting by referring to the table below.
| Tester Display | Default | Content | Setting | Relevant ECU |
| Lighting Time | 15 s | Changes the lighting time after closing all of the doors. (It will fade out immediately in case of turning the power switch from off to on (IG) or on (ACC).) | 7.5 s, 15 s or 30 s | Main body ECU (Multiplex network body ECU) |
| I/L when ACC OFF | ON | Lights up the power switch illumination, personal light and rear interior light when the power switch is turned from on (IG) or on (ACC) to off. | ON or OFF | |
| I/L ON W/Door Key Unlock | ON | Lights up the power switch illumination, personal light and rear interior light when doors are unlocked using a mechanical key or door control transmitter. | ON or OFF | |
| Light Control | ON | Dims (ON setting) or turns off (OFF setting) the inside handle illumination lights when all of the following conditions are met:
| ON or OFF | |
| Room Light when Aprchd | ON | Lights up the power switch illumination, personal light and rear interior light when a key enters any actuation area around the doors. | ON or OFF | |
| Inside Foot Light | ON | Lights up the inside handle illumination lights. | ON or OFF | |
| Interior Light Control | ON | Lights up the power switch illumination, personal light, rear interior light and inside handle illumination lights when the illuminated entry function is operating. | ON or OFF |
| 7. CUSTOMIZE METER / GAUGE SYSTEM |
Customizing with the intelligent tester
Connect the intelligent tester to the DLC3.
Turn the power switch on (IG).
Turn the intelligent tester on.
Enter the following menus: Customize Setting / Combination Meter / Warning.
Select the setting by referring to the table below.
| Tester Display | Default | Content | Setting | Relevant ECU |
| Key Remind Sound | Slow | Function to change the cycle of the key remind warning buzzer | Normal, Slow, Fast | Combination meter assembly |
| Driver Side Seatbelt Warning Buzzer*1 | ON | Function to turn on/off the seat belt warning buzzer | ON or OFF | Combination meter assembly |
| Lane Change Flashing Times Setting | 3 | Function to change the lane change flashing time | OFF, 3, 4, 5, 6, 7 | Combination meter assembly |
Customizing with the combination meter assembly
Turn the power switch on (IG).
Select the following menus: SETTINGS.
Select the setting by referring to the table below.
| Combination Meter Assembly Display | Default | Content | Setting | Relevant ECU |
| LANGUAGE | ENGLISH | Function to change the multi-information display language | ENGLISH, FRENCH, SPANISH | Combination meter assembly |
| ECO INDICATOR | ON | Function to display/not display the eco indicator and current fuel economy display | ON or OFF | Combination meter assembly |
| EV INDICATOR | ON | Function to display/not display the EV indicator | ON or OFF | Combination meter assembly |
Press and hold the DISP switch.
Return to the item selection screen.
| 8. CUSTOMIZE SEAT BELT WARNING SYSTEM |
Customizing with the intelligent tester
Connect the intelligent tester to the DLC3.
Turn the power switch on (IG).
Turn the intelligent tester on.
Enter the following menus: Body / Combination Meter / Utility / Customize / Warning.
Select the setting by referring to the table below.
| Display | Default | Content | Setting | Relevant ECU |
| Driver Side Seatbelt Warning Buzzer | ON | Function to sound the driver seat belt warning buzzer | ON/OFF | Combination meter assembly |
| 9. CUSTOMIZE AIR CONDITIONING SYSTEM |
Customizing with the intelligent tester
Connect the intelligent tester.
Turn the power switch on (IG).
Turn the intelligent tester on.
Enter the following menus: Body / Air Conditioner / Utility / Customize.
Select the setting by referring to the table below.
| Tester Display | Default | Content | Setting | Relevant ECU |
| Set Temperature Shift | Normal | Function to perform control with the shifted temperature versus the displayed temperature | -2C, -1C, Normal, +1C, +2C | Air Conditioning Amplifier Assembly |
| Compressor Mode | Automatic | Function to turn the A/C ON automatically by pressing the AUTO button when the blower is ON and the A/C is OFF | Automatic or Manual | Air Conditioning Amplifier Assembly |
| Air Inlet Mode | Automatic | In case of turning the A/C ON to cool the cabin down quickly, this is the function to change the mode automatically to RECIRCULATION mode | Automatic or Manual | Air Conditioning Amplifier Assembly |
| Foot/DEF Auto Mode | ON | Function to turn the airflow from FOOT/DEF ON automatically when AUTO MODE is ON | ON or OFF | Air Conditioning Amplifier Assembly |
| Foot/DEF Automatic Blow Up Function | ON | Function to increase the blower level automatically when the defroster is ON | ON or OFF | Air Conditioning Amplifier Assembly |
| Ambient Temperature Shift | Normal | Function to display shifted ambient temperature versus actual ambient temperature | -3C, -2C, -1C, Normal, +1C, +2C, +3C | Air Conditioning Amplifier Assembly |
| ECO MODE Cancel | OFF | Function to cancel the ECO mode drive when item is on | OFF or ON | Air conditioning amplifier assembly |
| Noise and Vibration Reduction | OFF | Function to change speed of the compressor when item is on | OFF or ON | Air conditioning amplifier assembly |
| Refrigerant Shortage Check | ON | Function to cancel the refrigerant shortage check (check performed during normal operation) when item is OFF | ON or OFF | Air Conditioning Amplifier Assembly |
| Fan speed increment control | Normal | Function to define how fast the AC blower goes to target speed when first activating the AC | Slow, Normal, Fast | Air Conditioning Amplifier Assembly |
| Ion Generate Control | ON | Function to generate ions is stopped when item is OFF | ON or OFF | Air Conditioning Amplifier Assembly |
| 10. CUSTOMIZE POWER WINDOW CONTROL SYSTEM |
Customizing with the intelligent tester
Connect the intelligent tester to the DLC3.
Turn the power switch to on (IG).
Turn the intelligent tester on.
Enter the following menus: Body / Main Body / Utility / Customize / Power Window.
Select the setting by referring to the table below.
| Tester Display | Default | Content | Setting | Relevant ECU |
| Door Key P/W Up | OFF | This function is used to close the windows by operating the mechanical key. | OFF/ON | Main body ECU (Multiplex network body ECU) |
| Door Key P/W Down | OFF | This function is used to open the windows by operating the mechanical key. | OFF/ON | Main body ECU (Multiplex network body ECU) |
| P/W Up W/ Transmit | OFF | This function is used to close the windows using the wireless key transmitter. | OFF/ON | Main body ECU (Multiplex network body ECU) |
| P/W Down W/ Transmit | OFF | This function is used to open the windows using the wireless key transmitter. | OFF/ON | Main body ECU (Multiplex network body ECU) |
| P Window Auto Up | Avail | This function is used to enable or disable the auto up function for the front passenger door window using the power window regulator switch assembly (for front passenger door). | Not Avl/Avail | Power window ECU (Power window regulator motor assembly) |
| P Window Auto Up From Driver | Avail | This function is used to enable or disable the remote auto up function for the front passenger door window using the multiplex network master switch assembly. | Not Avl/Avail | Power window ECU (Power window regulator motor assembly) |
| RR Window Auto Up | Avail | This function is used to enable or disable the auto up function using the power window regulator switch assembly (for rear RH door). | Not Avl/Avail | Power window ECU (Power window regulator motor assembly) |
| RR Window Auto Up From Driver | Avail | This function is used to enable or disable the remote auto up function for the rear RH door window using the multiplex network master switch assembly. | Not Avl/Avail | Power window ECU (Power window regulator motor assembly) |
| RL Window Auto Up | Avail | This function is used to enable or disable the auto up function using the power window regulator switch assembly (for rear LH door). | Not Avl/Avail | Power window ECU (Power window regulator motor assembly) |
| RL Window Auto Up From Driver | Avail | This function is used to enable or disable the remote auto up function for the rear LH door window using the multiplex network master switch assembly. | Not Avl/Avail | Power window ECU (Power window regulator motor assembly) |
Enter the following menus: Body / Main Body / Utility / Customize / Wireless Door Lock.
Select the setting by referring to the table below.
| Display | Default | Content | Setting | Relevant ECU |
| P/W Wireless Ope Buzz | ON | This function turns the wireless power window buzzer response on or off. | OFF/ON | Main body ECU (Multiplex network body ECU) |
| 11. CUSTOMIZE SLIDING ROOF SYSTEM |
Customizing with the intelligent tester
Connect the intelligent tester to the DLC3.
Turn the power switch on (IG).
Turn the intelligent tester on.
Enter the following menus: Body / Main Body / Utility / Customize / Power Window.
Select the setting by referring to the table below.
| Display | Default | Content | Setting | Relevant ECU |
| Door Key P/W Up | OFF | This function is used to close the power windows and sliding roof by operating the mechanical key. | OFF/ON | Main body ECU (Multiplex network body ECU) |
| Door Key P/W Down | OFF | This function is used to open the power windows and sliding roof by operating the mechanical key. | OFF/ON | Main body ECU (Multiplex network body ECU) |
| P/W Up W/ Transmit | OFF | This function is used to close the power windows and sliding roof using the wireless key transmitter. | OFF/ON | Main body ECU (Multiplex network body ECU) |
| P/W Down W/ Transmit | OFF | This function is used to open the power windows and sliding roof using the wireless key transmitter. | OFF/ON | Main body ECU (Multiplex network body ECU) |
Enter the following menus: Body / Sliding Roof / Utility / Customize / Slide Roof.
Select the setting by referring to the table below.
| Display | Default | Content | Setting | Relevant ECU |
| Door Key Related Operation | Slide | Function to select tilt up or slide open of sliding roof key-linked function. | Slide/Tilt | Sliding roof ECU (Sliding roof drive gear sub-assembly) |
| Wireless Key Related Operation | Slide | Function to select tilt up or slide open of sliding roof wireless transmitter-linked function. | Slide/Tilt | Sliding roof ECU (Sliding roof drive gear sub-assembly) |
| Front SW Auto Operation | ON | This function is used to enable or disable the auto operation. | OFF/ON | Sliding roof ECU (Sliding roof drive gear sub-assembly) |
Enter the following menus: Body / Main Body / Utility / Customize / Security.
Select the setting by referring to the table below.
| Display | Default | Content | Setting | Relevant ECU |
| Slide Roof Open Warning | ON | This function is used to enable or disable the sliding roof open warning. | OFF/ON | Main body ECU (Multiplex network body ECU) |
| 12. CUSTOMIZE LIGHTING SYSTEM (EXT) |
Customizing with the intelligent tester
Connect the intelligent tester to the DLC3.
Turn the power switch on (IG).
Turn the intelligent tester on.
Enter the following menus: Body / Main Body / Utility / Customize / Light Control.
Select the setting by referring to the table below.
| Display | Default | Content | Setting | Relevant ECU |
| Disp Ex ON Sen | Normal | Changes the ambient brightness level required to dim the lights such as the indicator lights of the combination meter, A/C indicator light and clock.*A | Light2, Light1, Normal, Dark1 or Dark2 | Main Body ECU (Multiplex Network Body ECU) |
| Disp Ex OFF Sen | Normal | Changes the ambient brightness level required to cancel the dimming of the lights such as the indicator lights of the combination meter, A/C indicator light and clock.*B | Light2, Light1, Normal, Dark1 or Dark2 | |
| Response Time | Normal | Changes the delay timing of lighting the taillights when going into a tunnel when the light control switch is in the AUTO position | Normal or Long | |
| Sensitivity | Normal | Adjusts the sensitivity of the automatic light control system.*C | Light2, Light1, Normal, Dark1 or Dark2 |
| Brightness level required to dim the lights | ![]() | ||||
| Setting | Dark2 | Dark1 | Normal | Light1 | Light2 |
| Brightness level required to cancel the dimming of the lights | ![]() | ||||
| Setting | Dark2 | Dark1 | Normal | Light1 | Light2 |
| Sensitivity of the automatic light control system | ![]() | ||||
| Setting | Dark2 | Dark1 | Normal | Light1 | Light2 |
Customizing with Multi-display (w/ Audio and Visual System (for Radio and Display Type))
Turn the power switch on (IG).
Enter the following menus: SETUP / Vehicle.
Select the setting by referring to the table below.
| Display | Default | Content | Setting | Relevant ECU |
| Light sensor sensitivity | 0 | Adjusts the sensitivity of the automatic light control system.*A | -2, -1, 0, 1 or 2 | Main Body ECU (Multiplex Network Body ECU) |
| Sensitivity of the automatic light control system | ![]() | ||||
| Setting | -2 | -1 | 0 | 1 | 2 |