 |
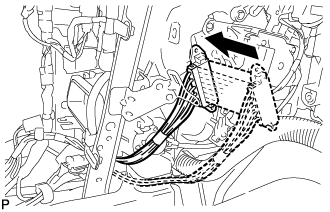
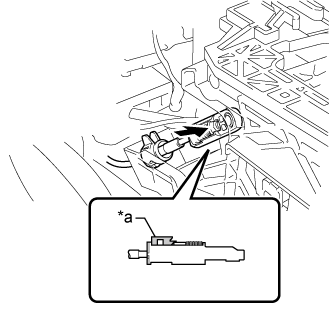
Insert the quick heater assembly as shown in the illustration.
PTC HEATER ASSEMBLY > INSTALLATION |
| 1. INSTALL QUICK HEATER ASSEMBLY |
|
Insert the quick heater assembly as shown in the illustration.
Install the 2 screws.
Engage the 4 clamps.
Install the quick heater assembly with the bolt.
Connect the quick heater connector.
| 2. INSTALL SHIFT LEVER SUPPORT (for LHD) |
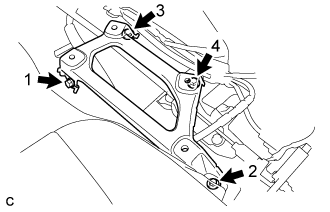 |
Install the shift lever support to the vehicle body with the 4 bolts in the sequence shown in the illustration.
| 3. INSTALL LOWER SHIFT LEVER ASSEMBLY (for LHD) |
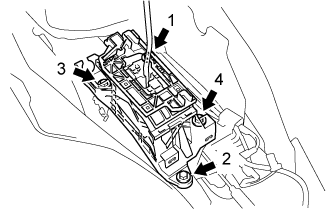 |
Install the lower shift lever assembly to the shift lever support with the 4 bolts in the sequence shown in the illustration.
Connect the 3 clamps and connector.
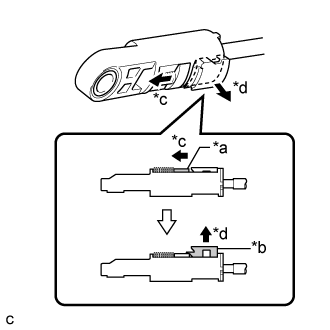 |
Slide the slider of the transmission control cable assembly in the direction indicated by the arrow and pull the lock piece outward.
| *a | Slider |
| *b | Lock Piece |
| *c | Slide |
| *d | Pull |
Engage the 2 claws to connect the transmission control cable assembly to the lower shift lever assembly.
 |
Connect the end of the transmission control cable assembly to the shift lever assembly.
| *a | Lock Piece |
Push the lock piece into the adjuster case.
| 4. INSTALL NO. 1 CONSOLE BOX DUCT |
Install the No. 1 console box duct with the clip.
| 5. INSTALL NO. 1 CONSOLE BOX MOUNTING BRACKET |
Install the No. 1 console mounting bracket with the screw.
| 6. INSTALL FLOOR CARPET BRACKET LH |
Engage the 2 guides.
Install the floor carpet bracket LH with the 2 clips.
| 7. INSTALL FLOOR CARPET BRACKET RH |
Engage the 2 guides.
Install the floor carpet bracket RH with the 2 clips.
| 8. INSTALL NO. 2 AIR DUCT SUB-ASSEMBLY (for RHD) |
Engage the 2 claws to install the No. 2 air duct sub-assembly.
Install the bolt.
Connect the connector to the footwell light.
| 9. INSTALL CONSOLE BOX INSERT |
for RHD:
Engage the 2 claws to connect the room temperature sensor.
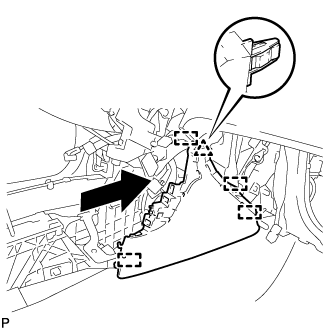 |
Engage the clip and 3 guides as shown in the illustration.
Install the console box insert with the 2 screws <C>.
| 10. INSTALL FRONT NO. 2 CONSOLE BOX INSERT |
for LHD:
Engage the 2 claws to connect the room temperature sensor.
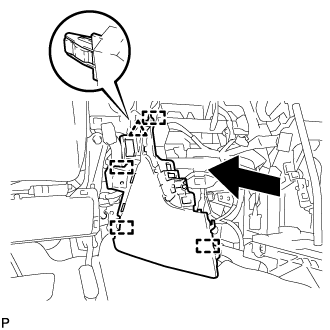 |
Engage the clip and 3 guides as shown in the illustration.
Install the front No. 2 console box insert with the 2 screws <C>.
| 11. INSTALL LOWER INSTRUMENT PANEL SUB-ASSEMBLY |
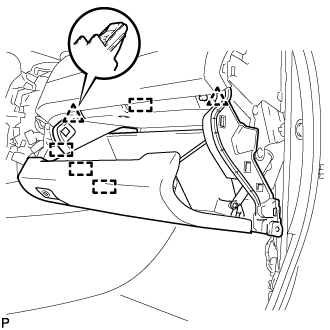 |
Engage the 2 clips and 4 guides.
Install the 3 screws <C>.
Close the lower instrument panel door.
Install the lower instrument panel sub-assembly with the bolt <B> and screw <C>.
| 12. INSTALL NO. 2 INSTRUMENT PANEL UNDER COVER SUB-ASSEMBLY |
Connect the connector.
Engage the 2 guides and 4 claws to install the No. 2 instrument panel under cover sub-assembly.
| 13. INSTALL INSTRUMENT SIDE PANEL RH |
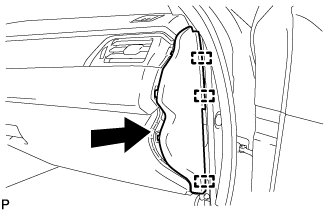 |
Engage the 3 guides as shown in the illustration.
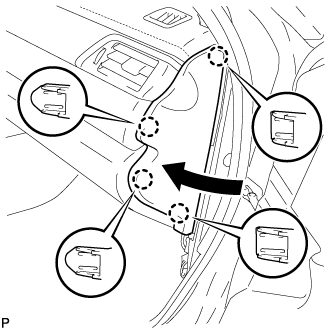 |
Engage the 4 claws to install the instrument side panel RH as shown in the illustration.
| 14. INSTALL FRONT DOOR OPENING TRIM WEATHERSTRIP RH |
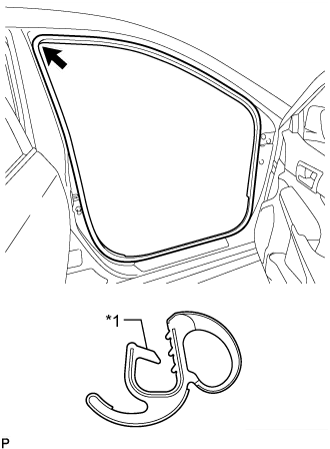 |
Align the alignment mark (White) on the weatherstrip with the protruding portion on the body indicated by the arrow in the illustration, and install the front door opening trim weatherstrip RH.
| *1 | Alignment Mark (White) |
| 15. INSTALL COWL SIDE TRIM SUB-ASSEMBLY RH |
| 16. INSTALL FRONT DOOR SCUFF PLATE RH |
| 17. INSTALL RADIO RECEIVER ASSEMBLY WITH AIR CONDITIONING CONTROL ASSEMBLY |
Connect each connector.
Engage the 6 clips to the vehicle body to temporarily install the radio receiver assembly with air conditioning control assembly.
Install the radio receiver assembly with air conditioning control assembly with the 4 bolts.
| 18. INSTALL FRONT ASH RECEPTACLE ASSEMBLY |
Connect each connector.
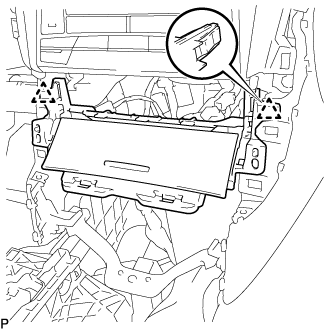 |
Engage the 2 clips.
Install the front ash receptacle assembly with the 2 screws <C>.
| 19. INSTALL FRONT CONSOLE UPPER PANEL GARNISH |
Connect each connector.
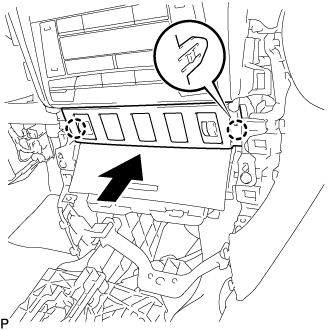 |
Engage the 2 claws to install the front console upper panel garnish as shown in the illustration.
| 20. INSTALL NO. 2 INSTRUMENT PANEL REGISTER ASSEMBLY |
Connect the connector.
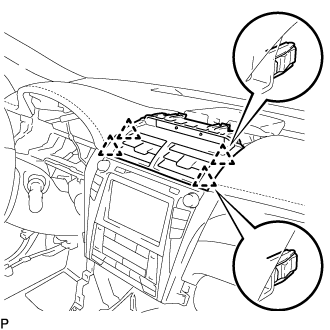 |
Engage the 4 clips to install the No. 2 instrument panel register assembly.
| 21. INSTALL CENTER INSTRUMENT CLUSTER FINISH PANEL SUB-ASSEMBLY |
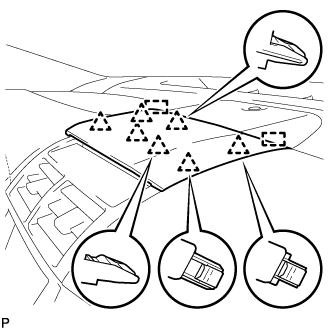 |
Engage the 7 clips and 2 guides to install the center instrument cluster finish panel sub-assembly.
| 22. INSTALL CONSOLE BOX ASSEMBLY |
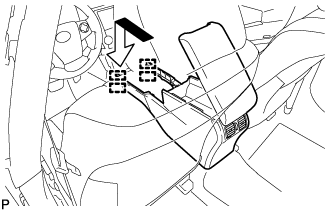 |
Engage the 4 guides as shown in the illustration.
Install the console box assembly with the 2 bolts and 2 screws.
| 23. INSTALL CONSOLE BOX CARPET |
Install the console box carpet.
| 24. INSTALL NO. 4 CONSOLE BOX DUCT |
Engage the claw to install the No. 4 console box duct.
| 25. INSTALL UPPER CONSOLE BOX SUB-ASSEMBLY |
Connect the 2 connectors.
Engage the clamp.
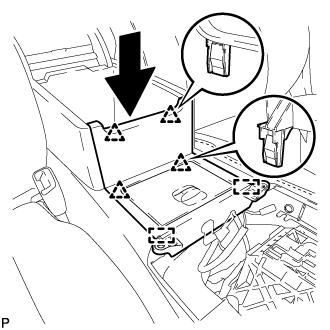 |
Engage the 2 guides and 4 clips as shown in the illustration.
Install the upper console box sub-assembly with the 2 screws.
| 26. INSTALL REAR CONSOLE UPPER PANEL SUB-ASSEMBLY |
Connect each connector.
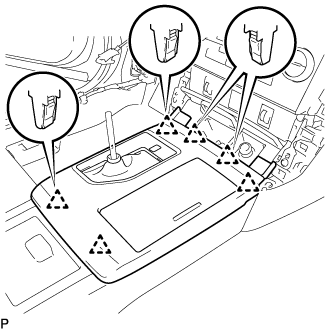 |
Engage the 6 clips to install the rear console upper panel sub-assembly.
Move the shift lever to P.
| 27. INSTALL SHIFT LEVER KNOB SUB-ASSEMBLY |
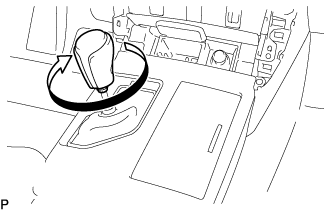 |
Turn the shift lever knob sub-assembly clockwise to install it.
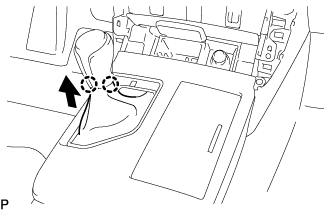 |
Engage the 2 claws to connect the shift hole cover sub-assembly as shown in the illustration.
| 28. INSTALL FRONT PANEL GARNISH RH |
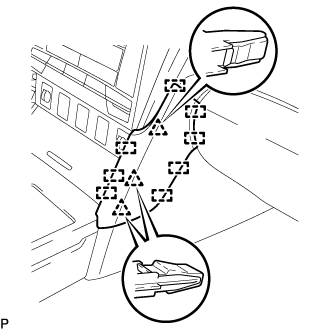 |
Engage the 3 clips and 8 guides to install the front panel garnish RH.
| 29. INSTALL INSTRUMENT PANEL SUB-ASSEMBLY |
Connect each connector.
Engage the 5 clips and 3 guides.
Install the instrument panel sub-assembly with the 2 bolts <B>.
| 30. CONNECT HOOD LOCK CONTROL LEVER SUB-ASSEMBLY |
Engage the claw and 2 guides to connect the hood lock control lever sub-assembly.
| 31. INSTALL FRONT PANEL GARNISH LH |
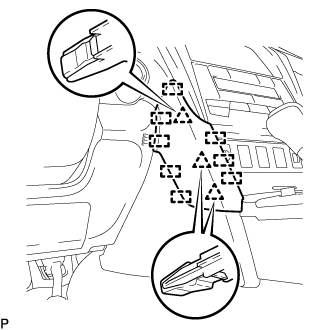 |
Engage the 3 clips and 8 guides to install the front panel garnish LH.
| 32. INSTALL UPPER INSTRUMENT PANEL FINISH PANEL (for RHD) |
Connect the connector.
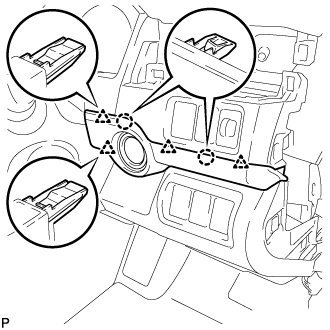 |
Engage the 2 claws and 4 clips to install the upper instrument panel finish panel.
| 33. INSTALL INSTRUMENT SIDE PANEL LH |
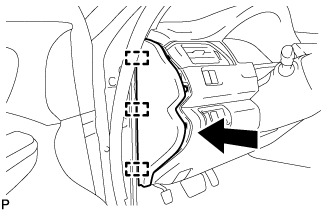 |
Engage the 3 guides.
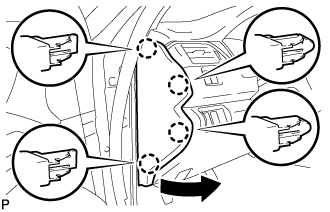 |
Engage the 4 claws to install the instrument side panel LH as shown in the illustration.
| 34. INSTALL FRONT DOOR OPENING TRIM WEATHERSTRIP LH |
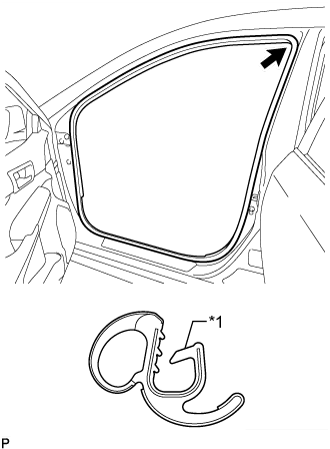 |
Align the alignment mark (Yellow) on the weatherstrip with the protruding portion on the body indicated by the arrow in the illustration, and install the front door opening trim weatherstrip LH.
| *1 | Alignment Mark (Yellow) |
| 35. INSTALL COWL SIDE TRIM SUB-ASSEMBLY LH |
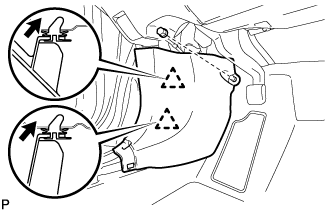 |
Insert the 2 clips in the direction indicated by the arrows shown in the illustration to engage them.
Install the cowl side trim sub-assembly LH with the clip.
| 36. INSTALL FRONT DOOR SCUFF PLATE LH |
Engage the 10 claws to install the front door scuff plate LH.
| 37. INSTALL FRONT SEAT ASSEMBLY LH |
| 38. INSTALL FRONT SEAT ASSEMBLY RH |
| 39. INSPECT SHIFT LEVER POSITION |
While moving the shift lever from N to each position, check that the lever moves smoothly and that the shift position indicator comes on properly according to the shift lever position.
Put the vehicle into the READY-on state and check the following:
When the shift lever is moved to D, the vehicle moves forward.
When the shift lever is moved to R, the vehicle moves in reverse.