 |
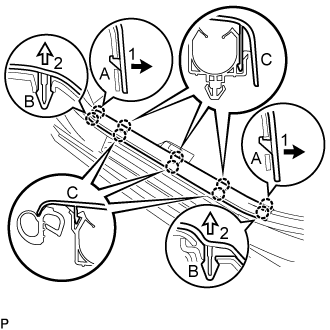
Disengage the 2 claws (A) in the direction indicated by the arrows (1) shown in the illustration.
PTC HEATER ASSEMBLY > REMOVAL |
| 1. REMOVE FRONT SEAT ASSEMBLY LH |
| 2. REMOVE FRONT SEAT ASSEMBLY RH |
| 3. REMOVE FRONT DOOR SCUFF PLATE LH |
|
Disengage the 2 claws (A) in the direction indicated by the arrows (1) shown in the illustration.
Disengage the 2 claws (B) in the direction indicated by the arrows (2) shown in the illustration.
Disengage the 6 claws (C) to remove the front door scuff plate LH.
| 4. REMOVE COWL SIDE TRIM SUB-ASSEMBLY LH |
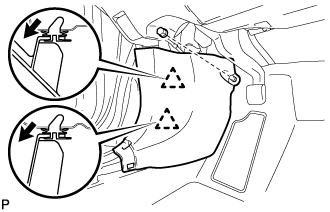 |
Remove the clip.
Pull the cowl side trim sub-assembly LH in the direction indicated by the arrow shown in the illustration to disengage the 2 clips and remove the cowl side trim sub-assembly LH.
| 5. DISCONNECT FRONT DOOR OPENING TRIM WEATHERSTRIP LH |
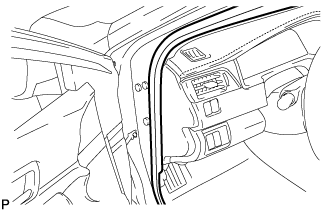 |
Disconnect the front door opening trim weatherstrip LH.
| 6. REMOVE INSTRUMENT SIDE PANEL LH |
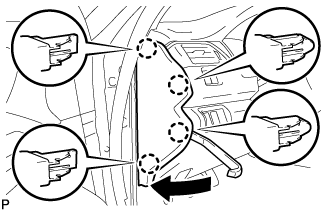 |
Using a moulding remover, disengage the 4 claws as shown in the illustration.
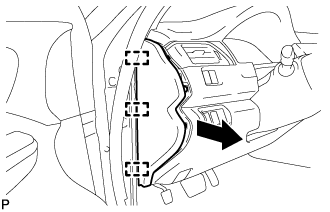 |
Disengage the 3 guides and remove the instrument side panel LH as shown in the illustration.
| 7. REMOVE UPPER INSTRUMENT PANEL FINISH PANEL (for RHD) |
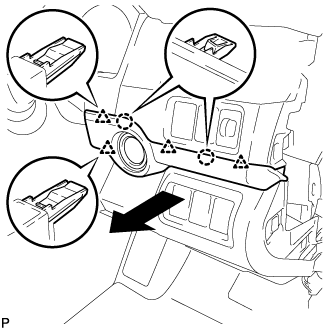 |
Disengage the 2 claws and 4 clips as shown in the illustration.
Disconnect the connector to remove the upper instrument panel finish panel.
| 8. REMOVE FRONT PANEL GARNISH LH |
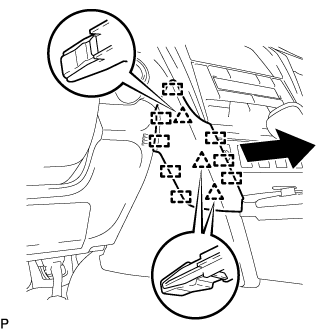 |
Disengage the 3 clips and 8 guides to remove the front panel garnish LH as shown in the illustration.
| 9. DISCONNECT HOOD LOCK CONTROL LEVER SUB-ASSEMBLY |
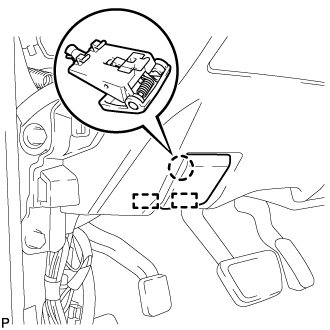 |
Disengage the claw and 2 guides to disconnect the hood lock control lever sub-assembly.
| 10. REMOVE INSTRUMENT PANEL SUB-ASSEMBLY |
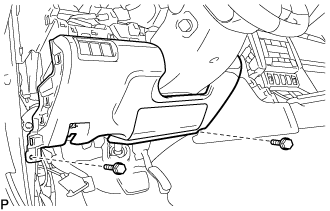 |
Remove the 2 bolts <B>.
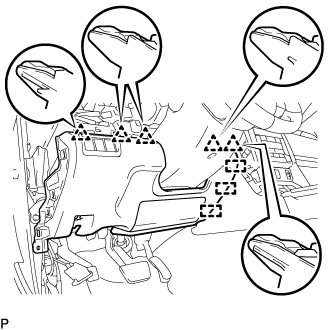 |
Disengage the 5 clips and 3 guides.
Disconnect each connector to remove the instrument panel sub-assembly
| 11. REMOVE FRONT PANEL GARNISH RH |
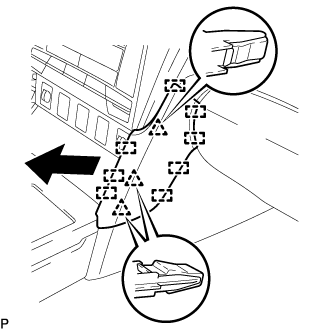 |
Disengage the 3 clips and 8 guides to remove the front panel garnish RH as shown in the illustration.
| 12. REMOVE SHIFT LEVER KNOB SUB-ASSEMBLY |
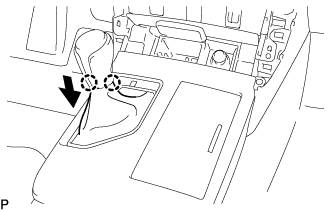 |
Disengage the 2 claws and disconnect the shift hole cover sub-assembly as shown in the illustration.
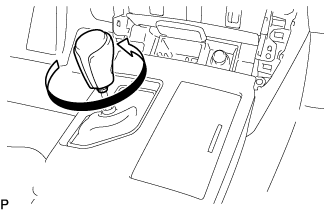 |
Turn the shift lever knob sub-assembly counterclockwise and remove the shift lever knob sub-assembly.
| 13. REMOVE REAR CONSOLE UPPER PANEL SUB-ASSEMBLY |
Move the shift lever to N.
Disengage the 6 clips as shown in the illustration.
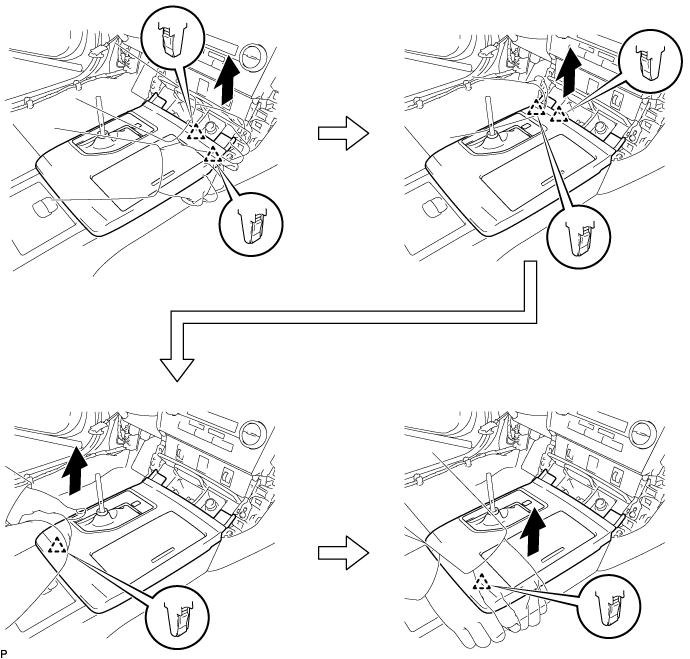
Disconnect each connector to remove the rear console upper panel sub-assembly.
| 14. REMOVE UPPER CONSOLE BOX SUB-ASSEMBLY |
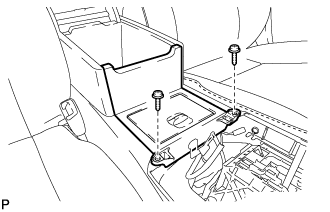 |
Remove the 2 screws.
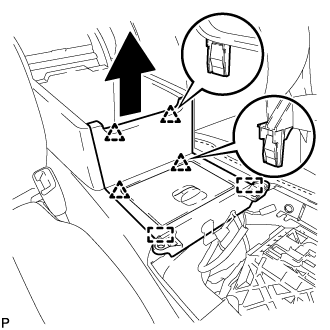 |
Disengage the 4 clips and 2 guides as shown in the illustration.
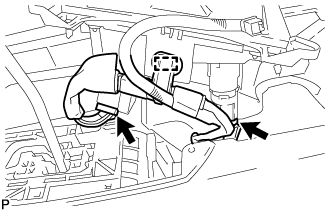 |
Disengage the clamp.
Disconnect the 2 connectors to remove the upper console box sub-assembly.
| 15. REMOVE NO. 4 CONSOLE BOX DUCT |
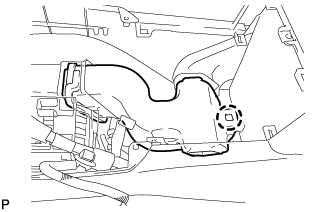 |
Disengage the claw and remove the No. 4 console box duct.
| 16. REMOVE CONSOLE BOX CARPET |
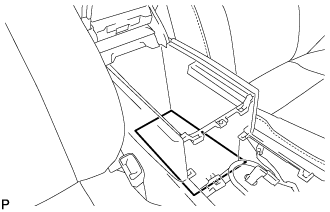 |
Remove the console box carpet.
| 17. REMOVE CONSOLE BOX ASSEMBLY |
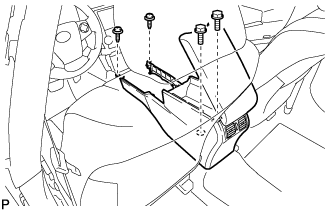 |
Remove the 2 bolts and 2 screws.
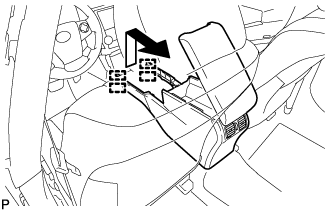 |
Pull the console box assembly in the direction indicated by the arrow to disengage the 4 guides and remove the console box assembly.
| 18. REMOVE CENTER INSTRUMENT CLUSTER FINISH PANEL SUB-ASSEMBLY |
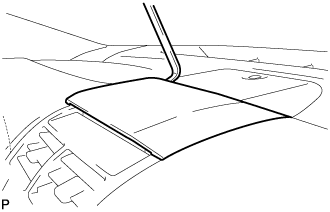 |
Using a moulding remover, pry up on the center instrument cluster finish panel sub-assembly until there is enough of a gap to make it possible to pull on the panel by hand.
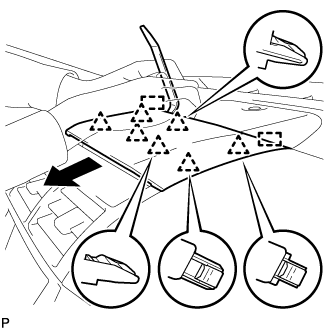 |
Pull the center instrument cluster finish panel sub-assembly in the direction indicated by the arrow to disengage the 7 clips and 2 guides to remove the center instrument cluster finish panel sub-assembly as shown in the illustration.
| 19. REMOVE NO. 2 INSTRUMENT PANEL REGISTER ASSEMBLY |
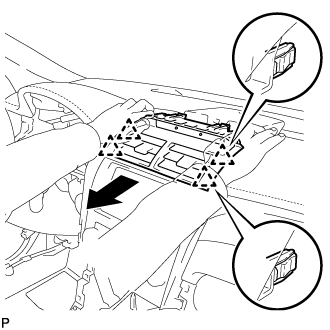 |
Pull the No. 2 instrument panel register assembly in the direction indicated by the arrow to disengage the 4 clips as shown in the illustration.
Disconnect the connector to remove the No. 2 instrument panel register assembly.
| 20. REMOVE FRONT CONSOLE UPPER PANEL GARNISH |
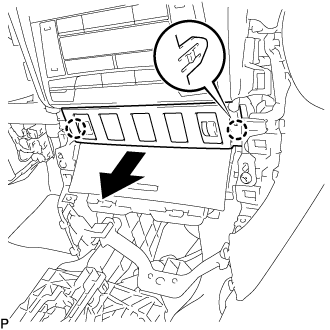 |
Disengage the 2 claws as shown in the illustration.
Disconnect each connector to remove the front console upper panel garnish.
| 21. REMOVE FRONT ASH RECEPTACLE ASSEMBLY |
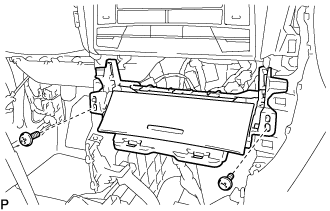 |
Remove the 2 screws <C>.
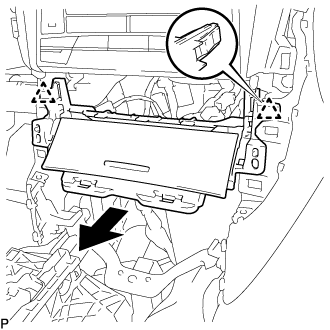 |
Disengage the 2 clips as shown in the illustration.
Disconnect each connector to remove the front ash receptacle assembly.
| 22. REMOVE RADIO RECEIVER ASSEMBLY WITH AIR CONDITIONING CONTROL ASSEMBLY |
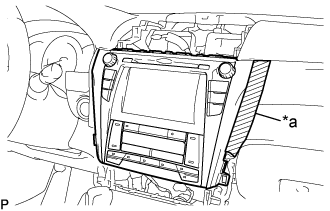 |
Apply protective tape to the area shown in the illustration.
| *a | Protective Tape |
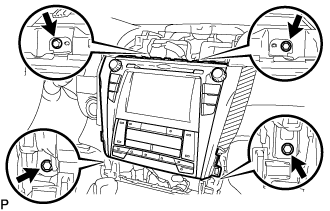 |
Remove the 4 bolts.
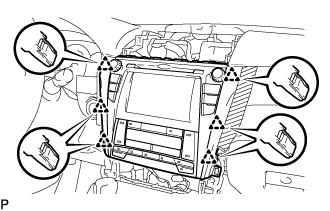 |
Pull the radio receiver assembly with air conditioning control assembly toward the rear of the vehicle and disengage the 6 clips.
Disconnect each connector and remove the radio receiver assembly with air conditioning control assembly.
| 23. REMOVE FRONT DOOR SCUFF PLATE RH |
| 24. REMOVE COWL SIDE TRIM SUB-ASSEMBLY RH |
| 25. DISCONNECT FRONT DOOR OPENING TRIM WEATHERSTRIP RH |
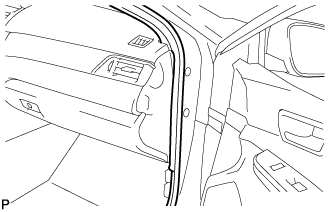 |
Disconnect the front door opening trim weatherstrip RH.
| 26. REMOVE INSTRUMENT SIDE PANEL RH |
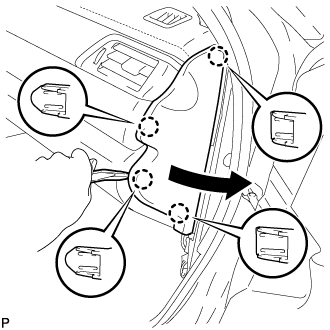 |
Using moulding remover, disengage the 4 claws as shown in the illustration.
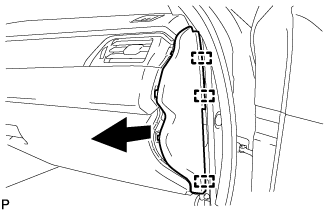 |
Disengage the 3 guides to remove the instrument side panel RH as shown in the illustration.
| 27. REMOVE NO. 2 INSTRUMENT PANEL UNDER COVER SUB-ASSEMBLY |
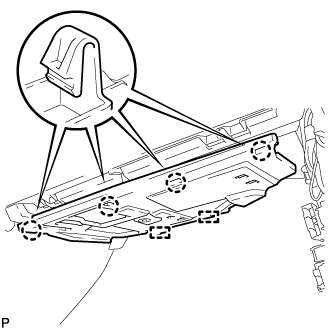 |
Disengage the 4 claws.
Disengage the 2 guides.
Disconnect the connector to remove the No. 2 instrument panel under cover sub-assembly.
| 28. REMOVE LOWER INSTRUMENT PANEL SUB-ASSEMBLY |
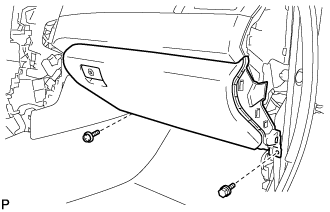 |
Remove the bolt <B> and screw <C>.
Open the lower instrument panel door.
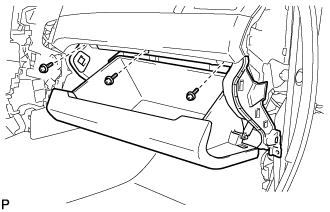 |
Remove the 3 screws <C>.
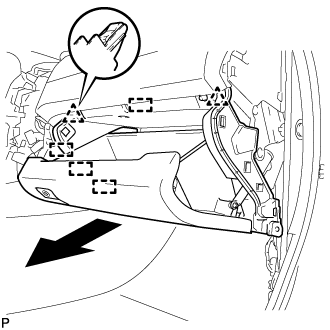 |
Disengage the 2 clips, 4 guides and remove the lower instrument panel sub-assembly as shown in the illustration.
| 29. REMOVE FRONT NO. 2 CONSOLE BOX INSERT |
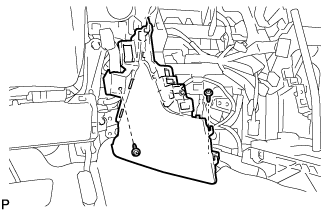 |
Remove the 2 screws <C>.
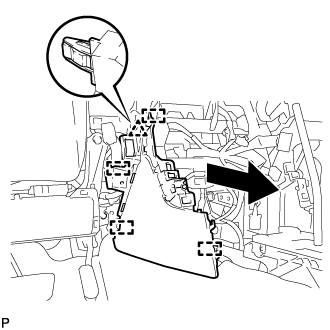 |
Disengage the clip and 3 guides to remove the front No. 2 console box insert as shown in the illustration.
for LHD:
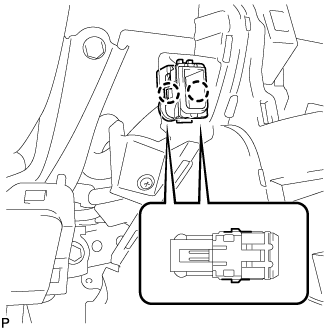 |
Disengage the 2 claws to disconnect the room temperature sensor from the front No. 2 console box insert.
| 30. REMOVE CONSOLE BOX INSERT |
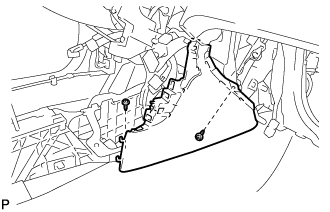 |
Remove the 2 screws <C>.
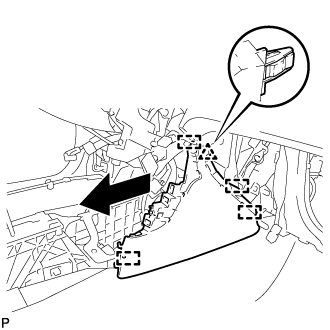 |
Disengage the clip and 3 guides to remove the console box insert as shown in the illustration.
for RHD:
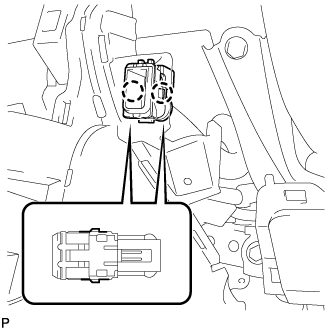 |
Disengage the 2 claws to disconnect the room temperature sensor from the console box insert.
| 31. REMOVE FLOOR CARPET BRACKET LH |
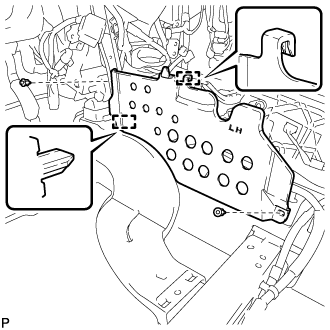 |
Remove the 2 clips.
Disengage the 2 guides to remove the floor carpet bracket LH.
| 32. REMOVE FLOOR CARPET BRACKET RH |
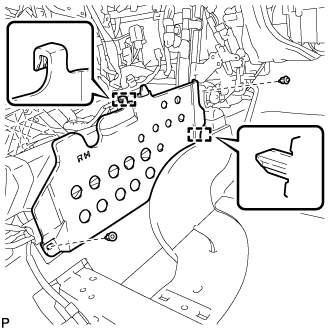 |
Remove the 2 clips.
Disengage the 2 guides to remove the floor carpet bracket RH.
| 33. REMOVE NO. 1 CONSOLE BOX MOUNTING BRACKET |
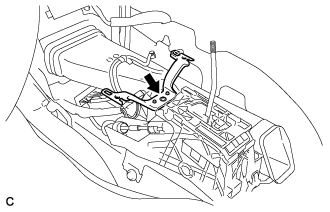 |
Remove the screw and No. 1 console box mounting bracket from the lower shift lever assembly.
| 34. REMOVE NO. 1 CONSOLE BOX DUCT |
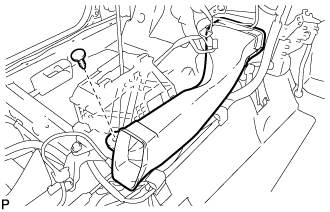 |
Remove the clip and the No. 1 console box duct.
| 35. REMOVE NO. 2 AIR DUCT SUB-ASSEMBLY (for RHD) |
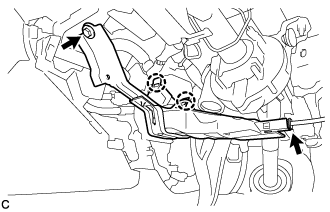 |
Disconnect the connector from the footwell light.
Remove the bolt.
Disengage the 2 claws to remove the No. 2 air duct sub-assembly.
| 36. REMOVE LOWER SHIFT LEVER ASSEMBLY (for LHD) |
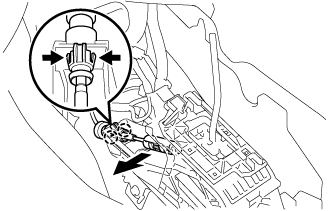 |
Disconnect the end of transmission control cable assembly from the lower shift lever assembly.
Disengage the 2 claws and disconnect the transmission control cable assembly from the lower shift lever assembly.
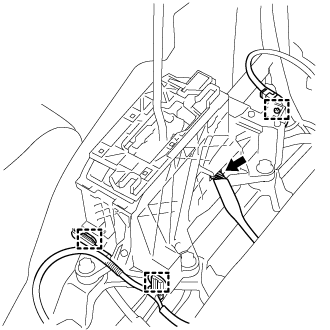 |
Disconnect the 3 clamps and connector.
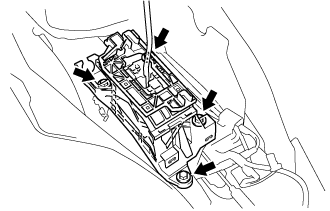 |
Remove the 4 bolts and lower shift lever assembly from the shift lever support.
| 37. REMOVE SHIFT LEVER SUPPORT (for LHD) |
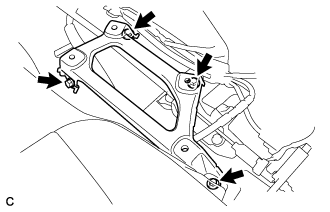 |
Remove the 4 bolts and shift lever support from the vehicle body.
| 38. REMOVE QUICK HEATER ASSEMBLY |
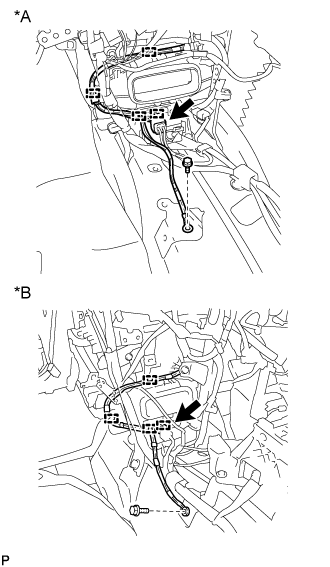 |
Disconnect the quick heater connector.
| *A | for LHD |
| *B | for RHD |
Remove the bolt.
Disengage the 4 clamps.
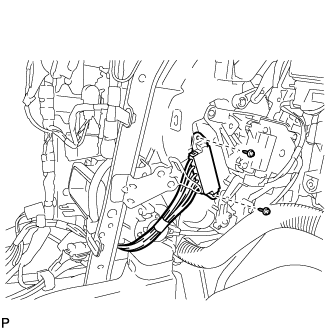 |
Remove the 2 screws.
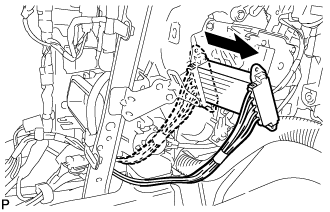 |
Remove the quick heater assembly as shown in the illustration.