Home › Drivetrain › P314 HYBRID TRANSMISSION / TRANSAXLE › TRANSMISSION CONTROL CABLE

TRANSMISSION CONTROL CABLE > INSTALLATION

for Preparation Click here


1. INSTALL TRANSMISSION CONTROL CABLE ASSEMBLY (for LHD)

NOTICE:
Before installing the transmission control cable assembly, check that the shift lever position sensor and the shift lever are in neutral.

  1. Pass the transmission control cable assembly from the cabin to the engine compartment.

  1. Install the transmission control cable assembly with the 2 bolts.

    Torque:
    5.0 N*m{ 51 kgf*cm , 44 in.*lbf }

  1. Install the dash panel insulator to the original position.

  1. Connect the transmission control cable assembly to the 2 transmission control cable brackets.

  1. Install a new clip to the No. 1 transmission control cable bracket.


    C245030E01
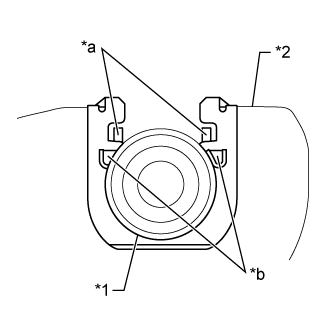
  1. Install the transmission control cable assembly to the No. 1 transmission control cable bracket
    Text in Illustration 
    *1
    No. 1 Transmission control cable assembly
    *2
    No. 1 transmission control cable bracket
    *a
    Claw A
    *b
    Claw B

    NOTICE:
    1. Make sure that the claws A on the clip are securely fit into the bracket holes.
    2. Make sure that the cable is securely installed inside of the claws B of the clip.
  1. Connect the transmission control cable assembly to the control shaft lever with the nut.

    Torque:
    15 N*m{ 153 kgf*cm , 11 ft.*lbf }

  1. Engage the 2 claws to connect the transmission control cable assembly.


    C194520E03
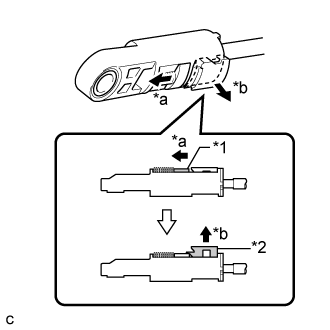
  1. Slide the slider of the transmission control cable in the direction indicated by the arrow and pull the lock piece outward.
    Text in Illustration 
    *1
    Slider
    *2
    Lock Piece
    *a
    Slide
    *b
    Pull


    C241614E01
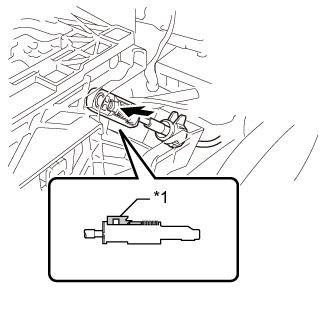
  1. Install the end of transmission control cable assembly to the lower shift lever assembly.
    Text in Illustration 
    *1
    Lock Piece

    NOTICE:
    1. Check that the lock piece is pulled up.
    2. Install the cable end all the way to the base of the pin.

  1. Push the lock piece into the adjuster case.

    NOTICE:
    1. Check that the shift lever position sensor and the shift lever are in neutral.
    2. Securely push in the lock piece until the slider lock is engaged.


2. INSTALL TRANSMISSION CONTROL CABLE ASSEMBLY (for RHD)

NOTICE:
Before installing the transmission control cable assembly, check that the shift lever position sensor and the shift lever are in neutral.

  1. Pass the transmission control cable assembly from the cabin to the engine compartment.

  1. Install the transmission control cable assembly with the 2 bolts.

    Torque:
    5.0 N*m{ 51 kgf*cm , 44 in.*lbf }

  1. Install the dash panel insulator to the original position.

  1. Install the No. 1 parking brake cable assembly with the bolt.

    Torque:
    15 N*m{ 153 kgf*cm , 11 ft.*lbf }

  1. Install the floor carpet to the original position.

  1. Connect the transmission control cable assembly to the 2 transmission control cable brackets.

  1. Install a new clip to the control cable bracket.


    C245030E01
  1. Install the transmission control cable assembly to the No. 1 transmission control cable bracket
    Text in Illustration 
    *1
    Transmission control cable assembly
    *2
    No. 1 transmission control cable bracket
    *a
    Claw A
    *b
    Claw B

    NOTICE:
    1. Make sure that the claws A on the clip are securely fit into the bracket holes.
    2. Make sure that the cable is securely installed inside of the claws B of the clip.
  1. Connect the transmission control cable to the control shaft lever with the nut.

    Torque:
    15 N*m{ 153 kgf*cm , 11 ft.*lbf }

  1. Engage the 2 claws to connect the transmission control cable assembly.


    C194520E03
  1. Slide the slider of the transmission control cable in the direction indicated by the arrow and pull the lock piece outward.
    Text in Illustration 
    *1
    Slider
    *2
    Lock Piece
    *a
    Slide
    *b
    Pull


    C241614E01
  1. Install the end of transmission control cable to the lower shift lever assembly.
    Text in Illustration 
    *1
    Lock Piece

    NOTICE:
    1. Check that the lock piece is pulled up.
    2. Install the cable end all the way to the base of the pin.

  1. Push the lock piece into the adjuster case.

    NOTICE:
    1. Check that the shift lever position sensor and the shift lever are in neutral.
    2. Securely push in the lock piece until the slider lock is engaged.


3. CONNECT NO. 1 PARKING BRAKE CABLE ASSEMBLY (for LHD)
  1. Install the No. 1 parking brake cable assembly with the bolt and nut.

    Torque:
    Bolt:
    15 N*m{ 153 kgf*cm , 11 ft.*lbf }
    Nut:
    5.4 N*m{ 55 kgf*cm , 48 in.*lbf }

  1. Install the floor carpet to the original position.


4. INSTALL ACCELERATOR PEDAL SENSOR ASSEMBLY (for LHD)
(Click here)


5. INSTALL AIRBAG SENSOR ASSEMBLY
(Click here)


6. INSTALL AIR CLEANER CASE SUB-ASSEMBLY


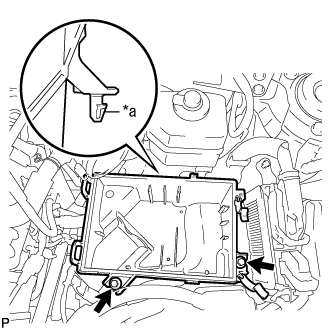
    A259768E03
  1. Insert the projection of the air cleaner case sub-assembly to the hole of the No. 2 air cleaner bracket as shown in the illustration.
    Text in Illustration 
    *a
    Projection

  1. Tighten the 2 bolts.

    Torque:
    5.0 N*m{ 51 kgf*cm , 44 in.*lbf }


7. INSTALL AIR CLEANER FILTER ELEMENT SUB-ASSEMBLY


8. INSTALL AIR CLEANER CAP SUB-ASSEMBLY
  1. Install the air cleaner hose with the hose clamp.


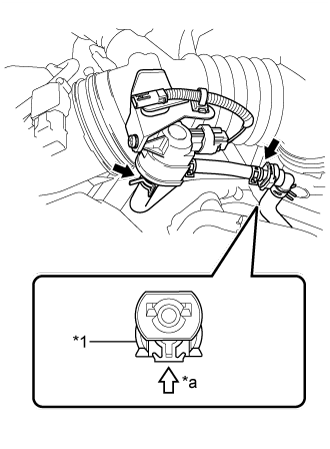
    A259685E01
  1. Connect the 2 fuel vapor feed hoses.
    Text in Illustration 
    *1
    Retainer
    *a
    Push

    NOTICE:
    1. Check that there are no scratches or foreign matter around the connected part of the fuel tube connector and pipe before performing this work.
    2. Connect the quick connector and push the retainer in until the retainer makes a "click" sound to lock the claws of the retainer.
    3. After connecting the fuel vapor feed hose to the fuel tube connector, check that the fuel vapor feed hose is securely connected by pulling on the fuel tube connector and the fuel vapor feed hose.

  1. Install the air cleaner cap sub-assembly with the 2 clamps.

  1. Connect the connector.

  1. Connect the ventilation hose to the cylinder head cover.

  1. Connect the mass air flow meter connector and wire harness clamp to the air cleaner cap sub-assembly.


9. INSTALL INLET AIR CLEANER ASSEMBLY
  1. Install the inlet air cleaner with the 2 bolts.

    Torque:
    8.0 N*m{ 82 kgf*cm , 71 in.*lbf }


10. INSTALL COOL AIR INTAKE DUCT SEAL
  1. Install the cool air intake duct seal with the 9 clips.


11. INSPECT SHIFT LEVER POSITION
  1. While moving the shift lever from the N position to each position, check that the lever moves smoothly and that the shift position indicator comes on properly according to the shift lever position.

  1. Put the vehicle into the READY-on state and check the following:

    1. When the shift lever is moved to the D position, the vehicle moves forward.

    2. When the shift lever is moved to the R position, the vehicle moves in reverse.

      NOTICE:
      The vehicle should not move when the shift position indicator is off.


12. ADJUST SHIFT LEVER POSITION
  1. Move the shift lever to N.

  1. Remove the console box (Click here).


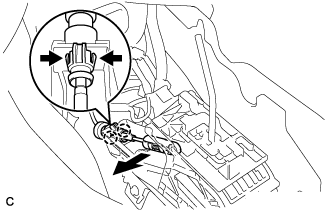
    C239451
  1. Disconnect the end of the transmission control cable assembly from the lower shift lever assembly.


    C194520E03
  1. Slide the slider of the transmission control cable assembly in the direction indicated by the arrow and pull the lock piece outward.
    Text in Illustration 
    *1
    Slider
    *2
    Lock Piece
    *a
    Slide
    *b
    Pull


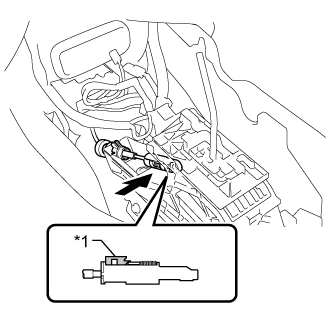
    C239661E01
  1. Install the end of the transmission control cable assembly to the lower shift lever assembly.
    Text in Illustration 
    *1
    Lock Piece

    NOTICE:
    1. Check that the lock piece is pulled up.
    2. Install the cable end all the way to the base of the pin.

  1. Push the lock piece into the adjuster case.

    NOTICE:
    1. Check that the park/neutral position switch and the shift lever are in neutral.
    2. Securely push in the lock piece until the slider lock is engaged.

  1. After adjusting the shift lever position, check the operation and function of the shift lever. If there is a problem, adjust the position again.

  1. Install the console box (Click here).