TRANSMISSION CONTROL CABLE > INSTALLATION |
| 1. INSTALL TRANSMISSION CONTROL CABLE ASSEMBLY (for LHD) |
Pass the transmission control cable assembly from the cabin to the engine compartment.
Install the transmission control cable assembly to the vehicle body with the 2 bolts.
Install the dash panel insulator to the original position.
Connect the transmission control cable assembly to the 2 transmission control cable brackets.
Install a new clip to the No. 1 transmission control cable bracket.
![]() |
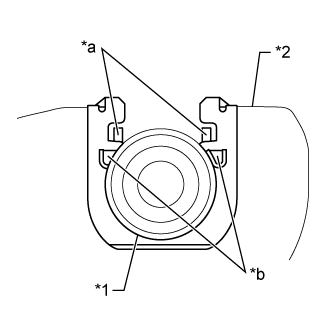
Install the transmission control cable assembly to the No. 1 transmission control cable bracket.
| *1 | No. 1 Transmission control cable assembly |
| *2 | No. 1 transmission control cable bracket |
| *a | Claw (A) |
| *b | Claw (B) |
Connect the transmission control cable assembly to the control shaft lever with the nut.
![]() |
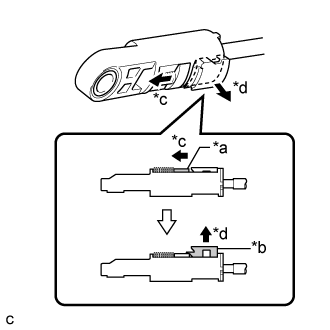
Slide the slider of the transmission control cable assembly in the direction indicated by the arrow and pull the lock piece outward.
| *a | Slider |
| *b | Lock Piece |
| *c | Slide |
| *d | Pull |
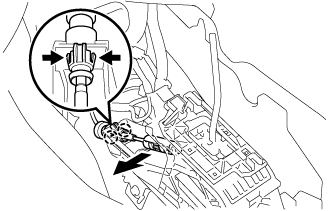
Engage the 2 claws to connect the transmission control cable assembly to the lower shift lever assembly.
![]() |
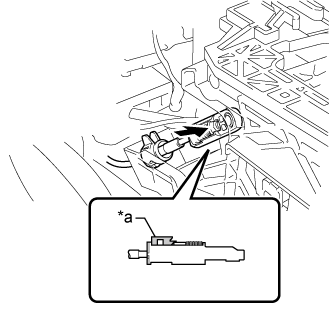
Connect the end of transmission control cable assembly to the lower shift lever assembly.
| *a | Lock Piece |
Push the lock piece into the adjuster case.
| 2. INSTALL TRANSMISSION CONTROL CABLE ASSEMBLY (for RHD) |
Pass the transmission control cable assembly from the cabin to the engine compartment.
Install the transmission control cable assembly to the vehicle body with the 2 bolts.
Install the dash panel insulator to the original position.
Install the No. 1 parking brake cable assembly to the vehicle body with the bolt.
Install the floor carpet to the original position.
Connect the transmission control cable assembly to the 2 transmission control cable brackets.
Install a new clip to the No. 1 transmission control cable bracket.
![]() |
Install the transmission control cable assembly to the No. 1 transmission control cable bracket.
| *1 | Transmission control cable assembly |
| *2 | No. 1 transmission control cable bracket |
| *a | Claw (A) |
| *b | Claw (B) |
Connect the transmission control cable assembly to the control shaft lever with the nut.
![]() |
Slide the slider of the transmission control cable assembly in the direction indicated by the arrow and pull the lock piece outward.
| *a | Slider |
| *b | Lock Piece |
| *c | Slide |
| *d | Pull |
Engage the 2 claws to connect the transmission control cable assembly to the lower shift lever assembly.
![]() |
Connect the end of transmission control cable to the lower shift lever assembly.
| *a | Lock Piece |
Push the lock piece into the adjuster case.
| 3. CONNECT NO. 1 PARKING BRAKE CABLE ASSEMBLY (for LHD) |
Connect the No. 1 parking brake cable assembly to the vehicle body with the bolt and nut.
Install the floor carpet to the original position.
| 4. INSTALL ACCELERATOR PEDAL SENSOR ASSEMBLY (for LHD) |
| 5. INSTALL AIRBAG SENSOR ASSEMBLY |
| 6. INSTALL AIR CLEANER CASE SUB-ASSEMBLY |
![]() |
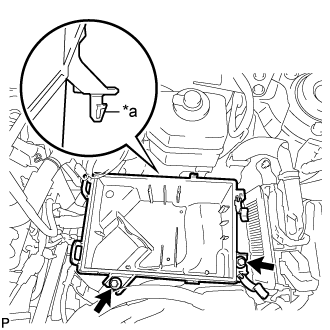
Insert the projection of the air cleaner case sub-assembly to the hole of the No. 2 air cleaner bracket as shown in the illustration.
| *a | Projection |
Tighten the 2 bolts.
| 7. INSTALL AIR CLEANER FILTER ELEMENT SUB-ASSEMBLY |
| 8. INSTALL AIR CLEANER CAP SUB-ASSEMBLY |
Install the air cleaner hose with the hose clamp.
![]() |
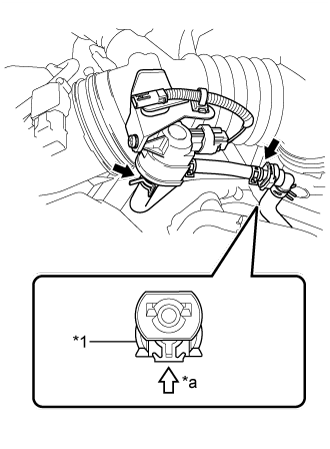
Connect the 2 fuel vapor feed hoses.
| *1 | Retainer |
| *a | Push |
Install the air cleaner cap sub-assembly with the 2 clamps.
Connect the connector.
Connect the ventilation hose to the cylinder head cover.
Connect the mass air flow meter connector and wire harness clamp to the air cleaner cap sub-assembly.
| 9. INSTALL INLET AIR CLEANER ASSEMBLY |
Install the inlet air cleaner with the 2 bolts.
| 10. INSTALL COOL AIR INTAKE DUCT SEAL |
Install the cool air intake duct seal with the 9 clips.
| 11. INSPECT SHIFT LEVER POSITION |
While moving the shift lever from N to each position, check that the lever moves smoothly and that the shift position indicator comes on properly according to the shift lever position.
Put the vehicle into the READY-on state and check the following:
When the shift lever is moved to D, the vehicle moves forward.
When the shift lever is moved to R, the vehicle moves in reverse.
| 12. ADJUST SHIFT LEVER POSITION |
Move the shift lever to N.
Remove the console box (Click here).
![]() |
Disconnect the end of the transmission control cable assembly from the lower shift lever assembly.
Disengage the 2 claws and disconnect the transmission control cable assembly from the lower shift lever assembly.
![]() |
Slide the slider of the transmission control cable assembly in the direction indicated by the arrow and pull the lock piece outward.
| *a | Slider |
| *b | Lock Piece |
| *c | Slide |
| *d | Pull |
Engage the 2 claws to connect the transmission control cable assembly to the lower shift lever assembly.
![]() |
Connect the end of the transmission control cable assembly to the lower shift lever assembly.
| *a | Lock Piece |
Push the lock piece into the adjuster case.
After adjusting the shift lever position, check the operation and function of the shift lever. If there is a problem, adjust the position again.
Install the console box (Click here).