 |
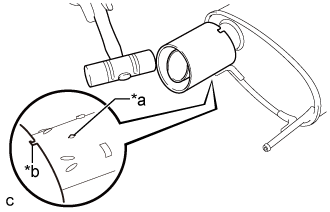
Align the concave area of each baffle with the protruding part of the tail exhaust pipe assembly as shown in the illustration.
| *a | Protruding Part |
| *b | Concave |
EXHAUST PIPE > INSTALLATION |
| 1. INSTALL TAIL EXHAUST PIPE BAFFLE SUB-ASSEMBLY |
|
Align the concave area of each baffle with the protruding part of the tail exhaust pipe assembly as shown in the illustration.
| *a | Protruding Part |
| *b | Concave |
Using a plastic hammer, uniformly tap the 2 new tail exhaust pipe baffle sub-assemblies onto the tail exhaust pipe assembly.
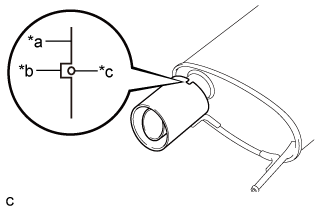 |
Check that the concave area of each baffle is aligned with the protruding part on the bottom of the tail exhaust pipe assembly as shown in the illustration.
| *a | Baffle Edge |
| *b | Concave |
| *c | Protruding Part |
| 2. INSTALL HEATED OXYGEN SENSOR (for Bank 2) |
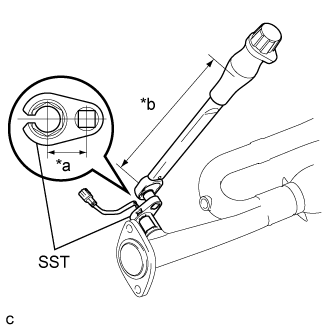 |
Using SST, install the heated oxygen sensor to the front exhaust pipe assembly.
| *a | Fulcrum Length 30 mm (1.18 in.) |
| *b | Fulcrum Length 180 mm (7.09 in.) |
| 3. INSTALL HEATED OXYGEN SENSOR (for Bank 1) |
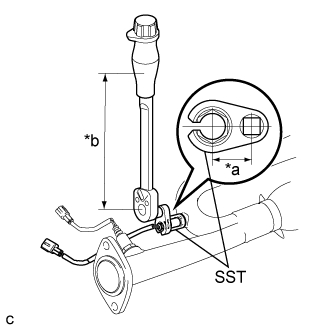 |
Using SST, install the heated oxygen sensor to the center exhaust pipe assembly.
| *a | Fulcrum Length 30 mm (1.18 in.) |
| *b | Fulcrum Length 180 mm (7.09 in.) |
| 4. INSTALL FRONT EXHAUST PIPE ASSEMBLY |
Install 2 new gaskets to the front exhaust pipe assembly.
Connect the front exhaust pipe assembly to the No. 1 exhaust pipe support bracket (for Rear Side).
Install the front exhaust pipe assembly with the 2 bolts and 2 nuts.
Connect the 2 heated oxygen sensor connectors.
Install the 2 wire harnesses to the clamp.
| 5. INSTALL NO. 1 EXHAUST PIPE SUPPORT BRACKET (for Front Side) |
Install the No. 1 exhaust pipe support bracket with the 2 nuts (for Front Side).
| 6. INSTALL ENGINE UNDER COVER RH |
| 7. INSTALL FRONT WHEEL OPENING EXTENSION PAD RH |
| 8. INSTALL CENTER EXHAUST PIPE ASSEMBLY |
Install a new gasket to the front exhaust pipe assembly.
Connect the center exhaust pipe assembly to the exhaust pipe supports.
Install the center exhaust pipe assembly with the 2 bolts and 2 nuts.
| 9. INSTALL EXHAUST PIPE DAMPER |
Install the exhaust pipe damper with the 2 bolts.
| 10. INSTALL TAIL EXHAUST PIPE ASSEMBLY |
Install a new gasket to the center exhaust pipe assembly.
Connect the tail exhaust pipe assembly to the 3 exhaust pipe supports.
Install the tail exhaust pipe assembly with the 2 nuts.
| 11. INSTALL TAIL EXHAUST PIPE ASSEMBLY LH |
Install a new gasket to the center exhaust pipe assembly.
Connect the tail exhaust pipe assembly LH to the 2 exhaust pipe supports.
Install the tail exhaust pipe assembly LH with the 2 nuts.
| 12. INSPECT FOR EXHAUST GAS LEAK |