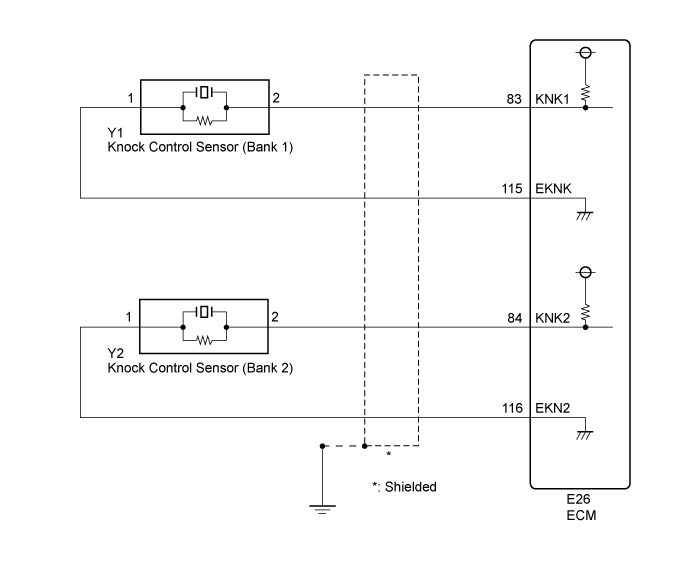
DTC P0327 Knock Sensor 1 Circuit Low Input (Bank 1 or Single Sensor) |
DTC P0328 Knock Sensor 1 Circuit High Input (Bank 1 or Single Sensor) |
DTC P0332 Knock Sensor 2 Circuit Low Input (Bank 2) |
DTC P0333 Knock Sensor 2 Circuit High Input (Bank 2) |
| DTC No. | DTC Detection Condition | Trouble Area |
| P0327 P0332 | Output voltage of knock control sensor (bank 1, 2) is less than 0.5 V for 1 second or more (1 trip detection logic). |
|
| P0328 P0333 | Output voltage of knock control sensor (bank 1, 2) is higher than 4.5 V for 1 second or more (1 trip detection logic). |
|
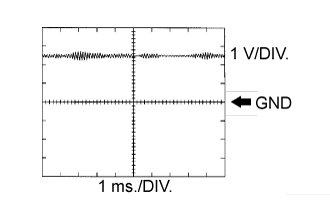
| ECM Terminal Name | Between KNK1 and EKNK, or KNK2 and EKN2 |
| Tester Range | 1 V/DIV., 1 ms./DIV. |
| Condition | Engine speed maintained at 4000 rpm after warming up engine |
| Frequency of Operation | Continuous |
| Tester Display | Description |
| NORMAL |
|
| ABNORMAL |
|
| INCOMPLETE |
|
| N/A |
|
| 1.READ VALUE USING INTELLIGENT TESTER (KNOCK FEEDBACK VALUE) |
Connect the intelligent tester to the DLC3.
Start the engine.
Turn the tester on.
Warm up the engine.
Enter the following menus: Powertrain / Engine / Data List / All Data / Knock Feedback Value.
Read the value while driving the vehicle.
| Malfunction does not occur | Knock Feedback Value changes |
| Malfunctions occur | Knock Feedback Value does not change |
|
| ||||
| OK | ||
 | ||
| ||
| 2.CHECK TERMINAL VOLTAGE (POWER SOURCE OF KNOCK CONTROL SENSOR) |
 |
Disconnect the knock control sensor connector.
Turn the engine switch on (IG).
Measure the voltage according to the value(s) in the table below.
| Tester Connection | Switch Condition | Specified Condition |
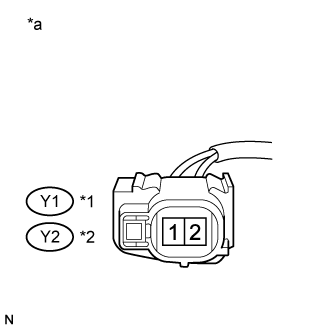
| Y1-1 - Y1-2 | Engine switch on (IG) | 4.5 to 5.5 V |
| Y2-1 - Y2-2 | Engine switch on (IG) | 4.5 to 5.5 V |
| *1 | Bank 1 |
| *2 | Bank 2 |
| *a | Front view of wire harness connector (to Knock Control Sensor) |
|
| ||||
| OK | |
 |
| 3.INSPECT KNOCK CONTROL SENSOR |
Inspect the knock control sensor (Click here).
|
| ||||
| OK | ||
| ||
| ||
| 4.CHECK HARNESS AND CONNECTOR (KNOCK CONTROL SENSOR - ECM) |
Disconnect the knock control sensor connector.
Disconnect the ECM connector.
Measure the resistance according to the value(s) in the table below.
| Tester Connection | Condition | Specified Condition |
| Y1-2 - E26-83 (KNK1) | Always | Below 1 Ω |
| Y1-1 - E26-115 (EKNK) | Always | Below 1 Ω |
| Y2-2 - E26-84 (KNK2) | Always | Below 1 Ω |
| Y2-1 - E26-116 (EKN2) | Always | Below 1 Ω |
| Y1-2 or E26-83 (KNK1) - Body ground | Always | 10 kΩ or higher |
| Y1-1 or E26-115 (EKNK) - Body ground | Always | 10 kΩ or higher |
| Y2-2 or E26-84 (KNK2) - Body ground | Always | 10 kΩ or higher |
| Y2-1 or E26-116 (EKN2) - Body ground | Always | 10 kΩ or higher |
|
| ||||
| OK | ||
| ||
| ||

