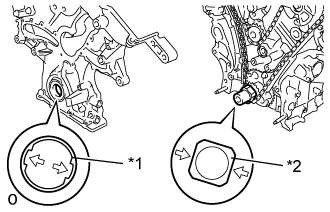
Home › Engine / Hybrid System ยท 2GR-FE › ENGINE MECHANICAL › ENGINE UNIT

ENGINE UNIT > REASSEMBLY

for Preparation Click here


1. INSTALL ENGINE REAR OIL SEAL
  1. Place the engine rear oil seal retainer on wooden blocks.


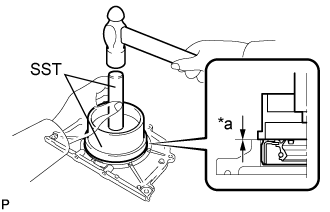
    A120675E03
  1. Using SST, tap in a new engine rear oil seal until its surface is flush with the engine rear oil seal retainer edge.

    SST
    09223-15030  
    09950-70010   (09951-07100)
    Text in Illustration 
    *a
    Depth

    NOTICE:
    1. Keep the lip free of foreign matter.
    2. Do not tap the engine rear oil seal at an angle.
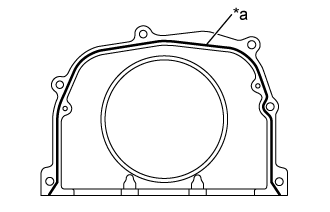


2. INSTALL ENGINE REAR OIL SEAL RETAINER


    A187879E01
  1. Apply seal packing in a continuous line as shown in the illustration.
    Text in Illustration 
    *a
    Seal Packing Diameter
    (2.0 to 3.0 mm (0.0787 to 0.118 in.))

    Seal packing:
    Toyota Genuine Seal Packing Black, Three Bond 1207B or equivalent

    Seal diameter:
    2.0 to 3.0 mm (0.0787 to 0.118 in.)

    NOTICE:
    1. Remove any oil from the contact surfaces.
    2. Install the engine rear oil seal retainer within 3 minutes of applying seal packing.
    3. Do not start the engine for at least 2 hours after installation.


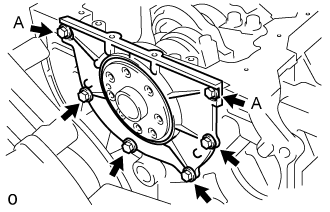
    A129686E01
  1. Install the engine rear oil seal retainer with the 6 bolts.

    Torque:
    10 N*m{ 102 kgf*cm , 7 ft.*lbf }

    NOTICE:
    Be sure to apply adhesive 1324 to the bolts in the places indicated by A before installing them.

    Adhesive:
    Toyota Genuine Adhesive 1324, Three Bond 1324 or equivalent


3. INSTALL WATER INLET PIPE


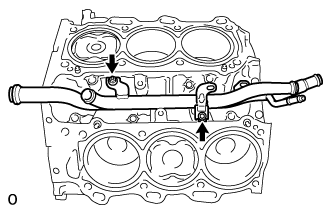
A129713
  1. Install the water inlet pipe with the 2 bolts.

    Torque:
    10 N*m{ 102 kgf*cm , 7 ft.*lbf }

  1. Install the No. 1 water by-pass hose.


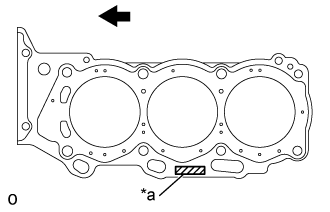
4. INSTALL CYLINDER HEAD GASKET RH


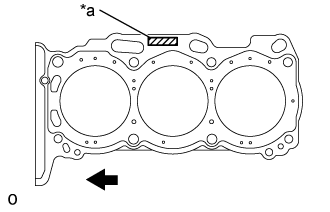
    A131898E02
  1. Place a new cylinder head gasket RH on the cylinder block surface with the Lot No. stamp facing upward.
    Text in Illustration 
    *a
    Lot No.
    V100135
    Engine Front

    NOTICE:
    Be careful of the installation direction.


5. INSTALL CYLINDER HEAD SUB-ASSEMBLY RH
  1. Place the cylinder head on the cylinder block.

    NOTICE:
    1. Be careful not to allow oil to adhere to the bottom part of the cylinder head.
    2. Gently lower the cylinder head in order not to damage the gasket with the bottom part of the head.

    HINT:
    The cylinder head bolts are tightened in 3 progressive steps.

  1. Apply a light coat of engine oil to the threads and under the heads of the cylinder head bolts.


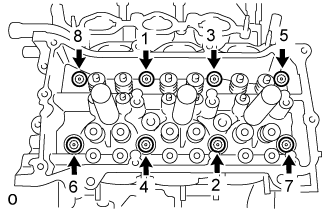
  1. Step 1


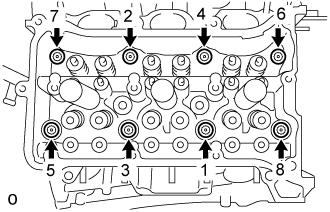
      A129712E02
    1. Using a 10 mm bi-hexagon wrench, install and uniformly tighten the 8 cylinder head bolts with the plate washers in several steps and in the sequence shown in the illustration.

      Torque:
      36 N*m{ 367 kgf*cm , 27 ft.*lbf }


    A035289E05
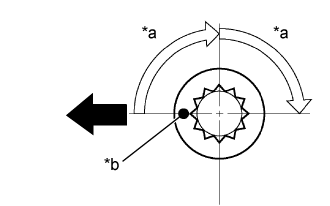
  1. Step 2
    Text in Illustration 
    *a
    Turn 90°
    *b
    Painted Mark
    V100135
    Engine Front

    1. Mark each cylinder head bolt head with paint as shown in the illustration.

    2. Tighten the cylinder head bolts 90° in the sequence shown in step 1.

  1. Step 3

    1. Tighten the cylinder head bolts an additional 90° in the sequence shown in step 1.

    2. Check that the painted mark is now facing rearward.

      HINT:
      Perform "Inspection After Repair" after replacing the cylinder head RH (Click here).


6. INSTALL CYLINDER HEAD GASKET LH


    A131900E02
  1. Place a new cylinder head gasket LH on the cylinder block surface with the Lot No. stamp facing upward.
    Text in Illustration 
    *a
    Lot No.
    V100135
    Engine Front

    NOTICE:
    Be careful of the installation direction.


7. INSTALL CYLINDER HEAD SUB-ASSEMBLY LH
  1. Place the cylinder head on the cylinder block.

    NOTICE:
    1. Be careful not to allow oil to adhere to the bottom part of the cylinder head.
    2. Gently lower the cylinder head in order not to damage the gasket with the bottom part of the head.

    HINT:
    The cylinder head bolts are tightened in 3 progressive steps.

  1. Apply a light coat of engine oil to the threads and under the heads of the cylinder head bolts.


  1. Step 1


      A129711E02
    1. Using a 10 mm bi-hexagon wrench, install and uniformly tighten the 8 cylinder head bolts with the plate washers in several steps in the sequence shown in the illustration.

      Torque:
      36 N*m{ 367 kgf*cm , 27 ft.*lbf }


    A035289E05
  1. Step 2
    Text in Illustration 
    *a
    Turn 90°
    *b
    Painted Mark
    V100135
    Engine Front

    1. Mark each cylinder head bolt head with paint as shown in the illustration.

    2. Tighten the cylinder head bolts 90° in the sequence shown in step 1.

  1. Step 3

    1. Tighten the cylinder head bolts an additional 90° in the sequence shown in step 1.

    2. Check that the painted mark is now facing rearward.


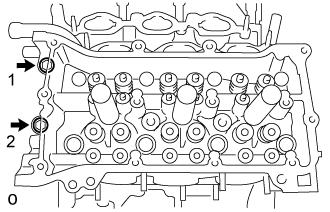
    A129710E02
  1. Tighten the 2 bolts in the order shown in the illustration.

    Torque:
    30 N*m{ 306 kgf*cm , 22 ft.*lbf }

    HINT:
    Perform "Inspection After Repair" after replacing the cylinder head LH (Click here).


8. INSTALL VALVE STEM CAP
  1. Apply a light coat of engine oil to the valve stem caps.

  1. Install the valve stem caps on the valves.


9. INSTALL VALVE LASH ADJUSTER ASSEMBLY

NOTICE:
  1. Keep the lash adjuster free of dirt and foreign objects.
  2. Only use clean engine oil.

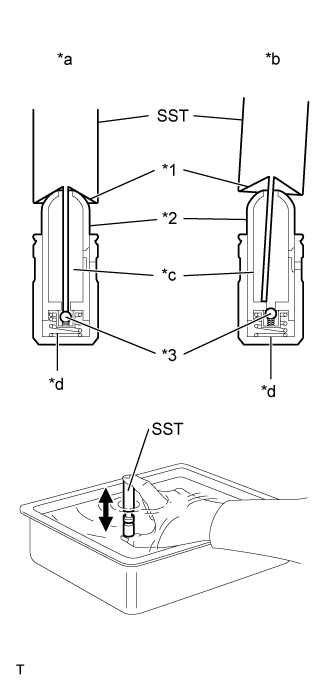
  1. Place the lash adjuster into a container filled with engine oil.


    A109630E17
  1. Insert the tip of SST into the lash adjuster plunger and use the tip to press down on the check ball inside the plunger.
    Text in Illustration 
    *1
    Tapered Part
    *2
    Plunger
    *3
    Check Ball
    *a
    CORRECT
    *b
    INCORRECT
    *c
    Low Pressure Chamber
    *d
    High Pressure Chamber

    SST
    09276-75010  

  1. Squeeze SST and lash adjuster together to move the plunger up and down 5 to 6 times.

  1. Check the movement of the plunger and bleed the air.

    OK:
    Plunger moves up and down.

    NOTICE:
    When bleeding air from the high-pressure chamber, make sure that the tip of SST is actually pressing the check ball as shown in the illustration. If the check ball is not pressed, air will not bleed.

  1. After bleeding the air, remove SST. Then, try to press the plunger quickly and firmly by hand.

    OK:
    Plunger is very difficult to move.

    If the result is not as specified, replace the valve lash adjuster.

  1. Install the valve lash adjusters.

    NOTICE:
    Install each valve lash adjuster to the same place it was removed from.


10. INSTALL NO. 1 VALVE ROCKER ARM SUB-ASSEMBLY
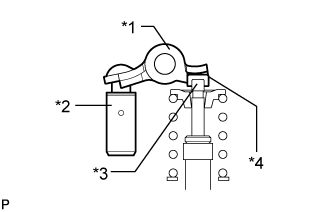
  1. Apply engine oil to the lash adjuster tip and valve stem cap end.


    A131901E06
  1. Install the valve rocker arms as shown in the illustration.
    Text in Illustration 
    *1
    Valve Rocker Arm
    *2
    Lash Adjuster
    *3
    Valve Stem
    *4
    Valve Stem Cap


11. INSTALL NO. 3 CAMSHAFT
  1. Apply a light coat of engine oil to the No. 3 camshaft journals and camshaft housing sub-assembly LH.

  1. Install the No. 3 camshaft to the camshaft housing sub-assembly LH.

    HINT:
    Perform "Inspection After Repair" after replacing the No. 3 camshaft (Click here).


12. INSTALL NO. 4 CAMSHAFT
  1. Apply a light coat of engine oil to the No. 4 camshaft journals and camshaft housing sub-assembly LH.

  1. Install the No. 4 camshaft to the camshaft housing sub-assembly LH.

    HINT:
    Perform "Inspection After Repair" after replacing the No. 4 camshaft (Click here).


13. INSTALL CAMSHAFT BEARING CAP (for Bank 2)
  1. Apply engine oil to the camshaft bearing caps.


    A134960
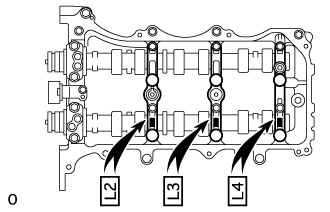
  1. Make sure of the marks and numbers on the camshaft bearing caps and place them in each proper position and direction.


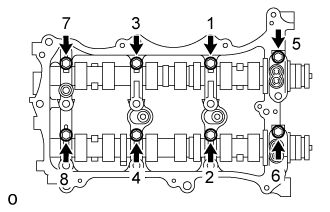
    A132217E01
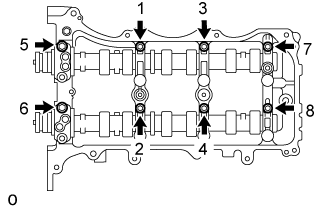
  1. Temporarily tighten the 8 bolts in the order shown in the illustration.

    Torque:
    10 N*m{ 102 kgf*cm , 7 ft.*lbf }


14. INSTALL CAMSHAFT HOUSING SUB-ASSEMBLY LH


    A131901E06
  1. Make sure that the valve rocker arm is installed as shown in the illustration.
    Text in Illustration 
    *1
    Valve Rocker Arm
    *2
    Lash Adjuster
    *3
    Valve Stem
    *4
    Valve Stem Cap


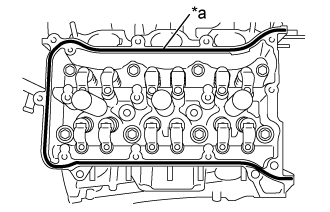
    A187877E01
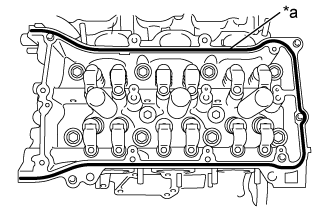
  1. Apply seal packing in a continuous line as shown in the illustration.
    Text in Illustration 
    *a
    Seal packing diameter
    (3.5 to 4.5 mm)

    Seal packing:
    Toyota Genuine Seal Packing Black, Three Bond 1207B or equivalent

    Standard seal diameter:
    3.5 to 4.5 mm (0.138 to 0.177 in.)

    NOTICE:
    1. Remove any oil from the contact surface.
    2. Install the camshaft housing sub-assembly LH within 3 minutes and tighten the bolts.
    3. Do not start the engine for at least 2 hours after installing.


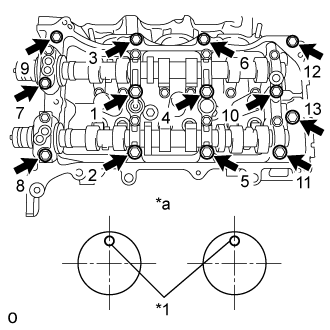
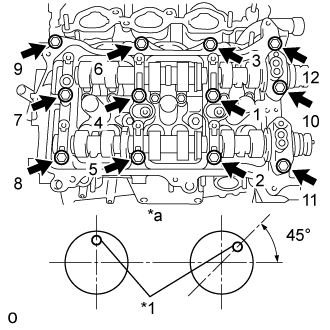
    A132219E06
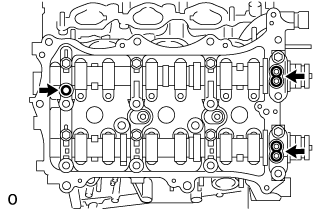
  1. Install the camshaft housing sub-assembly LH and tighten the 13 bolts in the order shown in the illustration.
    Text in Illustration 
    *1
    Knock Pin
    *a
    Front View

    Torque:
    28 N*m{ 286 kgf*cm , 21 ft.*lbf }

    NOTICE:
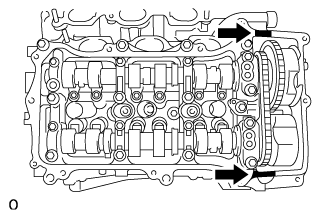
    1. When installing the camshaft housing sub-assembly LH, it is necessary to correctly position the camshafts as shown in the illustration. Failure to correctly position these parts may result in damage due to contact between the pistons and valves. If a camshaft is rotated, valve contact with a piston at TDC will occur.
    2. If any of the bolts are loosened during installation, remove the camshaft housing sub-assembly LH, clean the installation surfaces, and reapply seal packing.
    3. If the camshaft housing sub-assembly LH is removed because any of the bolts are loosened during installation, make sure that the previously applied seal packing does not enter any oil passages.


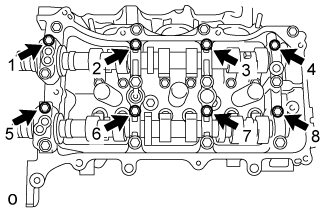
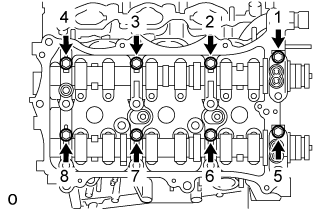
    A134891E02
  1. Tighten the 8 bolts in the order shown in the illustration.

    Torque:
    16 N*m{ 163 kgf*cm , 12 ft.*lbf }


15. INSTALL CAMSHAFT
  1. Apply a light coat of engine oil to the camshaft journals and camshaft housing sub-assembly RH.

  1. Install the camshaft to the camshaft housing sub-assembly RH.

    HINT:
    Perform "Inspection After Repair" after replacing the camshaft (Click here).


16. INSTALL NO. 2 CAMSHAFT
  1. Apply a light coat of engine oil to the No. 2 camshaft journals and camshaft housing sub-assembly RH.

  1. Install the No. 2 camshaft to the camshaft housing sub-assembly RH.

    HINT:
    Perform "Inspection After Repair" after replacing the No. 2 camshaft (Click here).


17. INSTALL CAMSHAFT BEARING CAP (for Bank 1)
  1. Apply engine oil to the camshaft bearing caps.


    A131902
  1. Make sure of the marks and numbers on the camshaft bearing caps and place them in each proper position and direction.


    A131903E01
  1. Temporarily tighten the 8 bearing cap bolts in the order shown in the illustration.

    Torque:
    10 N*m{ 102 kgf*cm , 7 ft.*lbf }


18. INSTALL CAMSHAFT HOUSING SUB-ASSEMBLY RH


    A131901E06
  1. Make sure that the No. 1 valve rocker arm sub-assembly is installed as shown in the illustration.
    Text in Illustration 
    *1
    Valve Rocker Arm
    *2
    Lash Adjuster
    *3
    Valve Stem
    *4
    Valve Stem Cap


    A187878E01
  1. Apply seal packing in a continuous line as shown in the illustration.
    Text in Illustration 
    *a
    Seal packing diameter
    (3.5 to 4.5 mm)

    Seal packing:
    Toyota Genuine Seal Packing Black, Three Bond 1207B or equivalent

    Standard seal diameter:
    3.5 to 4.5 mm (0.138 to 0.177 in.)

    NOTICE:
    1. Remove any oil from the contact surface.
    2. Install the camshaft housing sub-assembly RH within 3 minutes and tighten the bolts.
    3. Do not start the engine for at least 2 hours after installing.


    A131905E04
  1. Install the camshaft housing sub-assembly RH and tighten the 12 bolts in the order shown in the illustration.
    Text in Illustration 
    *1
    Knock Pin
    *a
    Front View

    Torque:
    28 N*m{ 286 kgf*cm , 21 ft.*lbf }

    NOTICE:
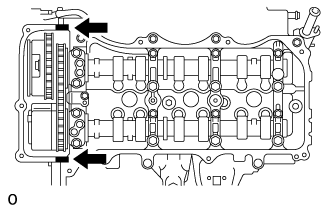
    1. When installing the camshaft housing RH, it is necessary to correctly position the camshafts as shown in the illustration.
      Failure to correctly position these parts may result in damage due to contact between the pistons and valves. If a camshaft is rotated, valve contact with a piston at TDC will occur.
    2. If any of the bolts are loosened during installation, remove the camshaft housing sub-assembly RH, clean the installation surfaces, and reapply seal packing.
    3. If the camshaft housing sub-assembly RH is removed because any of the bolts are loosened during installation, make sure that the previously applied seal packing does not enter any oil passages.


    A129701E02
  1. Tighten the 8 bolts in the order shown in the illustration.

    Torque:
    16 N*m{ 163 kgf*cm , 12 ft.*lbf }


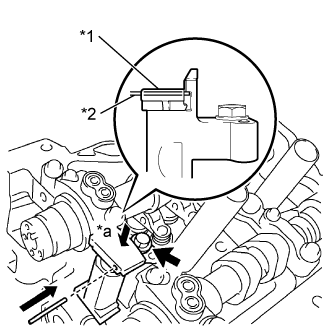
19. INSTALL NO. 3 CHAIN TENSIONER ASSEMBLY


    A121266E08
  1. Install the No. 3 chain tensioner assembly with the bolt.
    Text in Illustration 
    *1
    Plunger
    *2
    Pin
    *a
    Push

    Torque:
    21 N*m{ 214 kgf*cm , 15 ft.*lbf }

  1. While pushing in the tensioner, insert a pin of 1.0 mm (0.0394 in.) diameter into the hole to hold it.


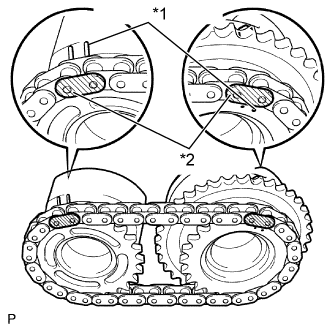
20. INSTALL CAMSHAFT TIMING GEARS AND NO. 2 CHAIN (for Bank 2)


    A094669E01
  1. Align the mark plates (yellow) with the timing marks of the camshaft timing gear assemblies as shown in the illustration.
    Text in Illustration 
    *1
    Timing Mark
    *2
    Mark Plate

  1. Apply a light coat of engine oil to the bolt threads and bolt-seating surface.

  1. Align the knock pin of the camshaft with the pin hole of the camshaft timing gear assembly. Install the camshaft timing gear assembly and camshaft timing exhaust gear assembly with the No. 2 chain sub-assembly installed.


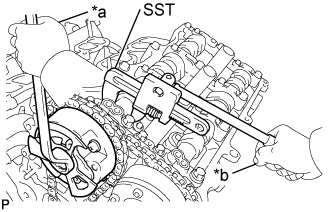
    A182778E06
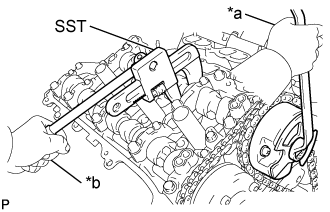
  1. Using SST to hold the hexagonal portion of each camshaft, tighten the flange bolts of the camshaft timing gear assembly and the camshaft timing exhaust gear assembly.
    Text in Illustration 
    *a
    Turn
    *b
    Hold

    SST
    09922-10010  

    Torque:
    100 N*m{ 1020 kgf*cm , 74 ft.*lbf }

  1. Remove the pin from the No. 3 chain tensioner assembly.

    HINT:
    Perform "Inspection After Repair" after replacing the camshaft timing gear assembly or camshaft timing exhaust gear assembly (Click here).


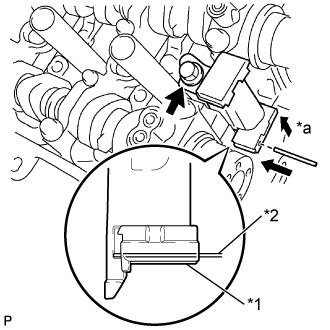
21. INSTALL NO. 2 CHAIN TENSIONER ASSEMBLY


    A121265E08
  1. Install the No. 2 chain tensioner assembly with the bolt.
    Text in Illustration 
    *1
    Plunger
    *2
    Pin
    *a
    Push

    Torque:
    21 N*m{ 214 kgf*cm , 15 ft.*lbf }

  1. While pushing in the No. 2 chain tensioner assembly, insert a pin of 1.0 mm (0.0394 in.) diameter into the hole to hold it.


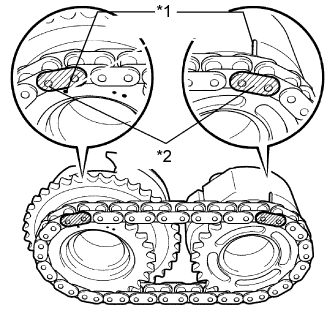
22. INSTALL CAMSHAFT TIMING GEARS AND NO. 2 CHAIN (for Bank 1)


    A124048E11
  1. Align the mark plates (yellow) with the timing marks of the camshaft timing gear assemblies as shown in the illustration.
    Text in Illustration 
    *1
    Timing Mark
    *2
    Mark Plate

  1. Apply a light coat of engine oil to the bolt threads and bolt-seating surface.

  1. Align the knock pin of the camshaft with the pin hole of the camshaft timing gear assembly. Install the camshaft timing gear assembly and camshaft timing exhaust gear assembly with the No. 2 chain sub-assembly installed.


    A182777E06
  1. Using SST to hold the hexagonal portion of each camshaft, tighten the flange bolts of the camshaft timing gear assembly and the camshaft timing exhaust gear assembly.
    Text in Illustration 
    *a
    Turn
    *b
    Hold

    SST
    09922-10010  

    Torque:
    100 N*m{ 1020 kgf*cm , 74 ft.*lbf }

  1. Remove the pin from the No. 2 chain tensioner assembly.

    HINT:
    Perform "Inspection After Repair" after replacing the camshaft timing gear assembly or camshaft timing exhaust gear assembly (Click here).


23. INSTALL NO. 1 CHAIN VIBRATION DAMPER


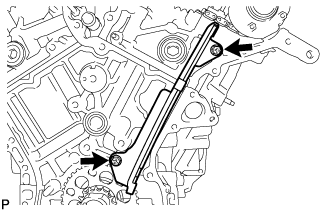
    A120649
  1. Install the No. 1 chain vibration damper with the 2 bolts.

    Torque:
    23 N*m{ 230 kgf*cm , 17 ft.*lbf }


24. INSTALL NO. 2 CHAIN VIBRATION DAMPER
  1. Install the 2 No. 2 chain vibration dampers.


25. INSTALL CRANKSHAFT TIMING SPROCKET


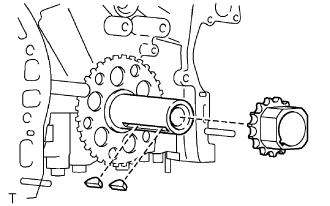
    A109720
  1. Install the 2 keys and crankshaft timing sprocket as shown in the illustration.


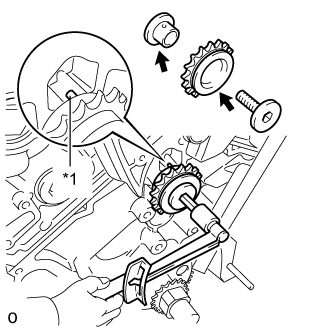
26. INSTALL IDLE SPROCKET ASSEMBLY


    A132222E03
  1. Apply a light coat of engine oil to the rotating surface of the No. 1 idle gear shaft.
    Text in Illustration 
    *1
    Knock Pin

  1. Temporarily install the No. 1 idle gear shaft and idle sprocket assembly with the No. 2 idle gear shaft while aligning the knock pin of the No. 1 idle gear shaft with the knock pin groove of the cylinder block.

    NOTICE:
    Be careful of the idle sprocket installation position.

    HINT:
    Check that no foreign objects are on the No. 1 and No. 2 idle gear shafts.

  1. Using a 10 mm hexagon wrench, tighten the No. 2 idle gear shaft.

    Torque:
    60 N*m{ 612 kgf*cm , 44 ft.*lbf }

    HINT:
    After installing the idle sprocket assembly, check that the idle sprocket turns smoothly.


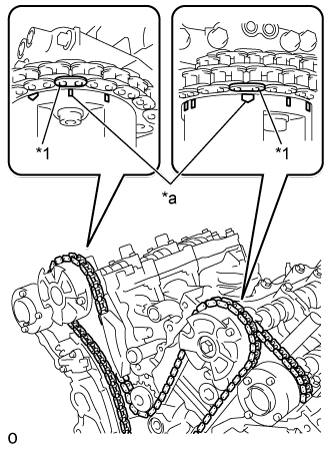
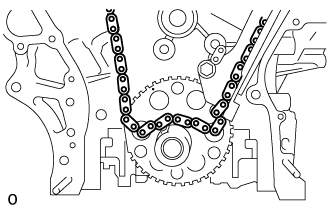
27. INSTALL CHAIN SUB-ASSEMBLY


    A132223E04
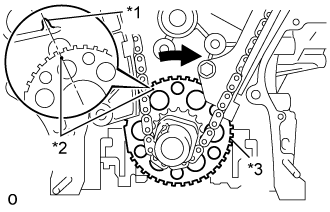
  1. Align the mark plates and timing marks as shown in the illustration and install the chain sub-assembly.
    Text in Illustration 
    *1
    Mark Plate
    *a
    Timing Mark

    HINT:
    The camshaft mark plates are orange.


    A134890
  1. Do not pass the chain sub-assembly over the crankshaft, just temporarily place it on the crankshaft.


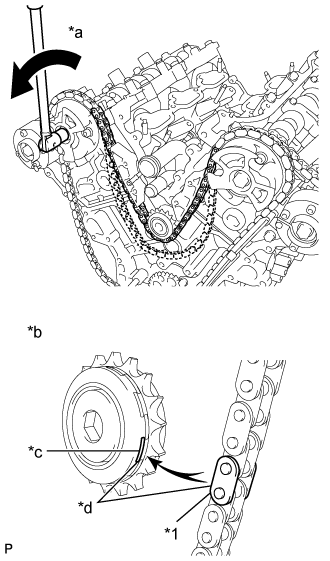
    A122184E15
  1. Turn the camshaft timing gear assembly on bank 1 counterclockwise to tighten the chain sub-assembly between the banks.
    Text in Illustration 
    *1
    Mark Plate
    *a
    Turn
    *b
    When the idle sprocket is reused
    *c
    Mark
    *d
    Align

    NOTICE:
    When the idle sprocket assembly is reused, align the chain plate with the mark where the plate had been in order to tighten the chain sub-assembly between the banks.


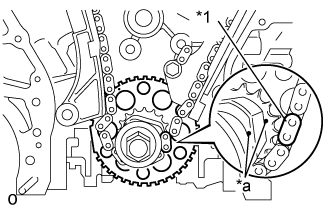
    A132224E05
  1. Align the mark plate and timing marks as shown in the illustration and install the chain sub-assembly onto the crankshaft timing sprocket.
    Text in Illustration 
    *1
    Mark Plate
    *a
    Timing Mark

    HINT:
    The crankshaft mark plate is yellow.

  1. Temporarily tighten the pulley set bolt.


    A205165E03
  1. Turn the crankshaft clockwise to set it to the RH block bore center line (TDC/compression).
    Text in Illustration 
    *1
    Center Line
    *2
    Timing Mark
    *3
    Sensor Plate


28. INSTALL CHAIN TENSIONER SLIPPER
  1. Install the chain tensioner slipper.


29. INSTALL NO. 1 CHAIN TENSIONER ASSEMBLY


    A132225E04
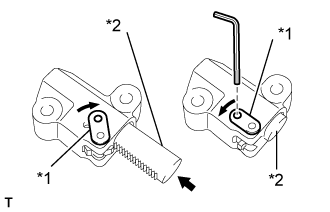
  1. Move the stopper plate upward to release the lock, and push the plunger deep into the No. 1 chain tensioner assembly.
    Text in Illustration 
    *1
    Stopper Plate
    *2
    Plunger

  1. Move the stopper plate downward to set the lock, and insert a hexagon wrench into the hole of the stopper plate.


    A095165
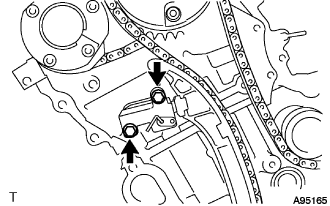
  1. Install the No. 1 chain tensioner assembly with the 2 bolts.

    Torque:
    10 N*m{ 102 kgf*cm , 7 ft.*lbf }

  1. Remove the hexagon wrench from the No. 1 chain tensioner assembly.


30. INSPECT VALVE TIMING
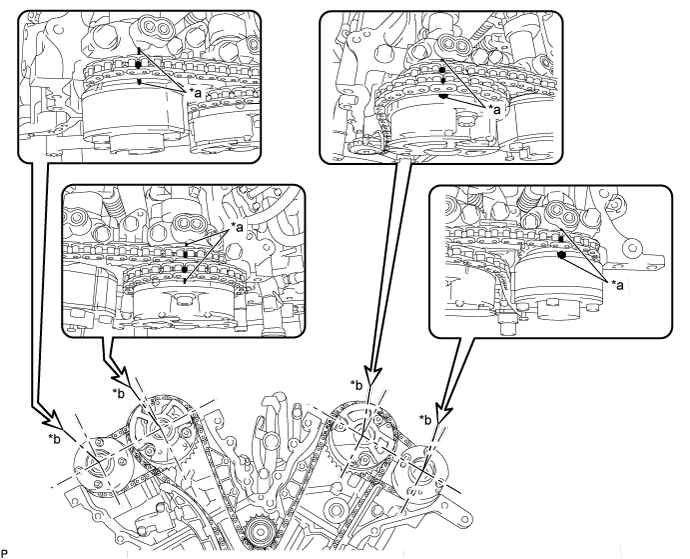
  1. Check the camshaft timing marks.

    NOTICE:
    1. Check each timing mark from a viewpoint directly in line with the center of the camshaft and the timing mark on each camshaft timing gear assembly.
    2. If the timing marks are checked from any other viewpoint, the valve timing may appear misaligned.


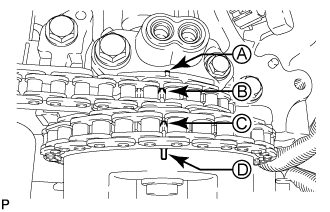
  1. Check that each camshaft timing mark is positioned as shown in the illustration.


    A182779E06


    Text in Illustration 
    *a
    Timing Mark
    *b
    Viewpoint

    HINT:
    A182780E01
    For the intake camshaft:
    Be sure to check mark A at the point when marks B, C, and D are positioned in line. If the marks are checked from any other viewpoint, they cannot be checked correctly.

  1. If the valve timing is misaligned, reinstall the timing chain sub-assembly and No. 2 chain sub-assembly.

  1. Remove the pulley set bolt.


31. INSTALL TIMING CHAIN CASE OIL SEAL


    A125109E04
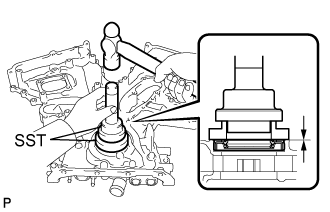
  1. Using SST, tap in a new oil seal until its surface is flush with the timing chain case edge.

    SST
    09223-22010  
    09506-35010  

    NOTICE:
    1. Keep the lip free from foreign matter.
    2. Do not tap on the oil seal at an angle.
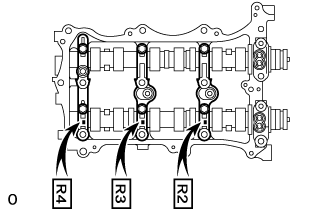
    3. Make sure that the oil seal edge does not stick out of the timing chain case.
    HINT:
    Tap in the oil seal so that it is positioned within 1.0 mm from the edge of the timing chain case.
  1. Apply a light coat of MP grease to the timing chain cover oil seal lip.


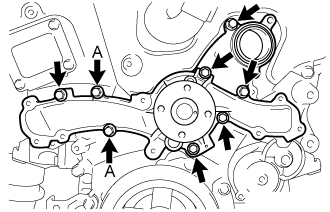
32. INSTALL ENGINE WATER PUMP ASSEMBLY


    A192425E01
  1. Install a new water pump gasket and the engine water pump assembly with the 8 bolts.

    Torque:
    11 N*m{ 112 kgf*cm , 8 ft.*lbf }

    NOTICE:
    Be sure to replace the bolts indicated by A with new ones or reuse them after applying adhesive 1344.


33. INSTALL TIMING CHAIN COVER SUB-ASSEMBLY


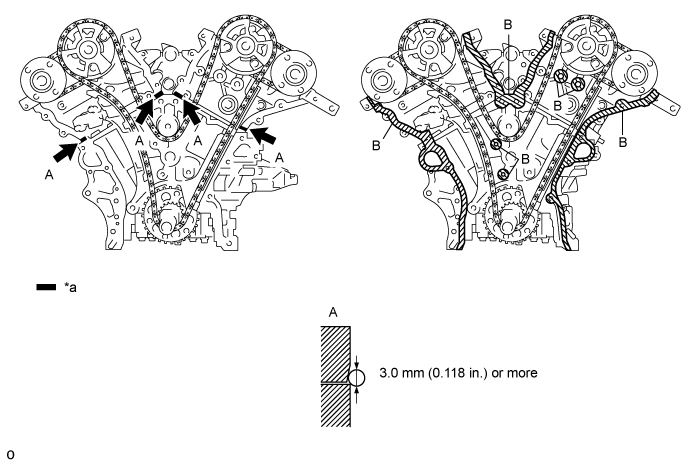
  1. Apply seal packing in a continuous line to the engine unit as shown in the following illustration.


    A132228E13


    Text in Illustration 
    *a
    Seal Packing
    -
    -

    Seal packing:
    Toyota Genuine Seal Packing Black, Three Bond 1207B or equivalent

    Seal diameter:
    3.0 mm (0.118 in.)

    NOTICE:
    1. Be sure to clean and degrease the contact surfaces, especially the surfaces indicated by B in the illustration.
    2. If there is oil on the contact surfaces, wipe them with an oil-free cloth before applying seal packing.
    3. Install the timing chain cover sub-assembly within 3 minutes of applying seal packing.
    4. Do not start the engine for at least 2 hours after installation.


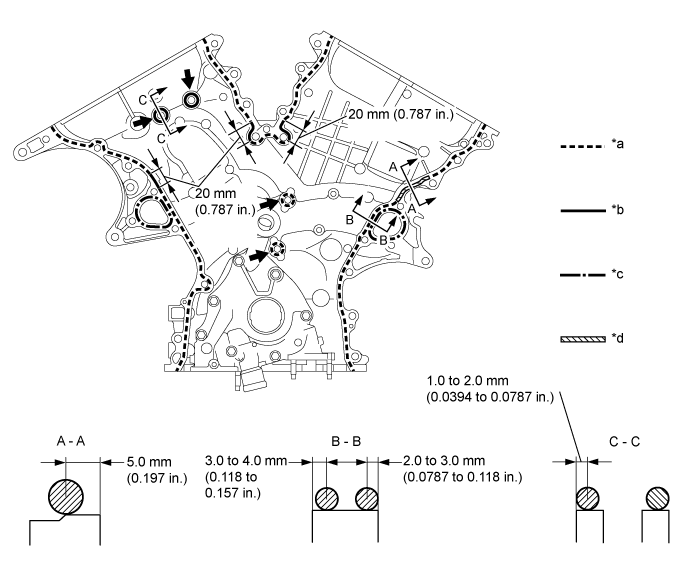
  1. Apply seal packing in a continuous line to the timing chain cover sub-assembly as shown in the following illustration.


    A187885E01


    Text in Illustration 
    *a
    Dashed line area
    (Seal packing: Toyota Genuine Seal Packing Black, Three Bond 1207B or equivalent)
    *b
    Continuous line area
    (Seal packing: Toyota Genuine Seal Packing Black, Three Bond 1207B or equivalent)
    *c
    Alternate long and short dashed line area
    (Seal packing: Toyota Genuine Seal Packing 1282B, Three Bond 1282B or equivalent)
    *d
    Diagonal line area
    (Seal packing: Toyota Genuine Seal Packing Black, Three Bond 1207B or equivalent)
    V100135
    Be sure to apply seal packing
    -
    -

    Seal packing:
    Toyota Genuine Seal Packing Black, Three Bond 1207B or equivalent
    Toyota Genuine Seal Packing 1282B, Three Bond 1282B or equivalent

    NOTICE:
    1. If there is oil on the contact surfaces, wipe them with an oil-free cloth before applying seal packing.
    2. Install the timing chain cover sub-assembly within 3 minutes and tighten the bolts within 15 minutes of applying seal packing.
    3. Do not start the engine for at least 2 hours after installation.


    Seal Packing Application Chart 
    Area
    Seal Packing Diameter
    Application Position from Inside Seal Line
    Continuous Line Area
    4.5 mm (0.177 in.) or more
    1.0 to 2.0 mm (0.0394 to 0.0787 in.)
    Alternate Long and Short Dashed Line Area
    3.5 mm (0.138 in.) or more
    2.0 to 3.0 mm (0.0787 to 0.118 in.)
    Dashed Line Area
    3.5 mm (0.138 in.) or more
    3.0 to 4.0 mm (0.118 to 0.158 in.)
    Diagonal Line Area
    6.0 mm (0.236 in.) or more
    5.0 mm (0.197 in.)


    A128017
  1. Install a new gasket.


    A132229E07
  1. Align the oil pump's drive rotor spline and the crankshaft as shown in the illustration. Install the spline and timing chain cover sub-assembly to the crankshaft.
    Text in Illustration 
    *1
    Drive Rotor Spline
    *2
    Crankshaft


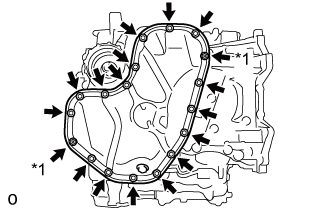
    A187948E01
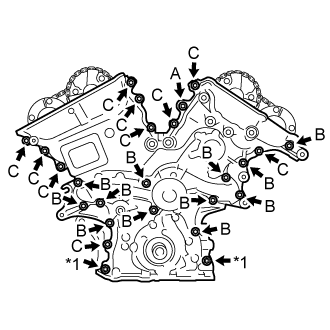
  1. Temporarily tighten the timing chain cover sub-assembly with the 23 bolts and 2 nuts.
    Text in Illustration 
    *1
    Nut
    Bolt Length 
    Item
    Length
    Bolt A
    40 mm (1.57 in.)
    Bolt B
    55 mm (2.17 in.)
    Bolt C
    28 mm (1.102 in.)

    NOTICE:
    Make sure that there is no oil on the threads of the bolts (B) and (C).


    A187949E01
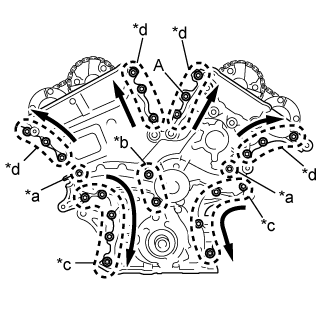
  1. Fully tighten the bolts in this order: Area 1 and Area 2.
    Text in Illustration 
    *a
    Area 1
    *b
    Area 2
    *c
    Area 3
    *d
    Area 4

    Torque:
    21 N*m{ 214 kgf*cm , 15 ft.*lbf }

  1. Fully tighten the bolts and nuts in Area 3.

    Torque:
    21 N*m{ 214 kgf*cm , 15 ft.*lbf }

    HINT:
    Tighten the bolts and nuts from top to bottom as shown in the illustration.

  1. Fully tighten the bolts in Area 4.

    Torque:
    Bolt A:
    43 N*m{ 438 kgf*cm , 32 ft.*lbf }

    Torque:
    Except bolt A:
    21 N*m{ 214 kgf*cm , 15 ft.*lbf }

    HINT:
    Tighten the bolts from bottom to top as shown in the illustration.

  1. Install a new timing chain cover plate gasket and the timing chain cover plate with the 4 bolts.

    Torque:
    9.1 N*m{ 93 kgf*cm , 81 in.*lbf }


34. INSTALL WATER INLET HOUSING


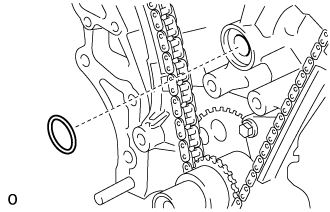
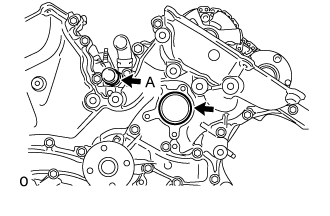
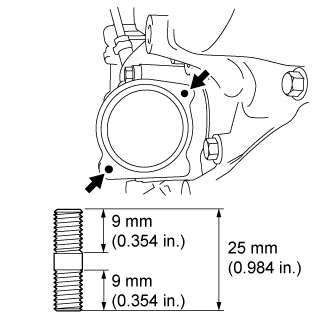
    A129675E01
  1. Install 2 new O-rings.

    HINT:
    Apply a small amount of water or soapy water to the O-ring (A) shown in the illustration before installation.


    A137975E02
  1. Install the 2 stud bolts.

    Torque:
    4.0 N*m{ 41 kgf*cm , 35 in.*lbf }


    A134879E03
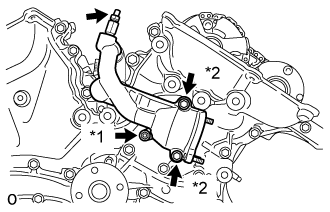
  1. Install the water inlet housing with the 2 bolts and nut.
    Text in Illustration 
    *1
    Nut
    *2
    Bolt

    Torque:
    10 N*m{ 102 kgf*cm , 7 ft.*lbf }

    NOTICE:
    Be careful that the O-ring does not get caught between the parts.

  1. Connect the No. 1 water by-pass hose.

  1. Apply adhesive around the drain cock assembly.

    Adhesive:
    Toyota Genuine Adhesive 1324, Three Bond 1324 or equivalent

  1. Install the drain cock assembly to the water inlet housing.

    Torque:
    30 N*m{ 306 kgf*cm , 22 ft.*lbf }

  1. Install the drain cock plug to the drain cock assembly.

    Torque:
    13 N*m{ 130 kgf*cm , 9 ft.*lbf }

  1. Install a new gasket to the thermostat.


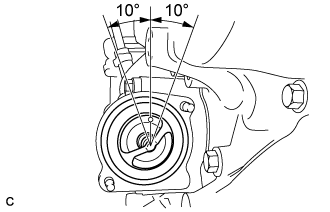
    A134896E01
  1. Align the thermostat jiggle valve with the upper stud bolt, and insert the thermostat in the water inlet housing.

    HINT:
    The jiggle valve may be set within 10° of either side of the prescribed position.


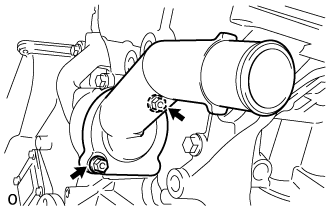
    A129673
  1. Install the water inlet with the 2 nuts.

    Torque:
    10 N*m{ 102 kgf*cm , 7 ft.*lbf }


35. INSTALL NO. 1 FRONT ENGINE MOUNTING BRACKET LH


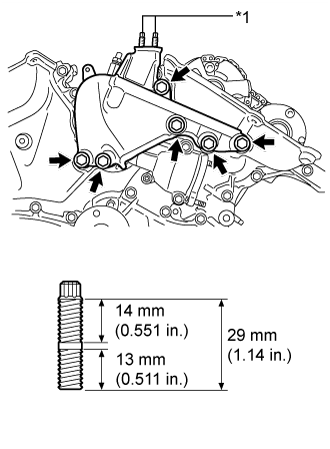
    A134961E03
  1. Using an E8 "TORX" socket wrench, install the 2 stud bolts.
    Text in Illustration 
    *1
    Stud Bolt

    Torque:
    10 N*m{ 102 kgf*cm , 7 ft.*lbf }

  1. Install the No. 1 front engine mounting bracket LH with the 6 bolts.

    Torque:
    54 N*m{ 550 kgf*cm , 40 ft.*lbf }

    NOTICE:
    1. Install the water inlet and No. 1 front engine mounting bracket LH within 15 minutes of installing the timing chain cover sub-assembly.
    2. Do not start the engine for at least 2 hours after installation.


36. INSTALL NO. 1 OIL PAN BAFFLE PLATE


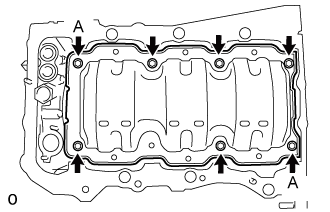
    A129685E01
  1. Install the No. 1 oil pan baffle plate with the 7 bolts.

    Torque:
    10 N*m{ 102 kgf*cm , 7 ft.*lbf }

    HINT:
    Temporarily tighten the 7 bolts. Fully tighten the 2 bolts (A) shown in the illustration before tightening the other bolts.


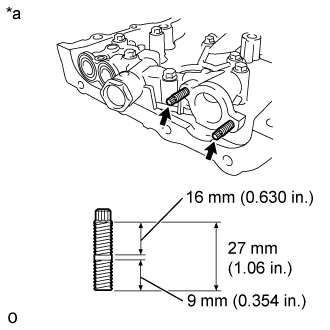
37. INSTALL OIL PAN SUB-ASSEMBLY


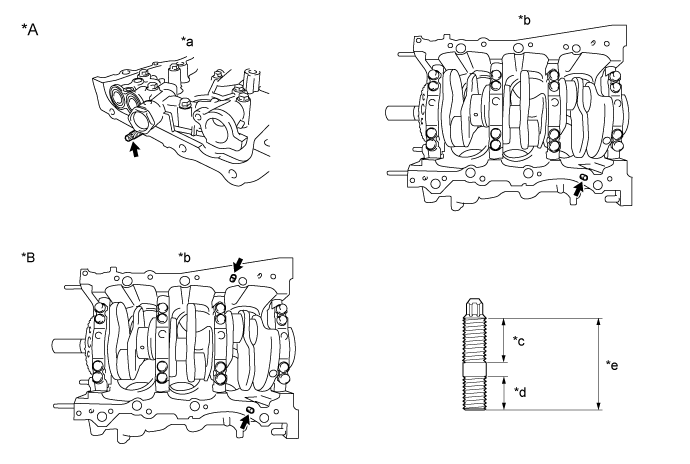
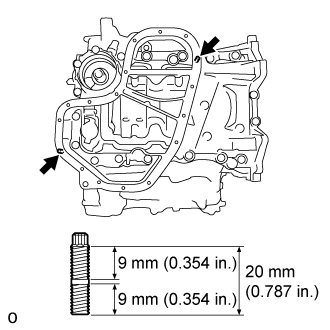
  1. Using an E8 "TORX" socket wrench, install the 2 stud bolts.


    A374606E01


    Text in Illustration 
    *A
    Type A
    *B
    Type B
    *a
    Timing Chain Cover Sub-assembly Side
    *b
    Cylinder Block Sub-assembly Bottom Side
    *c
    20 mm (0.787 in.)
    *d
    13 mm (0.512 in.)
    *e
    35 mm (1.38 in.)
    -
    -

    Torque:
    10 N*m{ 102 kgf*cm , 7 ft.*lbf }


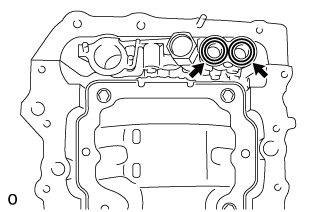
    A129684
  1. Install 2 new O-rings.


    A187880E01
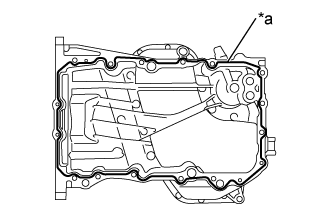
  1. Apply seal packing in a continuous line as shown in the illustration.
    Text in Illustration 
    *a
    Seal Diameter

    Seal packing:
    Toyota Genuine Seal Packing Black, Three Bond 1207B or equivalent

    Seal diameter:
    3.0 to 4.0 mm (0.118 to 0.157 in.)

    NOTICE:
    1. Remove any oil from the contact surface.
    2. Install the oil pan sub-assembly within 3 minutes of after applying seal packing.
    3. Do not start the engine for at least 2 hours after installation.


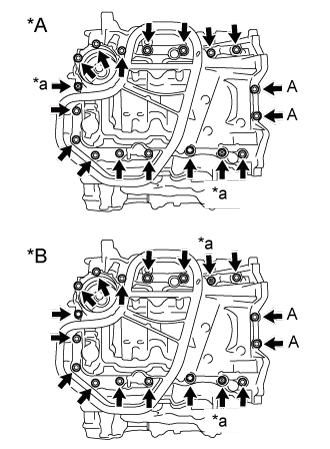
    A376952E02
  1. Install the oil pan sub-assembly with the 16 bolts and 2 nuts.
    Text in Illustration 
    *A
    Type A
    *B
    Type B
    *a
    Nut

    Torque:
    Bolts A:
    10 N*m{ 102 kgf*cm , 7 ft.*lbf }
    Except bolts A:
    21 N*m{ 214 kgf*cm , 15 ft.*lbf }


38. INSTALL OIL STRAINER SUB-ASSEMBLY


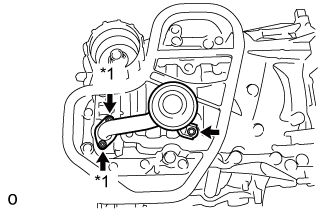
    A134963E07
  1. Using an E6 "TORX" socket wrench, install the 2 stud bolts as shown in the illustration.
    Text in Illustration 
    *a
    Timing Chain Cover

    Torque:
    4.0 N*m{ 41 kgf*cm , 35 in.*lbf }


    A129681E02
  1. Install a new gasket and the oil strainer sub-assembly with the bolt and 2 nuts.
    Text in Illustration 
    *1
    Nut

    Torque:
    10 N*m{ 102 kgf*cm , 7 ft.*lbf }


39. INSTALL NO. 2 OIL PAN SUB-ASSEMBLY


    A134964E02
  1. Using an E6 "TORX" socket wrench, install the 2 stud bolts as shown in the illustration.

    Torque:
    4.0 N*m{ 41 kgf*cm , 35 in.*lbf }


    A187881E01
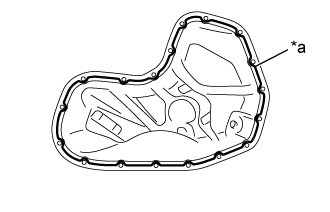
  1. Apply seal packing in a continuous line as shown in the illustration.
    Text in Illustration 
    *a
    Seal Diameter

    Seal packing:
    Toyota Genuine Seal Packing Black, Three Bond 1207B or equivalent

    Seal diameter:
    3.0 to 4.0 mm (0.118 to 0.157 in.)

    NOTICE:
    1. Remove any oil from the contact surface.
    2. Install the No. 2 oil pan sub-assembly within 3 minutes of applying seal packing.
    3. Do not start the engine for at least 2 hours after installation.


    A129680E02
  1. Install the No. 2 oil pan sub-assembly with the 16 bolts and 2 nuts.
    Text in Illustration 
    *1
    Nut

    Torque:
    10 N*m{ 102 kgf*cm , 7 ft.*lbf }


40. INSTALL OIL PAN DRAIN PLUG


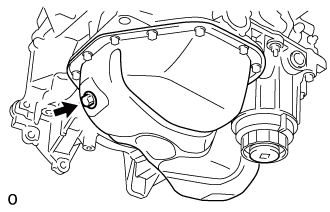
    A129654
  1. Install a new oil pan drain plug gasket and the oil pan drain plug.

    Torque:
    40 N*m{ 408 kgf*cm , 30 ft.*lbf }


41. INSTALL CYLINDER HEAD COVER SUB-ASSEMBLY


    A187882
  1. Apply seal packing as shown in the illustration.
    Text in Illustration 
    V100135
    Seal Packing

    Seal packing:
    Toyota Genuine Seal Packing Black, Three Bond 1207B or equivalent

    NOTICE:
    1. Remove any oil from the contact surface.
    2. Install the cylinder head cover sub-assembly within 3 minutes of applying seal packing.
    3. Do not start the engine for at least 2 hours after installation.


    A129699
  1. Install 3 new gaskets as shown in the illustration.

  1. Install a new cylinder head cover gasket to the cylinder head cover sub-assembly.


    A129679E01
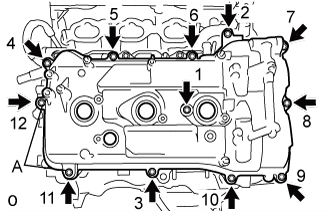
  1. Install the cylinder head cover sub-assembly with the 12 bolts and a new seal washer.

    Torque:
    Bolts A:
    21 N*m{ 214 kgf*cm , 15 ft.*lbf }
    Except bolts A:
    10 N*m{ 102 kgf*cm , 7 ft.*lbf }

    HINT:
    After tightening all bolts, check the tightening torque of 1 and 11. Retighten the bolt if necessary.


42. INSTALL CYLINDER HEAD COVER SUB-ASSEMBLY LH


    A187886
  1. Apply seal packing as shown in the illustration.
    Text in Illustration 
    V100135
    Seal Packing

    Seal packing:
    Toyota Genuine Seal Packing Black, Three Bond 1207B or equivalent

    NOTICE:
    1. Remove any oil from the contact surfaces.
    2. Install the cylinder head cover sub-assembly LH within 3 minutes of applying seal packing.
    3. Do not start the engine for at least 2 hours after installation.


    A129705
  1. Install 3 new gaskets as shown in the illustration.

  1. Install a new No. 2 cylinder head cover gasket to the cylinder head cover sub-assembly LH.


    A129678E04
  1. Install the cylinder head cover sub-assembly LH with the 12 bolts and a new seal washer.

    Torque:
    Bolts A:
    21 N*m{ 214 kgf*cm , 15 ft.*lbf }
    Except bolts A:
    10 N*m{ 102 kgf*cm , 7 ft.*lbf }

    HINT:
    After tightening all bolts, check the tightening torque of 1 and 10. Retighten the bolt if necessary.


43. INSTALL WATER OUTLET


    A129677
  1. Install 2 new gaskets and a new O-ring.

    HINT:
    Apply soapy water to the O-ring.


    A129676E02
  1. Install the water outlet with the 2 bolts and 4 nuts.
    Text in Illustration 
    *1
    Nut
    *2
    Bolt

    Torque:
    10 N*m{ 102 kgf*cm , 7 ft.*lbf }

    NOTICE:
    Be careful that the O-ring does not get caught between the parts.


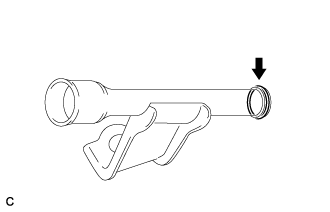
44. INSTALL ENGINE OIL LEVEL DIPSTICK GUIDE


    A171897
  1. Apply a light coat of engine oil to a new O-ring and install it to the engine oil level dipstick guide.


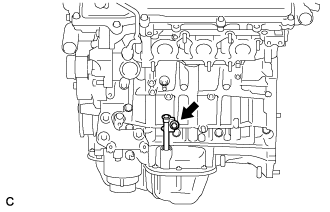
    A192400
  1. Install the engine oil level dipstick guide with the bolt.

    Torque:
    21 N*m{ 214 kgf*cm , 15 ft.*lbf }


45. INSTALL CRANKSHAFT PULLEY
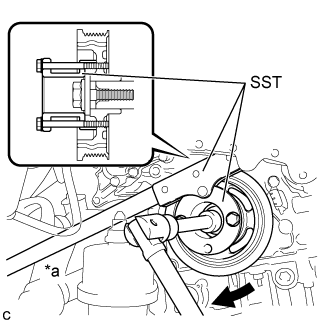
  1. Align the pulley set key with the key groove of the pulley, and slide on the pulley.


    A208602E03
  1. Using SST, install the pulley bolt.

    SST
    09213-70011   (09213-70020)
    09330-00021  

    Torque:
    260 N*m{ 2651 kgf*cm , 192 ft.*lbf }

    Text in Illustration 
    *a
    Hold
    V100135
    Turn


46. INSTALL OIL FILTER CAP ASSEMBLY
  1. Clean the inside of the oil filter cap, threads and O-ring groove.


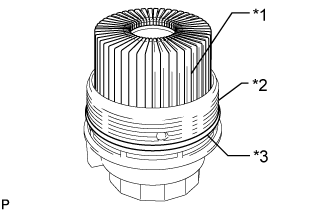
    A128001E06
  1. Apply a light coat of engine oil to a new O-ring and install it to the oil filter cap.
    Text in Illustration 
    *1
    Oil Filter Element
    *2
    Oil Filter Cap
    *3
    O-ring

    NOTICE:
    Make sure that the O-ring does not get twisted on the groove.

  1. Install a new oil filter element to the oil filter cap.

  1. Remove all dirt and foreign matter from the installation surface and the inside of the cap on the engine side.

  1. Apply a light coat of engine oil to the O-ring again and install the oil filter cap.

    NOTICE:
    Make sure that the O-ring does not get caught between the parts.


    A128002E02
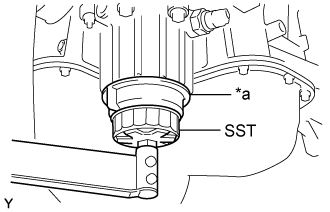
  1. Using SST, install the oil filter cap.
    Text in Illustration 
    *a
    No Clearance

    SST
    09228-06501  

    Torque:
    25 N*m{ 255 kgf*cm , 18 ft.*lbf }

    NOTICE:
    Make sure that there is no clearance between the parts after tightening the oil filter cap.


    A161390E03
  1. Apply a light coat of engine oil to a new O-ring and install it to the oil filter cap.
    Text in Illustration 
    *1
    O-ring

    NOTICE:
    Remove all dirt and foreign matter from the installation surface.

  1. Install the oil filter drain plug to the oil filter cap.

    Torque:
    13 N*m{ 127 kgf*cm , 10 ft.*lbf }

    NOTICE:
    Make sure that the O-ring does not get caught between the parts.


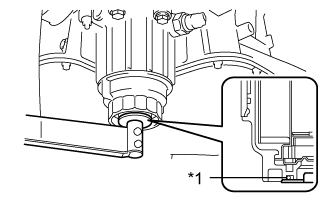
47. INSTALL CYLINDER BLOCK WATER DRAIN COCK SUB-ASSEMBLY
  1. for Bank 1:

    1. Apply adhesive around the cylinder block water drain cock sub-assembly.


  1. for Bank 2:

    HINT:
    Perform this operation only when a taper screw plug is not installed.


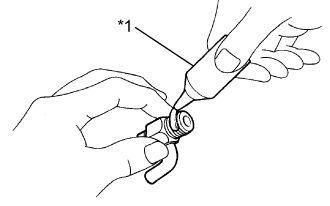
      A076531E08
    1. Apply adhesive around the cylinder block water drain cock sub-assembly.
      Text in Illustration 
      *1
      Adhesive

      Adhesive:
      Toyota Genuine Adhesive 1324, Three Bond 1324 or equivalent

  1. for Bank 1:

    1. Install the cylinder block water drain cock sub-assembly as shown in the illustration.

      Torque:
      25 N*m{ 255 kgf*cm , 18 ft.*lbf }


  1. for Bank 2:

    HINT:
    Perform this operation only when a taper screw plug is not installed.


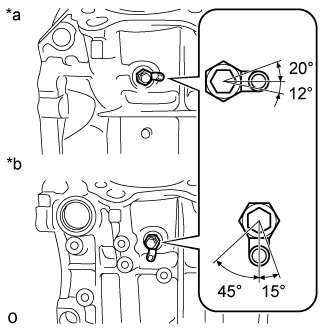
      A135830E07
    1. Install the cylinder block water drain cock sub-assembly as shown in the illustration.
      Text in Illustration 
      *a
      for Bank 1
      *b
      for Bank 2

      Torque:
      25 N*m{ 255 kgf*cm , 18 ft.*lbf }

      NOTICE:
      Do not rotate the cylinder block water drain cock sub-assembly more than 1 revolution (360°) after tightening the cylinder block water drain cock sub-assembly to the specified torque.

  1. for Bank 1:

    1. Install the cylinder block water drain cock plug to the cylinder block water drain cock sub-assembly.

      Torque:
      13 N*m{ 130 kgf*cm , 9 ft.*lbf }

  1. for Bank 2:

    HINT:
    Perform this operation only when a taper screw plug is not installed.


    1. Install the cylinder block water drain cock plug to the cylinder block water drain cock sub-assembly.

      Torque:
      13 N*m{ 130 kgf*cm , 9 ft.*lbf }


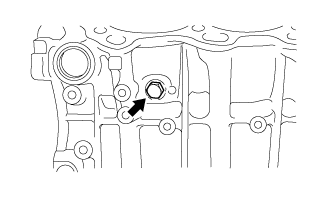
48. INSTALL TAPER SCREW PLUG


A292824

HINT:
Perform this operation only when a taper screw plug is installed.

  1. Apply adhesive around the taper screw plug.

  1. Install the taper screw plug to the cylinder block.

    Torque:
    13 N*m{ 130 kgf*cm , 9 ft.*lbf }


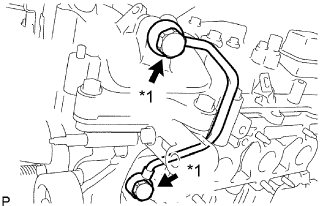
49. INSTALL NO. 1 OIL PIPE
  1. Make sure that there is no foreign matter on the mesh of the oil control valve filter LH.

    NOTICE:
    Do not touch the mesh when installing the oil control valve filter LH.


    A135726E02
  1. Install the oil control valve filter LH to the oil pipe union. Install new gaskets and temporarily install the No. 1 oil pipe (on the head cover side) with the union.
    Text in Illustration 
    *1
    Oil Pipe Union

  1. Install a new gasket and temporarily install the No. 1 oil pipe (on the cylinder head side) with the union.

  1. Tighten the oil pipe union (on the head cover side).

    Torque:
    65 N*m{ 663 kgf*cm , 48 ft.*lbf }

  1. Tighten the oil pipe union (on the cylinder head side).

    Torque:
    65 N*m{ 663 kgf*cm , 48 ft.*lbf }

    NOTICE:
    If the link that connects the gaskets is broken, remove the connecting link by using side cutters or a similar tool.


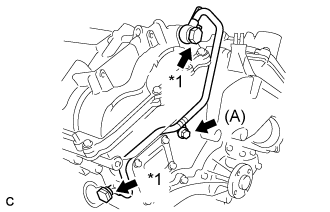
50. INSTALL OIL PIPE
  1. Make sure that there is no foreign matter on the mesh of the oil control valve filter RH.

    NOTICE:
    Do not touch the mesh when installing the oil control valve filter RH.


    A200607E05
  1. Install the oil control valve filter RH to the oil pipe union. Install new gaskets and temporarily install the oil pipe (on the head cover side) with the union.
    Text in Illustration 
    *1
    Oil Pipe Union

  1. Install a new gasket and temporarily install the oil pipe (on the cylinder head side) with the union.

  1. Install the bolt (A) to the cylinder head.

    Torque:
    10 N*m{ 102 kgf*cm , 7 ft.*lbf }

  1. Tighten the oil pipe union (on the head cover side).

    Torque:
    65 N*m{ 663 kgf*cm , 48 ft.*lbf }

  1. Tighten the oil pipe union (on the cylinder head side).

    Torque:
    65 N*m{ 663 kgf*cm , 48 ft.*lbf }

    NOTICE:
    If the link that connects the gaskets is broken, remove the connecting link by using side cutters or a similar tool.


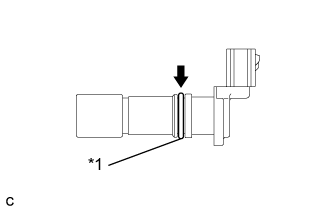
51. INSTALL CRANK POSITION SENSOR


    A191152E02
  1. Apply a light coat of engine oil to the O-ring on the crank position sensor.
    Text in Illustration 
    *1
    O-ring

  1. Install the crank position sensor with the bolt.

    Torque:
    10 N*m{ 102 kgf*cm , 7 ft.*lbf }

  1. Connect the crank position sensor connector.


52. INSTALL CAMSHAFT TIMING OIL CONTROL VALVE ASSEMBLY


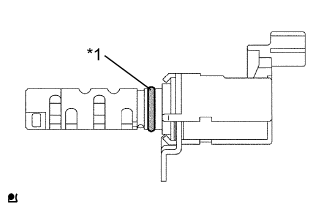
    A090053E06
  1. Apply a light coat of engine oil to 4 new O-rings and install them to the 4 camshaft timing oil control valve assemblies.
    Text in Illustration 
    *1
    New O-ring

  1. Install the 4 oil control valves with the 4 bolts.

    Torque:
    10 N*m{ 102 kgf*cm , 7 ft.*lbf }

    NOTICE:
    Make sure that each O-ring is not cracked or does not jump out of position during installation.

  1. Connect the 4 oil control valve connectors.


53. INSTALL VVT SENSOR
  1. Install the 4 sensors with the 4 bolts.

    Torque:
    10 N*m{ 102 kgf*cm , 7 ft.*lbf }

  1. Connect the 4 sensor connectors.


54. INSTALL VENTILATION VALVE SUB-ASSEMBLY
  1. Apply adhesive around the ventilation valve sub-assembly.

    Adhesive:
    Toyota Genuine Adhesive 1324, Three Bond 1324 or equivalent


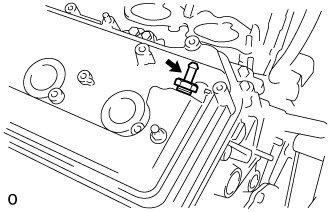
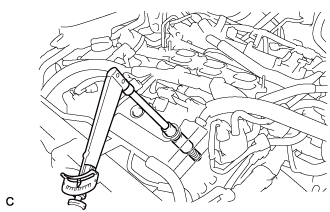
    A129655
  1. Using a deep socket wrench 19 mm, install the ventilation valve sub-assembly.

    Torque:
    27 N*m{ 275 kgf*cm , 20 ft.*lbf }


55. INSTALL SPARK PLUG


    A191153
  1. Install the 6 spark plugs.

    Torque:
    18 N*m{ 184 kgf*cm , 13 ft.*lbf }

    HINT:
    Perform "Inspection After Repairs" after replacing the spark plug (Click here).


56. INSTALL OIL FILLER CAP SUB-ASSEMBLY
  1. Install a new oil filler gasket.

  1. Install the oil filler cap sub-assembly.