Home › Vehicle Exterior › WINDOW / GLASS › WINDOW DEFOGGER SYSTEM

WINDOW DEFOGGER SYSTEM > TERMINALS OF ECU

for Preparation Click here


CHECK AIR CONDITIONING AMPLIFIER ASSEMBLY


  1. Disconnect the I77 air conditioning amplifier assembly connector.
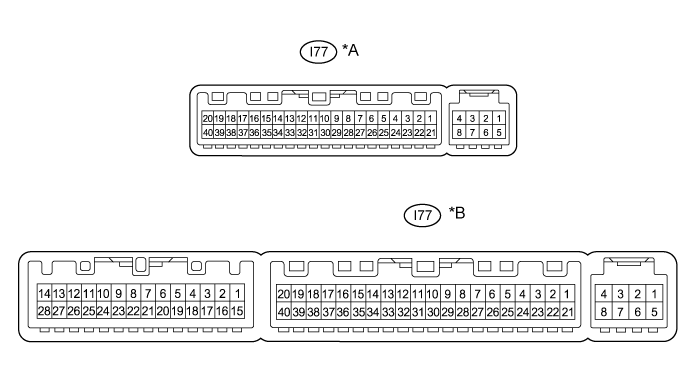

    B401680E01


    Text in Illustration 
    *A
    air conditioning amplifier assembly with 2 connectors
    *B
    air conditioning amplifier assembly with 3 connectors

  2. Measure the voltage and resistance according to the value(s) in the table below.

    HINT:
    Measure the values on the wire harness side with the connector disconnected.


    Terminal No. (Symbol)
    Wiring Color
    Terminal Description
    Condition
    Specified Condition
    I77-1 (IG+) - I77-14 (GND)
    B - W-B
    Power source (IG)
    Ignition switch ON
    11 to 14 V
    I77-1 (IG+) - I77-14 (GND)
    B - W-B
    Power source (IG)
    Ignition switch off
    Below 1 V
    I77-21 (B) - I77-14 (GND)
    Y - W-B
    Battery power supply
    Always
    11 to 14 V
    I77-14 (GND) - Body ground
    W-B - Body ground
    Ground
    Always
    Below 1 Ω
    If the result is not as specified, there may be a malfunction in the wire harness.

  3. Reconnect the I77 air conditioning amplifier assembly connector.

  4. Measure the voltage and check for pulses according to the value(s) in the table below.

    Terminal No. (Symbol)
    Wiring Color
    Terminal Description
    Condition
    Specified Condition
    I77-38 (RDFG) - I77-14 (GND)
    G*1 - W-B
    P*2 - W-B
    Rear window defogger signal
    Ignition switch ON, rear window defogger switch off
    11 to 14 V
    I77-38 (RDFG) - I77-14 (GND)
    G*1 - W-B
    P*2 - W-B
    Rear window defogger signal
    Ignition switch ON, rear window defogger switch on
    Below 2.2 V
    I77-37 (LIN1) - I77-14 (GND)
    V - W-B
    LIN communication line
    Ignition switch ON
    Pulse generation

    1. *1: for LHD
    2. *2: for RHD
    If the result is not as specified, the air conditioning amplifier assembly may have a malfunction.


CHECK AIR CONDITIONING PANEL (HEATER CONTROL SWITCH BOARD)


  1. Disconnect the I56 air conditioning panel (heater control switch board) connector.


    B270939E02

  2. Measure the voltage and resistance according to the value(s) in the table below.

    HINT:
    Measure the values on the wire harness side with the connector disconnected.


    Terminal No. (Symbol)
    Wiring Color
    Terminal Description
    Condition
    Specified Condition
    I56-2 (IG+) - I56-6 (GND)
    R - W-B
    Power source (IG)
    Ignition switch ON
    11 to 14 V
    I56-2 (IG+) - I56-6 (GND)
    R - W-B
    Power source (IG)
    Ignition switch off
    Below 1 V
    I56-6 (GND) - Body ground
    W-B - Body ground
    Ground
    Always
    Below 1 Ω
    If the result is not as specified, there may be a malfunction in the wire harness.

  3. Reconnect the I56 air conditioning panel (heater control switch board) connector.

  4. Check for pulses according to the value(s) in the table below.

    Terminal No. (Symbol)
    Wiring Color
    Terminal Description
    Condition
    Specified Condition
    I56-9 (LIN1) - I56-6 (GND)
    V - W-B
    LIN communication line
    Ignition switch ON
    Pulse generation
    If the result is not as specified, the air conditioning panel (heater control switch board) may have a malfunction.