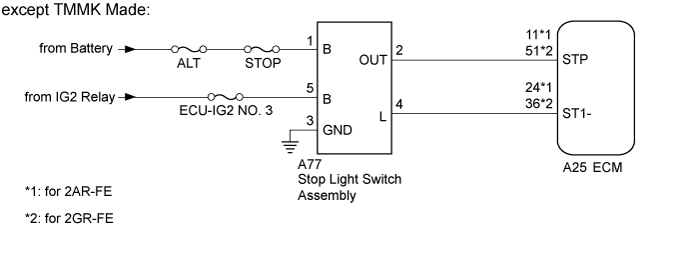
DTC P0571 Brake Switch "A" Circuit |
| DTC No. | DTC Detection Condition | Trouble Area |
| P0571 | When voltage of STP terminal and that of ST1- terminal of ECM are less than 1 V for 0.5 sec. or more |
|
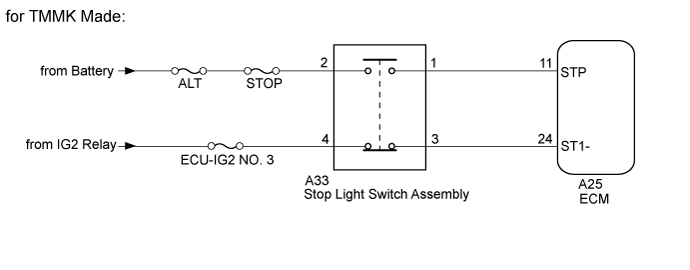
| 1.CHECK VEHICLE CONDITION |
Choose the model to be inspected.
| Result | Proceed to |
| except TMMK Made | A |
| for TMMK Made | B |
|
| ||||
| A | |
 |
| 2.CHECK HARNESS AND CONNECTOR (POWER SOURCE, BODY GROUND) |
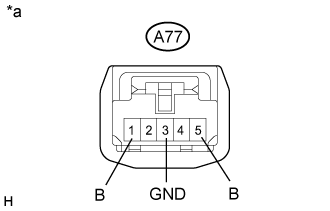 |
Disconnect the stop light switch assembly connector.
Measure the resistance according to the value(s) in the table below.
| Tester Connection | Condition | Specified Condition |
| A77-3 (GND) - Body ground | Always | Below 1 Ω |
Measure the voltage according to the value(s) in the table below.
| Tester Connection | Condition | Specified Condition |
| A77-1 (B) - A77-3 (GND) | Always | 11 to 14 V |
| A77-5 (B) - A77-3 (GND) | Ignition switch ON | 11 to 14 V |
| *a | Front view of wire harness connector (to Stop Light Switch Assembly) |
Reconnect the stop light switch assembly connector.
|
| ||||
| OK | |
|
| 3.INSPECT STOP LIGHT SWITCH ASSEMBLY |
Inspect the stop light switch assembly (Click here).
|
| ||||
| OK | |
|
| 4.CHECK HARNESS AND CONNECTOR (ECM - STOP LIGHT SWITCH ASSEMBLY) |
Disconnect the ECM connector.
Disconnect the stop light switch assembly connector.
Measure the resistance according to the value(s) in the table below.
| Tester Connection | Condition | Specified Condition |
| A25-11 (STP) - A77-2 (OUT) | Always | Below 1 Ω |
| A25-24 (ST1-) - A77-4 (L) | Always | Below 1 Ω |
| Tester Connection | Condition | Specified Condition |
| A25-51 (STP) - A77-2 (OUT) | Always | Below 1 Ω |
| A25-36 (ST1-) - A77-4 (L) | Always | Below 1 Ω |
| Tester Connection | Condition | Specified Condition |
| A25-11 (STP) or A77-2 (OUT) - Body ground | Always | 10 kΩ or higher |
| A25-24 (ST1-) or A77-4 (L) - Body ground | Always | 10 kΩ or higher |
| Tester Connection | Condition | Specified Condition |
| A25-51 (STP) or A77-2 (OUT) - Body ground | Always | 10 kΩ or higher |
| A25-36 (ST1-) or A77-4 (L) - Body ground | Always | 10 kΩ or higher |
| Result | Proceed to |
| NG | A |
| OK (for 2AR-FE) | B |
| OK (for 2GR-FE) | C |
Reconnect the stop light switch assembly connector.
Reconnect the ECM connector.
|
| ||||
|
| ||||
| A | ||
 | ||
| ||
| 5.CHECK HARNESS AND CONNECTOR (POWER SOURCE) |
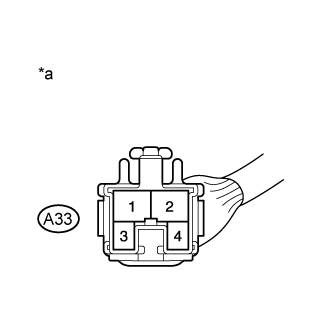 |
Disconnect the stop light switch assembly connector.
| *a | Front view of wire harness connector (to Stop Light Switch Assembly) |
Measure the voltage according to the value(s) in the table below.
| Tester Connection | Condition | Specified Condition |
| A33-2 - Body ground | Always | 11 to 14 V |
| A33-4 - Body ground | Ignition switch ON | 11 to 14 V |
Reconnect the stop light switch assembly connector.
|
| ||||
| OK | |
|
| 6.INSPECT STOP LIGHT SWITCH ASSEMBLY |
Inspect the stop light switch assembly (Click here).
|
| ||||
| OK | |
|
| 7.CHECK HARNESS AND CONNECTOR (ECM - STOP LIGHT SWITCH ASSEMBLY) |
Disconnect the ECM connector.
Disconnect the stop light switch assembly connector.
Measure the resistance according to the value(s) in the table below.
| Tester Connection | Condition | Specified Condition |
| A25-11 (STP) - A33-1 | Always | Below 1 Ω |
| A25-24 (ST1-) - A33-3 | Always | Below 1 Ω |
| Tester Connection | Condition | Specified Condition |
| A25-11 (STP) or A33-1 - Body ground | Always | 10 kΩ or higher |
| A25-24 (ST1-) or A33-3 - Body ground | Always | 10 kΩ or higher |
|
| ||||
| OK | ||
| ||
| ||

