 |
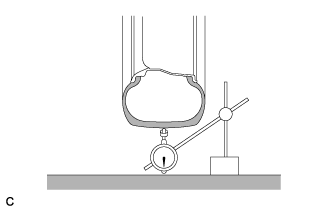
Using a dial indicator, check the runout of the tires.
- Maximum Tire Runout:
- 1.4 mm (0.0551 in.)
REAR WHEEL ALIGNMENT (for TMMK Made) > ADJUSTMENT |
| 1. INSPECT TIRES |
Check the tires for wear and proper inflation pressure.
| Tire Size | Front kPa (kgf/cm2, psi) | Rear kPa (kgf/cm2, psi) |
| P215/55R17 93V | 210 (2.1, 30) | |
Perform initialization (Click here).
Tire pressure adjustment method when warm:
Turn the engine switch off.
Connect the GTS to the DLC3.
Turn the engine switch on (IG).
Turn the GTS on.
Enter the following menus: Chassis / Tire Pressure Monitor / Data List.
Adjust the tire pressure so that the displayed value is equal to the set pressure.
Perform initialization and check that initialization completes (Click here).
Check and record the value of the Data List item "Temperature in Tire". (Ts)
Check and record the ambient temperature during tire pressure adjustment. (Tm)
Readjust the tire pressure according to the difference between the tire internal temperature (Ts) and the ambient temperature (Tm). (P)
Check the pressure adjustment value with the Data List item "Tire Inflation Pressure".
|
Using a dial indicator, check the runout of the tires.
| 2. MEASURE VEHICLE HEIGHT |
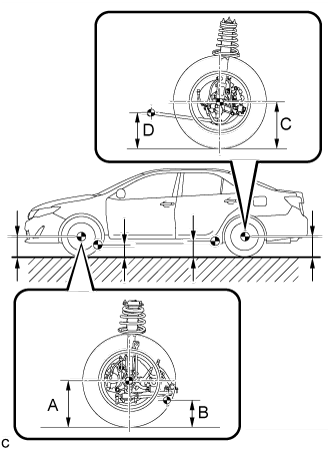 |
Bounce the vehicle up and down at the corners to stabilize the suspension.
Measure the vehicle height.
| Front A - B | Rear C - D |
| 125 mm (4.92 in.) | 55 mm (2.17 in.) |
| 3. INSPECT CAMBER |
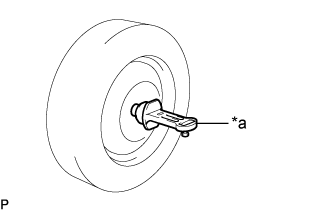 |
Install a camber-caster-kingpin gauge.
| *a | Camber-caster-kingpin Gauge |
Inspect the camber.
| Camber Inclination | Right-left Difference |
| -1°15' +/- 45' (-1.25° +/- 0.75°) | 45' (0.75°) or less |
| 4. INSPECT TOE-IN |
Bounce the vehicle up and down at the corners to stabilize the suspension.
Release the parking brake and move the shift lever to N.
Push the vehicle straight ahead approximately 5 m (16.4 ft.). (Step A)
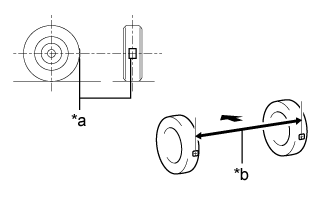 |
Put tread center marks on the rearmost points of the rear wheels and measure the distance between the marks (dimension B).
| *a | Tread Center Mark |
| *b | Dimension B |
 | Front of the Vehicle |
Slowly push the vehicle straight ahead to cause the rear wheels to rotate 180°. Use the rear tire valve as a reference point.
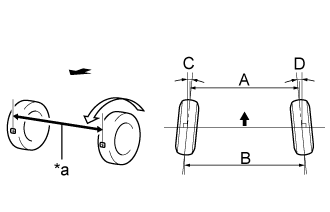 |
Measure the distance between the tread center marks on the front of the rear wheels (dimension A).
| *a | Dimension A |
| Front of the Vehicle |
| Specified Condition |
| C + D: 0°13' +/- 0°10' (0.21° +/- 0.17°) |
| B - A: 2.5 +/- 2.0 mm (0.0984 +/- 0.0787 in.) |
| 5. ADJUST TOE-IN |
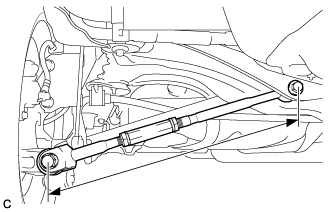 |
Measure the lengths of the right and left rear No. 2 suspension arms.
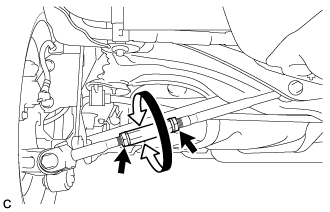 |
Loosen the 2 lock nuts.
If the length difference between the left and right rear No. 2 suspension arm assemblies is not within the specified range, adjust it by following the procedures below.
If the toe-in measurement is greater than the specified range (too much toe-out), extend the shorter rear No. 2 suspension arm by rotating the adjusting tube so that the length difference is within the specified range.
If the toe-in measurement is less than the specified range (too much toe-in), shorten the longer rear No. 2 suspension arm by rotating the adjusting tube so that the length difference is within the specified range.
Measure the toe-in.
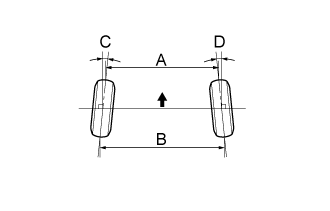 |
Turn the right and left adjusting tubes by an equal amount to adjust toe-in.
| Specified Condition |
| C + D: 0°13' +/- 0°10' (0.21° +/- 0.17°) |
| B - A: 2.5 +/- 2.0 mm (0.0984 +/- 0.0787 in.) |
| Front of the Vehicle |
Tighten the lock nuts while securing the adjusting tube in the order indicated below: