Home › Drivetrain ยท U660E AUTOMATIC TRANSMISSION / TRANSAXLE › VALVE BODY ASSEMBLY

VALVE BODY ASSEMBLY > INSTALLATION

for Preparation Click here


1. INSTALL MANUAL VALVE
  1. Coat the manual valve with ATF and install it to the transmission valve body assembly.


2. INSTALL TRANSMISSION VALVE BODY ASSEMBLY
  1. Coat the O-ring of the transmission wire with ATF.


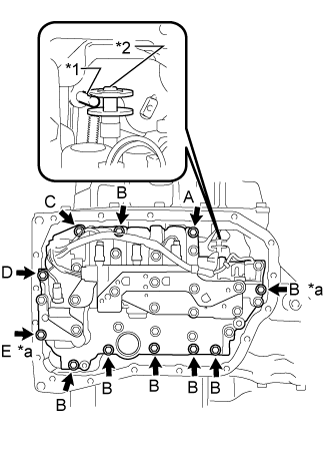
    C326386E02
  1. Insert the manual valve lever shaft sub-assembly pin into the groove on the end of the manual valve as shown in the illustration and temporarily install the transmission valve body assembly to the transaxle case sub-assembly with the 11 bolts.
    Text in Illustration 
    *1
    Manual Valve Lever Shaft Sub-assembly Pin
    *2
    Manual Valve
    *a
    Positioning Bolt

    NOTICE:
    1. When installing the transmission valve body assembly, be careful not to allow the transmission revolution sensor and transaxle case sub-assembly to interfere with each other.
    2. Be sure to insert the manual valve lever shaft sub-assembly pin into the groove on the end of the manual valve.

    -
    Bolt Length
    Bolt (A)
    25 mm (0.984 in.)
    Bolt (B)
    30 mm (1.18 in.)
    Bolt (C)
    35 mm (1.38 in.)
    Bolt (D)
    45 mm (1.77 in.)
    Bolt (E)
    55 mm (2.17 in.)

  1. Fully tighten the 2 positioning bolts shown in the illustration.

    Torque:
    11 N*m{ 112 kgf*cm , 8 ft.*lbf }

  1. Fully tighten the 9 bolts to install the transmission valve body assembly.

    Torque:
    11 N*m{ 112 kgf*cm , 8 ft.*lbf }


3. INSTALL VALVE BODY OIL STRAINER ASSEMBLY
  1. Coat a new O-ring with ATF and install it to the valve body oil strainer assembly.

    NOTICE:
    Ensure that the O-ring is not twisted or pinched.

  1. Install the valve body oil strainer assembly to the transmission valve body assembly with the 2 bolts.

    Torque:
    11 N*m{ 112 kgf*cm , 8 ft.*lbf }


4. INSTALL AUTOMATIC TRANSAXLE OIL PAN SUB-ASSEMBLY


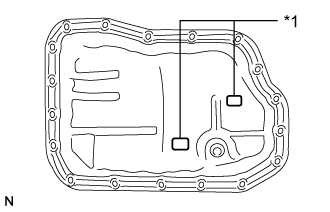
    C134963E03
  1. Install the 2 magnets onto the automatic transaxle oil pan sub-assembly as shown in the illustration.
    Text in Illustration 
    *1
    Magnet

  1. Install a new gasket to the automatic transaxle oil pan sub-assembly.


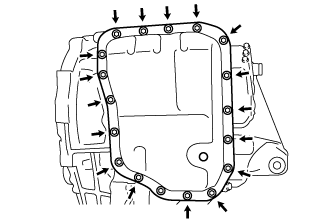
    C243139
  1. Install the automatic transaxle oil pan sub-assembly to the automatic transaxle assembly with the 17 bolts.

    Torque:
    7.5 N*m{ 76 kgf*cm , 66 in.*lbf }


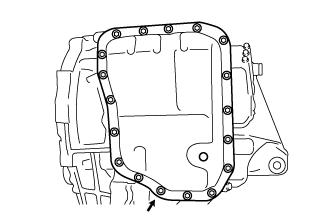
    C243140
  1. Clean and degrease the bolt and the installation hole in the automatic transaxle assembly.

  1. Apply adhesive to the bolt.

    Adhesive:
    Toyota Genuine Adhesive 1344, Three Bond 1344 or equivalent

  1. Install the bolt.

    Torque:
    7.0 N*m{ 71 kgf*cm , 62 in.*lbf }

    NOTICE:
    1. In order to ensure proper sealing of the automatic transaxle oil pan sub-assembly bolts, apply adhesive to the bolts and install them within 10 minutes of adhesive application.
    2. Completely remove any oil or grease from the contact surface of the transaxle case sub-assembly and automatic transaxle oil pan sub-assembly with the gasket before installation.


5. INSTALL TORQUE CONVERTER ASSEMBLY


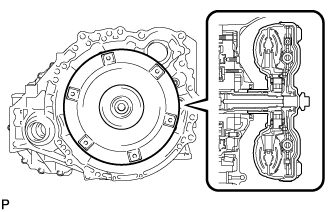
    C154963
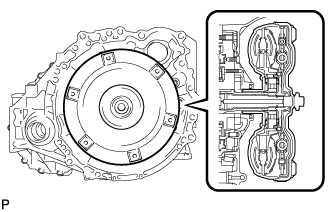
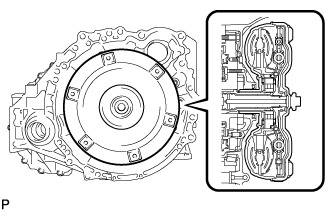
  1. Engage the splines of the input shaft and turbine runner.


    C154964
  1. Engage the splines of the stator shaft and the stator while turning the torque converter assembly.

    HINT:
    If the stator shaft splines are difficult to engage with the stator splines, move the torque converter back approximately 10 mm (0.393 in.) and engage the splines while rotating the torque converter.


    C154965
  1. Turn the torque converter assembly to insert the key of the oil pump drive gear into the groove of the torque converter assembly.

  1. Clean the torque converter set bolt holes.


    C191042E05
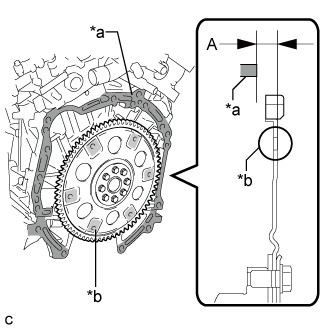
  1. Using a vernier caliper and straightedge, measure dimension A between the transaxle contact surface of the engine and the torque converter contact surface of the drive plate.
    Text in Illustration 
    *a
    Engine Surface
    *b
    Drive Plate Surface

    NOTICE:
    Make sure to deduct the thickness of the straightedge.


    C191041E01
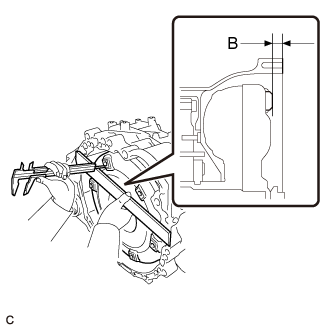
  1. Using a vernier caliper and straightedge, measure dimension B shown in the illustration and check that dimension B is more than dimension A, which was measured in the previous step.

    Standard:
    A + 1 mm (0.0394 in.) or more

    NOTICE:
    1. Make sure to deduct the thickness of the straightedge.
    2. If the transaxle is installed to the engine with the torque converter not sufficiently inserted, the torque converter may be damaged.


6. INSTALL AUTOMATIC TRANSAXLE ASSEMBLY
(Click here)