 |
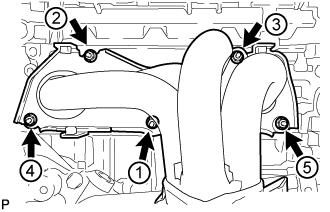
Tighten the 5 nuts in the sequence shown in the illustration.
- Torque:
- 35 N*m{ 357 kgf*cm , 26 ft.*lbf }
EXHAUST MANIFOLD > INSTALLATION |
| 1. INSTALL NO. 1 MANIFOLD CONVERTER INSULATOR |
Install the No. 1 manifold converter insulator with the 4 bolts.
| 2. INSTALL NO. 2 EXHAUST MANIFOLD HEAT INSULATOR |
Install the No. 2 exhaust manifold heat insulator with the 2 bolts.
| 3. INSTALL EXHAUST MANIFOLD CONVERTER SUB-ASSEMBLY |
Install a new exhaust manifold to head gasket onto the cylinder head.
Temporarily install the exhaust manifold converter sub-assembly with the 5 nuts.
|
Tighten the 5 nuts in the sequence shown in the illustration.
| 4. INSTALL NO. 1 EXHAUST MANIFOLD HEAT INSULATOR |
Install the No. 1 exhaust manifold heat insulator with the 4 bolts.
| 5. INSTALL NO. 2 MANIFOLD STAY |
Install the No. 2 manifold stay with the bolt and nut.
| 6. INSTALL MANIFOLD STAY |
Install the manifold stay with the bolt and nut.
| 7. INSTALL FRONT EXHAUST PIPE ASSEMBLY |
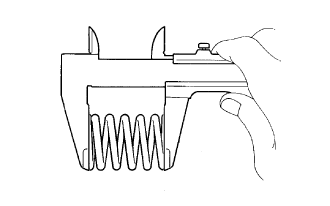 |
Using a vernier caliper, measure the free length of the compression spring.
| Minimum | 40.5 mm (1.60 in.) |
Fully insert a new gasket to the exhaust manifold converter sub-assembly.
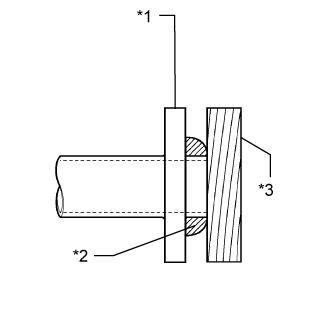 |
Using a plastic hammer and wooden block, tap in the new gasket until its surface is flush with the exhaust manifold converter sub-assembly.
| *1 | Exhaust Manifold Converter Sub-assembly |
| *2 | Gasket |
| *3 | Wooden Block |
Install a new gasket to the front exhaust pipe assembly.
Connect the front exhaust pipe assembly to the exhaust pipe support.
Install the front exhaust pipe assembly with the 2 compression springs, 2 bolts and 2 nuts.
Connect the heated oxygen sensor connector.
| 8. INSTALL ENGINE UNDER COVER RH |
| 9. INSTALL ENGINE UNDER COVER LH |
| 10. INSTALL FRONT WHEEL OPENING EXTENSION PAD RH |
| 11. INSTALL FRONT WHEEL OPENING EXTENSION PAD LH |
| 12. INSTALL AIR FUEL RATIO SENSOR |
| 13. INSPECT FOR EXHAUST GAS LEAK |