 |
Measure the valve opening pressure.
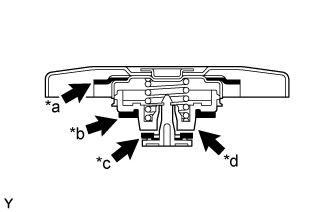
| *a | Rubber Packing (1) |
| *b | Rubber Packing (2) |
| *c | Rubber Packing (3) |
| *d | Valve Seat |
If there are water stains or foreign matter on the rubber packings (1), (2) or (3), clean the part(s) with water and finger scouring.
Check that the rubber packings (1), (2) and (3) are not deformed, cracked or swollen.
Check that the rubber packing (3) and valve seat are not stuck together.
Apply engine coolant to the rubber packings (2) and (3) before using the radiator cap tester.
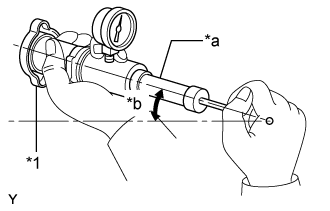
When using the radiator cap tester, tilt it upward 30° or more.
Pump the radiator cap tester several times, and check the maximum pressure.*1
Text in Illustration *1 Radiator Cap Sub-assembly *a Radiator Cap Tester *b 30° or more - Pumping speed:
- 1 pump per second
- Result:
Item Specified Condition Standard pressure
(for brand-new radiator cap sub-assembly)93 to 123 kPa (0.9 to 1.3 kgf/cm2, 13.5 to 18.0 psi) Minimum pressure
(for used radiator cap subassembly)79 kPa (0.8 kgf/cm2, 11.5 psi)
 |