 |
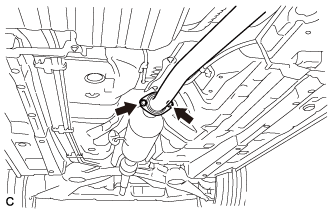
Remove the 2 nuts.
FUEL TANK (for TMMK Made) > REMOVAL |
| 1. REMOVE FUEL SUCTION TUBE WITH PUMP AND GAUGE ASSEMBLY |
| 2. DRAIN FUEL |
| 3. REMOVE CENTER EXHAUST PIPE ASSEMBLY |
|
Remove the 2 nuts.
Remove the center exhaust pipe assembly from the exhaust pipe support.
Remove the gasket from the front exhaust pipe assembly.
| 4. REMOVE NO. 1 FLOOR UNDER COVER |
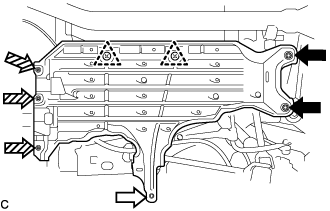 |
Remove the 2 bolts and screw.
 | Bolt |
 | Screw |
 | Nut (attached to under cover) |
Disengage the 3 nuts and 2 clips, and remove the No. 1 floor under cover.
| 5. REMOVE NO. 2 FLOOR UNDER COVER |
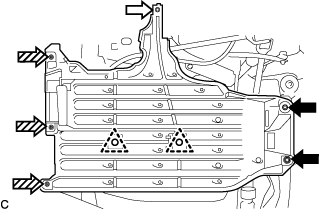 |
Remove the 2 bolts, screw and 2 clips.
| Bolt |
| Screw |
| Nut (attached to under cover) |
Disengage the 3 nuts and remove the No. 2 floor under cover.
| 6. SEPARATE NO. 2 PARKING BRAKE CABLE ASSEMBLY |
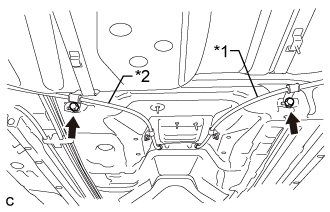 |
Remove the nut and separate the No. 2 parking brake cable assembly.
| *1 | No. 2 Parking Brake Cable Assembly |
| *2 | No. 3 Parking Brake Cable Assembly |
| 7. SEPARATE NO. 3 PARKING BRAKE CABLE ASSEMBLY |
Remove the nut and separate the No. 3 parking brake cable assembly.
| 8. REMOVE REAR NO. 1 STABILIZER BAR BRACKET |
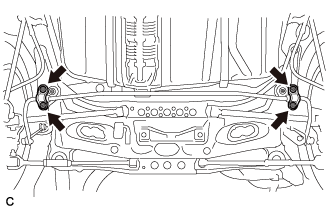 |
Remove the 4 nuts and 2 rear No. 1 stabilizer bar brackets.
| 9. REMOVE NO. 1 FUEL TANK PROTECTOR |
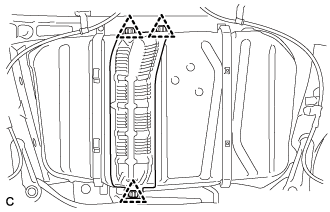 |
Remove the 3 clips and No. 1 fuel tank protector from the fuel tank sub-assembly.
| 10. DISCONNECT FUEL TANK MAIN TUBE SUB-ASSEMBLY |
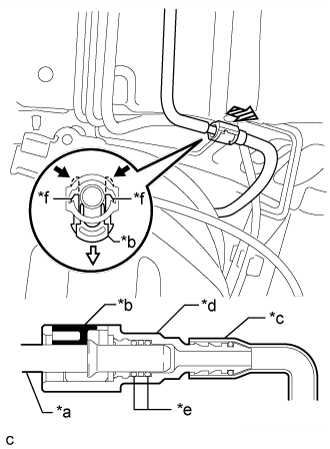 |
Disconnect the fuel tank main tube sub-assembly.
| *a | Fuel Pipe |
| *b | Retainer |
| *c | Nylon Tube |
| *d | Fuel Tube Connector |
| *e | O-ring |
| *f | Claw |
| Push |
| Pull out |
| Pull off |
Disengage the 2 claws of the retainer. Pull out the retainer and disconnect the fuel tube connector from the fuel pipe.
If the fuel tube connector and fuel pipe are stuck, push and pull the fuel tube connector to release it. Pull the fuel tube connector off of the fuel pipe carefully.
Check that there is no foreign matter on the sealing surfaces of the disconnected fuel lines. Clean them if necessary.
Cover the disconnected fuel pipe and fuel tube connector with plastic bags to prevent damage and contamination.
| 11. DISCONNECT FUEL EMISSION HOSE |
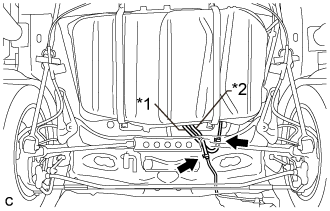 |
Slide the clip and disconnect the fuel emission hose.
| *1 | Fuel Emission Hose |
| *2 | No. 1 Charcoal Canister Outlet Hose |
| 12. DISCONNECT NO. 1 CHARCOAL CANISTER OUTLET HOSE |
Slide the clip and disconnect the No. 1 charcoal canister outlet hose.
| 13. DISCONNECT FUEL TANK BREATHER HOSE |
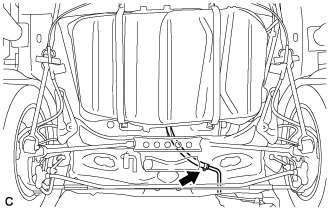 |
Slide the clip and disconnect the fuel tank breather hose.
| 14. DISCONNECT FUEL TANK TO FILLER PIPE HOSE |
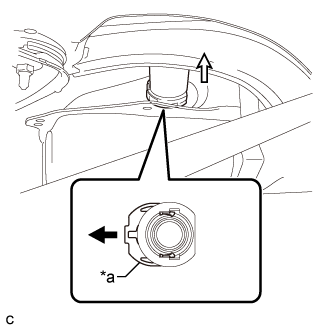 |
Pull out the retainer to disengage the lock claws and pull off the fuel tank to filler pipe hose from the fuel tank sub-assembly.
| *a | Retainer |
| Pull out |
| Pull off |
| 15. REMOVE FUEL TANK SUB-ASSEMBLY |
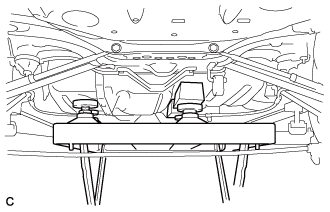 |
Support the fuel tank sub-assembly using an engine lifter.
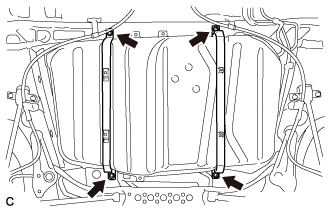 |
Remove the 4 bolts of the 2 fuel tank bands.
Lower the engine lifter to remove the fuel tank sub-assembly.
| 16. REMOVE FUEL TANK MAIN TUBE SUB-ASSEMBLY |
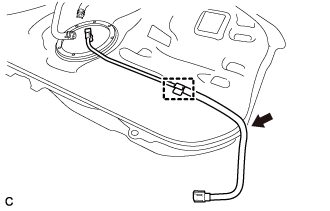 |
Disengage the clamp to remove the fuel tank main tube sub-assembly from the fuel tank sub-assembly.
| 17. REMOVE CHARCOAL CANISTER OUTLET HOSE |
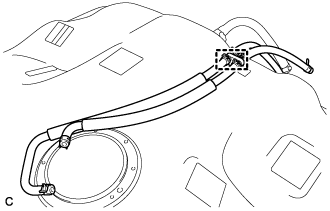 |
Disengage the No. 2 fuel tube clamp to remove the charcoal canister outlet hose from the fuel tank sub-assembly.
| 18. REMOVE NO. 1 FUEL TUBE CLAMP |
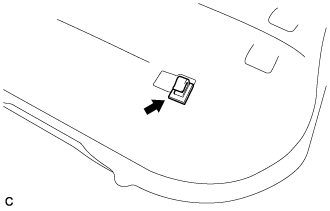 |
Remove the No. 1 fuel tube clamp from the fuel tank sub-assembly.
| 19. REMOVE FUEL TANK BREATHER HOSE |
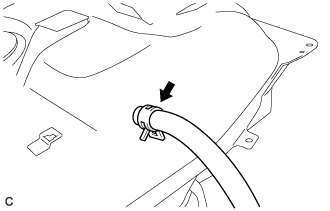 |
Slide the clip and remove the fuel tank breather hose from the fuel tank sub-assembly.
| 20. REMOVE NO. 1 FUEL TANK CUSHION |
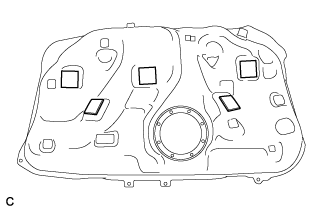 |
Remove the 5 No. 1 fuel tank cushions from the fuel tank sub-assembly.