 |
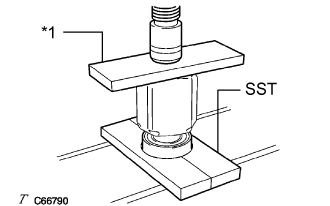
Using SST, a steel plate and a press, install a new front drive shaft bearing.
| *1 | Steel Plate |
- SST
- 09527-10011
- NOTICE:
- The bearing should be completely installed.
FRONT DRIVE SHAFT ASSEMBLY (for 2GR-FE) > REASSEMBLY |
| 1. INSTALL FRONT DRIVE SHAFT BEARING (for RH Side) |
|
Using SST, a steel plate and a press, install a new front drive shaft bearing.
| *1 | Steel Plate |
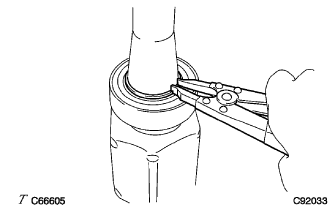 |
Using a snap ring expander, install a new drive shaft hole snap ring.
| 2. INSTALL FRONT DRIVE SHAFT DUST COVER RH |
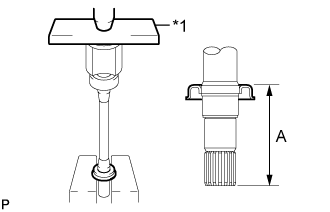 |
Using a steel plate and a press, install a new front drive shaft dust cover RH until dimension (A) from the tip of the front drive inboard joint assembly to the front drive shaft dust cover RH meets the specification.
| *1 | Steel Plate |
| 3. INSTALL FRONT DRIVE SHAFT DUST COVER LH |
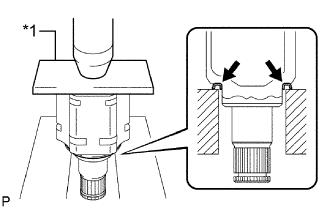 |
Using a steel plate and a press, install a new front drive shaft dust cover LH.
| *1 | Steel Plate |
| 4. INSTALL FRONT AXLE OUTBOARD JOINT BOOT |
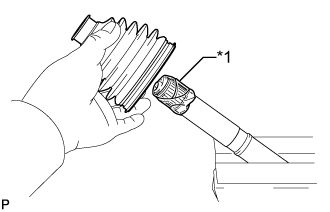 |
Wrap the splines of the front drive outboard joint shaft assembly with protective tape to prevent the boot from being damaged.
| *1 | Protective Tape |
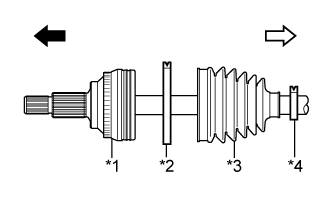 |
Install new parts onto the front drive outboard joint shaft assembly in the following order:
| *1 | Front Drive Outboard Joint Shaft Assembly |
| *2 | Front No. 2 Axle Outboard Joint Boot Clamp |
| *3 | Front Axle Outboard Joint Boot |
| *4 | Front Axle Outboard Joint Boot Clamp |
 | Outboard Joint Side |
 | Inboard Joint Side |
Front No. 2 axle outboard joint boot clamp
Front axle outboard joint boot
Front axle outboard joint boot clamp
Pack the joint portion of the front drive outboard joint shaft assembly and front axle outboard joint boot with grease.
Install the front axle outboard joint boot onto the front drive outboard joint shaft assembly groove.
| 5. INSTALL FRONT NO. 2 AXLE OUTBOARD JOINT BOOT CLAMP |
Hold the drive shaft in a vise between aluminum plates.
Install the front No. 2 axle outboard joint boot clamp onto the front axle outboard joint boot.
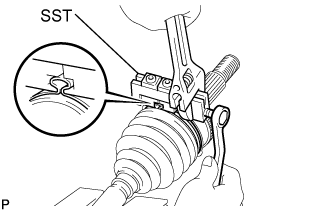 |
Place SST onto the front No. 2 axle outboard joint boot clamp, press it against the boot and slightly tighten SST.
Tighten SST so that the front No. 2 axle outboard joint boot clamp is pinched.
Remove SST.
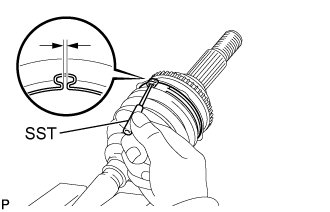 |
Using SST, measure the clearance of the front No. 2 axle outboard joint boot clamp.
| 6. INSTALL FRONT AXLE OUTBOARD JOINT BOOT CLAMP |
Install the front axle outboard joint boot clamp onto the front axle outboard joint boot.
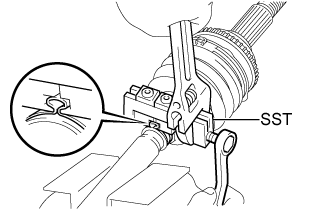 |
Place SST onto the front axle outboard joint boot clamp, press it against the boot and slightly tighten SST.
Tighten SST so that the front axle outboard joint boot clamp is pinched.
Remove SST.
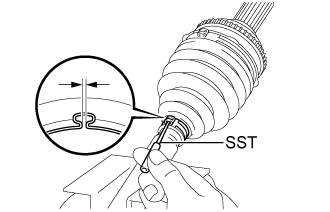 |
Using SST, measure the clearance of the front axle outboard joint boot clamp.
| 7. INSTALL FRONT DRIVE SHAFT DAMPER |
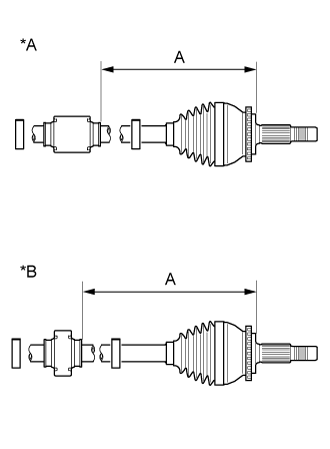 |
Temporarily install the front drive shaft damper and 2 new front drive shaft damper clamps to the front drive outboard joint shaft assembly as shown in the illustration.
| *A | LH Side |
| *B | RH Side |
Set the dimension as specified below.
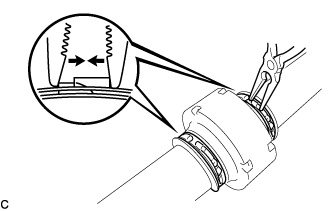 |
Using needle-nose pliers, install the 2 front drive shaft damper clamps as shown in the illustration.
| 8. INSTALL FRONT DRIVE INBOARD JOINT ASSEMBLY |
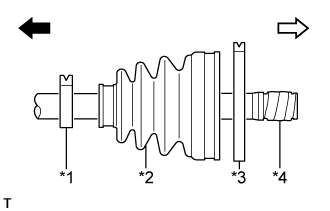 |
Install new parts onto the front drive outboard joint shaft assembly in the following order:
| *1 | Front Axle Inboard Joint Boot Clamp |
| *2 | Front Axle Inboard Joint Boot |
| *3 | Front No. 2 Axle Inboard Joint Boot Clamp |
| *4 | Protective Tape |
| Outboard Joint Side |
| Inboard Joint Side |
Front axle inboard joint boot clamp
Front axle inboard joint boot
Front No. 2 axle inboard joint boot clamp
Hold the drive shaft in a vise between aluminum plates.
Remove the protective tape.
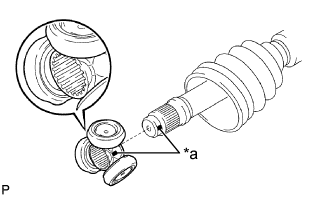 |
Align the matchmarks and install the tripod joint onto the front drive outboard joint shaft assembly.
| *a | Matchmark |
Align the matchmarks placed before removal.
Using a brass bar and a hammer, install the tripod joint to the front drive outboard joint shaft assembly.
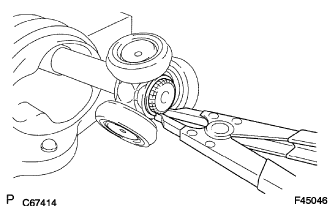 |
Using a snap ring expander, install a new shaft snap ring to the front drive outboard joint shaft assembly.
Pack the front drive inboard joint assembly and front axle inboard boot with grease.
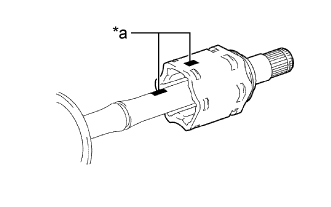 |
Align the matchmarks and install the front drive inboard joint assembly to the front drive outboard joint shaft assembly.
| *a | Matchmark |
| 9. INSTALL FRONT AXLE INBOARD JOINT BOOT |
Install the front axle inboard joint boot to the front drive inboard joint assembly.
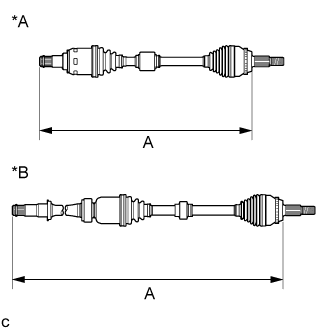 |
Check whether the drive shaft dimensions (A) are within the following specifications.
| *A | LH Side |
| *B | RH Side |
| Dimension (A) | |||
| LH Side | 587.5 mm (1.93 ft.) | ||
| RH Side | 906.4 mm (2.97 ft.) |
| 10. INSTALL FRONT AXLE INBOARD JOINT BOOT CLAMP |
Hold the drive shaft in a vise between aluminum plates.
Install the front axle inboard joint boot clamp onto the front axle inboard joint boot.
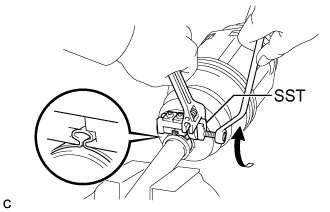 |
Place SST onto the front axle inboard joint boot clamp, press it against the boot and slightly tighten SST.
Tighten SST so that the front axle inboard joint boot clamp is pinched.
Remove SST.
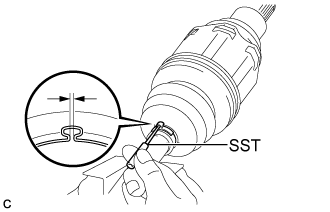 |
Using SST, measure the clearance of the front axle inboard joint boot clamp.
| 11. INSTALL FRONT NO. 2 AXLE INBOARD JOINT BOOT CLAMP |
Install the front No. 2 axle inboard joint boot clamp onto the front axle inboard joint boot.
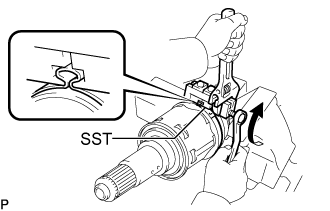 |
Place SST onto the front No. 2 axle inboard joint boot clamp, press it against the boot and slightly tighten SST.
Tighten SST so that the front No. 2 axle inboard joint boot clamp is pinched.
Remove SST.
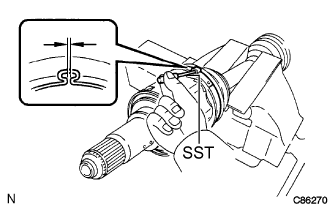 |
Using SST, measure the clearance of the front No. 2 axle inboard joint boot clamp.
| 12. INSTALL FRONT DRIVE SHAFT HOLE SNAP RING LH |
Install a new front drive shaft hole snap ring LH.
| 13. INSPECT FRONT DRIVE SHAFT ASSEMBLY |
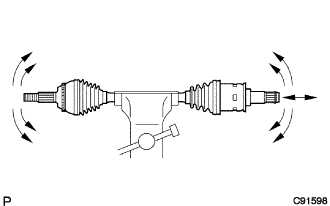 |
Check that there is no excessive play in the radial direction of the outboard joint.
Check that the inboard joint slides smoothly in the thrust direction.
Check that there is no excessive play in the radial direction of the inboard joint.
Check the boots for damage.
|
Check whether the drive shaft dimensions (A) are within the following specifications.
| *A | LH Side |
| *B | RH Side |
| Dimension (A) | |||
| LH Side | 587.5 mm (1.93 ft.) | ||
| RH Side | 906.4 mm (2.97 ft.) |