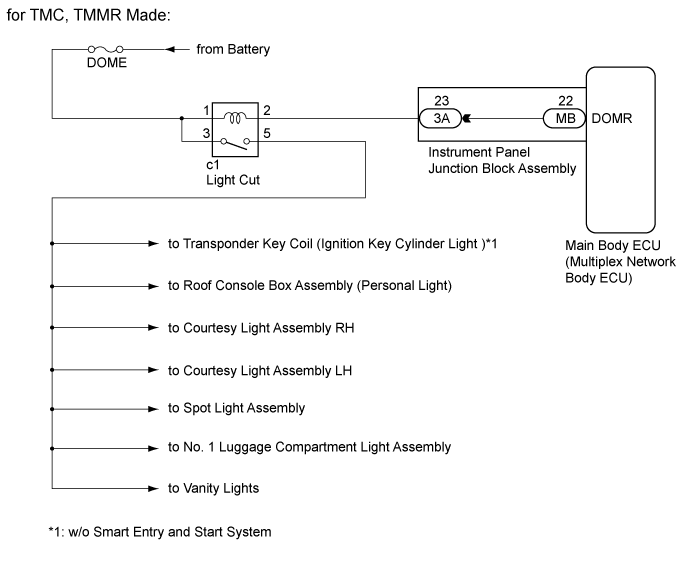
LIGHTING SYSTEM > Interior Light Auto Cut Circuit |
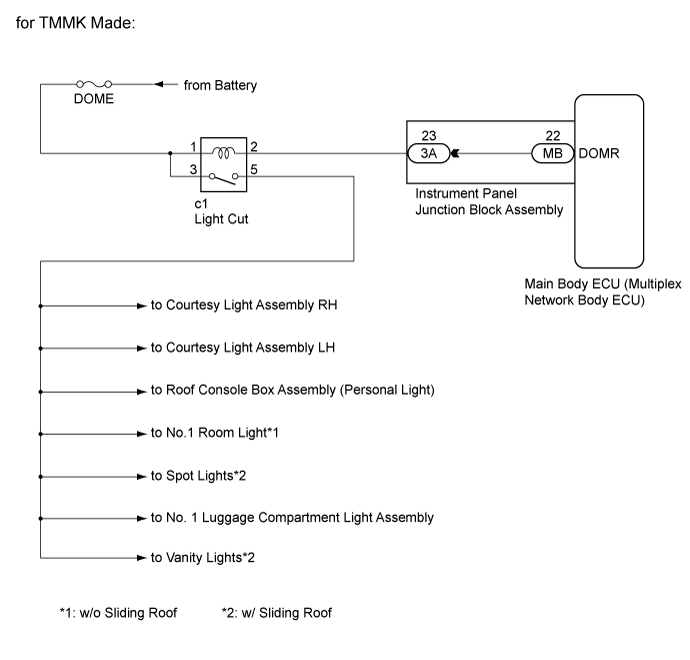
| 1.CHECK SYMPTOMS |
Check symptoms.
| Result | Proceed to |
| All the interior lights that receive power via the light cut relay do not illuminate. | A |
| Battery saving function does not operate. | B |
|
| ||||
| A | |
 |
| 2.INSPECT LIGHT CUT RELAY |
Remove the light cut relay from the c1 light cut relay connector.
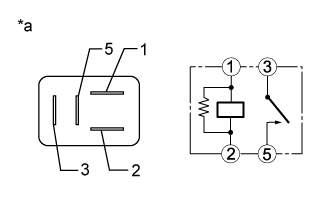 |
Measure the resistance according to the value(s) in the table below.
| Tester Connection | Condition | Specified Condition |
| 3 - 5 | Voltage is not applied between terminals 1 and 2 | 10 kΩ or higher |
| 3 - 5 | Voltage is applied between terminals 1 and 2 | Below 1 Ω |
| *a | Component without harness connected (Light Cut Relay) |
|
| ||||
| OK | |
|
| 3.CHECK HARNESS AND CONNECTOR (DOME FUSE - LIGHT CUT RELAY) |
Measure the voltage according to the value(s) in the table below.
| Tester Connection | Condition | Specified Condition |
| c1-1 - Body ground | Ignition switch off | 11 to 14 V |
| c1-3 - Body ground | Ignition switch off | 11 to 14 V |
|
| ||||
| OK | |
|
| 4.CHECK HARNESS AND CONNECTOR (LIGHT CUT RELAY) |
Install the light cut relay to the c1 light cut relay connector.
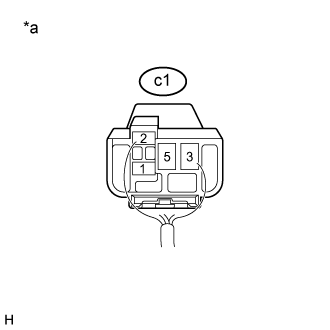 |
Measure the voltage according to the value(s) in the table below.
| Tester Connection | Condition | Specified Condition |
| c1-5 - Body ground | Ignition switch ON | 11 to 14 V |
| *a | Component with harness connected (Light Cut Relay) |
|
| ||||
| OK | ||
 | ||
| ||
| 5.CHECK HARNESS AND CONNECTOR (LIGHT CUT RELAY - INSTRUMENT PANEL JUNCTION BLOCK ASSEMBLY) |
Remove the light cut relay from the c1 light cut relay connector.
Disconnect the 3A instrument panel junction block assembly connector.
Measure the resistance according to the value(s) in the table below.
| Tester Connection | Condition | Specified Condition |
| c1-2 - 3A-23 | Always | Below 1 Ω |
| c1-2 - Body ground | Always | 10 kΩ or higher |
|
| ||||
| OK | |
|
| 6.INSPECT INSTRUMENT PANEL JUNCTION BLOCK ASSEMBLY |
Remove the instrument panel junction block assembly (Click here).
Remove the main body ECU (multiplex network body ECU) from the instrument panel junction block assembly.
Measure the resistance according to the value(s) in the table below.
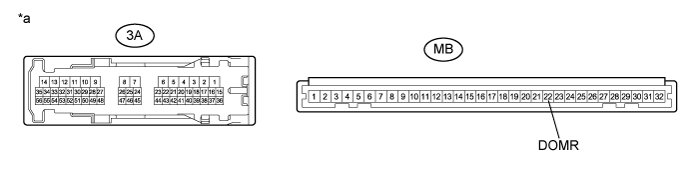
| *a | Component without harness connected (Instrument panel junction block assembly) | - | - |
| Tester Connection | Condition | Specified Condition |
| 3A-23 - MB-22 (DOMR) | Always | Below 1 Ω |
|
| ||||
| OK | ||
| ||
| ||
| 7.PERFORM ACTIVE TEST USING INTELLIGENT TESTER |
Connect the intelligent tester to the DLC3.
Turn the ignition switch to ON.
Turn the intelligent tester on.
Enter the following menus: Body / Main Body / Active Test.
Check that the relay operates.
| Tester Display | Test Part | Control Range | Diagnostic Note |
| Relay for Interior Light Auto Cut Function | Light cut relay | ON/OFF | - |
|
| ||||
| OK | ||
| ||
| ||
| 8.INSPECT LIGHT CUT RELAY |
Remove the light cut relay from the c1 light cut relay connector.
|
Measure the resistance according to the value(s) in the table below.
| Tester Connection | Condition | Specified Condition |
| 3 - 5 | Voltage is not applied between terminals 1 and 2 | 10 kΩ or higher |
| 3 - 5 | Voltage is applied between terminals 1 and 2 | Below 1 Ω |
| *a | Component without harness connected (Light Cut Relay) |
|
| ||||
| OK | |
|
| 9.CHECK HARNESS AND CONNECTOR (LIGHT CUT RELAY - INSTRUMENT PANEL JUNCTION BLOCK ASSEMBLY) |
Disconnect the 3A instrument panel junction block assembly connector.
Measure the resistance according to the value(s) in the table below.
| Tester Connection | Condition | Specified Condition |
| c1-2 - 3A-23 | Always | Below 1 Ω |
| c1-2 - Body ground | Always | 10 kΩ or higher |
|
| ||||
| OK | |
|
| 10.INSPECT INSTRUMENT PANEL JUNCTION BLOCK ASSEMBLY |
Remove the instrument panel junction block assembly (Click here).
Remove the main body ECU (multiplex network body ECU) from the instrument panel junction block assembly.
Measure the resistance according to the value(s) in the table below.
| *a | Component without harness connected (Instrument panel junction block assembly) | - | - |
| Tester Connection | Condition | Specified Condition |
| 3A-23 - MB-22 (DOMR) | Always | Below 1 Ω |
| 3A-23 - Body ground | Always | 10 kΩ or higher |
|
| ||||
| OK | ||
| ||
| ||

