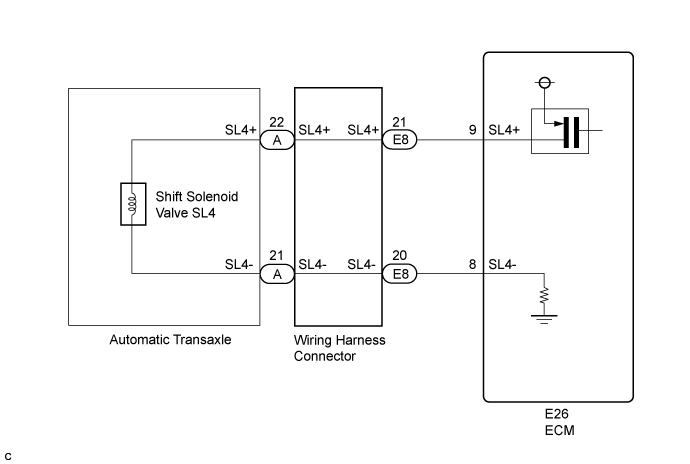
DTC P2810 Pressure Control Solenoid "G" Electrical (Shift Solenoid Valve SL4) |
| DTC No. | DTC Detection Condition | Trouble Area |
| P2810 | The ECM checks for an open or short in the shift solenoid valve SL4 circuit while driving and shifting gears. (1-trip detection logic)
|
|
| 1.CHECK HARNESS AND CONNECTOR (SHIFT SOLENOID VALVE SL4 CIRCUIT) |
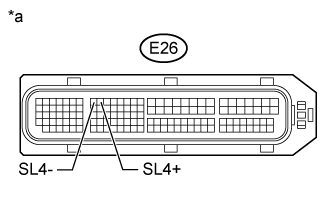 |
Disconnect the ECM connector.
Measure the resistance according to the value(s) in the table below.
| Tester Connection | Condition | Specified Condition |
| E26-9 (SL4+) - E26-8 (SL4-) | 20°C (68°F) | 5.0 to 5.6 Ω |
| E26-9 (SL4+) - Body ground and other terminals | Always | 10 kΩ or higher |
| E26-8 (SL4-) - Body ground and other terminals | Always | 10 kΩ or higher |
| *a | Front view of wire harness connector (to ECM) |
|
| ||||
| OK | ||
 | ||
| ||
| 2.CHECK HARNESS AND CONNECTOR (ECM - WIRING HARNESS CONNECTOR) |
Disconnect the harness connector from the wiring harness connector.
Measure the resistance according to the value(s) in the table below.
| Tester Connection | Condition | Specified Condition |
| E26-9 (SL4+) - E8-21 (SL4+) | Always | Below 1 Ω |
| E26-8 (SL4-) - E8-20 (SL4-) | Always | Below 1 Ω |
| E26-9 (SL4+) or E8-21 (SL4+) - Body ground and other terminals | Always | 10 kΩ or higher |
| E26-8 (SL4-) or E8-20 (SL4-) - Body ground and other terminals | Always | 10 kΩ or higher |
|
| ||||
| OK | |
 |
| 3.INSPECT TRANSMISSION WIRE (SL4) |
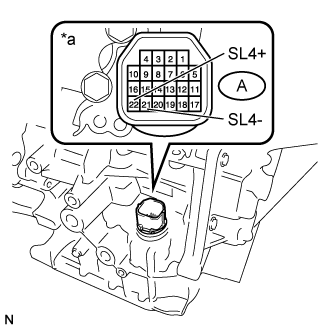 |
Remove the wiring harness connector from the automatic transaxle.
Measure the resistance according to the value(s) in the table below.
| Tester Connection | Condition | Specified Condition |
| A-22 (SL4+) - A-21 (SL4-) | 20°C (68°F) | 5.0 to 5.6 Ω |
| A-22 (SL4+) - Body ground and other terminals | Always | 10 kΩ or higher |
| A-21 (SL4-) - Body ground and other terminals | Always | 10 kΩ or higher |
| *a | Component without harness connected (Transmission Wire) |
|
| ||||
| OK | ||
| ||
| ||
| 4.INSPECT SHIFT SOLENOID VALVE SL4 |
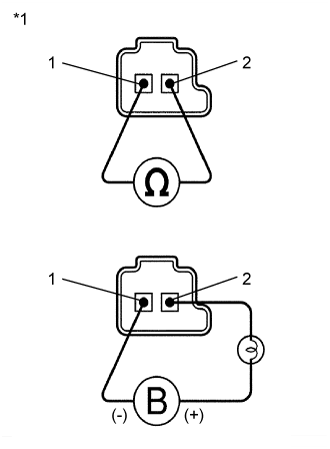 |
Remove shift solenoid valve SL4.
Measure the resistance according to the value(s) in the table below.
| Tester Connection | Condition | Specified Condition |
| 1 - 2 | 20°C (68°F) | 5.0 to 5.6 Ω |
| *1 | Shift Solenoid Valve SL4 |
Connect a battery positive (+) lead with a 21 W bulb to terminal 2 and a negative (-) lead to terminal 1 of the solenoid valve connector. Then check that the valve moves and makes an operating sound.
|
| ||||
| OK | ||
| ||
| ||

