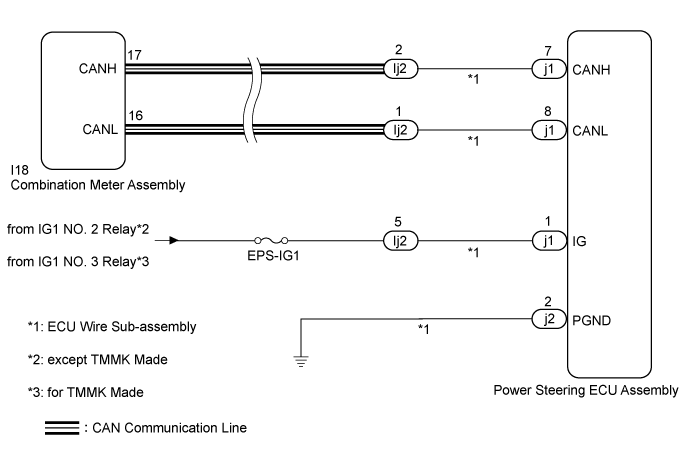
POWER STEERING SYSTEM > EPS Warning Light Circuit |
| 1.CHECK CONNECT CONNECTOR OR INSTALL GROUND WIRE |
Check the connection condition of the ECU wire sub-assembly and power steering ECU assembly connectors.
Check that the ground wire is securely installed with the bolt .
|
| ||||
| OK | |
 |
| 2.CHECK CAN COMMUNICATION SYSTEM |
Check for DTCs (Click here).
|
| ||||
| OK | |
|
| 3.READ VALUE USING INTELLIGENT TESTER |
Turn the ignition switch off.
Connect the intelligent tester to the DLC3.
Turn the ignition switch to ON.
Turn the intelligent tester on.
Enter the following menus: Chassis / EMPS / Data List.
Select the item "IG power supply" in the Data List and read the value displayed on the intelligent tester.
| Tester Display | Measurement Item/Range | Normal Condition | Diagnostic Note |
| IG power supply | IG power supply/ Min.: 0.0000 V Max.: 20.1531 V | 9 to 16 V | Ignition switch ON |
|
| ||||
| OK | ||
 | ||
| ||
| 4.CHECK HARNESS AND CONNECTOR (BATTERY - ECU WIRE SUB-ASSEMBLY) |
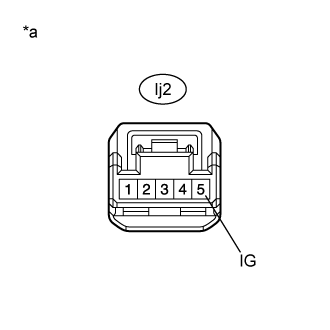 |
Disconnect the Ij2 connector from the ECU wire sub-assembly.
Measure the voltage according to the value(s) in the table below.
| Tester Connection | Switch Condition | Specified Condition |
| Ij2-5 (IG) - Body ground | Ignition switch ON | 9 to 16 V |
| *a | Front view of wire harness connector (to ECU Wire Sub-assembly) |
|
| ||||
| OK | |
|
| 5.CHECK HARNESS AND CONNECTOR (POWER STEERING ECU ASSEMBLY - BODY GROUND) |
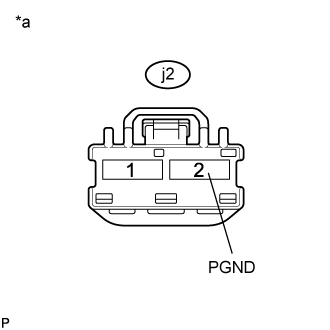 |
Disconnect the j2 connector from the power steering ECU assembly.
Measure the resistance according to the value(s) in the table below.
| Tester Connection | Condition | Specified Condition |
| j2-2 (PGND) - Body ground | Always | Below 1 Ω |
| *a | Front view of wire harness connector (to Power Steering ECU Assembly) |
|
| ||||
| OK | |
|
| 6.CHECK ECU WIRE SUB-ASSEMBLY |
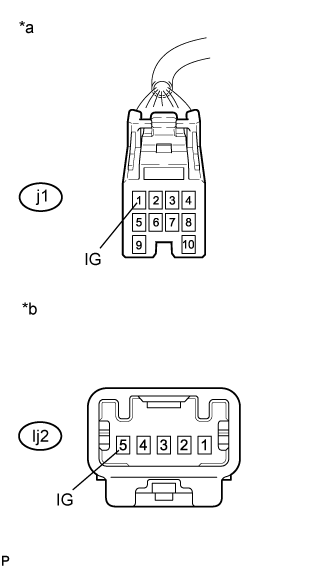 |
Disconnect the j1 connector from the power steering ECU assembly.
Measure the resistance according to the value(s) in the table below.
| Tester Connection | Condition | Specified Condition |
| j1-1 (IG) - Ij2-5 (IG) | Always | Below 1 Ω |
| *a | Front view of wire harness connector (to Power Steering ECU Assembly) |
| *b | Front view of wire harness connector (to Vehicle Wire Harness) |
|
| ||||
| OK | |
|
| 7.PERFORM ACTIVE TEST USING INTELLIGENT TESTER |
Turn the ignition switch off.
Connect the intelligent tester to the DLC3.
Turn the ignition switch to ON.
Turn the intelligent tester on.
Enter the following menus: Body / Combination Meter / Active Test.
Perform the Active Test of the combination meter assembly using the intelligent tester.
| Tester Display | Test Part | Control Range | Diagnostic Note |
| Indicat. EPS | EPS warning light | OFF or ON | Confirm that the vehicle is stopped with the engine idling |
Check that the EPS warning light operates in accordance with the Active Test.
|
| ||||
| OK | ||
| ||
| ||

