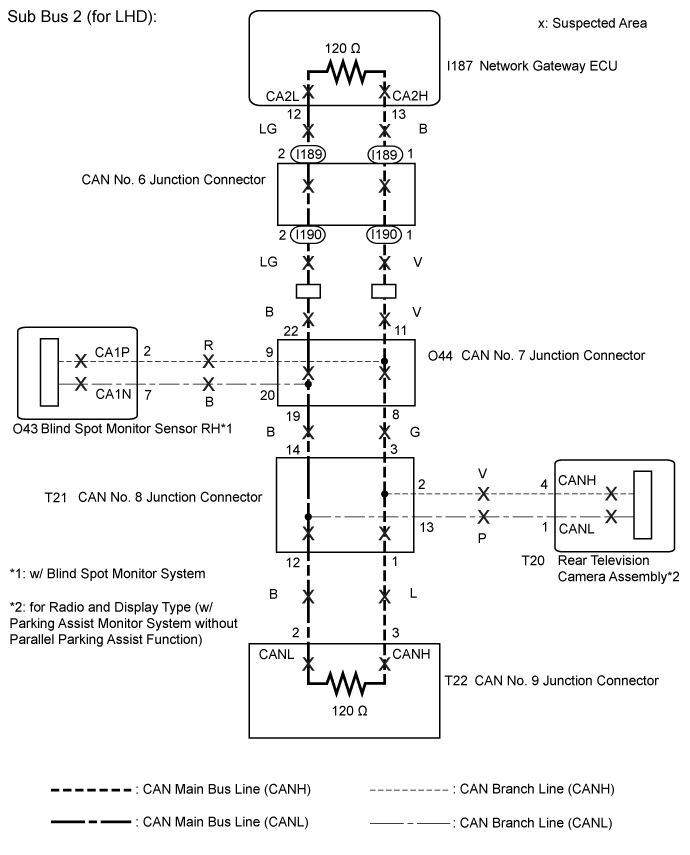
DTC U1002 Lost Communication with Gateway Module (Network Gateway ECU) |
| DTC No. | DTC Detection Condition | Trouble Area |
| U1002 | The network gateway ECU does not receive signals from all ECUs that have been memorized as those connected to sub bus 2. |
|
| 1.CHECK SUB BUS 2 |
Disconnect the cable from the negative (-) battery terminal.
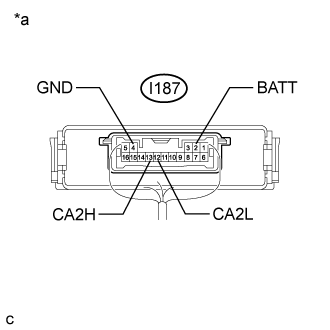 |
Measure the resistance according to the value(s) in the table below.
| Tester Connection | Condition | Specified Condition | Result |
| I187-13 (CA2H) - I187-12 (CA2L) | Cable disconnected from negative (-) battery terminal | 54 to 69 Ω | Below 54 Ω: Short circuit between bus lines |
| 70 Ω or higher: Open circuit in main bus lines | |||
| I187-13 (CA2H) - I187-4 (GND) | Cable disconnected from negative (-) battery terminal | 200 Ω or higher | Below 200 Ω: CANH ground short |
| I187-12 (CA2L) - I187-4 (GND) | Cable disconnected from negative (-) battery terminal | 200 Ω or higher | Below 200 Ω: CANL ground short |
| I187-13 (CA2H) - I187-2 (BATT) | Cable disconnected from negative (-) battery terminal | 6 kΩ or higher | Below 6 kΩ: CANH +B short |
| I187-12 (CA2L) - I187-2 (BATT) | Cable disconnected from negative (-) battery terminal | 6 kΩ or higher | Below 6 kΩ: CANL +B short |
| *a | Component with harness connected (Network Gateway ECU) |
| Result | Proceed to |
| OK | A |
| NG (Open circuit in CAN main bus lines) | B |
| NG (Short circuit between bus lines) | C |
| D |
|
| ||||
|
| ||||
|
| ||||
| A | |
 |
| 2.RECONFIRM DTC OUTPUT |
Reconnect the cable from the negative (-) battery terminal.
Connect the GTS to the DLC3.
Turn the ignition switch to ON.
Turn the GTS on.
Clear the DTCs.
Turn the ignition switch off.
Turn the ignition switch to ON.
Turn the GTS on.
Enter the following menus: Body Electrical / Gateway / Trouble Codes.
| Result | Proceed to |
| DTC U1002 is output from network gateway ECU. (GTS display: Gateway) | A |
| DTC U1002 is not output from network gateway ECU. (GTS display: Gateway) | B |
|
| ||||
| A | ||
 | ||
| ||
| 3.CHECK FOR OPEN IN SUB BUS 2 MAIN LINES (NETWORK GATEWAY ECU) |
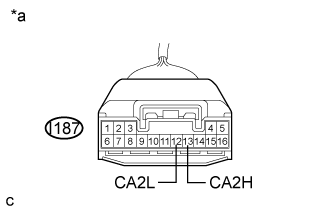 |
Disconnect the I187 network gateway ECU connector.
Measure the resistance according to the value(s) in the table below.
| Tester Connection | Condition | Specified Condition |
| I187-13 (CA2H) - I187-12 (CA2L) | Cable disconnected from negative (-) battery terminal | 108 to 132 Ω |
| *a | Front view of wire harness connector (to Network Gateway ECU) |
|
| ||||
| OK | ||
| ||
| ||
| 4.CHECK FOR OPEN IN SUB BUS 2 MAIN LINES (CAN NO. 7 J/C) |
Reconnect the I187 network gateway ECU connector.
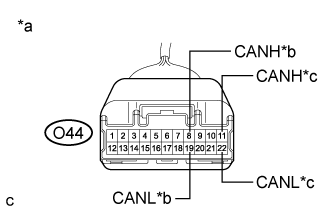 |
Disconnect the O44 CAN No. 7 junction connector.
Measure the resistance according to the value(s) in the table below.
| Tester Connection | Condition | Specified Condition | Connected to |
| O44-8 (CANH) - O44-19 (CANL) | Cable disconnected from negative (-) battery terminal | 108 to 132 Ω | CAN No. 8 junction connector |
| O44-11 (CANH) - O44-22 (CANL) | Cable disconnected from negative (-) battery terminal | 108 to 132 Ω | CAN No. 6 junction connector |
| *a | Front view of wire harness connector (to CAN No. 7 Junction Connector) |
| *b | to CAN No. 8 Junction Connector |
| *c | to CAN No. 6 Junction Connector |
| Result | Proceed to |
| OK | A |
| NG (to CAN No. 8 junction connector main bus lines) | B |
| NG (to CAN No. 6 junction connector main bus lines) | C |
|
| ||||
|
| ||||
| A | ||
| ||
| ||
| 5.CHECK FOR OPEN IN SUB BUS 2 MAIN LINES (CAN NO. 8 J/C) |
Reconnect the O44 CAN No. 7 junction connector.
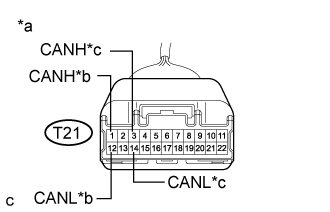 |
Disconnect the T21 CAN No. 8 junction connector.
Measure the resistance according to the value(s) in the table below.
| Tester Connection | Condition | Specified Condition | Connected to |
| T21-1 (CANH) - T21-12 (CANL) | Cable disconnected from negative (-) battery terminal | 108 to 132 Ω | CAN No. 9 junction connector |
| T21-3 (CANH) - T21-14 (CANL) | Cable disconnected from negative (-) battery terminal | 108 to 132 Ω | CAN No. 7 junction connector |
| *a | Front view of wire harness connector (to CAN No. 8 Junction Connector) |
| *b | to CAN No. 9 Junction Connector |
| *c | to CAN No. 7 Junction Connector |
| Result | Proceed to |
| OK | A |
| NG (to CAN No. 9 junction connector main bus lines) | B |
| NG (to CAN No. 7 junction connector main bus lines) | C |
|
| ||||
|
| ||||
| A | ||
| ||
| ||
| 6.CHECK FOR OPEN IN SUB BUS 2 MAIN LINES (CAN NO. 9 J/C) |
Reconnect the T21 CAN No. 8 junction connector.
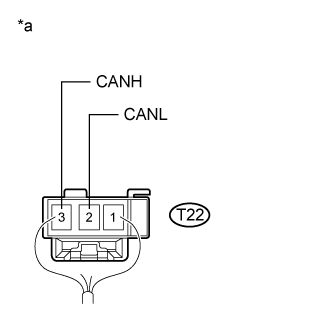 |
Disconnect the T22 CAN No. 9 junction connector.
Measure the resistance according to the value(s) in the table below.
| Tester Connection | Condition | Specified Condition |
| T22-3 (CANH) - T22-2 (CANL) | Cable disconnected from negative (-) battery terminal | 108 to 132 Ω |
| *a | Rear view of wire harness connector (to CAN No. 9 Junction Connector) |
|
| ||||
| OK | ||
| ||
| ||
| 7.CHECK FOR OPEN IN SUB BUS 2 MAIN LINES (CAN NO. 6 J/C) |
Reconnect the O44 CAN No. 7 junction connector.
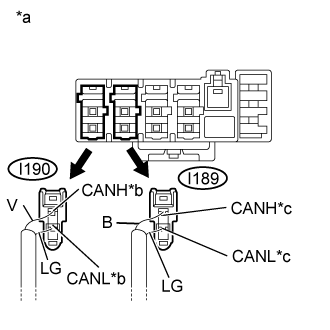 |
Disconnect the I189 and I190 wire harness connectors.
Measure the resistance according to the value(s) in the table below.
| Tester Connection | Condition | Specified Condition | Connected to |
| I190-1 (CANH) - I190-2 (CANL) | Cable disconnected from negative (-) battery terminal | 108 to 132 Ω | CAN No. 7 junction connector |
| I189-1 (CANH) - I189-2 (CANL) | Cable disconnected from negative (-) battery terminal | 108 to 132 Ω | Network gateway ECU |
| *a | Rear view of wire harness connector (to CAN No. 6 Junction Connector) |
| *b | to CAN No. 7 Junction Connector |
| *c | to Network Gateway ECU |
| Code | Color CANH Side | Color CANL Side | Connected to |
| I190 | V | LG | CAN No. 7 junction connector |
| I189 | B | LG | Network gateway ECU |
| Result | Proceed to |
| OK | A |
| NG (to CAN No. 7 junction connector main bus lines) | B |
| NG (to network gateway ECU main bus lines) | C |
|
| ||||
|
| ||||
| A | ||
| ||
| ||
| 8.CHECK FOR SHORT IN SUB BUS 2 LINES (NETWORK GATEWAY ECU) |
|
Disconnect the I187 network gateway ECU connector.
Measure the resistance according to the value(s) in the table below.
| Tester Connection | Condition | Specified Condition |
| I187-13 (CA2H) - I187-12 (CA2L) | Cable disconnected from negative (-) battery terminal | 108 to 132 Ω |
| *a | Front view of wire harness connector (to Network Gateway ECU) |
|
| ||||
| OK | ||
| ||
| ||
| 9.CHECK FOR SHORT IN SUB BUS 2 LINES (CAN NO. 7 J/C) |
Reconnect the I187 network gateway ECU connector.
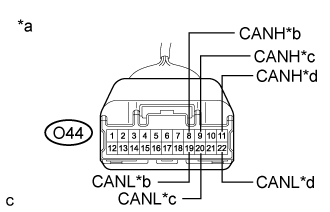 |
Disconnect the O44 CAN No. 7 junction connector.
Measure the resistance according to the value(s) in the table below.
| Tester Connection | Condition | Specified Condition | Connected to |
| O44-8 (CANH) - O44-19 (CANL) | Cable disconnected from negative (-) battery terminal | 108 to 132 Ω | CAN No. 8 junction connector |
| O44-9 (CANH) - O44-20 (CANL) | Cable disconnected from negative (-) battery terminal | 200 Ω or higher | Blind spot monitor sensor RH* |
| O44-11 (CANH) - O44-22 (CANL) | Cable disconnected from negative (-) battery terminal | 108 to 132 Ω | CAN No. 6 junction connector |
| *a | Front view of wire harness connector (to CAN No. 7 Junction Connector) |
| *b | to CAN No. 8 Junction Connector |
| *c | to Blind Spot Monitor Sensor RH (w/ Blind Spot Monitor System) |
| *d | to CAN No. 6 Junction Connector |
| Result | Proceed to |
| OK | A |
| NG (to CAN No. 8 junction connector main bus lines) | B |
| NG (to CAN No. 6 junction connector main bus lines) | C |
| NG (to blind spot monitor sensor RH branch lines) | D |
|
| ||||
|
| ||||
|
| ||||
| A | ||
| ||
| ||
| 10.CHECK FOR SHORT IN SUB BUS 2 LINES (CAN NO. 8 J/C) |
Reconnect the O44 CAN No. 7 junction connector.
 |
Disconnect the T21 CAN No. 8 junction connector.
Measure the resistance according to the value(s) in the table below.
| Tester Connection | Condition | Specified Condition | Connected to |
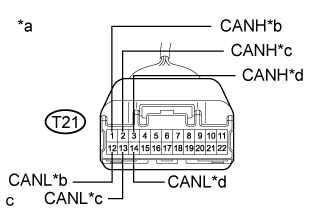
| T21-1 (CANH) - T21-12 (CANL) | Cable disconnected from negative (-) battery terminal | 108 to 132 Ω | CAN No. 9 junction connector |
| T21-2 (CANH) - T21-13 (CANL) | Cable disconnected from negative (-) battery terminal | 200 Ω or higher | Rear television camera assembly* |
| T21-3 (CANH) - T21-14 (CANL) | Cable disconnected from negative (-) battery terminal | 108 to 132 Ω | CAN No. 7 junction connector |
| *a | Front view of wire harness connector (to CAN No. 8 Junction Connector) |
| *b | to CAN No. 9 Junction Connector |
| *c | to Rear Television Camera Assembly (for Radio and Display Type (w/ Parking Assist Monitor System without Parallel Parking Assist Function)) |
| *d | to CAN No. 7 Junction Connector |
| Result | Proceed to |
| OK | A |
| NG (to CAN No. 9 junction connector main bus lines) | B |
| NG (to rear television camera assembly branch lines) | C |
| NG (to CAN No. 7 junction connector main bus lines) | D |
|
| ||||
|
| ||||
|
| ||||
| A | ||
| ||
| ||
| 11.CHECK FOR SHORT IN SUB BUS 2 LINES (CAN NO. 9 J/C) |
Reconnect the T21 CAN No. 8 junction connector.
 |
Disconnect the T22 CAN No. 9 junction connector.
Measure the resistance according to the value(s) in the table below.
| Tester Connection | Condition | Specified Condition |
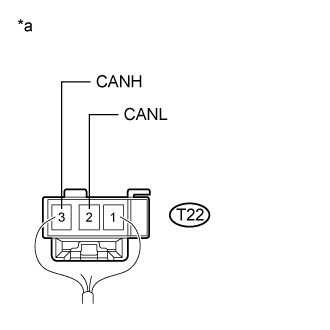
| T22-3 (CANH) - T22-2 (CANL) | Cable disconnected from negative (-) battery terminal | 108 to 132 Ω |
| *a | Rear view of wire harness connector (to CAN No. 9 Junction Connector) |
|
| ||||
| OK | ||
| ||
| ||
| 12.CHECK FOR SHORT IN SUB BUS 2 LINES (CAN NO. 6 J/C) |
Reconnect the O44 CAN No. 7 junction connector.
|
Disconnect the I189 and I190 wire harness connectors.
Measure the resistance according to the value(s) in the table below.
| Tester Connection | Condition | Specified Condition | Connected to |
| I190-1 (CANH) - I190-2 (CANL) | Cable disconnected from negative (-) battery terminal | 108 to 132 Ω | CAN No. 7 junction connector |
| I189-1 (CANH) - I189-2 (CANL) | Cable disconnected from negative (-) battery terminal | 108 to 132 Ω | Network gateway ECU |
| *a | Rear view of wire harness connector (to CAN No. 6 Junction Connector) |
| *b | to CAN No. 7 Junction Connector |
| *c | to Network Gateway ECU |
| Code | Color CANH Side | Color CANL Side | Connected to |
| I190 | V | LG | CAN No. 7 junction connector |
| I189 | B | LG | Network gateway ECU |
| Result | Proceed to |
| OK | A |
| NG (to CAN No. 7 junction connector main bus lines) | B |
| NG (to network gateway ECU main bus lines) | C |
|
| ||||
|
| ||||
| A | ||
| ||
| ||
| 13.CHECK FOR SHORT IN SUB BUS 2 LINE (NETWORK GATEWAY ECU) |
 |
Disconnect the I187 network gateway ECU connector.
Measure the resistance according to the value(s) in the table below.
| Tester Connection | Condition | Specified Condition | Result |
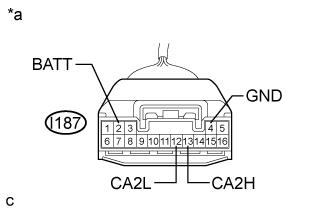
| I187-13 (CA2H) - I187-4 (GND) | Cable disconnected from negative (-) battery terminal | 200 Ω or higher | Below 200 Ω: CANH ground short |
| I187-12 (CA2L) - I187-4 (GND) | Cable disconnected from negative (-) battery terminal | 200 Ω or higher | Below 200 Ω: CANL ground short |
| I187-13 (CA2H) - I187-2 (BATT) | Cable disconnected from negative (-) battery terminal | 6 kΩ or higher | Below 6 kΩ: CANH +B short |
| I187-12 (CA2L) - I187-2 (BATT) | Cable disconnected from negative (-) battery terminal | 6 kΩ or higher | Below 6 kΩ: CANL +B short |
| *a | Front view of wire harness connector (to Network Gateway ECU) |
|
| ||||
| OK | ||
| ||
| ||
| 14.CHECK FOR SHORT IN SUB BUS 2 LINE (CAN NO. 7 J/C) |
Reconnect the I187 network gateway ECU connector.
Disconnect the O44 CAN No. 7 junction connector.
Measure the resistance according to the value(s) in the table below.
| Tester Connection | Condition | Specified Condition | Result | Connected to |
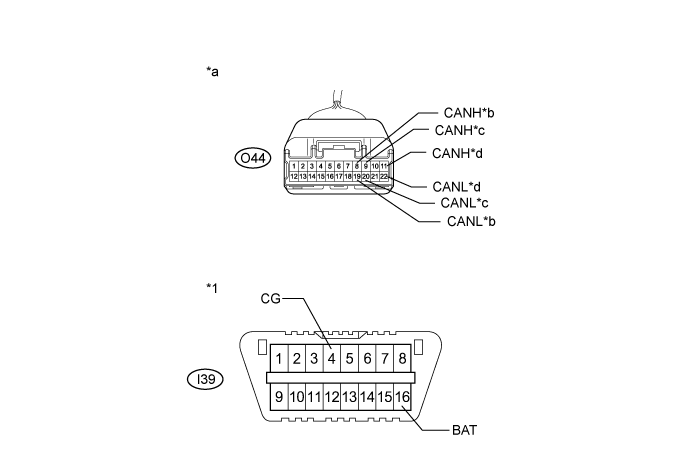
| O44-8 (CANH) - I39-4 (CG) | Cable disconnected from negative (-) battery terminal | 200 Ω or higher | Below 200 Ω: CANH ground short | CAN No. 8 junction connector |
| O44-19 (CANL) - I39-4 (CG) | Cable disconnected from negative (-) battery terminal | 200 Ω or higher | Below 200 Ω: CANL ground short | |
| O44-9 (CANH) - I39-4 (CG) | Cable disconnected from negative (-) battery terminal | 200 Ω or higher | Below 200 Ω: CANH ground short | Blind spot monitor sensor RH* |
| O44-20 (CANL) - I39-4 (CG) | Cable disconnected from negative (-) battery terminal | 200 Ω or higher | Below 200 Ω: CANL ground short | |
| O44-11 (CANH) - I39-4 (CG) | Cable disconnected from negative (-) battery terminal | 200 Ω or higher | Below 200 Ω: CANH ground short | CAN No. 6 junction connector |
| O44-22 (CANL) - I39-4 (CG) | Cable disconnected from negative (-) battery terminal | 200 Ω or higher | Below 200 Ω: CANL ground short | |
| O44-8 (CANH) - I39-16 (BAT) | Cable disconnected from negative (-) battery terminal | 6 kΩ or higher | Below 6 kΩ: CANH +B short | CAN No. 8 junction connector |
| O44-19 (CANL) - I39-16 (BAT) | Cable disconnected from negative (-) battery terminal | 6 kΩ or higher | Below 6 kΩ: CANL +B short | |
| O44-9 (CANH) - I39-16 (BAT) | Cable disconnected from negative (-) battery terminal | 6 kΩ or higher | Below 6 kΩ: CANH +B short | Blind spot monitor sensor RH* |
| O44-20 (CANL) - I39-16 (BAT) | Cable disconnected from negative (-) battery terminal | 6 kΩ or higher | Below 6 kΩ: CANL +B short | |
| O44-11 (CANH) - I39-16 (BAT) | Cable disconnected from negative (-) battery terminal | 6 kΩ or higher | Below 6 kΩ: CANH +B short | CAN No. 6 junction connector |
| O44-22 (CANL) - I39-16 (BAT) | Cable disconnected from negative (-) battery terminal | 6 kΩ or higher | Below 6 kΩ: CANL +B short |
| *1 | DLC3 | - | - |
| *a | Front view of wire harness connector (to CAN No. 7 Junction Connector) | *b | to CAN No. 8 Junction Connector |
| *c | to Blind Spot Monitor Sensor RH (w/ Blind Spot Monitor System) | *d | to CAN No. 6 Junction Connector |
| Result | Proceed to |
| OK | A |
| NG (to CAN No. 8 junction connector main bus line) | B |
| NG (to CAN No. 6 junction connector main bus line) | C |
| NG (to blind spot monitor sensor RH branch line) | D |
|
| ||||
|
| ||||
|
| ||||
| A | ||
| ||
| ||
| 15.CHECK FOR SHORT IN SUB BUS 2 LINE (CAN NO. 8 J/C) |
Reconnect the O44 CAN No. 7 junction connector.
Disconnect the T21 CAN No. 8 junction connector.
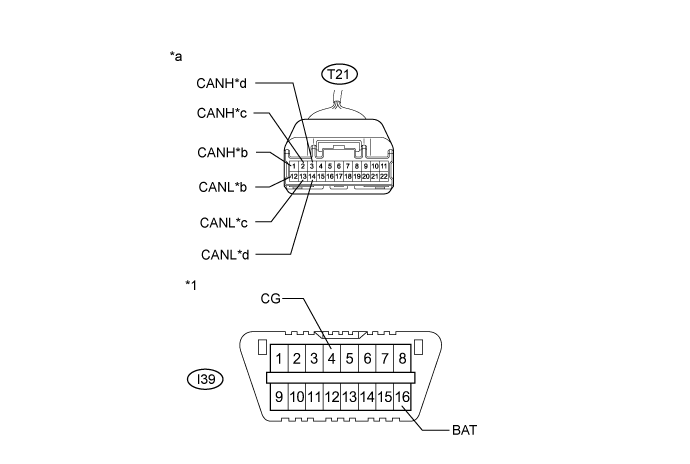
Measure the resistance according to the value(s) in the table below.
| Tester Connection | Condition | Specified Condition | Result | Connected to |
| T21-1 (CANH) - I39-4 (CG) | Cable disconnected from negative (-) battery terminal | 200 Ω or higher | Below 200 Ω: CANH ground short | CAN No. 9 junction connector |
| T21-12 (CANL) - I39-4 (CG) | Cable disconnected from negative (-) battery terminal | 200 Ω or higher | Below 200 Ω: CANL ground short | |
| T21-2 (CANH) - I39-4 (CG) | Cable disconnected from negative (-) battery terminal | 200 Ω or higher | Below 200 Ω: CANH ground short | Rear television camera assembly* |
| T21-13 (CANL) - I39-4 (CG) | Cable disconnected from negative (-) battery terminal | 200 Ω or higher | Below 200 Ω: CANL ground short | |
| T21-3 (CANH) - I39-4 (CG) | Cable disconnected from negative (-) battery terminal | 200 Ω or higher | Below 200 Ω: CANH ground short | CAN No. 7 junction connector |
| T21-14 (CANL) - I39-4 (CG) | Cable disconnected from negative (-) battery terminal | 200 Ω or higher | Below 200 Ω: CANL ground short | |
| T21-1 (CANH) - I39-16 (BAT) | Cable disconnected from negative (-) battery terminal | 6 kΩ or higher | Below 6 kΩ: CANH +B short | CAN No. 9 junction connector |
| T21-12 (CANL) - I39-16 (BAT) | Cable disconnected from negative (-) battery terminal | 6 kΩ or higher | Below 6 kΩ: CANL +B short | |
| T21-2 (CANH) - I39-16 (BAT) | Cable disconnected from negative (-) battery terminal | 6 kΩ or higher | Below 6 kΩ: CANH +B short | Rear television camera assembly* |
| T21-13 (CANL) - I39-16 (BAT) | Cable disconnected from negative (-) battery terminal | 6 kΩ or higher | Below 6 kΩ: CANL +B short | |
| T21-3 (CANH) - I39-16 (BAT) | Cable disconnected from negative (-) battery terminal | 6 kΩ or higher | Below 6 kΩ: CANH +B short | CAN No. 7 junction connector |
| T21-14 (CANL) - I39-16 (BAT) | Cable disconnected from negative (-) battery terminal | 6 kΩ or higher | Below 6 kΩ: CANL +B short |
| *1 | DLC3 | - | - |
| *a | Front view of wire harness connector (to CAN No. 8 Junction Connector) | *b | to CAN No. 9 Junction Connector |
| *c | to Rear Television Camera Assembly (for Radio and Display Type (w/ Parking Assist Monitor System without Parallel Parking Assist Function)) | *d | to CAN No. 7 Junction Connector |
| Result | Proceed to |
| OK | A |
| NG (to CAN No. 9 junction connector main bus line) | B |
| NG (to rear television camera assembly branch line) | C |
| NG (to CAN No. 7 junction connector main bus line) | D |
|
| ||||
|
| ||||
|
| ||||
| A | ||
| ||
| ||
| 16.CHECK FOR SHORT IN SUB BUS 2 LINE (CAN NO. 9 J/C) |
Reconnect the T21 CAN No. 8 junction connector.
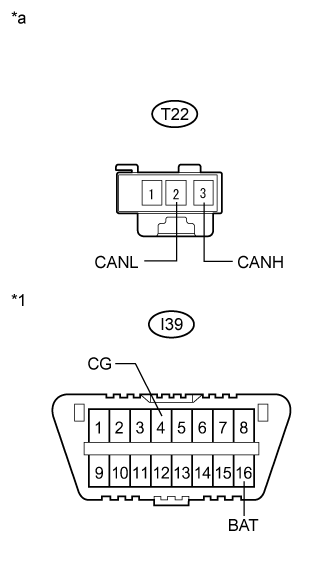 |
Disconnect the T22 CAN No. 9 junction connector.
Measure the resistance according to the value(s) in the table below.
| Tester Connection | Condition | Specified Condition | Result |
| T22-3 (CANH) - I39-4 (CG) | Cable disconnected from negative (-) battery terminal | 200 Ω or higher | Below 200 Ω: CANH ground short |
| T22-2 (CANL) - I39-4 (CG) | Cable disconnected from negative (-) battery terminal | 200 Ω or higher | Below 200 Ω: CANL ground short |
| T22-3 (CANH) - I39-16 (BAT) | Cable disconnected from negative (-) battery terminal | 6 kΩ or higher | Below 6 kΩ: CANH +B short |
| T22-2 (CANL) - I39-16 (BAT) | Cable disconnected from negative (-) battery terminal | 6 kΩ or higher | Below 6 kΩ: CANL +B short |
| *1 | DLC3 |
| *a | Front view of wire harness connector (to CAN No. 9 Junction Connector) |
|
| ||||
| OK | ||
| ||
| ||
| 17.CHECK FOR SHORT IN SUB BUS 2 LINE (CAN NO. 6 J/C) |
Reconnect the O44 CAN No. 7 junction connector.
Disconnect the I189 and I190 wire harness connectors.
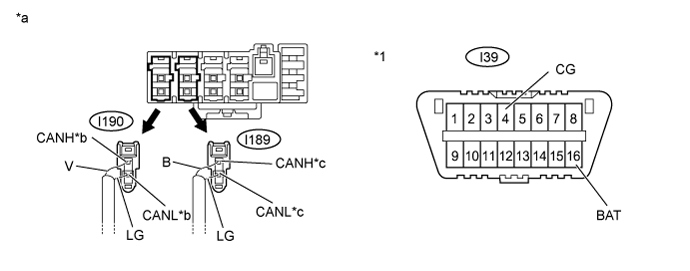
Measure the resistance according to the value(s) in the table below.
| Tester Connection | Condition | Specified Condition | Result | Connected to |
| I190-1 (CANH) - I39-4 (CG) | Cable disconnected from negative (-) battery terminal | 200 Ω or higher | Below 200 Ω: CANH ground short | CAN No. 7 junction connector |
| I190-2 (CANL) - I39-4 (CG) | Cable disconnected from negative (-) battery terminal | 200 Ω or higher | Below 200 Ω: CANL ground short | |
| I189-1 (CANH) - I39-4 (CG) | Cable disconnected from negative (-) battery terminal | 200 Ω or higher | Below 200 Ω: CANH ground short | Network gateway ECU |
| I189-2 (CANL) - I39-4 (CG) | Cable disconnected from negative (-) battery terminal | 200 Ω or higher | Below 200 Ω: CANL ground short | |
| I190-1 (CANH) - I39-16 (BAT) | Cable disconnected from negative (-) battery terminal | 6 kΩ or higher | Below 6 kΩ: CANH +B short | CAN No. 7 junction connector |
| I190-2 (CANL) - I39-16 (BAT) | Cable disconnected from negative (-) battery terminal | 6 kΩ or higher | Below 6 kΩ: CANL +B short | |
| I189-1 (CANH) - I39-16 (BAT) | Cable disconnected from negative (-) battery terminal | 6 kΩ or higher | Below 6 kΩ: CANH +B short | Network gateway ECU |
| I189-2 (CANL) - I39-16 (BAT) | Cable disconnected from negative (-) battery terminal | 6 kΩ or higher | Below 6 kΩ: CANL +B short |
| *1 | DLC3 | - | - |
| *a | Rear view of wire harness connector (to CAN No. 6 Junction Connector) | *b | to CAN No. 7 Junction Connector |
| *c | to Network Gateway ECU | - | - |
| Code | Color CANH Side | Color CANL Side | Connected to |
| I190 | V | LG | CAN No. 7 junction connector |
| I189 | B | LG | Network gateway ECU |
| Result | Proceed to |
| OK | A |
| NG (to CAN No. 7 junction connector main bus line) | B |
| NG (to network gateway ECU main bus line) | C |
|
| ||||
|
| ||||
| A | ||
| ||
| ||
| 18.CHECK FOR SHORT IN SUB BUS 2 LINES (ECU, SENSOR) |
Reconnect all wire harness connectors.
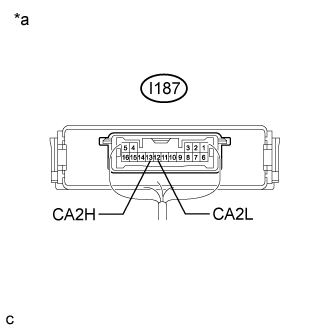 |
Disconnect the connector that includes terminals CANH and CANL from the ECU or sensor to which the short circuited branch line is connected (Click here).
Measure the resistance according to the value(s) in the table below.
| Tester Connection | Condition | Specified Condition |
| I187-13 (CA2H) - I187-12 (CA2L) | Cable disconnected from negative (-) battery terminal | 54 to 69 Ω |
| *a | Component with harness connected (Network Gateway ECU) |
|
| ||||
| OK | ||
| ||
| ||
| 19.CHECK FOR SHORT IN SUB BUS 2 LINE (ECU, SENSOR) |
Reconnect all wire harness connectors.
Disconnect the connector that includes terminals CANH and CANL from the ECU to which the bus line shorted to +B or shorted to GND is connected (Click here).
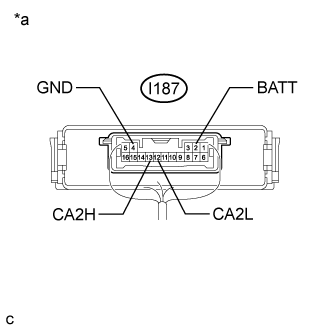 |
Measure the resistance according to the value(s) in the table below.
| Tester Connection | Condition | Specified Condition | Result |
| I187-13 (CA2H) - I187-4 (GND) | Cable disconnected from negative (-) battery terminal | 200 Ω or higher | Below 200 Ω: CANH ground short |
| I187-12 (CA2L) - I187-4 (GND) | Cable disconnected from negative (-) battery terminal | 200 Ω or higher | Below 200 Ω: CANL ground short |
| I187-13 (CA2H) - I187-2 (BATT) | Cable disconnected from negative (-) battery terminal | 6 kΩ or higher | Below 6 kΩ: CANH +B short |
| I187-12 (CA2L) - I187-2 (BATT) | Cable disconnected from negative (-) battery terminal | 6 kΩ or higher | Below 6 kΩ: CANL +B short |
| *a | Component with harness connected (Network Gateway ECU) |
|
| ||||
| OK | ||
| ||
| ||

