 |
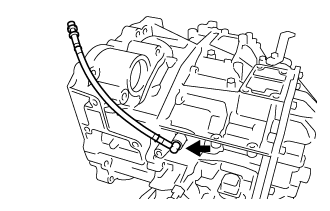
Using a screwdriver, remove the No. 2 breather plug from the transaxle case sub-assembly.
AUTOMATIC TRANSAXLE UNIT > DISASSEMBLY |
| 1. REMOVE TRANSMISSION BREATHER HOSE SUB-ASSEMBLY |
|
Using a screwdriver, remove the No. 2 breather plug from the transaxle case sub-assembly.
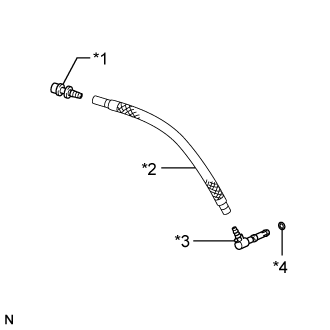 |
Using a screwdriver, remove the No. 1 breather plug from the breather plug hose.
| *1 | No. 1 Breather Plug |
| *2 | Breather Plug Hose |
| *3 | No. 2 Breather Plug |
| *4 | O-ring |
Using a screwdriver, remove the No. 2 breather plug from the breather plug hose.
Using a screwdriver, remove the O-ring from the No. 2 breather plug.
| 2. REMOVE TRANSMISSION CONTROL SHAFT LEVER |
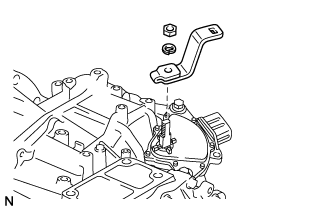 |
Remove the nut, washer and transmission control shaft lever from the manual valve lever shaft sub-assembly.
| 3. REMOVE PARK/NEUTRAL POSITION SWITCH ASSEMBLY |
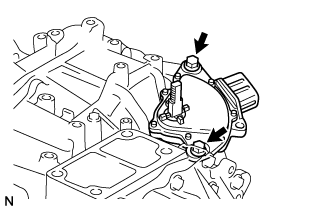 |
Remove the 2 bolts and park/neutral position switch assembly from the transaxle case sub-assembly.
| 4. REMOVE OIL COOLER TUBE UNION (OUTLET) |
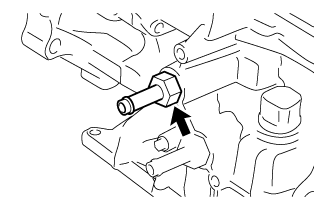 |
Remove the oil cooler tube union (outlet) from the transaxle case sub-assembly.
Remove the O-ring from the oil cooler tube union (outlet).
| 5. REMOVE OIL COOLER TUBE UNION (INLET) |
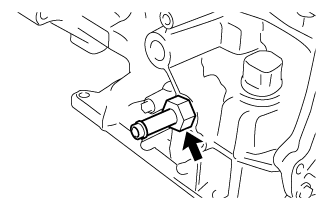 |
Remove the oil cooler tube union (inlet) from the transaxle case sub-assembly.
Remove the O-ring from the oil cooler tube union (inlet).
| 6. REMOVE NO. 1 TRANSAXLE CASE PLUG |
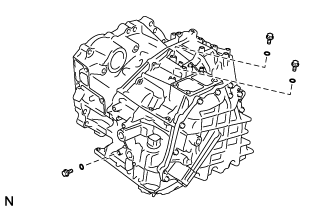 |
Remove the 3 No. 1 transaxle case plugs from the transaxle case sub-assembly.
Using a screwdriver, remove the 3 O-rings from the 3 No. 1 transaxle case plugs.
| 7. REMOVE NO. 2 TRANSAXLE CASE PLUG |
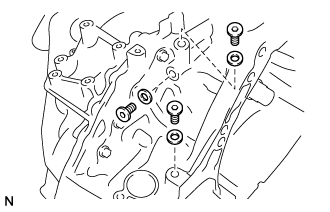 |
Using a 6 mm hexagon socket wrench, remove the 3 No. 2 transaxle case plugs from the transaxle housing.
Remove the 3 gaskets from the 3 No. 2 transaxle case plugs.
| 8. SUPPORT AUTOMATIC TRANSAXLE ASSEMBLY |
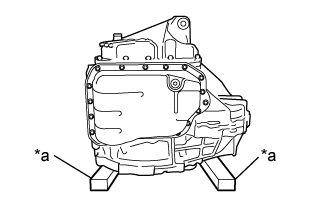 |
Support the automatic transaxle assembly with wooden blocks.
| *a | Wooden Block |
| 9. REMOVE OVERFLOW PLUG |
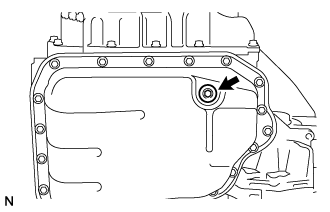 |
Using a 6 mm hexagon socket wrench, remove the overflow plug from the automatic transaxle oil pan sub-assembly.
Remove the gasket from the overflow plug.
| 10. REMOVE NO. 1 TRANSMISSION OIL FILLER TUBE |
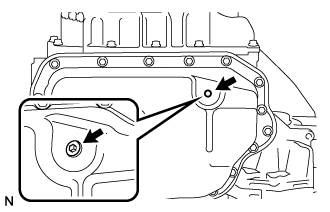 |
Using a 6 mm hexagon socket wrench, remove the No. 1 transmission oil filler tube from the automatic transaxle oil pan sub-assembly.
| 11. REMOVE AUTOMATIC TRANSAXLE OIL PAN SUB-ASSEMBLY |
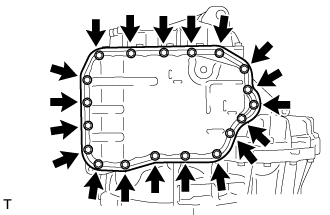 |
Remove the 19 bolts and automatic transaxle oil pan sub-assembly from the transaxle case sub-assembly.
| 12. REMOVE AUTOMATIC TRANSAXLE OIL PAN GASKET |
Remove the automatic transaxle oil pan gasket.
| 13. REMOVE TRANSMISSION OIL CLEANER MAGNET |
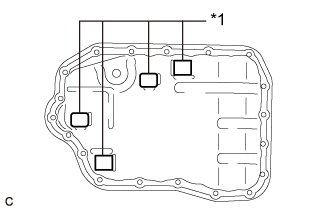 |
Remove the 4 transmission oil cleaner magnets from the automatic transaxle oil pan sub-assembly.
| *1 | Transmission Oil Cleaner Magnet |
| 14. INSPECT TRANSMISSION OIL CLEANER MAGNET |
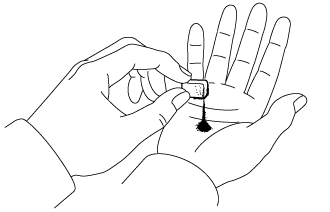 |
Use the removed transmission oil cleaner magnets to collect any steel chips. Examine the chips and particles in the automatic transaxle oil pan sub-assembly and on the transmission oil cleaner magnets to determine what type of wear might be found in the automatic transaxle assembly.
| Steel (magnetic) | Brass (non-magnetic) |
| Bearing, gear and plate wear | Bushing wear |
| 15. REMOVE VALVE BODY OIL STRAINER ASSEMBLY |
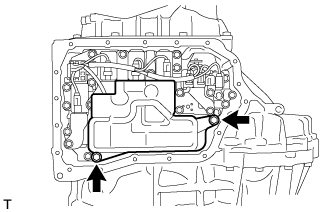 |
Remove the 2 bolts and valve body oil strainer assembly from the transmission valve body assembly.
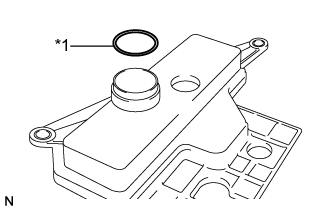 |
Remove the O-ring from the valve body oil strainer assembly.
| *1 | O-ring |
| 16. REMOVE TRANSMISSION VALVE BODY ASSEMBLY |
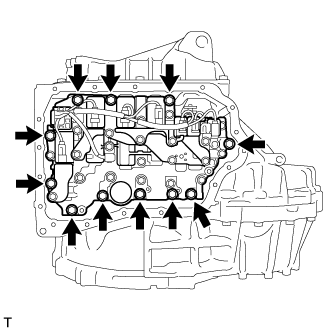 |
Remove the 11 bolts and transmission valve body assembly from the transaxle case sub-assembly.
| 17. REMOVE TRANSAXLE CASE GASKET |
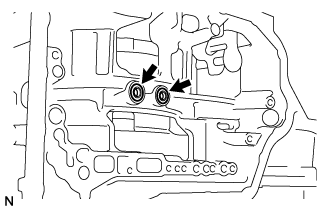 |
Remove the 2 transaxle case gaskets from the transaxle case sub-assembly.
| 18. INSPECT INPUT SHAFT SUB-ASSEMBLY END PLAY |
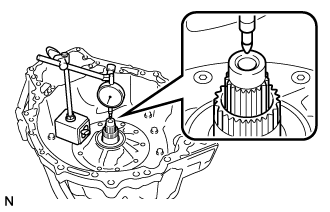 |
Using a dial indicator, measure the input shaft sub-assembly end play.
| 19. REMOVE REFILL PLUG |
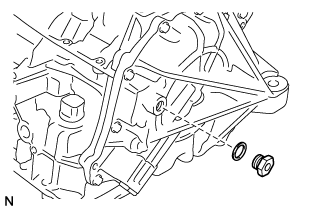 |
Remove the refill plug from the rear transaxle cover sub-assembly.
Remove the gasket from the refill plug.
| 20. REMOVE REAR TRANSAXLE COVER PLUG |
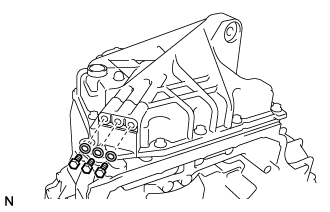 |
Remove the 3 rear transaxle cover plugs from the rear transaxle cover sub-assembly.
Using a screwdriver, remove the 3 O-rings from the 3 rear transaxle cover plugs.
| 21. REMOVE REAR TRANSAXLE COVER SUB-ASSEMBLY |
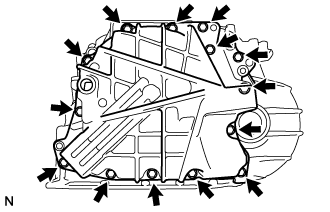 |
Remove the 14 bolts from the rear transaxle cover sub-assembly.
Using a brass bar and a hammer, tap on the circumference of the rear transaxle cover sub-assembly to remove the rear transaxle cover sub-assembly from the transaxle case sub-assembly.
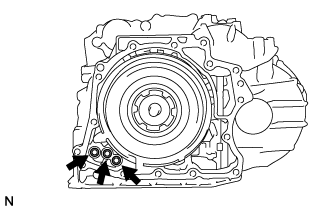 |
Using a screwdriver, remove the 3 O-rings from the transaxle case sub-assembly.
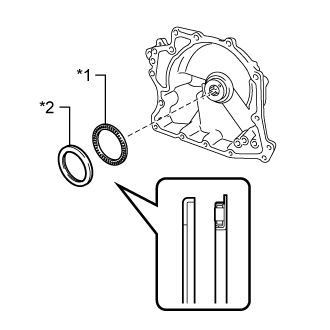 |
Remove the thrust needle roller bearing and thrust bearing race from the rear transaxle cover sub-assembly.
| *1 | Thrust Needle Roller Bearing |
| *2 | Thrust Bearing Race |
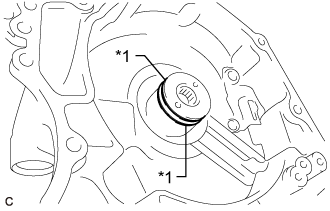 |
Using a screwdriver, remove the 2 oil seal rings from the rear transaxle cover sub-assembly.
| *1 | Oil Seal Ring |
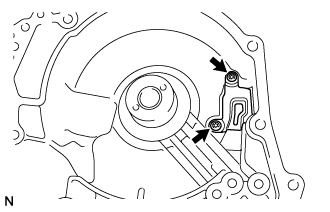 |
Using a T30 "TORX" socket wrench, remove the 2 "TORX" screws and rear transaxle cover plate from the rear transaxle cover sub-assembly.
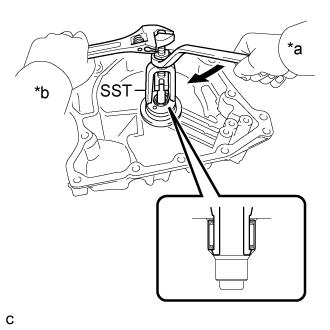 |
Using SST, remove the needle roller bearing from the rear transaxle cover sub-assembly.
| *a | Turn |
| *b | Hold |
| 22. REMOVE REAR MULTIPLE DISC CLUTCH ASSEMBLY |
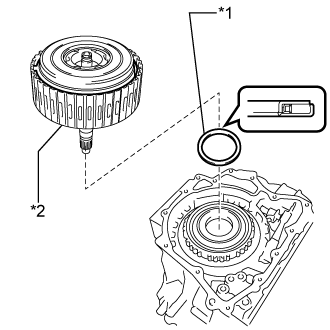 |
Remove the rear multiple disc clutch assembly from the transaxle case sub-assembly.
| *1 | Thrust Needle Roller Bearing |
| *2 | Rear Multiple Disc Clutch Assembly |
Remove the thrust needle roller bearing from the transaxle case sub-assembly.
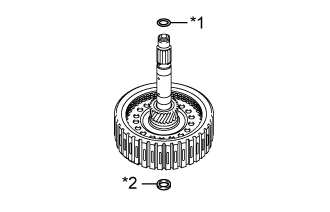 |
Using a screwdriver, remove the O-ring from the rear multiple disc clutch assembly.
| *1 | O-ring |
| *2 | Oil Seal Ring |
Using a screwdriver, remove the oil seal ring from the rear multiple disc clutch assembly.
| 23. REMOVE REAR PLANETARY SUN GEAR ASSEMBLY |
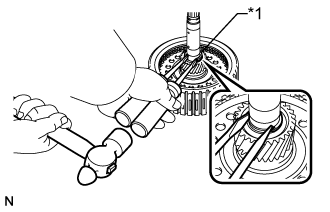 |
Using 2 screwdrivers and a hammer, remove the snap ring from the rear multiple disc clutch assembly.
| *1 | Snap Ring |
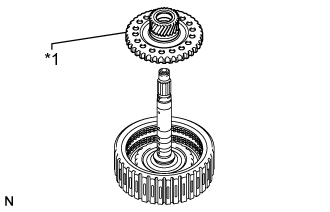 |
Remove the rear planetary sun gear assembly from the rear multiple disc clutch assembly.
| *1 | Rear Planetary Sun Gear Assembly |
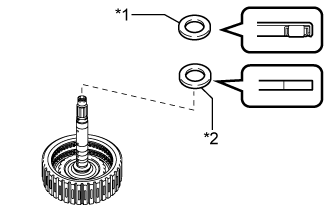 |
Remove the thrust needle roller bearing and thrust bearing race from the rear multiple disc clutch assembly.
| *1 | Thrust Needle Roller Bearing |
| *2 | Thrust Bearing Race |
| 24. INSPECT REAR PLANETARY SUN GEAR ASSEMBLY |
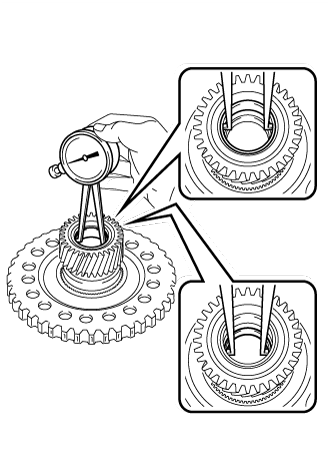 |
Using a caliper gauge, measure the inside diameter of the bushing of the rear planetary sun gear assembly.
| 25. REMOVE TRANSAXLE HOUSING |
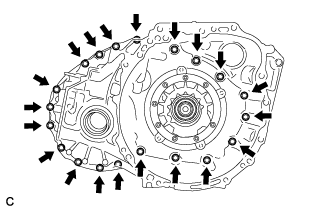 |
Remove the 20 bolts from the transaxle housing.
Using a brass bar and a hammer, tap on the circumference of the transaxle housing to remove the transaxle housing from the transaxle case sub-assembly.
| 26. REMOVE DIFFERENTIAL DRIVE PINION TAPERED ROLLER BEARING RH (OUTER RACE) |
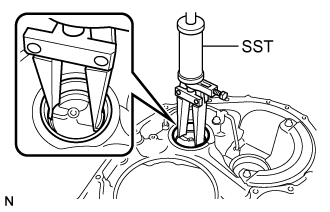 |
Using SST, remove the differential drive pinion tapered roller bearing RH (outer race) and shim from the transaxle housing.
| 27. REMOVE FRONT DIFFERENTIAL CASE FRONT TAPERED ROLLER BEARING (OUTER RACE) |
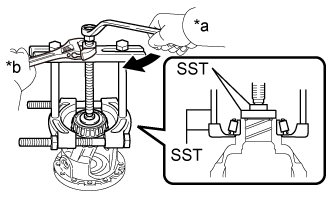 |
Using SST, remove the front differential case front tapered roller bearing (inner race) from the front differential case.
| *a | Turn |
| *b | Hold |
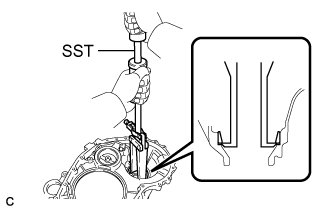 |
Using SST, remove the front differential case front tapered roller bearing (outer race) and shim from the transaxle housing.
| 28. REMOVE FRONT TRANSAXLE CASE OIL SEAL |
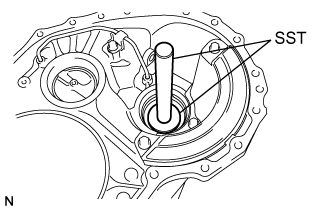 |
Using SST and a hammer, remove the front transaxle case oil seal from the transaxle housing.
| 29. REMOVE DIFFERENTIAL GEAR LUBE APPLY TUBE |
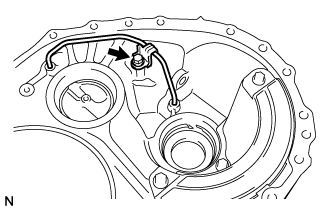 |
Remove the bolt, clamp and differential gear lube apply tube from the transaxle housing.
| 30. REMOVE TRANSAXLE HOUSING OIL SEPARATOR |
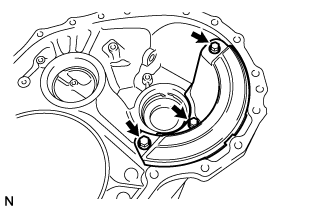 |
Remove the 3 bolts and transaxle housing oil separator from the transaxle housing.
| 31. REMOVE FRONT OIL PUMP ASSEMBLY |
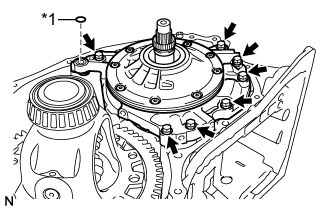 |
Remove the gasket from the front oil pump assembly.
| *1 | Gasket |
Remove the 7 bolts and front oil pump assembly from the transaxle case sub-assembly.
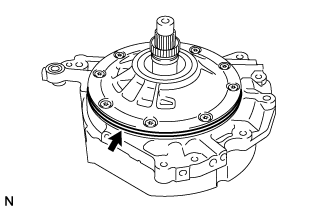 |
Remove the front oil pump body O-ring from the front oil pump body sub-assembly.
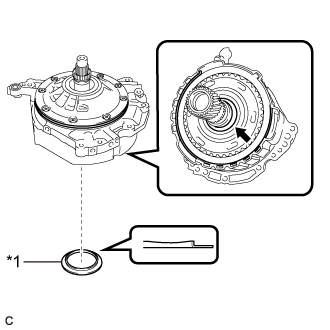 |
Remove the thrust bearing race from the underdrive planetary gear assembly.
| *1 | Thrust Bearing Race |
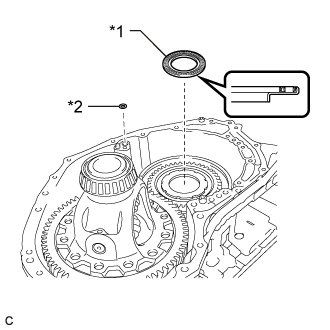 |
Remove the thrust needle roller bearing from the counter drive gear nut.
| *1 | Thrust Needle Roller Bearing |
| *2 | O-ring |
Remove the O-ring from the transaxle case sub-assembly.
| 32. REMOVE NO. 3 BRAKE DISC |
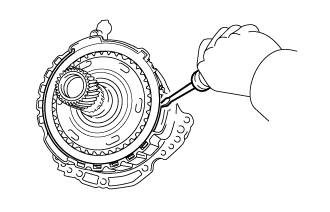 |
Using a screwdriver, remove the snap ring from the front oil pump assembly.
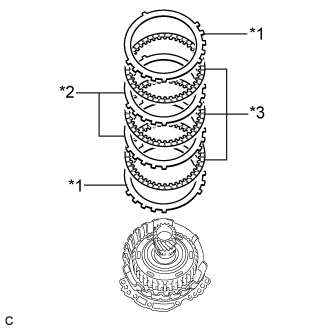 |
Remove the 2 No. 3 brake flanges, 3 No. 3 brake discs and 2 No. 3 brake plates from the front oil pump assembly.
| *1 | No. 3 Brake Flange |
| *2 | No. 3 Brake Plate |
| *3 | No. 3 Brake Disc |
| 33. INSPECT NO. 3 BRAKE DISC |
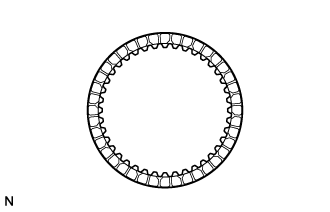 |
Check if the contact surfaces of the No. 3 brake discs, No. 3 brake plates and No. 3 brake flanges are worn or burnt.
If necessary, replace them.
| 34. REMOVE UNDERDRIVE PLANETARY GEAR ASSEMBLY |
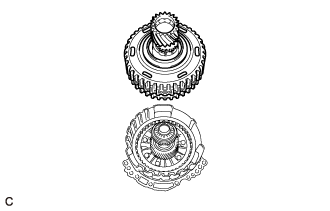 |
Remove the underdrive planetary gear assembly from the front oil pump assembly.
| 35. REMOVE NO. 3 BRAKE HUB |
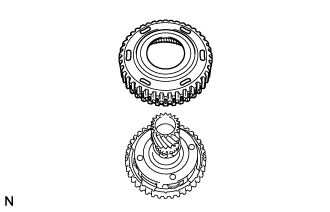 |
Remove the No. 3 brake hub from the underdrive planetary gear assembly.
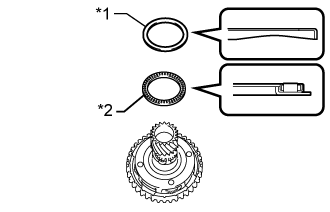 |
Remove the thrust needle roller bearing and thrust bearing race from the underdrive planetary gear assembly.
| *1 | Thrust Bearing Race |
| *2 | Thrust Needle Roller Bearing |
| 36. REMOVE PLANETARY SUN GEAR SUB-ASSEMBLY |
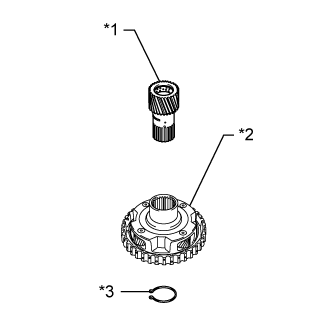 |
While expanding the snap ring with snap ring expander, remove the planetary sun gear sub-assembly from the underdrive planetary gear assembly.
| *1 | Planetary Sun Gear Sub-assembly |
| *2 | Underdrive Planetary Gear Assembly |
| *3 | Snap Ring |
Remove the snap ring from the underdrive planetary gear assembly.
| 37. INSPECT UNDERDRIVE PLANETARY GEAR ASSEMBLY |
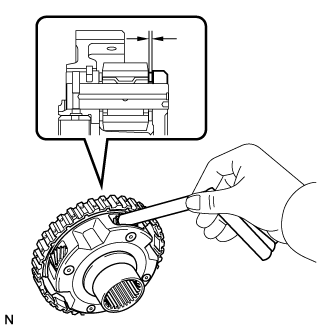 |
Using a feeler gauge, measure the clearance between the underdrive planetary gear case and each pinion gear.
| 38. INSPECT PLANETARY SUN GEAR SUB-ASSEMBLY |
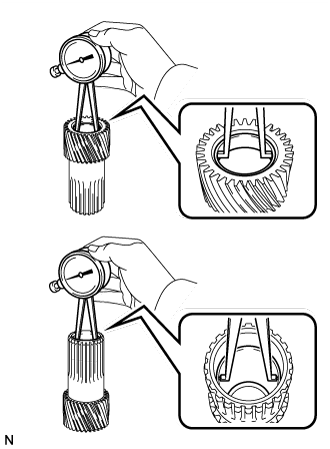 |
Using a caliper gauge, measure the inside diameters of the bushings of the planetary sun gear sub-assembly.
| 39. REMOVE INPUT SHAFT SUB-ASSEMBLY |
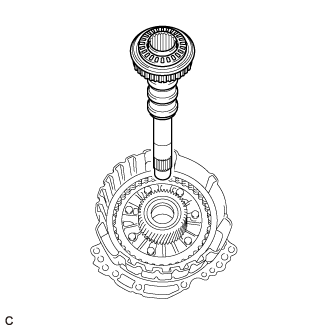 |
Remove the input shaft sub-assembly from the front oil pump assembly.
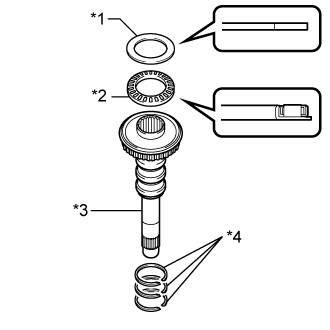 |
Remove the thrust needle roller bearing and thrust bearing race from the input shaft sub-assembly.
| *1 | Thrust Bearing Race |
| *2 | Thrust Needle Roller Bearing |
| *3 | Input Shaft Sub-assembly |
| *4 | Oil Seal Ring |
Using a screwdriver, remove the 3 oil seal rings from the input shaft sub-assembly.
| 40. REMOVE UNDERDRIVE PLANETARY SUN GEAR |
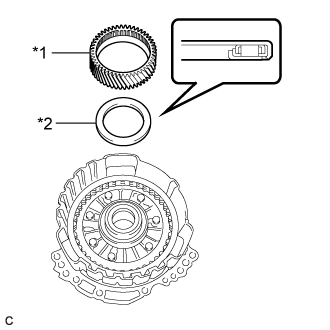 |
Remove the underdrive planetary sun gear from the front oil pump assembly.
| *1 | Underdrive Planetary Sun Gear |
| *2 | Thrust Needle Roller Bearing |
Remove the thrust needle roller bearing from the front oil pump assembly.
| 41. REMOVE NO. 1 BRAKE DISC |
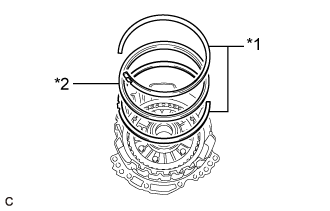 |
Using a screwdriver, remove the 2 snap rings and brake snap ring stopper from the front oil pump assembly.
| *1 | Snap Ring |
| *2 | Brake Snap Ring Stopper |
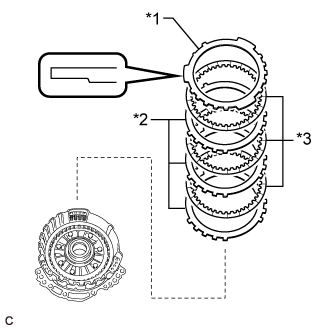 |
Remove the No. 1 brake flange, 3 No. 1 brake discs and 3 No. 1 brake plates from the front oil pump assembly.
| *1 | No. 1 Brake Flange |
| *2 | No. 1 Brake Plate |
| *3 | No. 1 Brake Disc |
| 42. INSPECT NO. 1 BRAKE DISC |
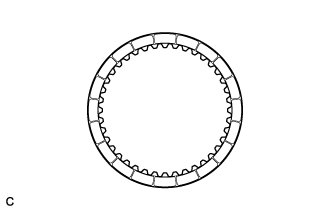 |
Check if the contact surfaces of the No. 1 brake discs, No. 1 brake plates and No. 1 brake flange are worn or burnt.
If necessary, replace them.
| 43. REMOVE 2ND BRAKE PISTON RETURN SPRING SUB-ASSEMBLY |
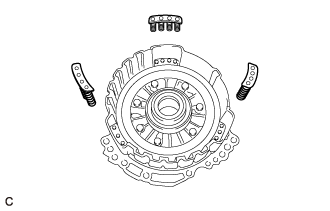 |
Remove the 3 2nd brake piston return spring sub-assemblies from the front oil pump assembly.
| 44. INSPECT 2ND BRAKE PISTON RETURN SPRING SUB-ASSEMBLY |
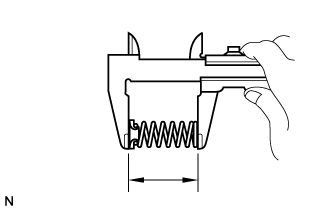 |
Using a vernier caliper, measure the free length of the 3 2nd brake piston return spring sub-assemblies including the spring seats.
| 45. REMOVE NO. 1 BRAKE PISTON |
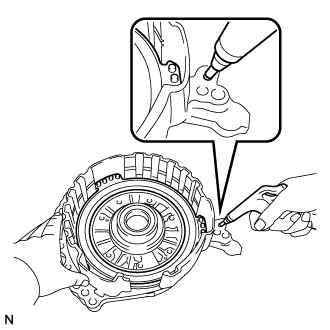 |
While holding the front oil pump assembly by hand, apply compressed air (392 kPa, 4.0 kgf/cm2, 57 psi) to the front oil pump assembly to remove the No. 1 brake piston.
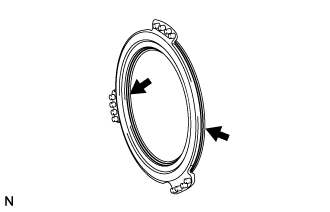 |
Using a screwdriver, remove the 2 O-rings from the No. 1 brake piston.
| 46. REMOVE FRONT DIFFERENTIAL CASE |
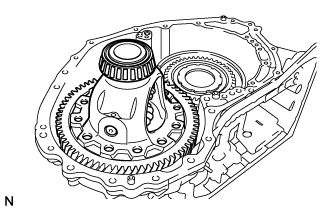 |
Remove the front differential case from the transaxle case sub-assembly.
| 47. REMOVE COUNTER DRIVE GEAR NUT |
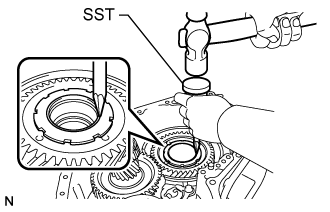 |
Using SST and a hammer, unstake the front planetary gear assembly.
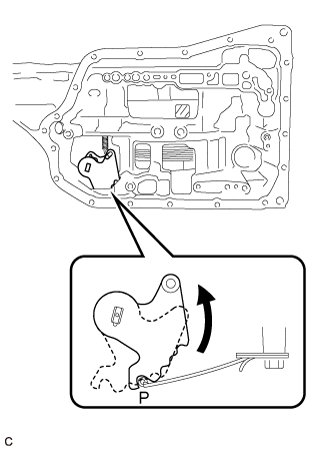 |
Turn the manual valve lever shaft sub-assembly counterclockwise to set it to the P position as shown in the illustration.
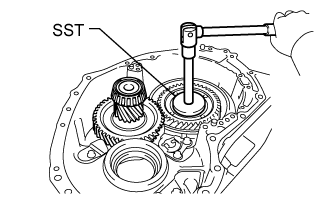 |
Using SST, remove the counter drive gear nut from the front planetary gear assembly.
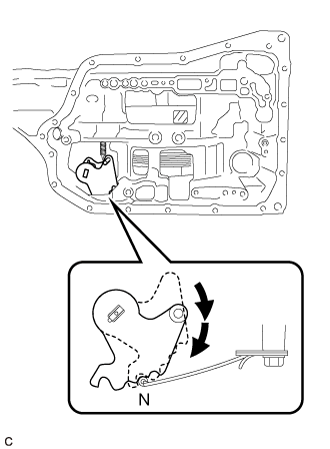 |
Turn the manual valve lever shaft sub-assembly 2 notches clockwise to set it to the N position as shown in the illustration.
| 48. REMOVE COUNTER DRIVEN GEAR |
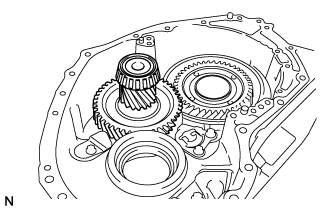 |
Remove the counter driven gear from the transaxle case sub-assembly.
| 49. REMOVE DIFFERENTIAL DRIVE PINION TAPERED ROLLER BEARING RH (INNER RACE) |
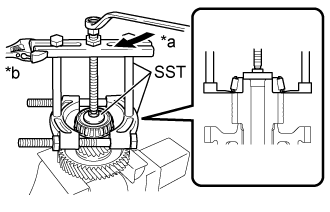 |
Using SST, remove the differential drive pinion tapered roller bearing RH (inner race) from the counter driven gear.
| *a | Turn |
| *b | Hold |
| 50. REMOVE DIFFERENTIAL DRIVE PINION TAPERED ROLLER BEARING LH (INNER RACE) |
| 51. REMOVE PAWL SHAFT CLAMP |
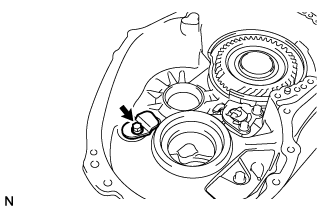 |
Remove the bolt and pawl shaft clamp from the transaxle case sub-assembly.
| 52. REMOVE NO. 1 TRANSMISSION CASE PLATE |
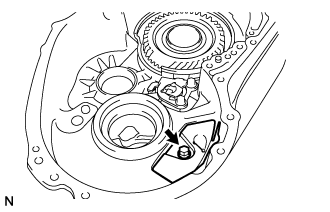 |
Remove the bolt and No. 1 transmission case plate from the transaxle case sub-assembly.
| 53. REMOVE PAWL STOPPER PLATE |
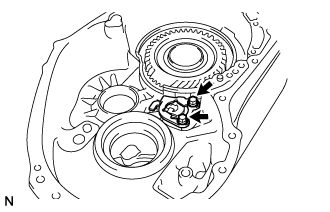 |
Remove the 2 bolts and pawl stopper plate from the transaxle case sub-assembly.
| 54. REMOVE PARKING LOCK SLEEVE |
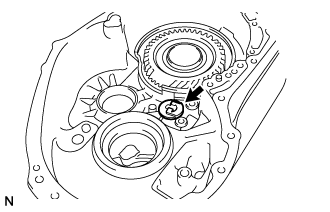 |
Remove the parking lock sleeve from the transaxle case sub-assembly.
| 55. REMOVE PARKING LOCK PAWL |
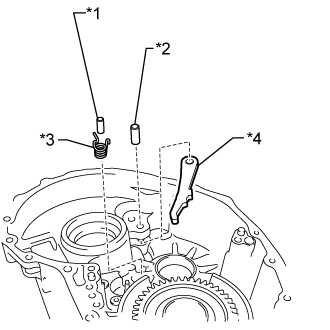 |
Remove the spring, parking lock pawl pin, parking lock pawl shaft and parking lock pawl from the transaxle case sub-assembly.
| *1 | Parking Lock Pawl Pin |
| *2 | Parking Lock Pawl Shaft |
| *3 | Spring |
| *4 | Parking Lock Pawl |
| 56. REMOVE DIFFERENTIAL DRIVE PINION TAPERED ROLLER BEARING LH (OUTER RACE) |
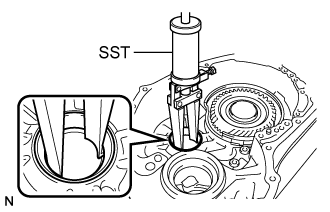 |
Using SST, remove the differential drive pinion tapered roller bearing LH (outer race) from the transaxle case sub-assembly.
| 57. REMOVE FRONT DIFFERENTIAL CASE REAR TAPERED ROLLER BEARING (OUTER RACE) |
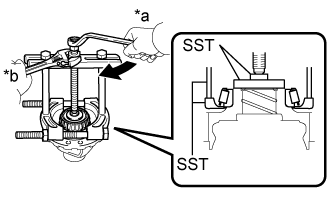 |
Using SST, remove the front differential case rear tapered roller bearing (inner race) from the front differential case.
| *a | Turn |
| *b | Hold |
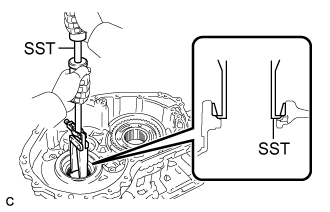 |
Using SST, remove the front differential case rear tapered roller bearing (outer race) from the transaxle case sub-assembly.
| 58. REMOVE TRANSAXLE CASE OIL SEAL |
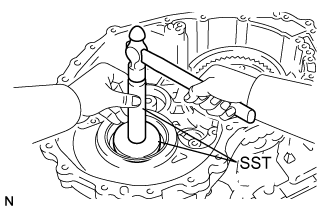 |
Using SST and a hammer, remove the transaxle case oil seal from the transaxle case sub-assembly.
| 59. REMOVE ONE-WAY CLUTCH ASSEMBLY |
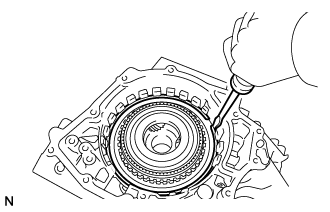 |
Using a screwdriver, remove the snap ring from the transaxle case sub-assembly.
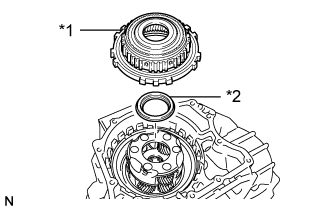 |
Remove the one-way clutch assembly with planetary ring gear from the transaxle case sub-assembly.
| *1 | One-way Clutch Assembly with Planetary Ring Gear |
| *2 | Thrust Needle Roller Bearing |
Remove the thrust needle roller bearing from the front planetary gear assembly.
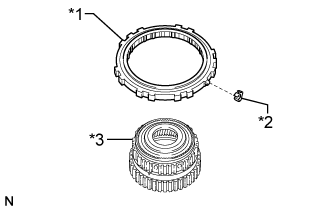 |
Remove the one-way clutch assembly from the planetary ring gear.
| *1 | One-way Clutch Assembly |
| *2 | Outer Race Retainer |
| *3 | Planetary Ring Gear |
Remove the outer race retainer from the one-way clutch assembly.
| 60. INSPECT ONE-WAY CLUTCH ASSEMBLY |
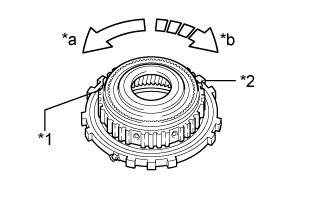 |
Temporarily install the one-way clutch assembly to the planetary ring gear.
| *1 | Planetary Ring Gear |
| *2 | One-way Clutch Assembly |
| *a | Free |
| *b | Lock |
Make sure that the one-way clutch assembly turns freely counterclockwise and locks when turned clockwise.
If the one-way clutch assembly does not operate normally, replace it.
| 61. REMOVE PLANETARY RING GEAR FLANGE |
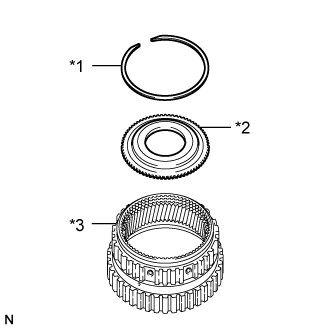 |
Using a screwdriver, remove the snap ring from the planetary ring gear.
| *1 | Snap Ring |
| *2 | Planetary Ring Gear Flange |
| *3 | Planetary Ring Gear |
Remove the planetary ring gear flange from the planetary ring gear.
| 62. REMOVE NO. 2 BRAKE DISC |
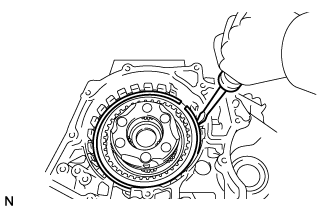 |
Using a screwdriver, remove the snap ring from the transaxle case sub-assembly.
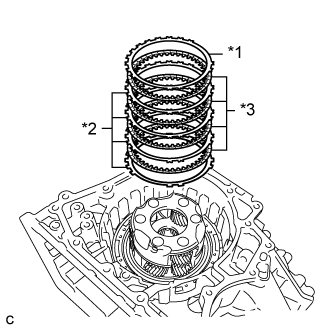 |
Remove the No. 2 brake flange, 4 No. 2 brake discs, and 4 No. 2 brake plates from the transaxle case sub-assembly.
| *1 | No. 2 Brake Flange |
| *2 | No. 2 Brake Plate |
| *3 | No. 2 Brake Disc |
| 63. INSPECT NO. 2 BRAKE DISC |
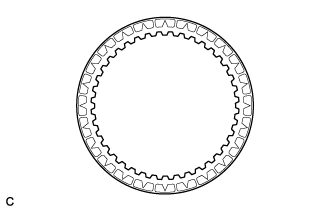 |
Check if the contact surfaces of the No. 2 brake discs, No. 2 brake plates and No. 2 brake flange are worn or burnt.
If necessary, replace them.
| 64. REMOVE 1ST AND REVERSE BRAKE RETURN SPRING SUB-ASSEMBLY |
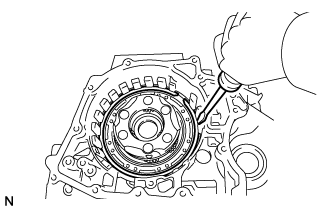 |
Using a screwdriver, remove the snap ring from the transaxle case sub-assembly.
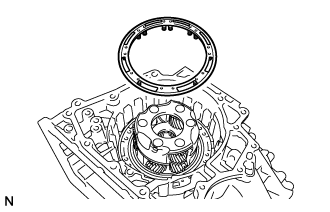 |
Remove the 1st and reverse brake return spring sub-assembly from the transaxle case sub-assembly.
| 65. INSPECT 1ST AND REVERSE BRAKE RETURN SPRING SUB-ASSEMBLY |
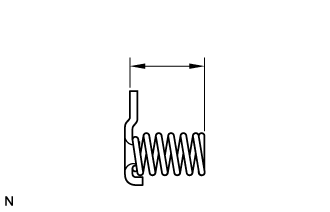 |
Using a vernier caliper, measure the free length of the 1st and reverse brake return spring sub-assembly including the spring seat.
| 66. REMOVE NO. 2 BRAKE PISTON |
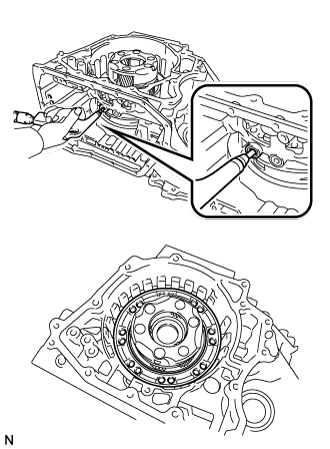 |
Apply compressed air (392 kPa, 4.0 kgf/cm2, 57 psi) to the ATF hole to remove the No. 2 brake piston from the transaxle case sub-assembly.
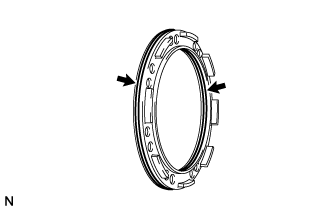 |
Using a screwdriver, remove the 2 O-rings from the No. 2 brake piston.
| 67. REMOVE FRONT PLANETARY GEAR ASSEMBLY |
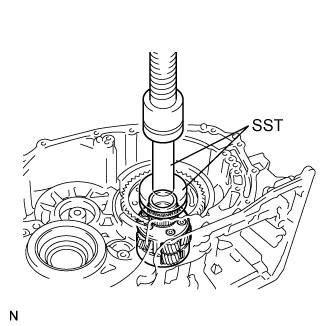 |
Using SST and a press, remove the front planetary gear assembly from the transaxle case sub-assembly.
| 68. REMOVE COUNTER DRIVE GEAR |
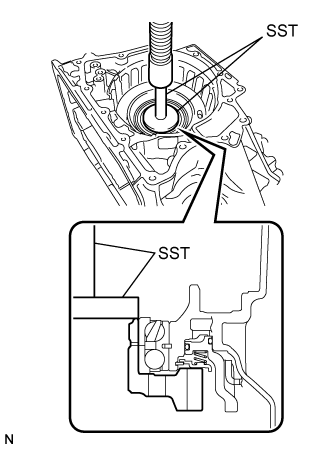 |
Using SST and a press, remove the counter drive gear with bearing inner race (front side) from the transaxle case sub-assembly.
Remove the bearing inner race (rear side).
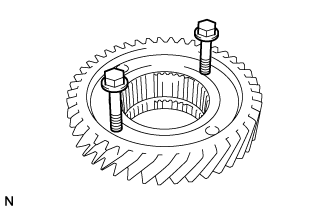 |
As shown in the illustration, tighten 2 service bolts evenly to make a clearance of approximately 5.0 mm (0.197 in.) between the counter drive gear and bearing inner race (front side).
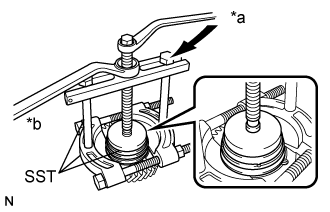 |
Using SST, remove the bearing inner race (front side) from the counter drive gear.
| *a | Turn |
| *b | Hold |
| 69. REMOVE NO. 3 BRAKE PISTON |
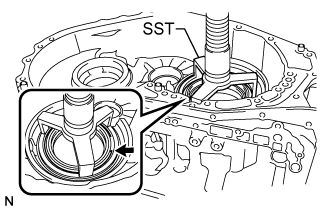 |
Place SST on the brake piston return spring and compress the brake piston return spring with a press.
Using a screwdriver, remove the snap ring from the transaxle case sub-assembly.
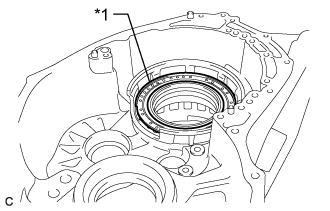 |
Remove the No. 3 brake piston return spring sub-assembly from the transaxle case sub-assembly.
| *1 | No. 3 Brake Piston Return Spring Sub-assembly |
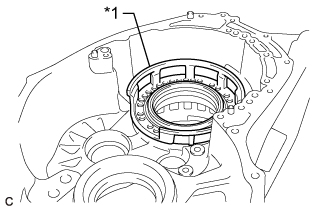 |
Remove the No. 3 brake piston from the transaxle case sub-assembly.
| *1 | No. 3 Brake Piston |
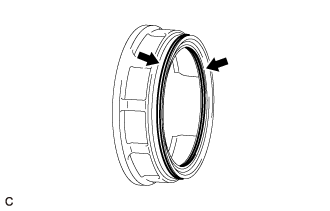 |
Using a screwdriver, remove the 2 O-rings from the No. 3 brake piston.
| 70. INSPECT NO. 3 BRAKE PISTON RETURN SPRING SUB-ASSEMBLY |
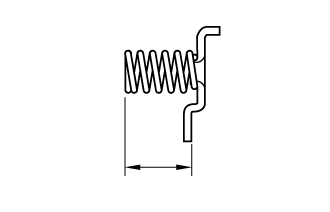 |
Using a vernier caliper, measure the free length of the No. 3 brake piston return spring sub-assembly including the spring seat.
| 71. REMOVE MANUAL DETENT SPRING SUB-ASSEMBLY |
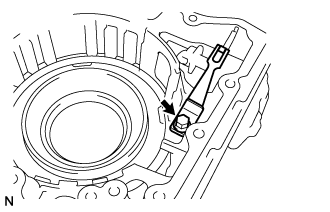 |
Remove the bolt, manual detent spring cover and manual detent spring sub-assembly from the transaxle case sub-assembly.
| 72. REMOVE PARKING LOCK ROD SUB-ASSEMBLY |
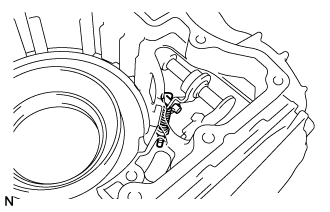 |
Remove the parking lock rod sub-assembly from the manual valve lever shaft sub-assembly.
| 73. REMOVE MANUAL VALVE LEVER SHAFT SUB-ASSEMBLY |
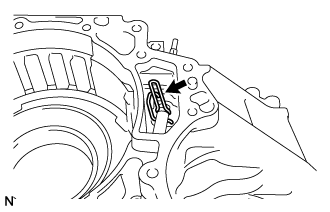 |
Using needle-nose pliers, remove the manual valve lever shaft retainer spring from the manual valve lever shaft sub-assembly.
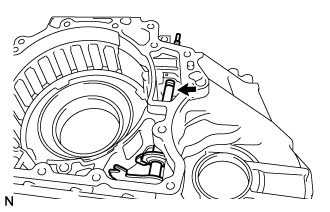 |
Remove the manual valve lever shaft sub-assembly from the transaxle case sub-assembly.
| 74. REMOVE MANUAL VALVE LEVER SHAFT OIL SEAL |
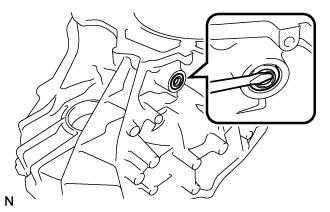 |
Using a screwdriver, remove the manual valve lever shaft oil seal from the transaxle case sub-assembly.