 |
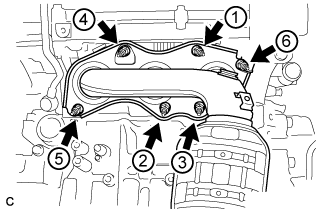
Using a 12 mm deep socket wrench, in several steps, uniformly tighten the 6 nuts in the order shown in the illustration.
- Torque:
- 21 N*m{ 214 kgf*cm , 15 ft.*lbf }
EXHAUST MANIFOLD > INSTALLATION |
| 1. INSTALL EXHAUST MANIFOLD SUB-ASSEMBLY LH |
Set a new gasket to the cylinder head sub-assembly.
Temporarily install the exhaust manifold sub-assembly LH with the 6 nuts.
Temporarily install the No. 2 manifold stay with the bolt and nut.
|
Using a 12 mm deep socket wrench, in several steps, uniformly tighten the 6 nuts in the order shown in the illustration.
| 2. INSTALL NO. 2 MANIFOLD STAY |
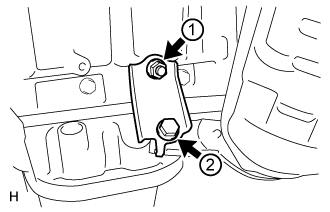 |
Tighten the bolt and nut in the order shown in the illustration.
| 3. INSTALL NO. 2 EXHAUST MANIFOLD HEAT INSULATOR |
Install the No. 2 exhaust manifold heat insulator with the 3 bolts.
| 4. INSTALL NO. 2 ENGINE OIL LEVEL DIPSTICK GUIDE |
Install a new O-ring to the No. 2 engine oil level dipstick guide.
Apply a light coat of engine oil to the O-ring.
Push in the No. 2 engine oil level dipstick guide end into the engine oil level dipstick guide.
Install the No. 2 engine oil level dipstick guide with the bolt.
Install the engine oil level dipstick.
| 5. INSTALL AIR FUEL RATIO SENSOR (for Bank 2) |
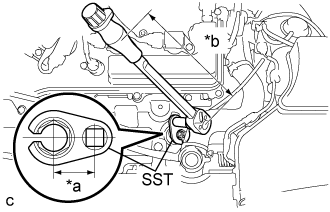 |
Using SST, install the air fuel ratio sensor to the exhaust manifold LH.
| *a | Fulcrum Length 30 mm (1.18 in.) |
| *b | Fulcrum Length 180 mm (7.09 in.) |
Connect the air fuel ratio sensor connector.
Install the wire harness clamp.
| 6. INSTALL EXHAUST MANIFOLD SUB-ASSEMBLY RH |
Set a new gasket to the cylinder head sub-assembly.
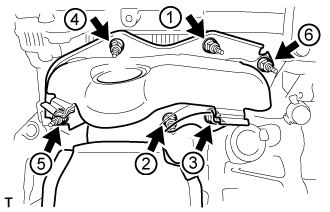 |
Using a 12 mm deep socket wrench, install the exhaust manifold sub-assembly RH by tightening the 6 nuts in the order shown in the illustration.
| 7. INSTALL AIR FUEL RATIO SENSOR (for Bank 1) |
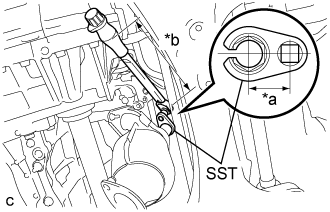 |
Using SST, install the air fuel ratio sensor to the exhaust manifold RH.
| *a | Fulcrum Length 30 mm (1.18 in.) |
| *b | Fulcrum Length 180 mm (7.09 in.) |
Connect the harness clamp.
Connect the air fuel ratio sensor connector.
| 8. INSTALL FRONT EXHAUST PIPE ASSEMBLY |
Install 3 new gaskets to the front exhaust pipe assembly.
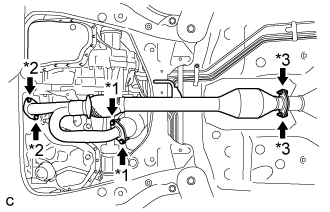 |
Install the front exhaust pipe assembly with the 4 bolts and 4 nuts.
| *1 | Bolt |
| *2 | Nut |
| *3 | Bolt and Nut |
Install the No. 1 exhaust pipe support bracket with the 2 bolts (for Rear Side).
Connect the 2 heated oxygen sensor connectors.
Install the 2 wire harnesses to the clamp.
| 9. INSTALL NO. 1 EXHAUST PIPE SUPPORT BRACKET (for Front Side) |
Install the No. 1 exhaust pipe support bracket with the 2 nuts (for Front Side).
| 10. INSTALL RADIATOR RESERVE TANK ASSEMBLY |
Install the radiator reserve tank with the 2 bolts.
Connect the radiator reserve tank hose.
| 11. INSTALL ENGINE UNDER COVER RH |
| 12. INSTALL FRONT WHEEL OPENING EXTENSION PAD RH |
| 13. INSPECT FOR EXHAUST GAS LEAK |