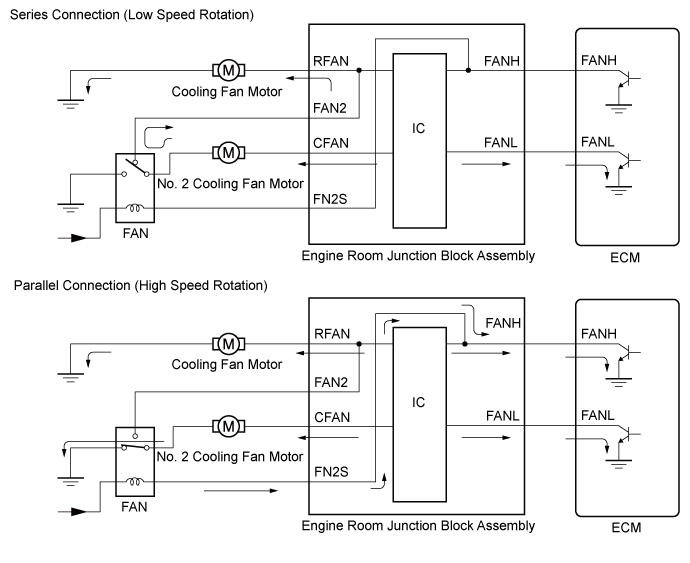
COOLING FAN SYSTEM > Cooling Fan Circuit |
| Input signal | FANL | OFF | ON | ON |
| FANH | OFF | OFF | ON | |
| Condition | Cooling fan motor | OFF | ON (Series connection (Low speed rotation)) | ON (Parallel connection (High speed rotation)) |
| No. 2 cooling fan motor | OFF | ON (Series connection (Low speed rotation)) | ON (Parallel connection (High speed rotation)) |
| 1.PERFORM ACTIVE TEST USING GTS (CONTROL THE ENGINE COOLING FAN) |
Connect the GTS to the DLC3.
Turn the engine switch on (IG).
Turn the GTS on.
Enter the following menus: Powertrain / Engine / Active Test / Control the Engine Cooling Fan.
Check the operation of the cooling fans using the GTS.
| Tester Operation | Fan Operation |
| HIGH | Cooling fans operates |
| LOW | Cooling fans operates |
| OFF | Cooling fans stops |
|
| ||||
| OK | ||
 | ||
| ||
| 2.CHECK HARNESS AND CONNECTOR (ECM - ENGINE ROOM JUNCTION BLOCK ASSEMBLY) |
Disconnect the A84 ECM connector.
Remove the engine room junction block assembly from the engine room relay block and junction block assembly.
Disconnect the engine room junction block assembly connector.
Measure the resistance according to the value(s) in the table below.
| Tester Connection | Condition | Specified Condition |
| A84-17 (FANL) - 1F-17 (FANL) | Always | Below 1 Ω |
| A84-4 (FANH) - 1F-9 (FANH) | Always | Below 1 Ω |
| A84-17 (FANL) or 1F-17 (FANL) - Body ground | Always | 10 kΩ or higher |
| A84-4 (FANH) or 1F-9 (FANH) - Body ground | Always | 10 kΩ or higher |
|
| ||||
| OK | |
 |
| 3.INSPECT ENGINE ROOM JUNCTION BLOCK ASSEMBLY (SIGNAL READING CHECK) |
Using a voltmeter, check the signal reading of the engine room junction block assembly .
|
| ||||
| OK | |
|
| 4.CHECK HARNESS AND CONNECTOR (ENGINE ROOM JUNCTION BLOCK ASSEMBLY POWER SOURCE) |
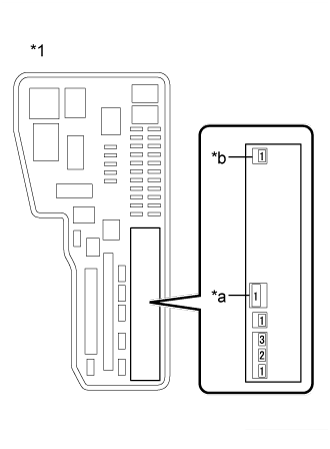 |
Remove the engine room junction block assembly from the engine room relay block and junction block assembly.
Measure the voltage according to the value(s) in the table below.
| Tester Connection | Condition | Specified Condition |
| (BATT) - Body ground | Always | 11 to 14 V |
| (ALT) - Body ground | Always | 11 to 14 V |
| *1 | Engine Room Relay Block and Junction Block Assembly |
| *a | ALT |
| *b | BATT |
|
| ||||
| OK | |
|
| 5.CHECK HARNESS AND CONNECTOR (ENGINE ROOM JUNCTION BLOCK ASSEMBLY - BODY GROUND) |
Remove the engine room junction block assembly from the engine room relay block and junction block assembly.
Disconnect the 1F and 1G engine room junction block assembly connector.
Measure the resistance according to the value(s) in the table below.
| Tester Connection | Condition | Specified Condition |
| 1F-3 (GND1) - Body ground | Always | Below 1 Ω |
| 1G-4 (GND2) - Body ground | Always | Below 1 Ω |
|
| ||||
| OK | |
|
| 6.CHECK HARNESS AND CONNECTOR (FAN RELAY POWER SOURCE) |
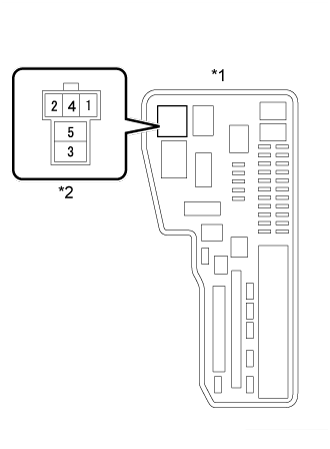 |
Remove the FAN relay from the engine room relay block and junction block assembly.
Turn the engine switch on (IG).
Measure the voltage according to the value(s) in the table below.
| Tester Connection | Condition | Specified Condition |
| 1 (FAN relay) - Body ground | Engine switch on (IG) | 11 to 14 V |
| *1 | Engine Room Relay Block and Junction Block Assembly |
| *2 | FAN Relay |
|
| ||||
| OK | |
|
| 7.CHECK HARNESS AND CONNECTOR (ENGINE ROOM JUNCTION BLOCK ASSEMBLY - FAN RELAY) |
Remove the engine room junction block assembly from the engine room relay block and junction block assembly.
Disconnect the 1F engine room junction block assembly connector.
Remove the FAN relay from the engine room relay block and junction block assembly.
Measure the resistance according to the value(s) in the table below.
| Tester Connection | Condition | Specified Condition |
| 1F-15 (IGN) - 1 (FAN relay) | Always | Below 1 Ω |
| 1F-15 (IGN) or 1 (FAN relay) - Body ground | Always | 10 kΩ or higher |
|
| ||||
| OK | |
|
| 8.INSPECT FAN RELAY |
Inspect the FAN relay (Click here).
|
| ||||
| OK | |
|
| 9.CHECK HARNESS AND CONNECTOR (FAN RELAY - ENGINE ROOM JUNCTION BLOCK ASSEMBLY) |
Remove the FAN relay from the engine room relay block and junction block assembly.
Remove the engine room junction block assembly from the engine room relay block and junction block assembly.
Disconnect the 1F engine room junction block assembly connector.
Measure the resistance according to the value(s) in the table below.
| Tester Connection | Condition | Specified Condition |
| 2 (FAN relay) - 1F-8 (FN2S) | Always | Below 1 Ω |
| 2 (FAN relay) or 1F-8 (FN2S) - Body ground | Always | 10 kΩ or higher |
|
| ||||
| OK | |
|
| 10.CHECK HARNESS AND CONNECTOR (FAN RELAY - ENGINE ROOM JUNCTION BLOCK ASSEMBLY) |
Remove the FAN relay from the engine room relay block and junction block assembly.
Remove the engine room junction block assembly from the engine room relay block and junction block assembly.
Disconnect the 1M engine room junction block assembly connector.
Measure the resistance according to the value(s) in the table below.
| Tester Connection | Condition | Specified Condition |
| 4 (FAN relay) - 1M-2 (FAN2) | Always | Below 1 Ω |
| 4 (FAN relay) or 1M-2 (FAN2) - Body ground | Always | 10 kΩ or higher |
|
| ||||
| OK | |
|
| 11.CHECK HARNESS AND CONNECTOR (FAN RELAY - BODY GROUND) |
Remove the FAN relay from the engine room relay block and junction block assembly.
Measure the resistance according to the value(s) in the table below.
| Tester Connection | Condition | Specified Condition |
| 5 (FAN relay) - Body ground | Always | Below 1 Ω |
|
| ||||
| OK | |
|
| 12.INSPECT NO. 2 COOLING FAN MOTOR |
Inspect the No. 2 cooling fan motor .
|
| ||||
| OK | |
|
| 13.CHECK HARNESS AND CONNECTOR (FAN RELAY - NO. 2 COOLING FAN MOTOR) |
Remove the FAN relay from the engine room relay block and junction block assembly.
Disconnect the A8 No. 2 cooling fan motor connector.
Measure the resistance according to the value(s) in the table below.
| Tester Connection | Condition | Specified Condition |
| 3 (FAN relay) - A8-1 | Always | Below 1 Ω |
| 3 (FAN relay) or A8-1 - Body ground | Always | 10 kΩ or higher |
|
| ||||
| OK | |
|
| 14.CHECK HARNESS AND CONNECTOR (NO. 2 COOLING FAN MOTOR - ENGINE ROOM JUNCTION BLOCK ASSEMBLY) |
Remove the engine room junction block assembly from the engine room relay block and junction block assembly.
Disconnect the 1M engine room junction block assembly connector.
Disconnect the A8 No. 2 cooling fan motor connector.
Measure the resistance according to the value(s) in the table below.
| Tester Connection | Condition | Specified Condition |
| A8-2 - 1M-3 (CFAN) | Always | Below 1 Ω |
| A8-2 or 1M-3 (CFAN) - Body ground | Always | 10 kΩ or higher |
|
| ||||
| OK | |
|
| 15.INSPECT COOLING FAN MOTOR |
Inspect the cooling fan motor .
|
| ||||
| OK | |
|
| 16.CHECK HARNESS AND CONNECTOR (ENGINE ROOM JUNCTION BLOCK ASSEMBLY - COOLING FAN MOTOR) |
Remove the engine room junction block assembly from the engine room relay block and junction block assembly.
Disconnect the 1M engine room junction block assembly connector.
Disconnect the A7 cooling fan motor connector.
Measure the resistance according to the value(s) in the table below.
| Tester Connection | Condition | Specified Condition |
| 1M-1 (RFAN) - A7-2 | Always | Below 1 Ω |
| 1M-1 (RFAN) or A7-2 - Body ground | Always | 10 kΩ or higher |
|
| ||||
| OK | |
|
| 17.CHECK HARNESS AND CONNECTOR (COOLING FAN MOTOR - BODY GROUND) |
Disconnect the A7 cooling fan motor connector.
Measure the resistance according to the value(s) in the table below.
| Tester Connection | Condition | Specified Condition |
| A7-1 - Body ground | Always | Below 1 Ω |
|
| ||||
| OK | ||
| ||
| ||

