Home › Power Source / Network · NETWORKING › LIN COMMUNICATION SYSTEM

LIN COMMUNICATION SYSTEM > TERMINALS OF ECU

for Preparation Click here


CHECK MAIN BODY ECU (MULTIPLEX NETWORK BODY ECU)


  1. Disconnect the 3D and 3B instrument panel junction block assembly connectors.
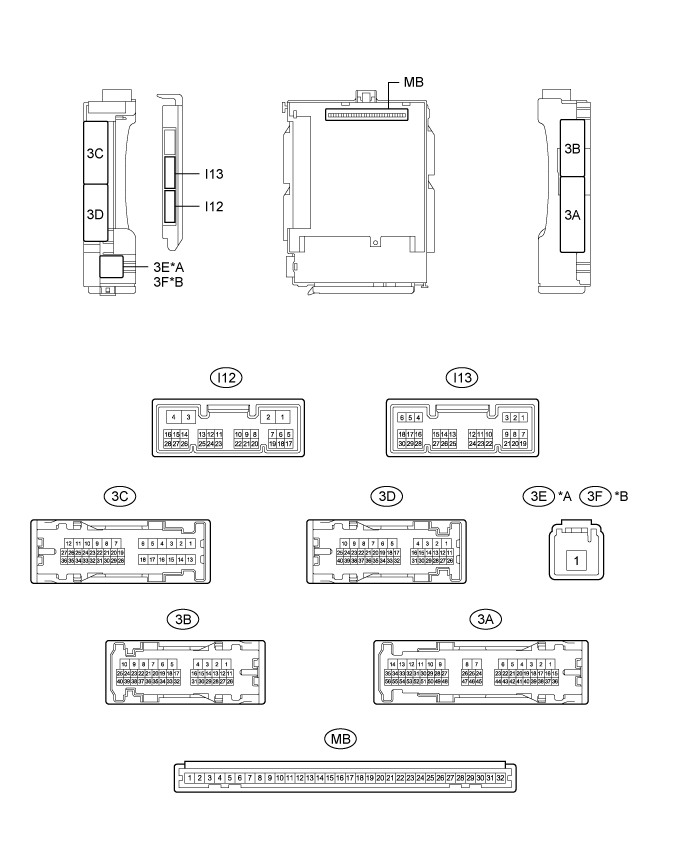

    B282096E25


    Text in Illustration 
    *A
    for LHD
    *B
    for RHD

  2. Measure the voltage and resistance according to the value(s) in the table below.

    HINT:
    Measure the values on the wire harness side with the connectors disconnected.


    Terminal No. (Symbol)
    Wiring Color
    Terminal Description
    Condition
    Specified Condition
    3D-31 (BECU) - Body ground
    V - Body ground
    Battery power supply
    Always
    11 to 14 V
    3B-7 (GND1) - Body ground
    W-B - Body ground
    Ground
    Always
    Below 1 Ω

  3. Reconnect the 3D and 3B instrument panel junction block assembly connectors.

  4. Check for pulses according to the value(s) in the table below.

    Terminal No. (Symbol)
    Wiring Color
    Terminal Description
    Condition
    Specified Condition
    3C-26 (LIN2) - 3B-7 (GND1)*
    P - W-B
    LIN communication line
    Ignition switch ON
    Pulse generation
    3B-30 (LIN2) - 3B-7 (GND1)
    P - W-B
    LIN communication line
    Ignition switch ON
    Pulse generation

    1. *: w/ Jam Protection Function on 4 Windows


CHECK POWER WINDOW REGULATOR MOTOR ASSEMBLY (for Driver Door)


  1. Disconnect the K9*1 or J9*2 power window regulator motor assembly (for driver door) connector.

    1. *1: for LHD
    2. *2: for RHD

    B286202E01


    Text in Illustration 
    *A
    for LHD
    *B
    for RHD

  2. Measure the voltage and resistance according to the value(s) in the table below.

    HINT:
    Measure the values on the wire harness side with the connector disconnected.


    for LHD 
    Terminal No. (Symbol)
    Wiring Color
    Terminal Description
    Condition
    Specified Condition
    K9-2 (B) - K9-1 (GND)
    GR*1 - W-B
    W*2 - W-B
    Battery power supply
    Always
    11 to 14 V
    K9-1 (GND) - Body ground
    W-B - Body ground
    Ground
    Always
    Below 1 Ω
    1. *1: except TMMK Made
      *2: for TMMK Made

    for RHD 
    Terminal No. (Symbol)
    Wiring Color
    Terminal Description
    Condition
    Specified Condition
    J9-2 (B) - J9-1 (GND)
    GR - W-B
    Battery power supply
    Always
    11 to 14 V
    J9-1 (GND) - Body ground
    W-B - Body ground
    Ground
    Always
    Below 1 Ω

  3. Reconnect the K9*1 or J9*2 power window regulator motor assembly (for driver door) connector.

    1. *1: for LHD
    2. *2: for RHD

  4. Check for pulses according to the value(s) in the table below.

    for LHD 
    Terminal No. (Symbol)
    Wiring Color
    Terminal Description
    Condition
    Specified Condition
    K9-9 (LIN) - K9-1 (GND)
    P - W-B
    LIN communication line
    Ignition switch ON
    Pulse generation

    for RHD 
    Terminal No. (Symbol)
    Wiring Color
    Terminal Description
    Condition
    Specified Condition
    J9-9 (LIN) - J9-1 (GND)
    L - W-B
    LIN communication line
    Ignition switch ON
    Pulse generation


CHECK POWER WINDOW REGULATOR MOTOR ASSEMBLY (for Front Passenger Door)


  1. Disconnect the J9*1 or K9*2 power window regulator motor assembly (for front passenger door) connector.

    1. *1: for LHD
    2. *2: for RHD

    B286202E02


    Text in Illustration 
    *A
    for LHD
    *B
    for RHD

  2. Measure the voltage and resistance according to the value(s) in the table below.

    HINT:
    Measure the values on the wire harness side with the connector disconnected.


    for LHD 
    Terminal No. (Symbol)
    Wiring Color
    Terminal Description
    Condition
    Specified Condition
    J9-2 (B) - J9-1 (GND)
    GR - W-B
    Battery power supply
    Always
    11 to 14 V
    J9-1 (GND) - Body ground
    W-B - Body ground
    Ground
    Always
    Below 1 Ω

    for RHD 
    Terminal No. (Symbol)
    Wiring Color
    Terminal Description
    Condition
    Specified Condition
    K9-2 (B) - K9-1 (GND)
    GR - W-B
    Battery power supply
    Always
    11 to 14 V
    K9-1 (GND) - Body ground
    W-B - Body ground
    Ground
    Always
    Below 1 Ω

  3. Reconnect the J9*1 or K9*2 power window regulator motor assembly (for front passenger door) connector.

    1. *1: for LHD
    2. *2: for RHD

  4. Check for pulses according to the value(s) in the table below.

    for LHD 
    Terminal No. (Symbol)
    Wiring Color
    Terminal Description
    Condition
    Specified Condition
    J9-9 (LIN) - J9-1 (GND)
    P - W-B
    LIN communication line
    Ignition switch ON
    Pulse generation

    for RHD 
    Terminal No. (Symbol)
    Wiring Color
    Terminal Description
    Condition
    Specified Condition
    K9-9 (LIN) - K9-1 (GND)
    P - W-B
    LIN communication line
    Ignition switch ON
    Pulse generation


CHECK POWER WINDOW REGULATOR MOTOR ASSEMBLY (for Rear RH Door) (w/ Jam Protection Function on 4 Windows)


  1. Disconnect the L2 power window regulator motor assembly (for rear RH door) connector.


    B203471E94

  2. Measure the voltage and resistance according to the value(s) in the table below.

    HINT:
    Measure the values on the wire harness side with the connector disconnected.


    Terminal No. (Symbol)
    Wiring Color
    Terminal Description
    Condition
    Specified Condition
    L2-2 (B) - L2-1 (GND)
    G - W-B
    Battery power supply
    Always
    11 to 14 V
    L2-1 (GND) - Body ground
    W-B - Body ground
    Ground
    Always
    Below 1 Ω

  3. Reconnect the L2 power window regulator motor assembly (for rear RH door) connector.

  4. Check for pulses according to the value(s) in the table below.

    Terminal No. (Symbol)
    Wiring Color
    Terminal Description
    Condition
    Specified Condition
    L2-9 (LIN) - L2-1 (GND)
    P - W-B
    LIN communication line
    Ignition switch ON
    Pulse generation


CHECK POWER WINDOW REGULATOR MOTOR ASSEMBLY (for Rear LH Door) (w/ Jam Protection Function on 4 Windows)


  1. Disconnect the M2 power window regulator motor assembly (for rear LH door) connector.


    B203471E95

  2. Measure the voltage and resistance according to the value(s) in the table below.

    HINT:
    Measure the values on the wire harness side with the connector disconnected.


    Terminal No. (Symbol)
    Wiring Color
    Terminal Description
    Condition
    Specified Condition
    M2-2 (B) - M2-1 (GND)
    G - W-B
    Battery power supply
    Always
    11 to 14 V
    M2-1 (GND) - Body ground
    W-B - Body ground
    Ground
    Always
    Below 1 Ω

  3. Reconnect the M2 power window regulator motor assembly (for rear LH door) connector.

  4. Check for pulses according to the value(s) in the table below.

    Terminal No. (Symbol)
    Wiring Color
    Terminal Description
    Condition
    Specified Condition
    M2-9 (LIN) - M2-1 (GND)
    P - W-B
    LIN communication line
    Ignition switch ON
    Pulse generation


CHECK MULTIPLEX NETWORK MASTER SWITCH ASSEMBLY (w/ Jam Protection Function on 4 Windows)


  1. Disconnect the K3*1 or J3*2 multiplex network master switch assembly connector.

    1. *1: for LHD
    2. *2: for RHD

    B131578E27


    Text in Illustration 
    *A
    for LHD
    *B
    for RHD

  2. Measure the voltage and resistance according to the value(s) in the table below.

    HINT:
    Measure the values on the wire harness side with the connector disconnected.


    for LHD 
    Terminal No. (Symbol)
    Wiring Color
    Terminal Description
    Condition
    Specified Condition
    K3-11 (B) - K3-12 (GND)
    W - BR
    Battery power supply
    Always
    11 to 14 V
    K3-12 (GND) - Body ground
    BR - Body ground
    Ground
    Always
    Below 1 Ω

    for RHD 
    Terminal No. (Symbol)
    Wiring Color
    Terminal Description
    Condition
    Specified Condition
    J3-11 (B) - J3-12 (GND)
    W - BR
    Battery power supply
    Always
    11 to 14 V
    J3-12 (GND) - Body ground
    BR - Body ground
    Ground
    Always
    Below 1 Ω

  3. Reconnect the K3*1 or J3*2 multiplex network master switch assembly connector.

    1. *1: for LHD
    2. *2: for RHD

  4. Check for pulses according to the value(s) in the table below.

    for LHD 
    Terminal No. (Symbol)
    Wiring Color
    Terminal Description
    Condition
    Specified Condition
    K3-17 (LIN1) - K3-12 (GND)
    P - BR
    LIN communication line
    Ignition switch ON
    Pulse generation

    for RHD 
    Terminal No. (Symbol)
    Wiring Color
    Terminal Description
    Condition
    Specified Condition
    J3-17 (LIN1) - J3-12 (GND)
    P - BR
    LIN communication line
    Ignition switch ON
    Pulse generation


CHECK POWER WINDOW REGULATOR MASTER SWITCH ASSEMBLY (w/ Jam Protection Function on Front Door Windows)


  1. Disconnect the K15 power window regulator master switch assembly connector.


    B164269E39

  2. Measure the voltage and resistance according to the value(s) in the table below.

    HINT:
    Measure the values on the wire harness side with the connector disconnected.


    Terminal No. (Symbol)
    Wiring Color
    Terminal Description
    Condition
    Specified Condition
    K15-3 (B) - K15-1 (GND)
    R - W-B
    Battery power supply
    Always
    11 to 14 V
    K15-1 (GND) - Body ground
    W-B - Body ground
    Ground
    Always
    Below 1 Ω

  3. Reconnect the K15 power window regulator master switch assembly connector.

  4. Check for pulses according to the value(s) in the table below.

    Terminal No. (Symbol)
    Wiring Color
    Terminal Description
    Condition
    Specified Condition
    K15-6 (LIN1) - K15-1 (GND)
    P - W-B
    LIN communication line
    Ignition switch ON
    Pulse generation


CHECK SLIDING ROOF ECU (SLIDING ROOF DRIVE GEAR SUB-ASSEMBLY) (w/ Sliding Roof System)


  1. Disconnect the S4 sliding roof ECU (sliding roof drive gear sub-assembly) connector.


    B270994E02

  2. Measure the voltage and resistance according to the value(s) in the table below.

    HINT:
    Measure the values on the wire harness side with the connector disconnected.


    Terminal No. (Symbol)
    Wiring Color
    Terminal Description
    Condition
    Specified Condition
    S4-8 (B) - S4-12 (E)
    B - W-B
    Battery power supply
    Always
    11 to 14 V
    S4-12 (E) - Body ground
    W-B - Body ground
    Ground
    Always
    Below 1 Ω

  3. Reconnect the S4 sliding roof ECU (sliding roof drive gear sub-assembly) connector.

  4. Check for pulses according to the value(s) in the table below.

    Terminal No. (Symbol)
    Wiring Color
    Terminal Description
    Condition
    Specified Condition
    S4-11 (MPX1) - S4-12 (E)
    P - W-B
    LIN communication line
    Ignition switch ON
    Pulse generation


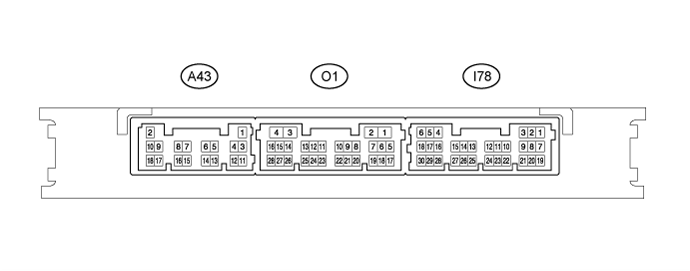
CHECK CERTIFICATION ECU (SMART KEY ECU ASSEMBLY) (w/ Smart Entry and Start System)


  1. Disconnect the A43 certification ECU (smart key ECU assembly) connector.


    B264892E16

  2. Measure the voltage and resistance according to the value(s) in the table below.

    HINT:
    Measure the values on the wire harness side with the connector disconnected.


    Terminal No. (Symbol)
    Wiring Color
    Terminal Description
    Condition
    Specified Condition
    A43-2 (+B) - A43-11 (E)
    W - W
    Battery power supply
    Always
    11 to 14 V
    A43-11 (E) - Body ground
    W - Body ground
    Ground
    Always
    Below 1 Ω

  3. Reconnect the A43 certification ECU (smart key ECU assembly) connector.

  4. Measure the voltage according to the value(s) in the table below.

  5. Check for pulses according to the value(s) in the table below.

    Terminal No. (Symbol)
    Wiring Color
    Terminal Description
    Condition
    Specified Condition
    I78-5 (IG) - A43-11 (E)
    LG - W
    IG power supply
    Ignition switch ON
    11 to 14 V
    I78-5 (IG) - A43-11 (E)
    LG - W
    IG power supply
    Ignition switch off
    Below 1 V
    I78-17 (LIN) - A43-11 (E)
    Y*1 - W
    LIN communication line
    Ignition switch ON
    Pulse generation
    V*2 - W
    LIN communication line
    Ignition switch ON
    Pulse generation

    1. *1: w/ Entry Function on Driver Door except TMMK Made
    2. *2: w/o Entry Function on Driver Door or for TMMK Made


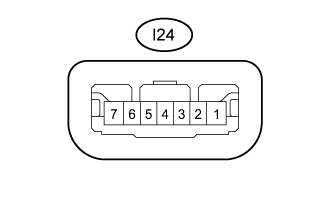
CHECK STEERING LOCK ECU (STEERING LOCK ACTUATOR ASSEMBLY) (w/ Smart Entry and Start System)


    C211401E12
  1. Disconnect the I24 steering lock ECU (steering lock actuator assembly) connector.

  2. Measure the resistance and voltage according to the value(s) in the table below.

    Terminal No. (Symbol)
    Wiring Color
    Terminal Description
    Condition
    Specified Condition
    I24-1 (GND) - Body ground
    W-B - Body ground
    Ground
    Always
    Below 1 Ω
    I24-7 (B) - Body ground
    B - Body ground
    Battery power supply
    Always
    11 to 14 V
    I24-6 (IG2) - Body ground
    LG - Body ground
    IG power supply
    Ignition switch ON
    11 to 14 V

  3. Reconnect the I24 steering lock ECU (steering lock actuator assembly) connector.

  4. Check for pulses according to the value(s) in the table below.

    Terminal No. (Symbol)
    Wiring Color
    Terminal Description
    Condition
    Specified Condition
    I24-5 (LIN) - I24-1 (GND)
    Y*1 - W-B
    LIN communication line
    Ignition switch ON
    Pulse generation
    V*2 - W-B
    LIN communication line
    Ignition switch ON
    Pulse generation

    1. *1: w/ Entry Function on Driver Door except TMMK Made
    2. *2: w/o Entry Function on Driver Door or for TMMK Made


CHECK ID CODE BOX (IMMOBILISER CODE ECU) (w/ Entry Function on Driver Door except TMMK Made)


  1. Disconnect the I20 ID code box (immobiliser code ECU) connector.


    B278917E02

  2. Measure the voltage and resistance according to the value(s) in the table below.

    HINT:
    Measure the values on the wire harness side with the connector disconnected.


    Terminal No. (Symbol)
    Wiring Color
    Terminal Description
    Condition
    Specified Condition
    I20-1 (+B) - I20-5 (GND)
    W - W-B
    Battery power supply
    Always
    11 to 14 V
    I20-5 (GND) - Body ground
    W-B - Body ground
    Ground
    Always
    Below 1 Ω

  3. Reconnect the I20 ID code box (immobiliser code ECU) connector.

  4. Check for pulses according to the value(s) in the table below.

    Terminal No. (Symbol)
    Wiring Color
    Terminal Description
    Condition
    Specified Condition
    I20-2 (LIN1) - I20-5 (GND)
    Y - W-B
    LIN communication line
    Ignition switch ON
    Pulse generation