NOISE FILTER (for TMMK Made) > REMOVAL |
| 1. PRECAUTION |
| 2. DISCONNECT CABLE FROM NEGATIVE BATTERY TERMINAL |
| 3. REMOVE REAR SEAT CUSHION ASSEMBLY |
![]() |
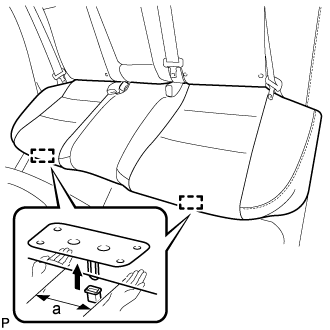
Lift up the front edge of the rear seat cushion assembly as shown in the illustration and disengage the 2 rear seat cushion frame hooks on the front side of the rear seat cushion assembly from the 2 rear seat cushion lock hooks.
| a | 100 mm (3.94 in.) or less |
Pass the 2 rear seat inner belt assemblies through the rear seat cushion assembly and remove the rear seat cushion assembly.
| 4. REMOVE REAR SEAT CUSHION LOCK HOOK |
![]() |
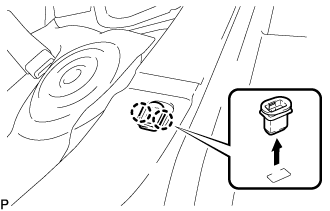
Disengage the 2 claws to remove the rear seat cushion lock hook as shown in the illustration.
| 5. REMOVE REAR SIDE SEATBACK ASSEMBLY LH |
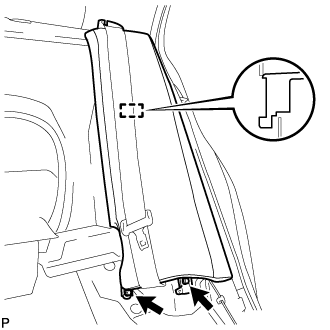
Disconnect the rear seat outer belt assembly from the rear seat shoulder belt guide.
Disconnect the connector.
![]() |
Remove the 2 bolts.
Disengage the hook and remove the rear side seatback assembly LH.
| 6. REMOVE RADIO SETTING CONDENSER (for High Mounted Stop Light) |
![]() |
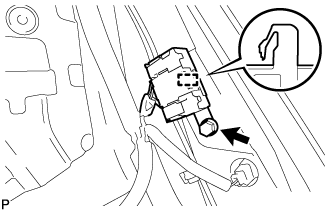
Remove the bolt.
Disengage the clamp and disconnect the radio setting condenser with wire harness from the vehicle body.
![]() |
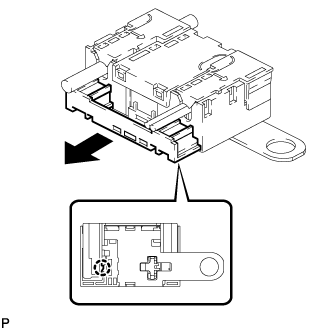
Disengage the claw and pull out the cover as shown in the illustration.
![]() |
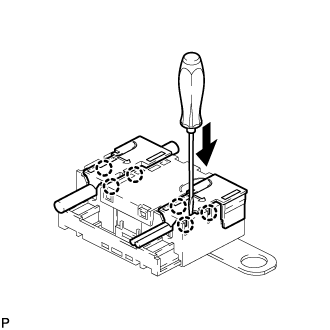
Using a screwdriver, disengage the 6 claws and remove the 2 terminal covers with wire harness from the condenser.
![]() |
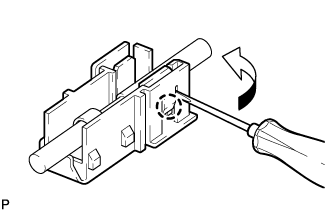
Using a screwdriver, bend back and break off the claw as shown in the illustration.
Remove the terminal cover from the wire harness.
| 7. DISCONNECT REAR DOOR OPENING TRIM WEATHERSTRIP LH (for Window Defogger) |
Disconnect the rear door opening trim weatherstrip LH.
| 8. REMOVE ROOF SIDE INNER GARNISH LH (for Window Defogger) |
![]() |
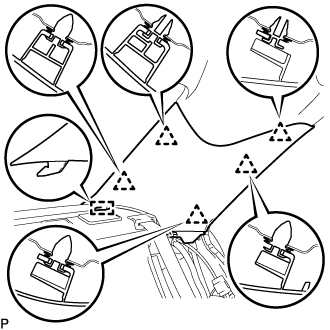
Disengage the 5 clips.
Disengage the guide and remove the roof side inner garnish LH.
Remove the 5 clips from the roof side inner garnish LH.
| 9. REMOVE RADIO SETTING CONDENSER (for Window Defogger) |
![]() |
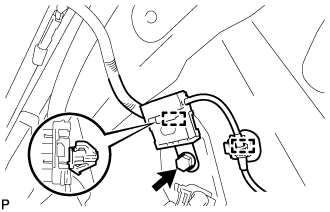
Remove the bolt.
Disengage the 2 clamps and disconnect the radio setting condenser with wire harness from the vehicle body.
![]() |
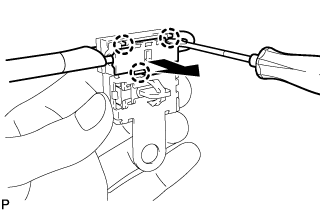
Using a screwdriver, disengage the 3 claws and remove the terminal cover with wire harness from the condenser.
![]() |
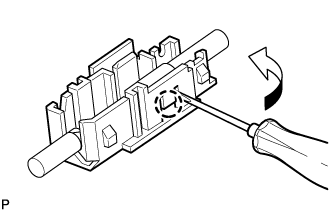
Using a screwdriver, bend back and break off the claw as shown in the illustration.
Remove the terminal cover from the wire harness.