Home › Vehicle Interior › SEAT › POWER SEAT SWITCH (for Rear Side)

POWER SEAT SWITCH (for Rear Side) > REMOVAL

for Preparation Click here


1. PRECAUTION (w/ Rear Seat Side Airbag)

CAUTION:
Be sure to read Precaution thoroughly before servicing (Click here).

NOTICE:
After turning the ignition switch off, waiting time may be required before disconnecting the cable from the negative (-) battery terminal. Therefore, make sure to read the disconnecting the cable from the negative (-) battery terminal notices before proceeding with work (Click here).


2. DISCONNECT CABLE FROM NEGATIVE BATTERY TERMINAL (w/ Rear Seat Side Airbag)

CAUTION:
Wait at least 90 seconds after disconnecting the cable from the negative (-) battery terminal to disable the SRS system.

NOTICE:
When disconnecting the cable, some systems need to be initialized after the cable is reconnected (Click here).


3. REMOVE REAR SEAT HEADREST ASSEMBLY


4. REMOVE REAR CENTER SEAT HEADREST ASSEMBLY


5. REMOVE REAR SEAT CUSHION ASSEMBLY


    B290774E01
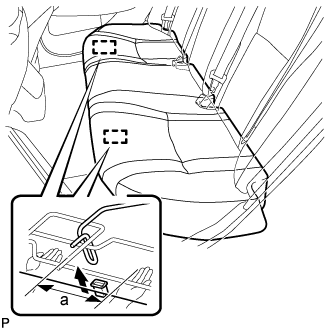
  1. Lift up the front edge of the rear seat cushion assembly as shown in the illustration and disengage the 2 rear seat cushion frame hooks on the front side of the rear seat cushion assembly from the 2 rear seat cushion lock hooks.
    Standard Measurement 
    a
    100 mm (3.94 in.) or less

    NOTICE:
    Be sure to hold the part of the rear seat cushion assembly directly next to the rear seat cushion lock hooks when lifting it up. Lifting a different part of the rear seat cushion assembly may deform the rear seat cushion frame.
  1. Disconnect the 2 seat heater connectors.

  1. Pass the 2 rear seat inner belt assemblies through the rear seat cushion assembly and remove the rear seat cushion assembly.

    NOTICE:
    Be careful not to damage the vehicle body.


6. REMOVE REAR SEAT CUSHION LOCK HOOK


    B393387
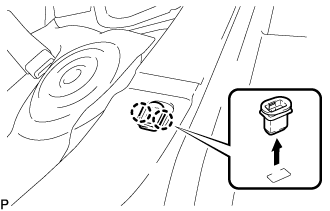
  1. Disengage the 2 claws to remove the rear seat cushion lock hook as shown in the illustration.

    NOTICE:
    Rear seat cushion lock hooks must not be reused.

    HINT:
    Use the same procedure as for the LH side.


7. REMOVE REAR SEATBACK COVER


    B281586
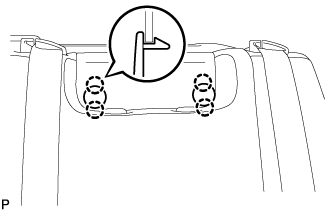
  1. Disengage the 4 claws and remove the 2 rear seatback covers.

    HINT:
    Use the same procedure as for the LH side.


8. REMOVE REAR SEATBACK ASSEMBLY LH
  1. w/ Rear Seat Side Airbag:

    1. Disconnect each connector and clamp from the child restraint seat anchor bracket sub-assembly LH.

  1. Disengage the 2 rear seat belts from the 2 rear seat shoulder belt guides.


    B281589
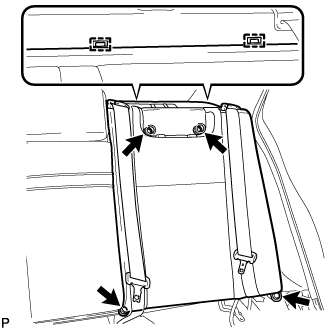
  1. Disengage the 2 hooks and disconnect the cover.

  1. Remove the 2 nuts, 2 bolts and rear seatback assembly LH.


9. REMOVE REAR SEATBACK ASSEMBLY RH
  1. w/ Rear Seat Side Airbag:

    1. Disconnect each connector and clamp from the child restraint seat anchor bracket sub-assembly RH.

  1. Disengage the rear seat belt from the rear seat shoulder belt guide.


    B281587
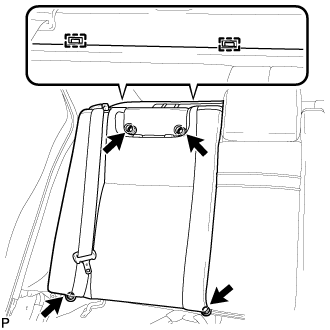
  1. Disengage the 2 hooks and disconnect the cover.

  1. Remove the 2 nuts, 2 bolts and rear seatback assembly RH.


10. REMOVE CENTER SEATBACK ASSEMBLY
  1. Disconnect the connector.


    B281590
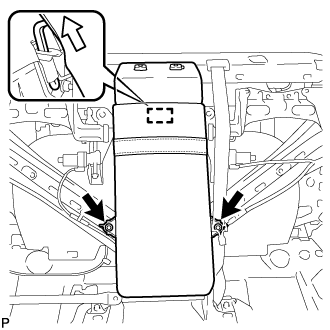
  1. Remove the 2 bolts.

  1. Disengage the hook and remove the center seatback assembly as shown in the illustration.


11. REMOVE CENTER SEAT ARMREST INNER PLATE


    B281592
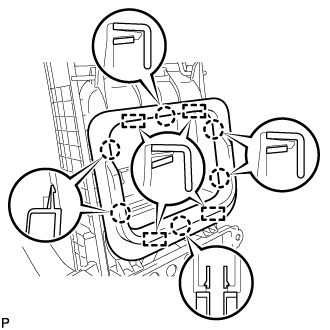
  1. Disengage the 6 claws and separate the 4 guides, and remove the center seat armrest inner plate.


12. REMOVE REAR CENTER SEATBACK FRAME WITH COVER AND PAD


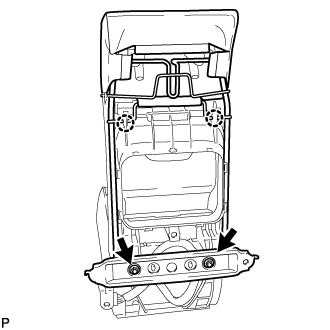
    B281593
  1. Remove the 2 nuts.

  1. Disengage the 2 claws and remove the rear center seatback frame with cover and pad.


13. REMOVE CENTER SEAT ARMREST BRACKET SUB-ASSEMBLY


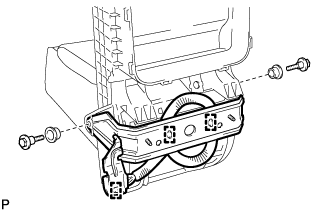
    B281594
  1. Disengage the 3 clamps.

  1. Remove the 2 bolts, 2 washers and center seat armrest bracket sub-assembly.


14. REMOVE REAR SEAT CENTER ARMREST BOX ASSEMBLY


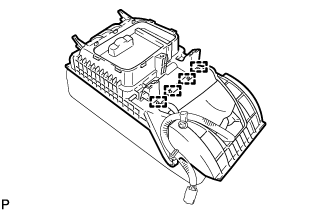
    B281595
  1. Disengage the 4 hooks and remove the rear seat center armrest box assembly from the rear seat center armrest.


15. REMOVE COOLER CONTROL SWITCH ASSEMBLY


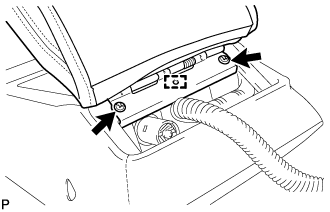
    B281596
  1. Remove the 2 screws.

  1. Separate the guide and remove the rear seat center armrest door sub-assembly.


    B281597
  1. Remove the screw.

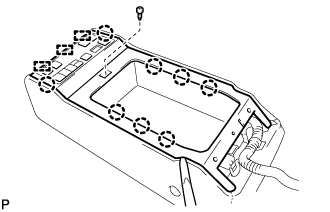
  1. Using a moulding remover, disengage the 8 claws and 3 guides, and remove the rear seat armrest plate.


    B281627
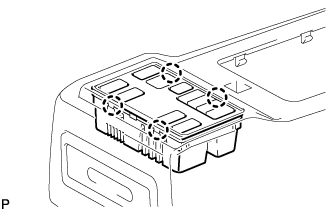
  1. Disengage the 4 claws.


    B281599
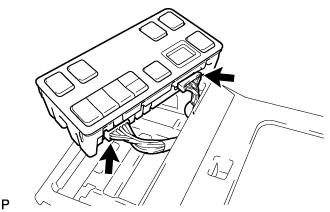
  1. Disconnect each connector to remove the cooler control switch assembly.