LIGHTING (EXT) HEADLIGHT ASSEMBLY(for LED Type Turn Signal Light) DISASSEMBLY
CAUTION / NOTICE / HINT
- NOTICE:
- ·
Be sure to read Precaution thoroughly before servicing.
Click hereVehicle Exterior>LIGHTING (EXT)>HEADLIGHT ASSEMBLY (for LED Type Turn Signal Light)>PRECAUTION
·Handle components indoors as much as possible to prevent foreign matter from entering and adhering to headlight assembly components.
·Do not reuse parts which have reduced fastening ability due to thread damage.
·Do not touch the inner surface of the lens and metallic surfaces as much as possible, or they may become dirty.
·Do not allow metallic surfaces to become dirty, as such surfaces become damaged even if they are only lightly wiped with a soft cloth.
·When installing components, make sure that the wire harness is not pinched or pulled.
·Do not use solvent to clean components. Only clean them with a dry cloth.
- HINT:
- ·
Use the same procedure for the RH side and LH side.
·The following procedure is for the LH side.
PROCEDURE

 81056A
1.REMOVE HEADLIGHT ECU SUB-ASSEMBLY
81134
2.REMOVE HEADLIGHT GASKET
81135F
3.REMOVE HEADLIGHT BACK COVER
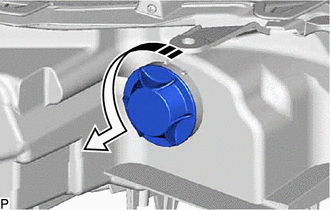

|
Remove in this Direction |
Turn the headlight back cover as shown in the illustration to remove it.
81171B
4.REMOVE HEADLIGHT LENS
- NOTICE:
- ·
Make sure to wear clean rubber gloves when performing this procedure.
·Do not allow dirt or foreign matter to get on the headlight lens.
·Prevention of static electricity is required during this procedure.
·Use static electricity countermeasures SST (desktop anti-static mat set) and observe all precautions to prevent damage to the system by electrostatic discharge (ESD).
·Do not touch the headlight lens with bare hands.
·Do not touch the inner surface of the lens and metallic surfaces as much as possible, or they may become dirty.
·Do not allow metallic surfaces to become dirty, as such surfaces become damaged even if they are only lightly wiped with a soft cloth.
·If there are any fingerprints or foreign matter on the back of the headlight lens, wipe them off with a soft cloth.
·Do not use solvent to clean components. Only clean them with a dry cloth.
- SST
- 09890-47010 (09891-04010, 09891-04020, 09891-04030, 09891-04040)
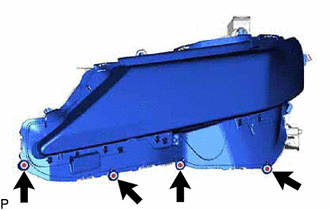
Remove the 4 screws.
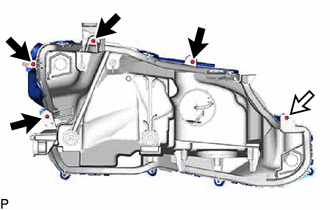

|
Screw |

|
"TORX" screw |
Remove the 4 screws.
Using a T20H "TORX" driver, remove the "TORX" screw.
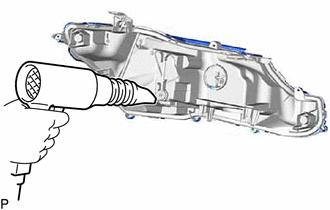
Using a hair dryer, heat the backside of the headlight assembly.
- NOTICE:
-
If the headlight assembly is heated unevenly, it will deform or melt.
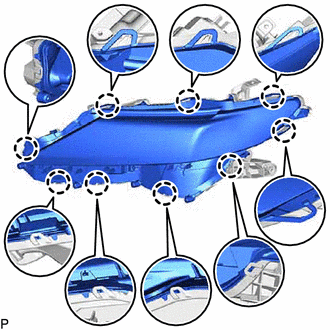
Disengage the 9 claws.
Separate the headlight lens from the headlight housing sub-assembly.
- HINT:
-
If the headlight lens cannot be separated even after heating, using a screwdriver with its tip wrapped with protective tape, lift the headlight lens. Be careful not to damage the headlight lens and headlight housing sub-assembly.
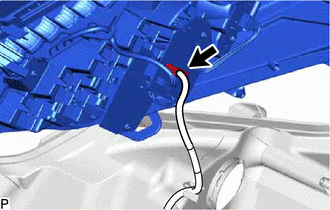
Disconnect the connector to remove the headlight lens from the headlight housing sub-assembly.
81132B
5.REMOVE HEADLIGHT LENS GASKET
- NOTICE:
- ·
The headlight lens gasket must not be reused.
·Make sure to wear clean rubber gloves when performing this procedure.
·Do not touch the inner surface of the lens and metallic surfaces as much as possible, or they may become dirty.
·Do not allow metallic surfaces to become dirty, as such surfaces become damaged even if they are only lightly wiped with a soft cloth.
·If there are any fingerprints or foreign matter on the headlight unit assembly or other components, wipe them off with a soft cloth.
·Do not use solvent to clean components. Only clean them with a dry cloth.
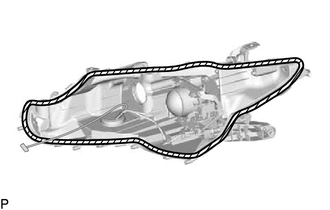
Remove the headlight lens gasket from the headlight housing sub-assembly.
- NOTICE:
-
Make sure to replace the headlight lens gasket with a new one. Failure to do so may cause water ingress.
81171A
6.REMOVE HEADLIGHT UNIT
- NOTICE:
- ·
Make sure to wear clean rubber gloves when performing this procedure.
·Do not allow dirt or foreign matter to get on the headlight unit or other components.
·Prevention of static electricity is required during this procedure.
·Use static electricity countermeasures SST (desktop anti-static mat set) and observe all precautions to prevent damage to the system by electrostatic discharge (ESD).
·Do not touch the headlight unit with bare hands.
·Do not allow metallic surfaces to become dirty, as such surfaces become damaged even if they are only lightly wiped with a soft cloth.
·If there are any fingerprints or foreign matter on the headlight unit or other components, wipe them off with a soft cloth.
·Do not use solvent to clean components. Only clean them with a dry cloth.
- SST
- 09890-47010 (09891-04010, 09891-04020, 09891-04030, 09891-04040)
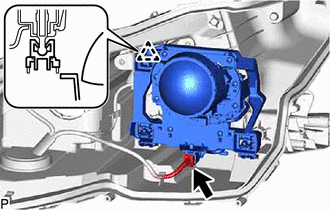
Disconnect the connector.
Disengage the pivot collar.
|
|
Turn in this Direction |
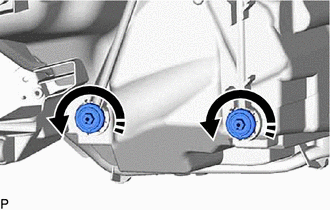
While holding the headlight unit by hand, turn the aiming screws as shown in the illustration until the aiming screws are disconnected from the headlight unit.
- HINT:
-
Make sure to remember the number of aiming screw rotations.
Remove the headlight unit from the headlight housing sub-assembly.
85661A
7.REMOVE HEADLIGHT LEVELING MOTOR
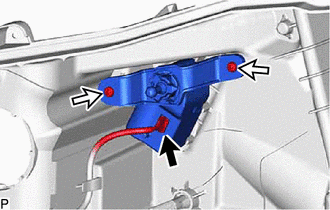
Disconnect the connector.
Remove the 2 screws and headlight leveling motor from the headlight housing sub-assembly.
81102
8.REMOVE HEADLIGHT HOUSING SUB-ASSEMBLY
- HINT:
-
As the headlight housing sub-assembly is available as a supply part, proceed to the next step if it is necessary to change the headlight housing sub-assembly.
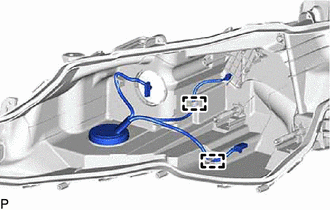
Disengage the 2 clamps to remove the headlight cord from the headlight housing sub-assembly.