LIGHTING (EXT) AUTOMATIC HIGH BEAM MAIN SWITCH REMOVAL
CAUTION / NOTICE / HINT
- HINT:
- ·
Use the same procedure for the RHD side and LHD side.
·The following procedure is for the LHD side.
PROCEDURE

 67914
1.REMOVE FRONT DOOR SCUFF PLATE LH
62112A
2.REMOVE COWL SIDE TRIM SUB-ASSEMBLY LH
62312B
3.DISCONNECT FRONT DOOR OPENING TRIM WEATHERSTRIP LH
55318C
4.REMOVE INSTRUMENT SIDE PANEL LH
55606
5.REMOVE NO. 1 INSTRUMENT PANEL UNDER COVER SUB-ASSEMBLY (for LHD)
55606
6.REMOVE NO. 1 INSTRUMENT PANEL UNDER COVER SUB-ASSEMBLY (for RHD)
55436B
7.REMOVE NO. 2 METER HOOD CLUSTER
53601
8.DISCONNECT HOOD LOCK CONTROL LEVER SUB-ASSEMBLY
55302D
9.REMOVE NO. 1 INSTRUMENT PANEL SUB-ASSEMBLY
84153
10.REMOVE AUTO HIGH BEAM SWITCH
for LHD:
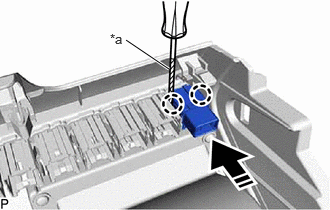
| *a | Protective Tape |

|
Remove in this Direction |
Using a screwdriver with its tip wrapped with protective tape, disengage the 2 claws and remove the auto high beam switch as shown in the illustration.
for RHD:
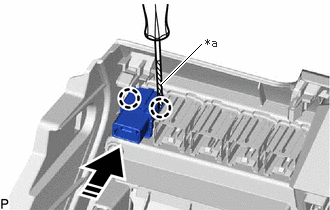
| *a | Protective Tape |
|
|
Remove in this Direction |
Using a screwdriver with its tip wrapped with protective tape, disengage the 2 claws and remove the auto high beam switch as shown in the illustration.