SUPPLEMENTAL RESTRAINT SYSTEMS CENTER AIRBAG SENSOR ASSEMBLY REMOVAL
CAUTION / NOTICE / HINT
The necessary procedures (adjustment, calibration, initialization or registration) that must be performed after parts are removed and installed, or replaced during airbag sensor assembly removal/installation are shown below.
| Replaced Part or Performed Procedure | Necessary Procedure | Effect/Inoperative Function when Necessary Procedure not Performed | Link |
|---|---|---|---|
|
*1: w/ Occupant Classification System |
|||
| Replacement of the airbag sensor assembly | Perform system variant learning and acceleration sensor zero point calibration. | ·
VSC disabled or malfunctioning ·
DTCs are output ·
Slip indicator light illuminated ·
ABS warning light illuminated |
( ) |
| Removal/installation of the front passenger seat*1 | Zero point calibration (Occupant classification system) | ·
Occupant classification system ·
Passenger airbag ON/OFF indicator ·
Airbag system (Front passenger side) ·
Seat belt warning system (Front passenger) |
()
|
| Disconnect cable from negative battery terminal | Perform steering sensor zero point calibration | Lane departure alert system (w/ Steering Control) | ()
|
| Pre-collision system | |||
| Memorize steering angle neutral point | Parking assist monitor system | ()
|
|
- HINT:
- ·
Use the same procedure for RHD and LHD vehicles.
·The following procedure is for an LHD vehicle.
PROCEDURE

 1. PRECAUTION
- CAUTION:
-
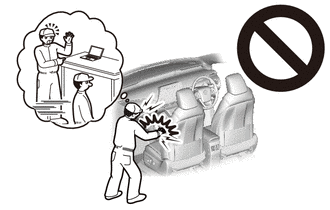
-
Be sure to read Precaution thoroughly before servicing.
-
Click hereVehicle Interior>SUPPLEMENTAL RESTRAINT SYSTEMS>AIRBAG SYSTEM>PRECAUTION
- NOTICE:
-
After turning the ignition switch off, waiting time may be required before disconnecting the cable from the negative (-) battery terminal. Therefore, make sure to read the disconnecting the cable from the negative (-) battery terminal notices before proceeding with work.
-
Click hereGeneral>INTRODUCTION>REPAIR INSTRUCTION>PRECAUTION
2.REMOVE FRONT SEAT ASSEMBLY LH
3.REMOVE FRONT SEAT ASSEMBLY RH (for Power Seat)
- HINT:
-
Use the same procedure as for the LH side.
-
Click hereVehicle Interior>SEAT>FRONT SEAT ASSEMBLY (for Power Seat)>REMOVAL
4.REMOVE FRONT SEAT ASSEMBLY RH (for Manual Seat)
58810J
5.REMOVE CONSOLE BOX ASSEMBLY
73350C
6.DISCONNECT REAR CENTER SEAT OUTER BELT ASSEMBLY
for Fold Down Seat Type: Click hereVehicle Interior>SEAT>REAR SEAT ASSEMBLY (for Fold Down Seat Type)>REMOVAL
for Reclining Seat Type: Click hereVehicle Interior>SEAT>REAR SEAT ASSEMBLY (for Reclining Seat Type)>REMOVAL
7.REMOVE REAR SEAT CUSHION ASSEMBLY
for Fold Down Seat Type: Click hereVehicle Interior>SEAT>REAR SEAT ASSEMBLY (for Fold Down Seat Type)>REMOVAL
for Reclining Seat Type: Click hereVehicle Interior>SEAT>REAR SEAT ASSEMBLY (for Reclining Seat Type)>REMOVAL
72693
8.REMOVE REAR SEAT CUSHION LOCK HOOK
for Fold Down Seat Type: Click hereVehicle Interior>SEAT>REAR SEAT ASSEMBLY (for Fold Down Seat Type)>REMOVAL
for Reclining Seat Type: Click hereVehicle Interior>SEAT>REAR SEAT ASSEMBLY (for Reclining Seat Type)>REMOVAL
67914
9.REMOVE FRONT DOOR SCUFF PLATE LH
62112A
10.REMOVE COWL SIDE TRIM SUB-ASSEMBLY LH
62312B
11.DISCONNECT FRONT DOOR OPENING TRIM WEATHERSTRIP LH
- HINT:
-
Disconnect the front door opening trim weatherstrip LH to the extent that allows the removal of the lower center pillar garnish LH.
67918A
12.REMOVE REAR DOOR SCUFF PLATE LH
62332A
13.DISCONNECT REAR DOOR OPENING TRIM WEATHERSTRIP LH
- HINT:
-
Disconnect the rear door opening trim weatherstrip LH to the extent that allows the removal of the lower center pillar garnish LH.
62414A
14.REMOVE LOWER CENTER PILLAR GARNISH LH
55606
15.REMOVE NO. 1 INSTRUMENT PANEL UNDER COVER SUB-ASSEMBLY (for LHD)
55606
16.REMOVE NO. 1 INSTRUMENT PANEL UNDER COVER SUB-ASSEMBLY (for RHD)
67913
17.REMOVE FRONT DOOR SCUFF PLATE RH
- HINT:
-
Use the same procedure as for the LH side.
-
Click hereVehicle Interior>INTERIOR PANELS / TRIM>ROOF HEADLINING>REMOVAL
62111A
18.REMOVE COWL SIDE TRIM SUB-ASSEMBLY RH
- HINT:
-
Use the same procedure as for the LH side.
-
Click hereVehicle Interior>INTERIOR PANELS / TRIM>ROOF HEADLINING>REMOVAL
62311B
19.DISCONNECT FRONT DOOR OPENING TRIM WEATHERSTRIP RH
- HINT:
-
Disconnect the front door opening trim weatherstrip RH to the extent that allows the removal of the lower center pillar garnish RH.
67917A
20.REMOVE REAR DOOR SCUFF PLATE RH
- HINT:
-
Use the same procedure as for the LH side.
-
Click hereVehicle Interior>INTERIOR PANELS / TRIM>ROOF HEADLINING>REMOVAL
62331A
21.DISCONNECT REAR DOOR OPENING TRIM WEATHERSTRIP RH
- HINT:
-
Disconnect the rear door opening trim weatherstrip RH to the extent that allows the removal of the lower center pillar garnish RH.
62413A
22.REMOVE LOWER CENTER PILLAR GARNISH RH
- HINT:
-
Use the same procedure as for the LH side.
-
Click hereVehicle Interior>INTERIOR PANELS / TRIM>ROOF HEADLINING>REMOVAL
55607
23.REMOVE NO. 2 INSTRUMENT PANEL UNDER COVER SUB-ASSEMBLY
78118
24.REMOVE ACCELERATOR PEDAL PAD
for 2AR-FE: Click hereEngine / Hybrid System>2AR-FE (ENGINE CONTROL)>ACCELERATOR PEDAL>REMOVAL
for A25A-FKS: Click hereEngine / Hybrid System>A25A-FKS (ENGINE CONTROL)>ACCELERATOR PEDAL>REMOVAL
for 2GR-FKS: Click hereEngine / Hybrid System>2GR-FKS (ENGINE CONTROL)>ACCELERATOR PEDAL>REMOVAL
78111
25.REMOVE ACCELERATOR PEDAL
for 2AR-FE: Click hereEngine / Hybrid System>2AR-FE (ENGINE CONTROL)>ACCELERATOR PEDAL>REMOVAL
for A25A-FKS: Click hereEngine / Hybrid System>A25A-FKS (ENGINE CONTROL)>ACCELERATOR PEDAL>REMOVAL
for 2GR-FKS: Click hereEngine / Hybrid System>2GR-FKS (ENGINE CONTROL)>ACCELERATOR PEDAL>REMOVAL
58569D
26.REMOVE FRONT FLOOR CAUTION PLATE COVER
58510D
27.DISCONNECT FRONT FLOOR CARPET ASSEMBLY
for LHD:
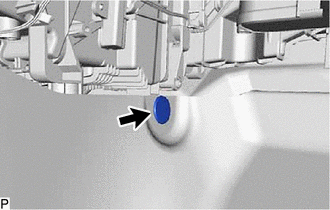
Remove the front floor carpet clip.
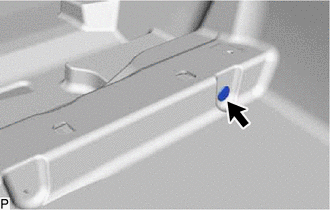
Remove the front floor carpet clip.
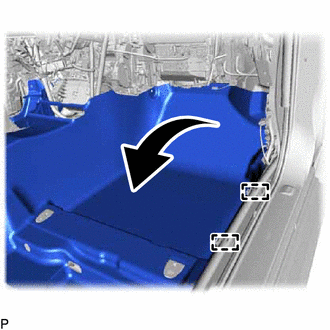
Disengage the 2 guides and turn back the front floor carpet assembly as shown in the illustration.
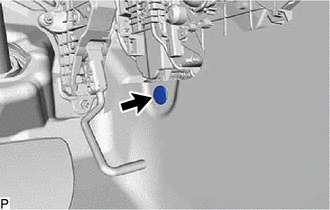
Remove the front floor carpet clip.
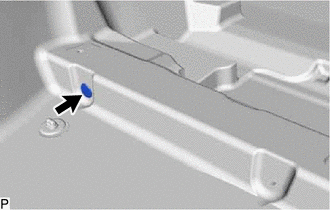
Remove the front floor carpet clip.
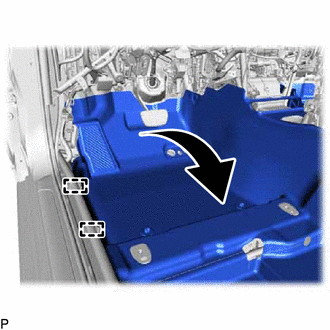
Disengage the 2 guides and turn back the front floor carpet assembly as shown in the illustration.
58861B
28.REMOVE NO. 1 CONSOLE BOX DUCT
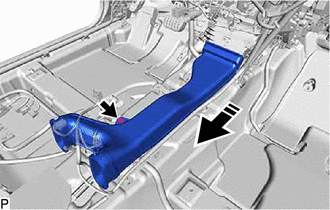

|
Remove in this Direction |
Remove the clip.
Remove the No. 1 console box duct as shown in the illustration.
89170
29.REMOVE AIRBAG SENSOR ASSEMBLY
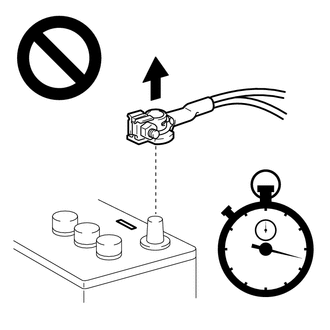
Check that the ignition switch is off.
Check that the cable is disconnected from the negative (-) battery terminal.
- CAUTION:
-
-
Wait at least 90 seconds after disconnecting the cable from the negative (-) battery terminal to disable the SRS system.
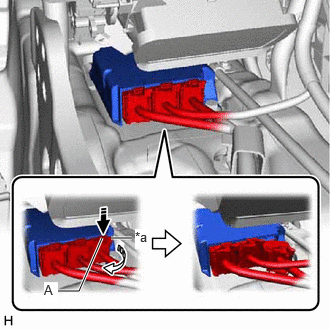
| *a | Lock Lever |
|
|
Release the lock (1) |

|
Disconnect the connector (2) |
Push down the part (A) in the direction indicated by the arrow (1) to release the lock, and then move the lock lever in the direction indicated by the arrow (2) shown in the illustration to disconnect the connectors.
- NOTICE:
-
When disconnecting any airbag connector, take care not to damage the airbag wire harness.
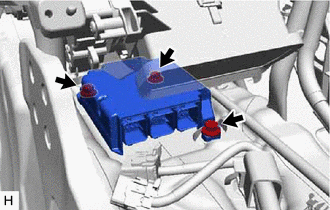
Remove the 3 bolts and airbag sensor assembly.