2GR-FKS INTAKE / EXHAUST EXHAUST PIPE INSTALLATION
PROCEDURE

 17408
1.INSTALL TAIL EXHAUST PIPE BAFFLE SUB-ASSEMBLY
- HINT:
- ·
Perform this procedure only when replacement of the tail exhaust pipe baffle sub-assembly is necessary.
·If the tail exhaust pipe baffle sub-assembly is removed, replace it with a new one.
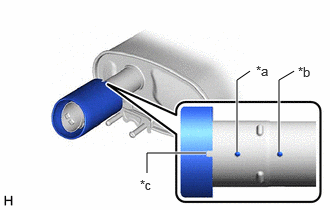
| *a | Protrusion (for position alignment) |
| *b | Protrusion (for stopper) |
| *c | Cutout |
Align the cutout of a new tail exhaust pipe baffle sub-assembly with the protrusion (for position alignment) of the tail exhaust pipe assembly as shown in the illustration.
Insert the tail exhaust pipe baffle sub-assembly to the position where it can be pressed in by hand.
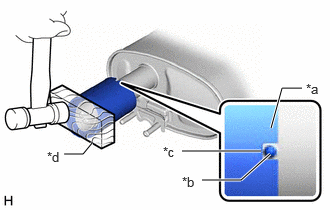
| *a | Baffle Edge |
| *b | Protrusion (for stopper) |
| *c | Cutout |
| *d | Wooden Block |
Using a plastic-faced hammer and wooden block, uniformly tap the tail exhaust pipe baffle sub-assembly onto the tail exhaust pipe assembly.
- NOTICE:
- ·
Lightly tap the top and bottom of the tail exhaust pipe baffle sub-assembly so that the tail exhaust pipe baffle sub-assembly is pressed in without a tilt.
·Press the tail exhaust pipe baffle sub-assembly in until the protrusion on the tail exhaust pipe assembly is fit into the cutout area of the tail exhaust pipe baffle sub-assembly.
·Check that there is no looseness in the tail exhaust pipe baffle sub-assembly.
89465A
2.INSTALL HEATED OXYGEN SENSOR (for Bank 2)
89465
3.INSTALL HEATED OXYGEN SENSOR (for Bank 1)
17410
4.INSTALL FRONT EXHAUST PIPE ASSEMBLY (TWC: Rear Catalyst)
Install 2 new gaskets to the front exhaust pipe assembly (TWC: Rear Catalyst).
Connect the front exhaust pipe assembly (TWC: Rear Catalyst) to the exhaust pipe support.
Install the front exhaust pipe assembly (TWC: Rear Catalyst) to the exhaust manifold (TWC: Front Catalyst) with 2 new bolts and 2 new nuts.
- Torque:
- 43 N*m (438 kgf*cm, 32 ft.*lbf)
Engage the 2 wire harness clamps.
Connect the 2 heated oxygen sensor connectors.
17584B
5.INSTALL NO. 1 EXHAUST PIPE SUPPORT BRACKET (for Lower Side)
Install the No. 1 exhaust pipe support bracket (for Lower Side) with the 2 nuts.
- Torque:
- 29 N*m (296 kgf*cm, 21 ft.*lbf)
52239B
6.INSTALL BODY MOUNTING PLATE
Install the body mounting plate with the 6 bolts.
- Torque:
- 17.5 N*m (178 kgf*cm, 13 ft.*lbf)
17420
7.INSTALL CENTER EXHAUST PIPE ASSEMBLY
Install a new gasket to the front exhaust pipe assembly (TWC: Rear Catalyst).
Connect the center exhaust pipe assembly to the 2 exhaust pipe supports.
Install the center exhaust pipe assembly to the front exhaust pipe assembly (TWC: Rear Catalyst) with 2 new bolts and 2 new nuts.
- Torque:
- 43 N*m (438 kgf*cm, 32 ft.*lbf)
57523A
8.INSTALL CENTER FLOOR CROSSMEMBER BRACE
Install the center floor crossmember brace to the vehicle body with the 4 bolts.
- Torque:
- 15 N*m (153 kgf*cm, 11 ft.*lbf)
57533B
9.INSTALL FRONT CENTER FLOOR BRACE
Install the front center floor brace to the vehicle body with the 4 bolts.
- Torque:
- 15 N*m (153 kgf*cm, 11 ft.*lbf)
17430
10.INSTALL TAIL EXHAUST PIPE ASSEMBLY
Install a new gasket to the center exhaust pipe assembly.
Connect the tail exhaust pipe assembly to the 2 exhaust pipe supports.
Install the tail exhaust pipe assembly to the center exhaust pipe assembly with 2 new bolts.
- Torque:
- 43 N*m (438 kgf*cm, 32 ft.*lbf)
17440
11.INSTALL TAIL EXHAUST PIPE ASSEMBLY LH
Install a new gasket to the center exhaust pipe assembly.
Connect the tail exhaust pipe assembly LH to the 2 exhaust pipe supports.
Install the tail exhaust pipe assembly LH to the center exhaust pipe assembly with 2 new bolts.
- Torque:
- 43 N*m (438 kgf*cm, 32 ft.*lbf)
12.INSPECT FOR EXHAUST GAS LEAK
If gas is leaking, tighten the areas necessary to stop the leak. Replace damaged parts as necessary.
Perform Inspection After Repair after repairing an exhaust gas leak.
Click hereEngine / Hybrid System>2GR-FKS (ENGINE CONTROL)>SFI SYSTEM>INITIALIZATION