NAVIGATION / MULTI INFO DISPLAY NAVIGATION SYSTEM AVC-LAN Circuit
DESCRIPTION
Each unit of the navigation system connected to the AVC-LAN (communication bus) transmits signals via AVC-LAN communication.
If a short to +B or short to ground occurs in an AVC-LAN communication line, the navigation system will not function normally because communication is not possible.
WIRING DIAGRAM
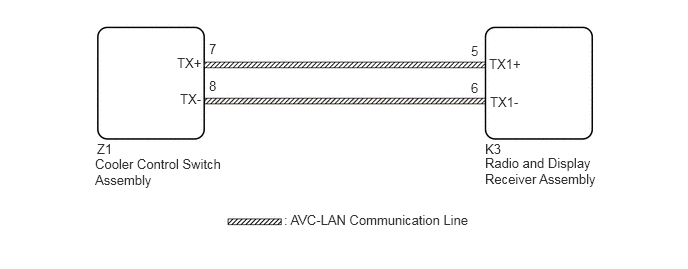
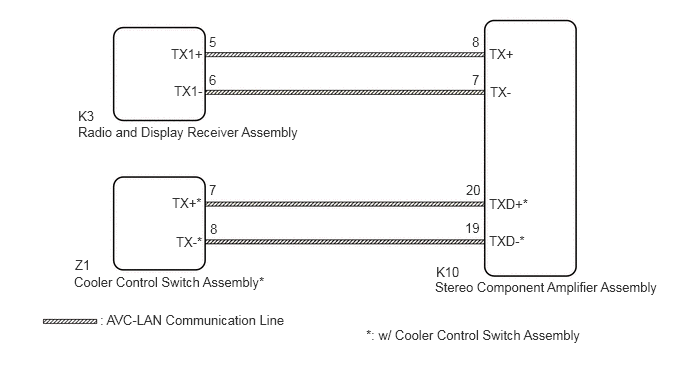
CAUTION / NOTICE / HINT
- NOTICE:
- ·
Depending on the parts that are replaced during vehicle inspection or maintenance, performing initialization, registration or calibration may be needed. Refer to Precaution for Navigation System.
Click hereAudio / Visual / Telematics>NAVIGATION / MULTI INFO DISPLAY>NAVIGATION SYSTEM>PRECAUTION
·When replacing the radio and display receiver assembly, always replace it with a new one. If a radio and display receiver assembly which was installed to another vehicle is used, the following may occur:
-A communication malfunction DTC may be stored.
-The radio and display receiver assembly may not operate normally.
- HINT:
-
The radio and display receiver assembly is the master unit.
PROCEDURE
Choose the model to be inspected.
- Result:
Result Proceed to for 6 Speakers A for 9 Speakers B
A
B
Remove the radio and display receiver assembly.
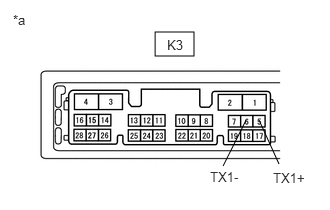
| *a | Component without harness connected
(Radio and Display Receiver Assembly) |
Measure the resistance according to the value(s) in the table below.
- Standard Resistance:
Tester Connection Condition Specified Condition K3-5 (TX1+) - K3-6 (TX1-) Always 60 to 80 Ω
- Result:
Proceed to OK NG
OK
NG
Disconnect the K3 radio and display receiver assembly connector.
Disconnect the Z1 cooler control switch assembly connector.
Measure the resistance according to the value(s) in the table below.
- Standard Resistance:
Tester Connection Condition Specified Condition Z1-7 (TX+) - K3-5 (TX1+) Always Below 1 Ω Z1-8 (TX-) - K3-6 (TX1-) Always Below 1 Ω Z1-7 (TX+) or K3-5 (TX1+) - Body ground Always 10 kΩ or higher Z1-8 (TX-) or K3-6 (TX1-) - Body ground Always 10 kΩ or higher
- Result:
Proceed to OK NG
OK
NG
Disconnect and reconnect each slave unit one by one until the master unit returns to normal.
- HINT:
- ·
Check all slave units.
·If disconnecting a slave unit causes the master unit to return to normal, the slave unit is defective and should be replaced.
- OK:
Master unit returns to normal.
- Result:
Proceed to OK NG
OK
NG
Remove the radio and display receiver assembly.
Click hereAudio / Visual / Telematics>AUDIO / VIDEO>RADIO RECEIVER>REMOVAL
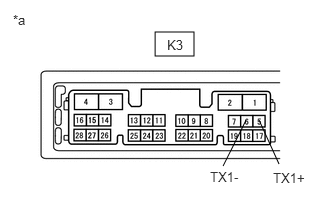
| *a | Component without harness connected
(Radio and Display Receiver Assembly) |
Measure the resistance according to the value(s) in the table below.
- Standard Resistance:
Tester Connection Condition Specified Condition K3-5 (TX1+) - K3-6 (TX1-) Always 60 to 80 Ω
- Result:
Proceed to OK NG
OK
NG
Disconnect the K3 radio and display receiver assembly connector.
Disconnect the K10 stereo component amplifier assembly connector.
Disconnect the Z1 cooler control switch assembly connector. (w/ Cooler Control Switch Assembly)
Measure the resistance according to the value(s) in the table below.
- Standard Resistance:
Tester Connection Condition Specified Condition K3-5 (TX1+) - K10-8 (TX+) Always Below 1 Ω K3-6 (TX1-) - K10-7 (TX-) Always Below 1 Ω K10-20 (TXD+) - Z1-7 (TX+)* Always Below 1 Ω K10-19 (TXD-) - Z1-8 (TX-)* Always Below 1 Ω K3-5 (TX1+) or K10-8 (TX+) - Body ground Always 10 kΩ or higher K3-6 (TX1-) or K10-7 (TX-) - Body ground Always 10 kΩ or higher K10-20 (TXD+) or Z1-7 (TX+) - Body ground* Always 10 kΩ or higher K10-19 (TXD-) or Z1-8 (TX-) - Body ground* Always 10 kΩ or higher
*: w/ Cooler Control Switch Assembly
- Result:
Proceed to OK NG
OK
NG
Disconnect and reconnect each slave unit one by one until the master unit returns to normal.
- HINT:
- ·
Check all slave units.
·If disconnecting a slave unit causes the master unit to return to normal, the slave unit is defective and should be replaced.
- OK:
Master unit returns to normal.
- Result:
Proceed to OK NG
OK
NG