U761E AUTOMATIC TRANSMISSION / TRANSAXLE AUTOMATIC TRANSAXLE UNIT REASSEMBLY
CAUTION / NOTICE / HINT
- HINT:
-
Check each bearing position and installation direction.
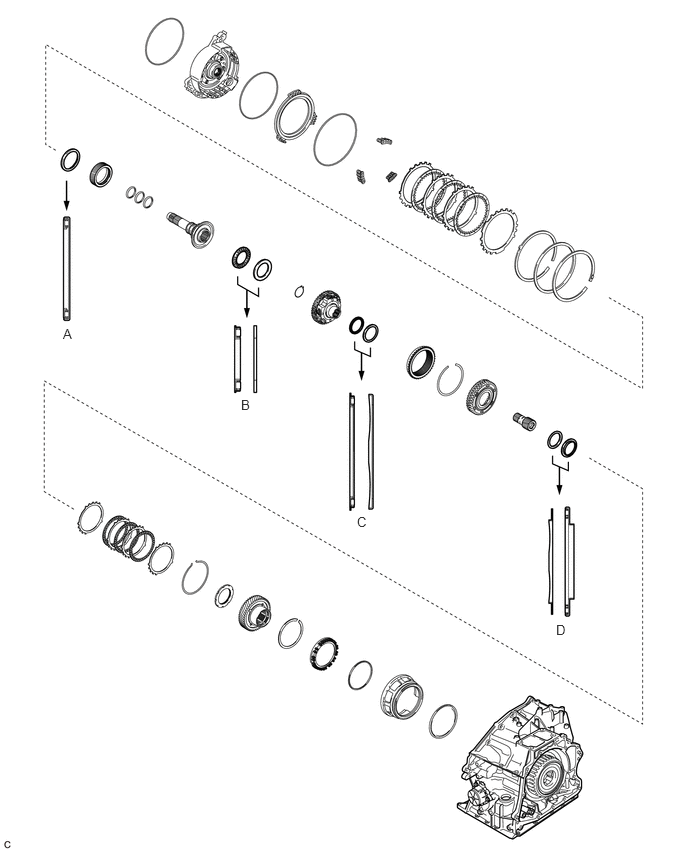
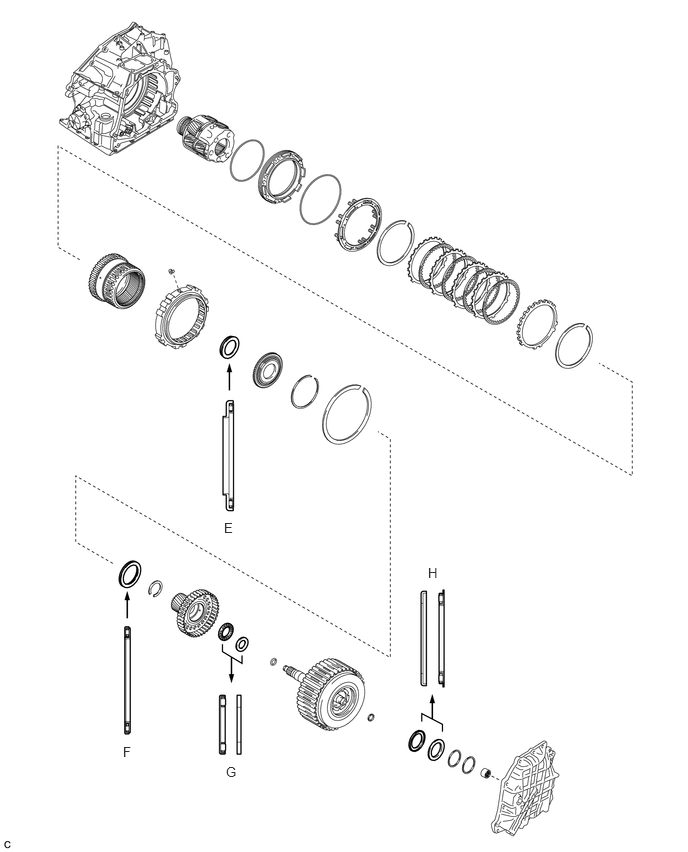
| Mark | Front Race Diameter
Inside / Outside (mm (in.)) |
Thrust Bearing Diameter
Inside / Outside (mm (in.)) |
Rear Race Diameter
Inside / Outside (mm (in.)) |
|---|---|---|---|
| A | - | 57.7 (2.27) / 75.2 (2.96) | - |
| B | - | 29.1 (1.15) / 48.6 (1.91) | 30.7 (1.21) / 48.3 (1.90) |
| C | - | 62.6 (2.46) / 82.4 (3.24) | 65.9 (2.59) / 82.3 (3.24) |
| D | 59.4 (2.34) / 76 (2.99) | 53.46 (2.10) / 79 (3.11) | - |
| E | - | 56.1 (2.21) / 81.1 (3.19) | - |
| F | - | 61.2 (2.41) / 79 (3.11) | - |
| G | - | 28 (1.10) / 47.1 (1.85) | 26.1 (1.03) / 44 (1.73) |
| H | 52.2 (2.06) / 70.4 (2.77) | 48.9 (1.93) / 72.0 (2.83) | - |
PROCEDURE

 35782E
1.INSTALL COUNTER DRIVE GEAR BEARING
- HINT:
-
Perform this procedure only when replacement of the counter drive gear bearing or transaxle case sub-assembly is necessary.
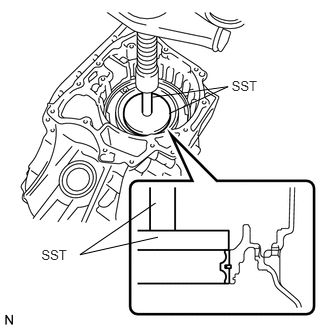
Using SST and a press, install a new counter drive gear bearing (outer race) and a new snap ring to the transaxle case sub-assembly.
- SST
- 09950-60021 (09951-01030)
09950-70010 (09951-07100)
2.INSTALL FRONT DIFFERENTIAL CASE REAR TAPERED ROLLER BEARING (OUTER RACE)
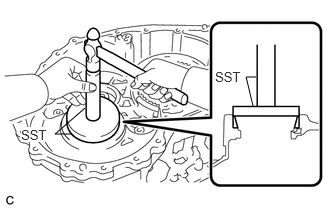
Using SST and a hammer, install a new front differential case rear tapered roller bearing (outer race) to the transaxle case sub-assembly.
- SST
- 09950-60021 (09951-00810)
09950-70010 (09951-07150)
- NOTICE:
-
Make sure to install the front differential case rear tapered roller bearing (outer race) so that there is no clearance between the front differential case rear tapered roller bearing (outer race) and transaxle case sub-assembly.
3.INSTALL FRONT DIFFERENTIAL CASE FRONT TAPERED ROLLER BEARING (OUTER RACE)
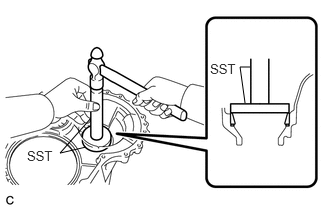
Install the shim to the transaxle housing.
Using SST and a hammer, install a new front differential case front tapered roller bearing (outer race) to the transaxle housing.
- SST
- 09950-60021 (09951-00790)
09950-70010 (09951-07150)
- NOTICE:
-
Make sure to install the front differential case front tapered roller bearing (outer race) so that there is no clearance between the front differential case front tapered roller bearing (outer race), shim and transaxle housing.
41311F
4.INSTALL FRONT DIFFERENTIAL CASE REAR TAPERED ROLLER BEARING (INNER RACE)
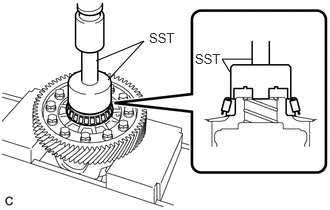
Using SST and a press, install a new front differential case rear tapered roller bearing (inner race) to the front differential case.
- SST
- 09726-36010
09950-70010 (09951-07100)
- NOTICE:
- ·
Do not damage the front differential case rear tapered roller bearing (inner race) cage when installing it.
·Make sure to install the front differential case rear tapered roller bearing (inner race) so that there is no clearance between the front differential case rear tapered roller bearing (inner race) and front differential case.
41311E
5.INSTALL FRONT DIFFERENTIAL CASE FRONT TAPERED ROLLER BEARING (INNER RACE)
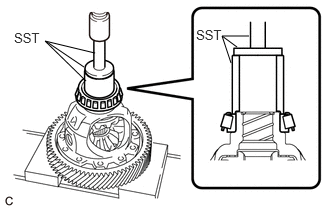
Using SST and a press, install a new front differential case front tapered roller bearing (inner race) to the front differential case.
- SST
- 09523-36010
09950-60011 (09951-00540)
09950-70010 (09951-07100)
- NOTICE:
- ·
Do not damage the front differential case front tapered roller bearing (inner race) cage when installing it.
·Make sure to install the front differential case front tapered roller bearing (inner race) so that there is no clearance between the front differential case front tapered roller bearing (inner race) and front differential case.
6.ADJUST DIFFERENTIAL SIDE BEARING PRELOAD
Remove any remaining seal packing from the contact surfaces of the transaxle housing and transaxle case sub-assembly.
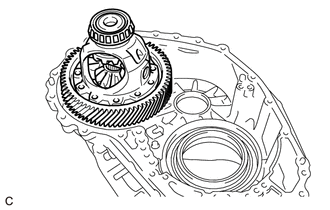
Install the front differential case to the transaxle case sub-assembly.
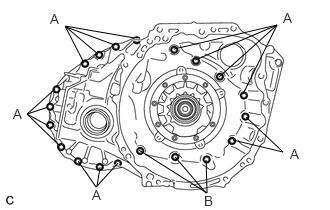
Install the transaxle housing to the transaxle case sub-assembly with the 20 bolts.
- Torque:
- Bolt (A) : 30.6 N*m (312 kgf*cm, 23 ft.*lbf)
- Bolt (B) : 22.7 N*m (231 kgf*cm, 17 ft.*lbf)
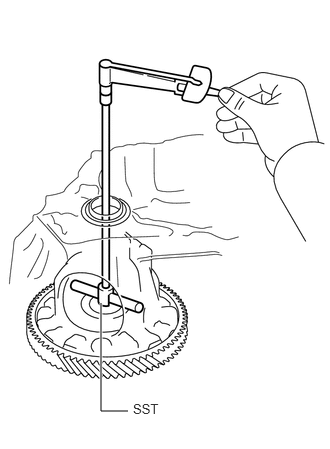
Using SST, turn the front differential case right and left 2 or 3 times to settle the bearings.
- SST
- 09564-33010
Using SST and a torque wrench, measure the turning torque of the differential side bearings while rotating SST at 10 rpm.
- SST
- 09564-33010
- Turning Torque:
1.3 to 1.7 N*m (13 to 17 kgf*cm, 12 to 15 in.*lbf)
If the turning torque is not within the specified range, refer to the table below to select a shim for the front differential case front tapered roller bearing (outer race) so that the turning torque is within the specified range.
| Part No. | Thickness (mm (in.)) |
|---|---|
| 90564-69001 | 2.000 (0.0787) |
| 90564-69002 | 2.025 (0.0797) |
| 90564-69003 | 2.050 (0.0807) |
| 90564-69004 | 2.075 (0.0817) |
| 90564-69005 | 2.100 (0.0827) |
| 90564-69006 | 2.125 (0.0837) |
| 90564-69007 | 2.150 (0.0846) |
| 90564-69008 | 2.175 (0.0856) |
| 90564-69009 | 2.200 (0.0866) |
| 90564-69010 | 2.225 (0.0876) |
| 90564-69011 | 2.250 (0.0886) |
| 90564-69012 | 2.275 (0.0896) |
| 90564-69013 | 2.300 (0.0906) |
| 90564-69014 | 2.325 (0.0915) |
| 90564-69015 | 2.350 (0.0925) |
| 90564-69016 | 2.375 (0.0935) |
| 90564-69017 | 2.400 (0.0945) |
| 90564-69020 | 2.425 (0.0955) |
| 90564-69021 | 2.450 (0.0965) |
| 90564-69022 | 2.475 (0.0974) |
| 90564-69023 | 2.500 (0.0984) |
| 90564-69024 | 2.525 (0.0994) |
| 90564-69025 | 2.550 (0.100) |
| 90564-69026 | 2.575 (0.101) |
| 90564-69027 | 2.600 (0.102) |
| 90564-69028 | 2.625 (0.103) |
| 90564-69029 | 2.650 (0.104) |
| 90564-69030 | 2.675 (0.105) |
| 90564-69031 | 2.700 (0.106) |
| 90564-69032 | 2.725 (0.107) |
| 90564-69033 | 2.750 (0.108) |
| 90564-69034 | 2.775 (0.109) |
| 90564-69035 | 2.800 (0.110) |
| 90564-69036 | 2.825 (0.111) |
| 90564-69037 | 2.850 (0.112) |
| 90564-69038 | 2.875 (0.113) |
Remove the 20 bolts and transaxle housing from the transaxle case sub-assembly.
Remove the front differential case from the transaxle case sub-assembly.
7.INSTALL DIFFERENTIAL DRIVE PINION TAPERED ROLLER BEARING LH (OUTER RACE)
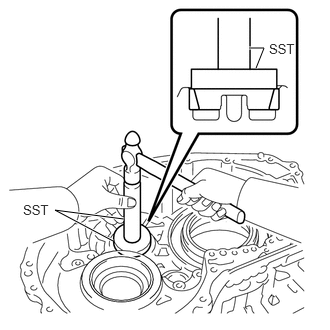
Using SST and a hammer, install a new differential drive pinion tapered roller bearing LH (outer race) to the transaxle case sub-assembly.
- SST
- 09950-60011 (09951-00630)
09950-70010 (09951-07100)
- NOTICE:
-
Make sure to install the differential drive pinion tapered roller bearing LH (outer race) so that there is no clearance between the differential drive pinion tapered roller bearing LH (outer race) and transaxle case sub-assembly. If there is any clearance, the turning torque of the counter driven gear cannot be measured correctly.
8.INSTALL DIFFERENTIAL DRIVE PINION TAPERED ROLLER BEARING RH (OUTER RACE)
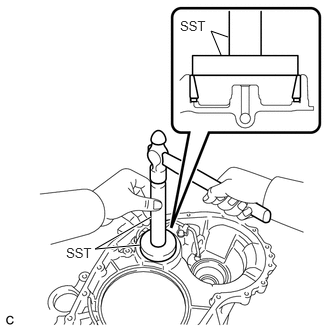
Install the shim to the transaxle housing.
Using SST, install a new differential drive pinion tapered roller bearing RH (outer race) to the transaxle housing.
- SST
- 09950-60021 (09951-00710)
09950-70010 (09951-07100)
- NOTICE:
-
Make sure to install the differential drive pinion tapered roller bearing RH (outer race) so that there is no clearance between the differential drive pinion tapered roller bearing RH (outer race), shim and transaxle housing. If there is any clearance, the turning torque of the counter driven gear cannot be measured correctly.
41211J
9.INSTALL DIFFERENTIAL DRIVE PINION TAPERED ROLLER BEARING LH (INNER RACE)
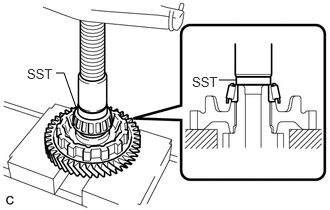
Using SST and a press, install a new differential drive pinion tapered roller bearing LH (inner race) to the counter driven gear.
- SST
- 09950-60011 (09951-00490)
- NOTICE:
-
Make sure to install the differential drive pinion tapered roller bearing LH (inner race) so that there is no clearance between the differential drive pinion tapered roller bearing LH (inner race) and counter driven gear. If there is any clearance, the turning torque of the counter driven gear cannot be measured correctly.
41211K
10.INSTALL DIFFERENTIAL DRIVE PINION TAPERED ROLLER BEARING RH (INNER RACE)
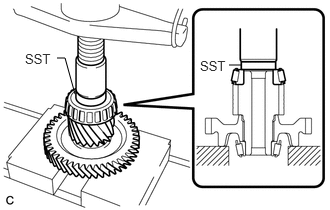
Using SST and a press, install a new differential drive pinion tapered roller bearing RH (inner race) to the counter driven gear.
- SST
- 09950-60011 (09951-00400)
- NOTICE:
-
Make sure to install the differential drive pinion tapered roller bearing RH (inner race) so that there is no clearance between the differential drive pinion tapered roller bearing RH (inner race) and counter driven gear. If there is any clearance, the turning torque of the counter driven gear cannot be measured correctly.
11.ADJUST COUNTER DRIVEN GEAR PRELOAD
Remove any remaining seal packing from the contact surfaces of the transaxle housing and transaxle case sub-assembly.
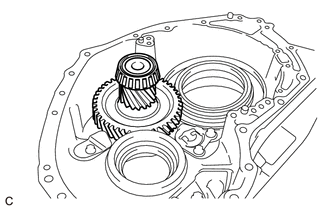
Install the counter driven gear to the transaxle case sub-assembly.
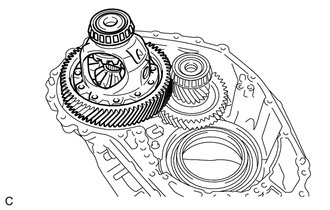
Install the front differential case to the transaxle case sub-assembly.
Install the transaxle housing to the transaxle case sub-assembly with the 20 bolts.
- Torque:
- Bolt (A) : 30.6 N*m (312 kgf*cm, 23 ft.*lbf)
- Bolt (B) : 22.7 N*m (231 kgf*cm, 17 ft.*lbf)
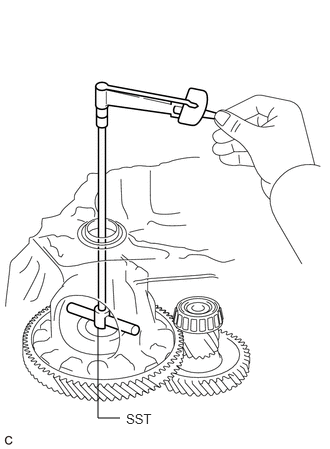
Using SST and a torque wrench, measure the turning torque of the counter driven gear while rotating SST at 10 rpm.
- SST
- 09564-33010
- Turning Torque:
Differential side bearing preload + 2.9 to 6.1 N*m (30 to 62 kgf*cm, 26 to 54 in.*lbf)
If the turning torque is not within the specified range, refer to the table below to select a shim for the differential drive pinion tapered roller bearing RH (outer race) so that the turning torque is within the specified range.
| Part No. | Thickness (mm (in.)) |
|---|---|
| 90564-61022 | 2.000 (0.0787) |
| 90564-61023 | 2.025 (0.0797) |
| 90564-61024 | 2.050 (0.0807) |
| 90564-61025 | 2.075 (0.0817) |
| 90564-61026 | 2.100 (0.0827) |
| 90564-61027 | 2.125 (0.0837) |
| 90564-61028 | 2.150 (0.0846) |
| 90564-61029 | 2.175 (0.0856) |
| 90564-61030 | 2.200 (0.0866) |
| 90564-61031 | 2.225 (0.0876) |
| 90564-61032 | 2.250 (0.0886) |
| 90564-61033 | 2.275 (0.0896) |
| 90564-61034 | 2.300 (0.0906) |
| 90564-61035 | 2.325 (0.0915) |
| 90564-61036 | 2.350 (0.0925) |
| 90564-61037 | 2.375 (0.0935) |
| 90564-61038 | 2.400 (0.0945) |
| 90564-61039 | 2.425 (0.0955) |
| 90564-61040 | 2.450 (0.0965) |
| 90564-61041 | 2.475 (0.0974) |
| 90564-61042 | 2.500 (0.0984) |
| 90564-61043 | 2.525 (0.0994) |
| 90564-61044 | 2.550 (0.100) |
| 90564-61045 | 2.575 (0.101) |
| 90564-61046 | 2.600 (0.102) |
| 90564-61047 | 2.625 (0.103) |
| 90564-61048 | 2.650 (0.104) |
| 90564-61049 | 2.675 (0.105) |
| 90564-61050 | 2.700 (0.106) |
| 90564-61051 | 2.725 (0.107) |
| 90564-61052 | 2.750 (0.108) |
| 90564-61053 | 2.775 (0.109) |
| 90564-61054 | 2.800 (0.110) |
| 90564-61055 | 2.825 (0.111) |
| 90564-61056 | 2.850 (0.112) |
| 90564-61057 | 2.875 (0.113) |
| 90564-61058 | 2.900 (0.114) |
| 90564-61059 | 2.925 (0.115) |
| 90564-61060 | 2.950 (0.116) |
| 90564-61061 | 2.975 (0.117) |
| 90564-61062 | 3.000 (0.118) |
Remove the 20 bolts and transaxle housing from the transaxle case sub-assembly.
Remove the front differential case from the transaxle case sub-assembly.
Remove the counter driven gear from the transaxle case sub-assembly.
35506F
12.INSTALL MANUAL VALVE LEVER SHAFT OIL SEAL
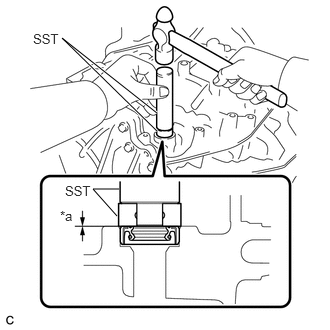
| *a | Depth |
Coat the lip of a new manual valve lever shaft oil seal with a small amount of MP grease.
Using SST and a hammer, install the manual valve lever shaft oil seal to the transaxle case sub-assembly.
- SST
- 09950-60011 (09951-00230)
09950-70010 (09951-07100)
- Standard Depth:
-0.5 to 0.5 mm (-0.0197 to 0.0197 in.)
- NOTICE:
-
Make sure the manual valve lever shaft oil seal is installed in the correct direction.
35506
13.INSTALL MANUAL VALVE LEVER SHAFT SUB-ASSEMBLY
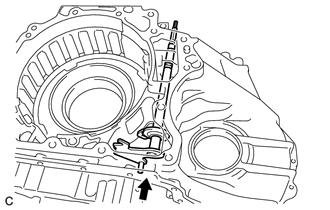
Install the manual valve lever shaft sub-assembly to the transaxle case sub-assembly.
- NOTICE:
-
Do not damage the manual valve lever shaft oil seal when installing the manual valve lever shaft sub-assembly to the transaxle case sub-assembly.
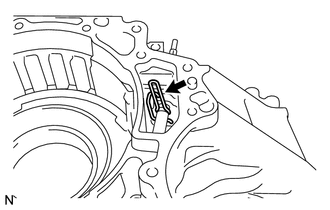
Using needle-nose pliers, install the manual valve lever shaft retainer spring to the manual valve lever shaft sub-assembly.
35501
14.INSTALL PARKING LOCK ROD SUB-ASSEMBLY
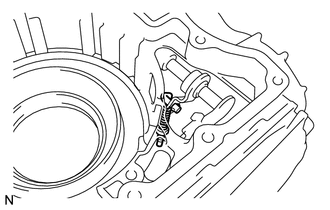
Align the protrusions on the parking lock rod sub-assembly with the notches on the manual valve lever shaft sub-assembly and install the parking lock rod sub-assembly.
35409
15.INSTALL MANUAL DETENT SPRING SUB-ASSEMBLY
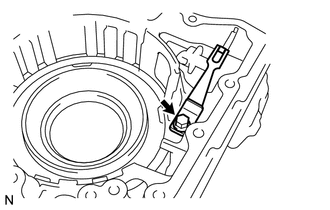
Install the manual detent spring sub-assembly and manual detent spring cover to the transaxle case sub-assembly with the bolt.
- Torque:
- 22.7 N*m (231 kgf*cm, 17 ft.*lbf)
- NOTICE:
-
Make sure to install the manual detent spring sub-assembly first and then the manual detent spring cover.
35623
16.INSTALL NO. 3 BRAKE PISTON
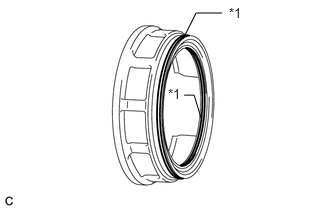
| *1 | O-ring |
Coat 2 new O-rings with Toyota Genuine ATF WS and install them to the No. 3 brake piston.
- NOTICE:
-
Ensure that the 2 O-rings are not twisted.
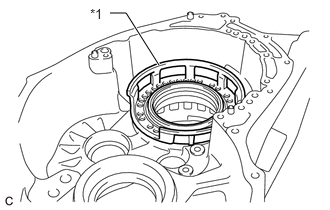
| *1 | No. 3 Brake Piston |
Temporarily install the No. 3 brake piston to the transaxle case sub-assembly.
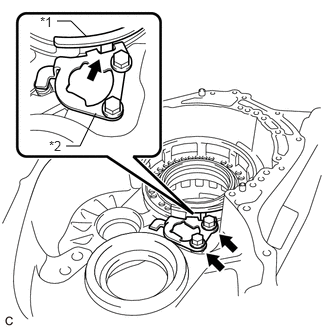
| *1 | No. 3 Brake Piston |
| *2 | Pawl Stopper Plate |
Temporarily install the pawl stopper plate to the transaxle case sub-assembly with the 2 bolts.
- NOTICE:
-
After installing, make sure that the protrusions on the No. 3 brake piston and grooves on the pawl stopper plate are aligned.
Press the No. 3 brake piston into the transaxle case sub-assembly.
- NOTICE:
-
Make sure that the O-rings of the No. 3 brake piston are not twisted or caught on the transaxle case sub-assembly.
- HINT:
-
Use the installation surface of the No. 3 brake piston return spring sub-assembly to press the No. 3 brake piston into the transaxle case sub-assembly.
Remove the 2 bolts and pawl stopper plate from the transaxle case sub-assembly.
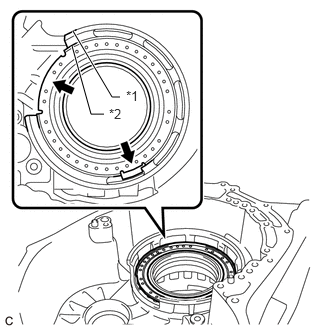
| *1 | No. 3 Brake Piston |
| *2 | No. 3 Brake Piston Return Spring Sub-assembly |
Install the No. 3 brake piston return spring sub-assembly to the transaxle case sub-assembly.
- NOTICE:
-
Install the No. 3 brake piston return spring sub-assembly as shown in the illustration.
Place SST on the No. 3 brake piston return spring sub-assembly and compress the No. 3 brake piston return spring sub-assembly with a press.
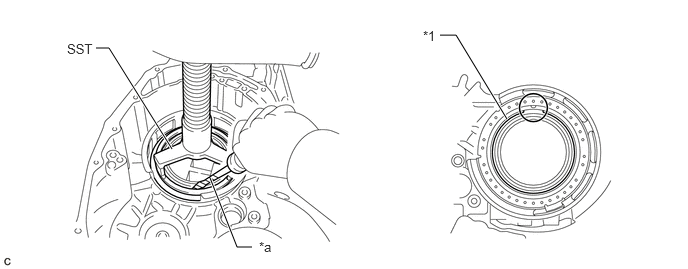
| *1 | Snap Ring | - | - |
| *a | Protective Tape | - | - |
- SST
- 09387-00070
- NOTICE:
-
Stop the press when the No. 3 brake piston return spring sub-assembly is flush with the snap ring groove. This prevents the No. 3 brake piston return spring sub-assembly from being deformed.
Using a screwdriver with its tip wrapped with protective tape, install the snap ring to the transaxle case sub-assembly as shown in the illustration.
- NOTICE:
- ·
Confirm that the snap ring is correctly located in the groove of the transaxle case sub-assembly.
·Be sure to orient the snap ring so that the edges do not protrude into a cutout on the No. 3 brake piston return spring sub-assembly as shown in the illustration.
35782C
17.INSTALL COUNTER DRIVE GEAR
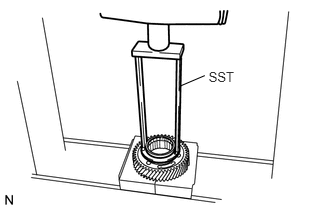
Using SST and a press, install a new counter drive gear bearing inner race (front side) to the counter drive gear.
- SST
- 09387-00020
- NOTICE:
-
Make sure to install the counter drive gear bearing inner race (front side) so that there is no clearance between the counter drive gear bearing inner race (front side) and counter drive gear.
Install 2 new counter drive gear bearings (balls and cage) to the counter drive gear bearing (outer race).
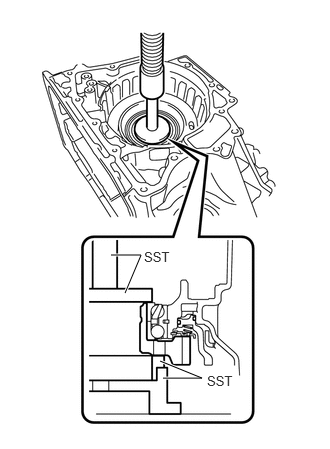
Using SST, install the counter drive gear with counter drive gear bearing inner race (front side) and a new counter drive gear bearing inner race (rear side) to the transaxle case sub-assembly.
- SST
- 09223-15030
09527-17011
09950-60021 (09951-00810)
09950-70010 (09951-07100)
35720
18.INSTALL FRONT PLANETARY GEAR ASSEMBLY
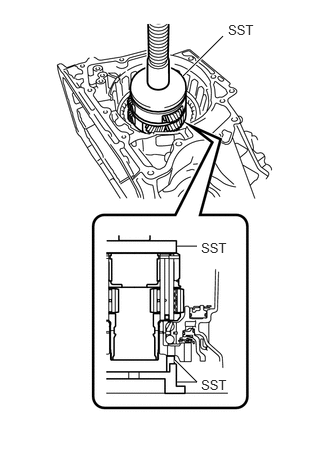
Using SST and a press, install a new front planetary gear assembly to the transaxle case sub-assembly.
- SST
- 09223-15030
09527-17011
09951-01100
35622G
19.INSTALL NO. 2 BRAKE PISTON
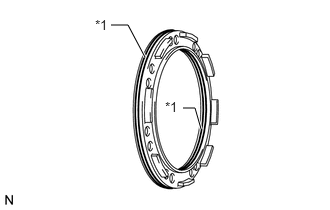
| *1 | O-ring |
Coat 2 new O-rings with Toyota Genuine ATF WS and install them to the No. 2 brake piston.
- NOTICE:
-
Ensure that the 2 O-rings are not twisted.
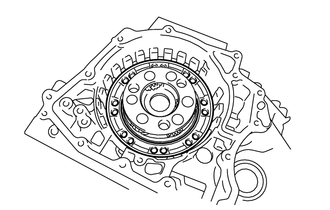
Install the No. 2 brake piston to the transaxle case sub-assembly.
- NOTICE:
-
Be careful not to damage the 2 O-rings.
35068C
20.INSTALL 1ST AND REVERSE BRAKE RETURN SPRING SUB-ASSEMBLY
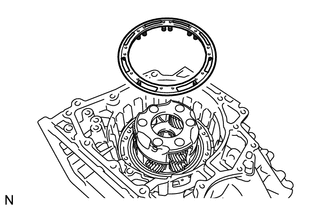
Install the 1st and reverse brake return spring sub-assembly to the transaxle case sub-assembly.
Place SST on the 1st and reverse brake return spring sub-assembly and compress the 1st and reverse brake return spring sub-assembly with a press.
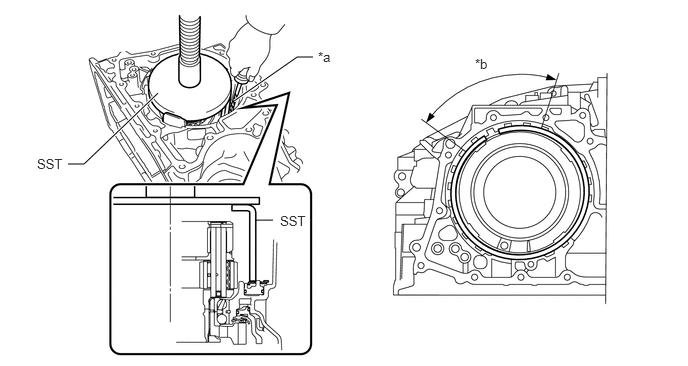
| *a | Protective Tape | *b | Snap Ring End Position |
- SST
- 09387-00060
- NOTICE:
-
Stop the press when the 1st and reverse brake return spring sub-assembly is flush with the snap ring groove. This prevents the 1st and reverse brake return spring sub-assembly from being deformed.
Using a screwdriver with its tip wrapped with protective tape, install the snap ring to the transaxle case sub-assembly as shown in the illustration.
- NOTICE:
- ·
Confirm that the snap ring is correctly located in the groove of the transaxle case sub-assembly.
·Be sure to orient the snap ring so that the edges do not protrude into one of the cutouts on the transaxle case sub-assembly as shown in the illustration.
·Be sure to install the snap ring so that the ends of the snap ring are within the area shown in the illustration.
35682A
21.INSTALL NO. 2 BRAKE DISC
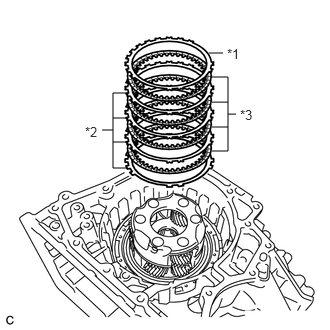
| *1 | No. 2 Brake Flange |
| *2 | No. 2 Brake Plate |
| *3 | No. 2 Brake Disc |
Install the 4 No. 2 brake discs, 4 No. 2 brake plates and No. 2 brake flange to the transaxle case sub-assembly.
- NOTICE:
-
Make sure that the No. 2 brake discs, No. 2 brake plates and No. 2 brake flange are installed in the correct order.
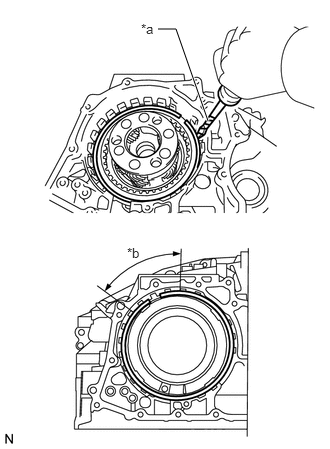
| *a | Protective Tape |
| *b | Snap Ring End Position |
Using a screwdriver with its tip wrapped with protective tape, install the snap ring to the transaxle case sub-assembly.
- NOTICE:
- ·
Confirm that the snap ring is correctly located in the groove of the transaxle case sub-assembly.
·Be sure to orient the snap ring so that the edges do not protrude into one of the cutouts on the transaxle case sub-assembly as shown in the illustration.
·Be sure to install the snap ring so that the ends of the snap ring are within the area shown in the illustration.
22.INSPECT CLEARANCE OF NO. 2 BRAKE PISTON
35762E
23.INSTALL PLANETARY RING GEAR FLANGE
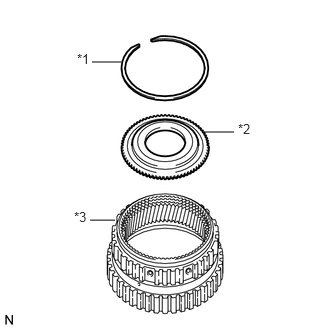
| *1 | Snap Ring |
| *2 | Planetary Ring Gear Flange |
| *3 | Planetary Ring Gear |
Install the planetary ring gear flange to the planetary ring gear.
Using a screwdriver with its tip wrapped with protective tape, install the snap ring to the planetary ring gear.
- NOTICE:
-
Confirm that the snap ring is correctly located in the groove of the planetary ring gear.
35790
24.INSTALL ONE-WAY CLUTCH ASSEMBLY
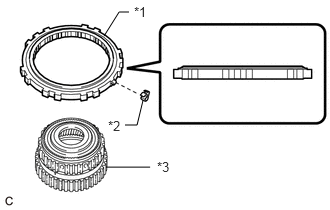
| *1 | One-way Clutch Assembly |
| *2 | Outer Race Retainer |
| *3 | Planetary Ring Gear |
Install the outer race retainer to the one-way clutch assembly.
Install the one-way clutch assembly to the planetary ring gear.
- NOTICE:
-
Make sure that the one-way clutch assembly is installed in the correct direction as shown in the illustration.
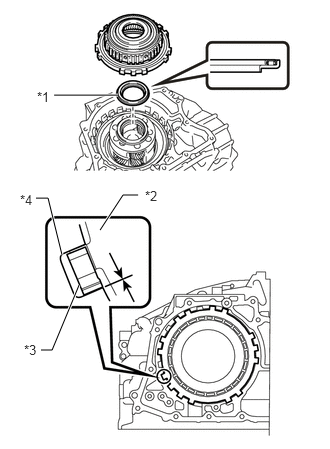
| *1 | Thrust Needle Roller Bearing |
| *2 | One-way Clutch Assembly |
| *3 | Outer Race Retainer |
| *4 | Transaxle Case Sub-assembly |
Coat the thrust needle roller bearing with Toyota Genuine ATF WS and install it to the front planetary gear assembly.
| - | Inside (mm (in.)) | Outside (mm (in.)) |
|---|---|---|
| Thrust needle roller bearing | 56.1 (2.21) | 81.1 (3.19) |
- NOTICE:
-
Be sure to install the thrust needle roller bearing so that the temper colored side of the race is visible.
Install the one-way clutch assembly with planetary ring gear to the transaxle case sub-assembly.
- NOTICE:
- ·
Make sure that there is no clearance between the outer race retainer and claw on the one-way clutch assembly. If there is any clearance, the spring of the outer race retainer will be deformed.
·Ensure that there is no clearance between the one-way clutch assembly and transaxle case sub-assembly.
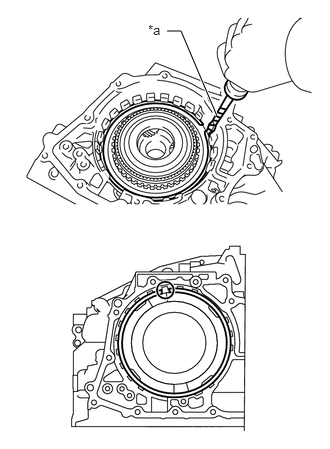
| *a | Protective Tape |
Using a screwdriver with its tip wrapped with protective tape, install the snap ring to the transaxle case sub-assembly.
- NOTICE:
- ·
Confirm that the snap ring is correctly located in the groove of the transaxle case sub-assembly.
·Be sure to orient the snap ring so that the edges do not protrude into one of the cutouts on the transaxle case sub-assembly as shown in the illustration.
35557
25.INSTALL PARKING LOCK PAWL
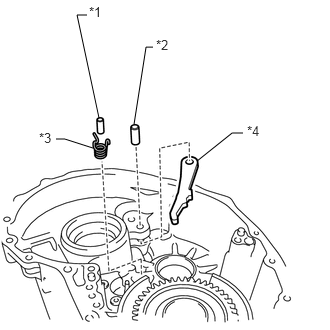
| *1 | Parking Lock Pawl Pin |
| *2 | Parking Lock Pawl Shaft |
| *3 | Spring |
| *4 | Parking Lock Pawl |
Install the parking lock pawl to the transaxle case sub-assembly with the parking lock pawl shaft.
Install the parking lock pawl pin to the transaxle case sub-assembly.
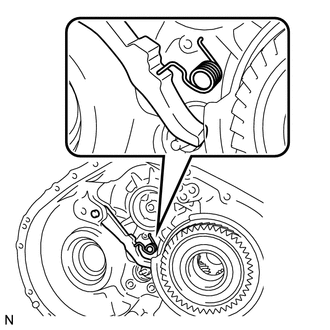
Install the spring to the parking lock pawl pin.
- NOTICE:
-
Make sure that one end of the spring is secured in the hole of the transaxle case sub-assembly and the other end is positioned on the parking lock pawl as shown in the illustration.
35598
26.INSTALL PARKING LOCK SLEEVE
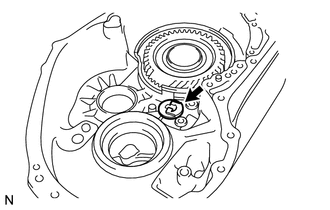
Install the parking lock sleeve to the transaxle case sub-assembly.
35596
27.INSTALL PAWL STOPPER PLATE
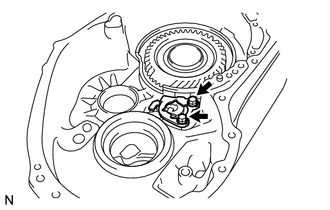
Install the pawl stopper plate to the transaxle case sub-assembly with the 2 bolts.
- Torque:
- 22.7 N*m (231 kgf*cm, 17 ft.*lbf)
35165
28.INSTALL NO. 1 TRANSMISSION CASE PLATE
Clean and degrease the bolt and installation hole in the transaxle case sub-assembly.
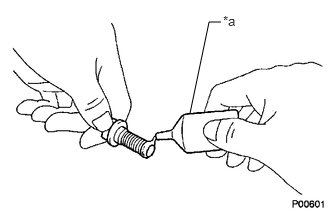
| *a | Adhesive |
Apply adhesive to 2 or 3 threads on the end of the bolt.
- Adhesive:
Toyota Genuine Adhesive 1324, Three Bond 1324 or equivalent
- NOTICE:
-
In order to ensure proper sealing of the bolt, apply adhesive to the bolt and install it within 10 minutes of adhesive application.
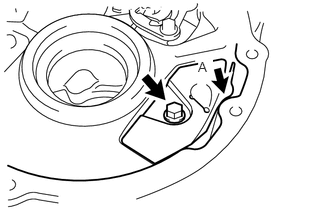
Install the No. 1 transmission case plate to the transaxle case sub-assembly with the bolt.
- Torque:
- 22.7 N*m (231 kgf*cm, 17 ft.*lbf)
- HINT:
-
Tighten the bolt with the part (A) of the No. 1 transmission case plate contacting the transaxle case sub-assembly as shown in the illustration.
35558
29.INSTALL PAWL SHAFT CLAMP
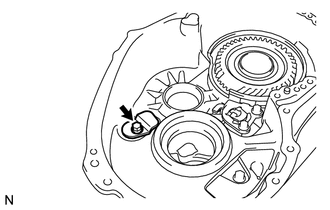
Install the pawl shaft clamp to the transaxle case sub-assembly with the bolt.
- Torque:
- 22.7 N*m (231 kgf*cm, 17 ft.*lbf)
35783R
30.INSTALL COUNTER DRIVEN GEAR
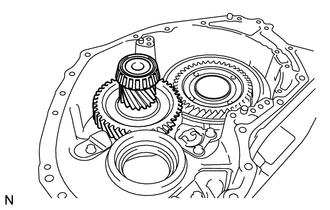
Install the counter driven gear to the transaxle case sub-assembly.
35782H
31.INSTALL COUNTER DRIVE GEAR NUT
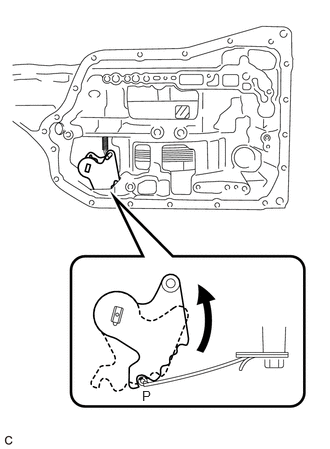
Turn the manual valve lever shaft sub-assembly counterclockwise to set it to the P position as shown in the illustration.
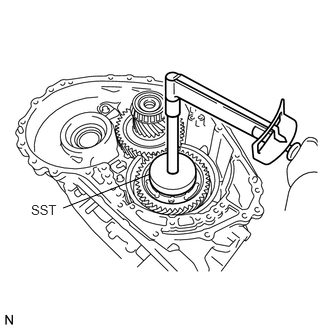
Using SST, install a new counter drive gear nut to the front planetary gear assembly.
- SST
- 09387-00130
- Torque:
- 120 N*m (1224 kgf*cm, 89 ft.*lbf)
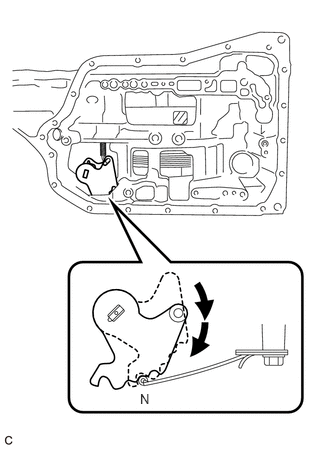
Turn the manual valve lever shaft sub-assembly 2 notches clockwise to set it to the N position as shown in the illustration.
Remove the counter driven gear from the transaxle case sub-assembly.
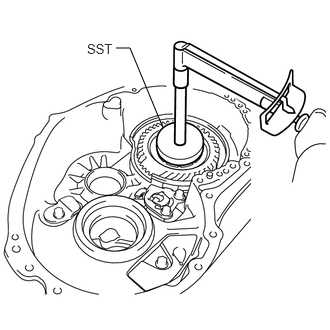
Using SST and a torque wrench, measure the turning torque of the bearing while rotating SST at 60 rpm.
- SST
- 09387-00130
- Turning Torque:
0.1 to 0.8 N*m (1 to 8 kgf*cm, 1 to 7 in.*lbf)
If the measured value is not within the specified range, gradually tighten the nut until the turning torque falls within the specified range.
- Maximum Torque:
180 N*m (1835 kgf*cm, 133 ft.*lbf)
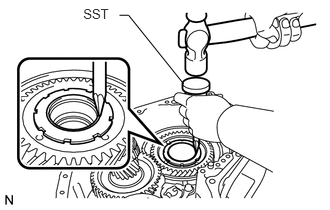
Using SST and a hammer, stake the front planetary gear assembly.
- SST
- 09930-00010
Install the counter driven gear to the transaxle case sub-assembly.
41311
32.INSTALL FRONT DIFFERENTIAL CASE
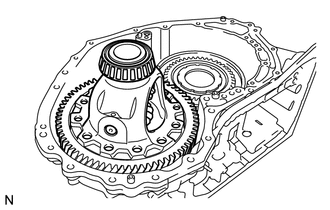
Install the front differential case to the transaxle case sub-assembly.
35621F
33.INSTALL NO. 1 BRAKE PISTON
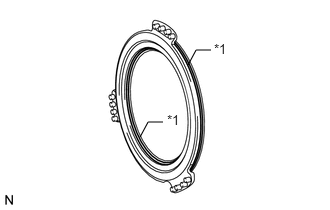
| *1 | O-ring |
Coat 2 new O-rings with Toyota Genuine ATF WS and install them to the No. 1 brake piston.
- NOTICE:
-
Ensure that the 2 O-rings are not twisted.
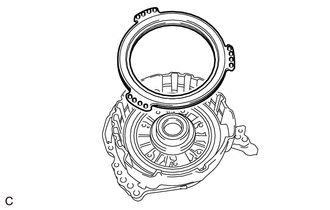
Install the No. 1 brake piston to the front oil pump assembly.
- NOTICE:
-
Be careful not to damage the 2 O-rings.
35608L
34.INSTALL 2ND BRAKE PISTON RETURN SPRING SUB-ASSEMBLY
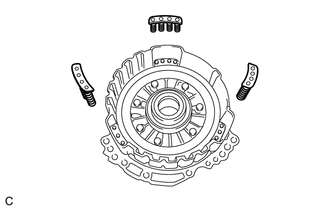
Install the 3 2nd brake piston return spring sub-assemblies to the front oil pump assembly.
- NOTICE:
-
Make sure that the 3 2nd brake piston return spring sub-assemblies are installed to the protrusions on the front oil pump assembly.
35681
35.INSTALL NO. 1 BRAKE DISC
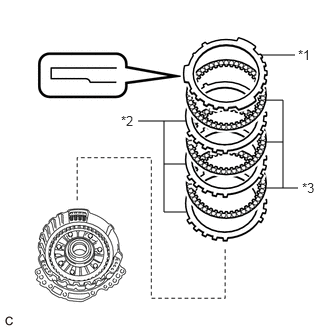
| *1 | No. 1 Brake Flange |
| *2 | No. 1 Brake Plate |
| *3 | No. 1 Brake Disc |
Install the 3 No. 1 brake discs, 3 No. 1 brake plates and No. 1 brake flange to the front oil pump assembly.
- NOTICE:
- ·
Make sure that the No. 1 brake discs, No. 1 brake plates and No. 1 brake flange are installed in the correct order.
·Be sure to install the No. 1 brake flange in the correct direction.
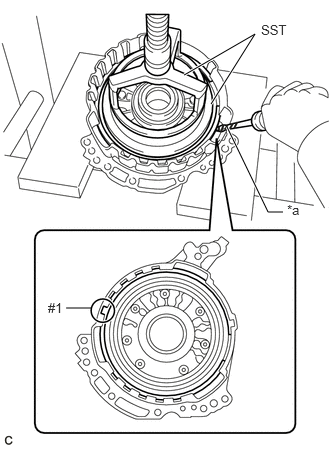
| *a | Protective Tape |
Place SST on the No. 1 brake flange and compress the No. 1 brake flange with a press.
- SST
- 09387-00070
09495-65040
- NOTICE:
-
Stop the press when the 2nd brake piston return spring sub-assemblies are flush with the snap ring groove. This prevents the 2nd brake piston return spring sub-assemblies from being deformed.
Using a screwdriver with its tip wrapped with protective tape, install the snap ring to the front oil pump assembly as shown in the illustration.
- NOTICE:
- ·
Confirm that the snap ring is correctly located in the groove of the front oil pump assembly.
·Make sure to align the protruding part of the snap ring with the cutout (#1) of the front oil pump assembly shown in the illustration to install the snap ring.
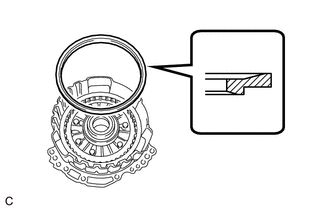
Install the brake snap ring stopper to the front oil pump assembly.
- NOTICE:
-
Be sure to install the brake snap ring stopper in the correct direction.
Using a screwdriver with its tip wrapped with protective tape, install the snap ring to the front oil pump assembly as shown in the illustration.
- NOTICE:
- ·
Confirm that the snap ring is correctly located in the groove of the front oil pump assembly.
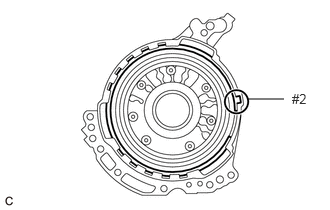
·Make sure to align the protruding part of the snap ring with the cutout (#2) of the front oil pump assembly shown in the illustration to install the snap ring.
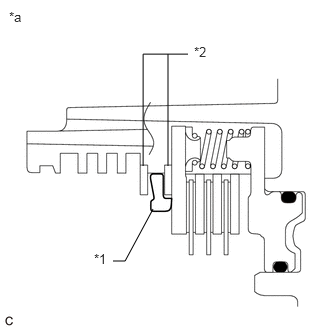
| *1 | Brake Snap Ring Stopper |
| *2 | Snap Ring |
| *a | Correctly Installed |
Check that the brake snap ring stopper can be turned by hand.
- NOTICE:
-
If the brake snap ring stopper cannot be turned by hand, the brake snap ring stopper may have been installed upside down, or a snap ring may not have been completely located in the groove on the front oil pump assembly. Remove and reinstall the snap ring and brake snap ring stopper.
36.INSPECT CLEARANCE OF NO. 1 BRAKE PISTON
34321
37.INSTALL UNDERDRIVE PLANETARY SUN GEAR
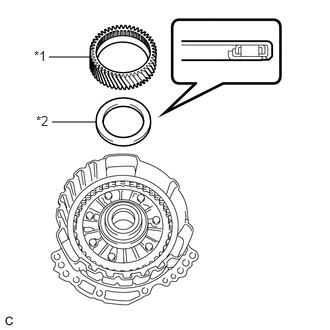
| *1 | Underdrive Planetary Sun Gear |
| *2 | Thrust Needle Roller Bearing |
Coat the thrust needle roller bearing with Toyota Genuine ATF WS and install it to the front oil pump assembly.
| - | Inside (mm (in.)) | Outside (mm (in.)) |
|---|---|---|
| Thrust needle roller bearing | 57.7 (2.27) | 75.2 (2.96) |
- NOTICE:
-
Be sure to install the thrust needle roller bearing so that the temper colored side of the race is visible.
Install the underdrive planetary sun gear to the front oil pump assembly.
35701
38.INSTALL INPUT SHAFT SUB-ASSEMBLY
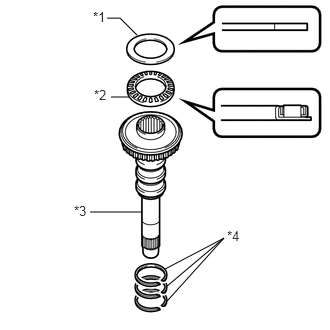
| *1 | Thrust Bearing Race |
| *2 | Thrust Needle Roller Bearing |
| *3 | Input Shaft Sub-assembly |
| *4 | Oil Seal Ring |
Coat 3 new oil seal rings with Toyota Genuine ATF WS and install them to the input shaft sub-assembly.
- NOTICE:
-
Do not expand the gap of the oil seal ring excessively.
Coat the thrust needle roller bearing and thrust bearing race with Toyota Genuine ATF WS and install them to the input shaft sub-assembly.
| - | Inside (mm (in.)) | Outside (mm (in.)) |
|---|---|---|
| Thrust needle roller bearing | 29.1 (1.15) | 48.6 (1.91) |
| Thrust bearing race | 30.7 (1.21) | 48.3 (1.90) |
- NOTICE:
-
Be sure to install the thrust needle roller bearing in the correct direction.
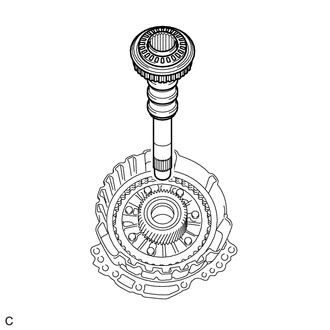
Install the input shaft sub-assembly to the front oil pump assembly.
35706V
39.INSTALL PLANETARY SUN GEAR SUB-ASSEMBLY
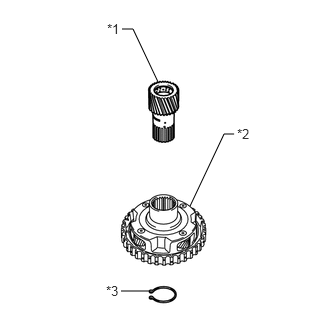
| *1 | Planetary Sun Gear Sub-assembly |
| *2 | Underdrive Planetary Gear Assembly |
| *3 | Snap Ring |
Using a snap ring expander, install the snap ring to the underdrive planetary gear assembly.
Using a snap ring expander, install the planetary sun gear sub-assembly to the underdrive planetary gear assembly with the snap ring expanded.
34341
40.INSTALL UNDERDRIVE PLANETARY RING GEAR
- HINT:
-
Perform this procedure only when replacement of the underdrive planetary ring gear or No. 3 brake hub is necessary.
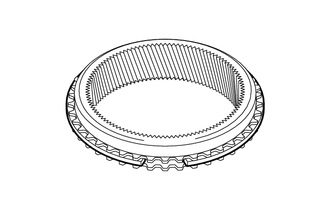
Install the snap ring to the underdrive planetary ring gear.
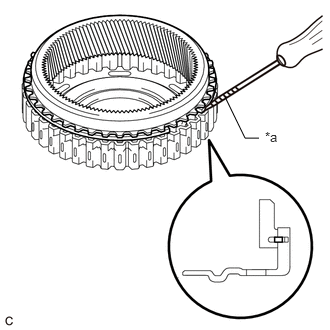
| *a | Protective Tape |
While compressing the snap ring with a screwdriver with its tip wrapped with protective tape, install the underdrive planetary ring gear to the No. 3 brake hub.
- NOTICE:
-
Confirm that the snap ring is correctly located in the groove of the No. 3 brake hub.
35663
41.INSTALL NO. 3 BRAKE HUB
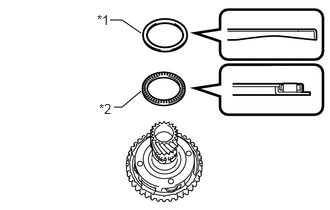
| *1 | Thrust Bearing Race |
| *2 | Thrust Needle Roller Bearing |
Coat the thrust needle roller bearing and thrust bearing race with Toyota Genuine ATF WS and install them to the underdrive planetary gear assembly.
| - | Inside (mm (in.)) | Outside (mm (in.)) |
|---|---|---|
| Thrust needle roller bearing | 62.6 (2.46) | 82.4 (3.24) |
| Thrust bearing race | 65.9 (2.59) | 82.3 (3.24) |
- NOTICE:
-
Be sure to install the thrust needle roller bearing so that the temper colored side of the race is visible.
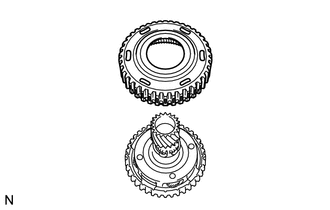
Install the No. 3 brake hub to the underdrive planetary gear assembly.
34330
42.INSTALL UNDERDRIVE PLANETARY GEAR ASSEMBLY
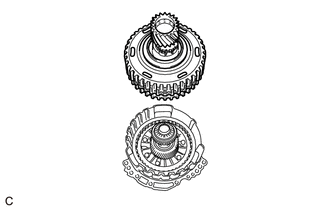
Install the underdrive planetary gear assembly to the front oil pump assembly.
35683B
43.INSTALL NO. 3 BRAKE DISC
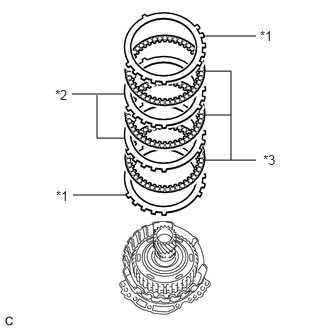
| *1 | No. 3 Brake Flange |
| *2 | No. 3 Brake Plate |
| *3 | No. 3 Brake Disc |
Install the 2 No. 3 brake flanges, 3 No. 3 brake discs and 2 No. 3 brake plates to the front oil pump assembly.
- NOTICE:
-
Make sure that the No. 3 brake discs, No. 3 brake plates and No. 3 brake flanges are installed in the correct order.
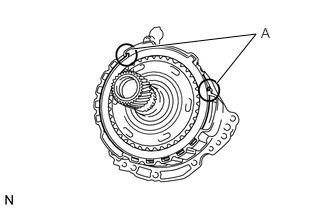
Using a screwdriver with its tip wrapped with protective tape, install the snap ring to the front oil pump assembly.
- NOTICE:
- ·
Confirm that the snap ring is correctly located in the groove of the front oil pump assembly.
·Make sure that the snap ring ends are positioned as shown in the illustration (A).
44.INSPECT CLEARANCE OF NO. 3 BRAKE PISTON
35035
45.INSTALL FRONT OIL PUMP ASSEMBLY
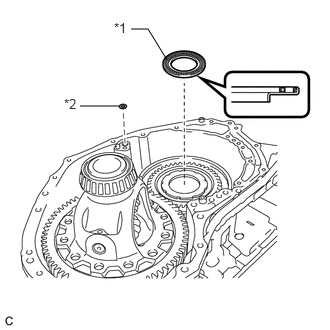
| *1 | Thrust Needle Roller Bearing |
| *2 | O-ring |
Coat a new O-ring with Toyota Genuine ATF WS and install it to the transaxle case sub-assembly.
Coat the thrust needle roller bearing with Toyota Genuine ATF WS.
Install the thrust needle roller bearing to the counter drive gear nut.
| - | Inside (mm (in.)) | Outside (mm (in.)) |
|---|---|---|
| Thrust needle roller bearing | 53.46 (2.10) | 79 (3.11) |
- NOTICE:
-
Be sure to install the thrust needle roller bearing so that the temper colored side of the race is visible.
Coat the thrust bearing race with MP grease.
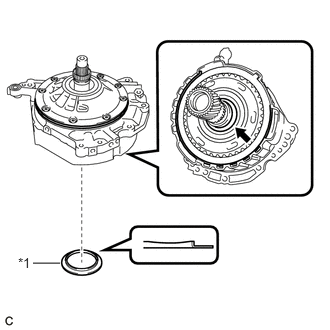
| *1 | Thrust Bearing Race |
Install the thrust bearing race to the underdrive planetary gear assembly.
| - | Inside (mm (in.)) | Outside (mm (in.)) |
|---|---|---|
| Thrust bearing race | 59.4 (2.34) | 76 (2.99) |
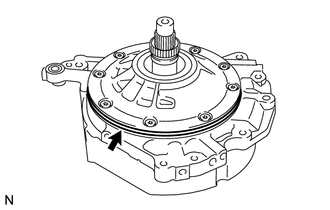
Coat a new front oil pump body O-ring with Toyota Genuine ATF WS and install it to the front oil pump assembly.
- NOTICE:
-
Make sure that the front oil pump body O-ring is installed correctly with the identification line facing outward and check that it is not twisted, protruding or damaged.
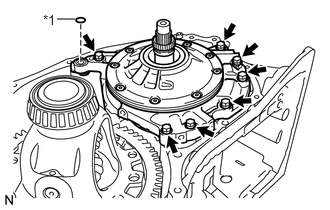
| *1 | Gasket |
Install the front oil pump assembly to the transaxle case sub-assembly with the 7 bolts.
- Torque:
- 22.7 N*m (231 kgf*cm, 17 ft.*lbf)
Coat a new gasket with Toyota Genuine ATF WS and install it to the front oil pump assembly.
35174
46.INSTALL TRANSAXLE HOUSING OIL SEPARATOR
Clean and degrease the 3 bolts and installation holes in the transaxle housing.
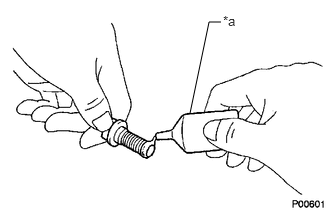
| *a | Adhesive |
Apply adhesive to 2 or 3 threads on the ends of the 3 bolts.
- Adhesive:
Toyota Genuine Adhesive 1324, Three Bond 1324 or equivalent
- NOTICE:
-
In order to ensure proper sealing of the 3 bolts, apply adhesive to the 3 bolts and install them within 10 minutes of adhesive application.
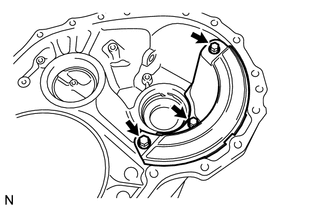
Install the transaxle housing oil separator to the transaxle housing with the 3 bolts.
- Torque:
- 22.7 N*m (231 kgf*cm, 17 ft.*lbf)
35882A
47.INSTALL DIFFERENTIAL GEAR LUBE APPLY TUBE
Clean and degrease the bolt and installation hole in the transaxle housing.
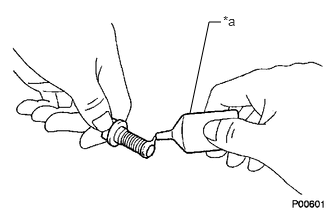
| *a | Adhesive |
Apply adhesive to 2 or 3 threads on the end of the bolt.
- Adhesive:
Toyota Genuine Adhesive 1324, Three Bond 1324 or equivalent
- NOTICE:
-
In order to ensure proper sealing of the bolt, apply adhesive to the bolt and install it within 10 minutes of adhesive application.
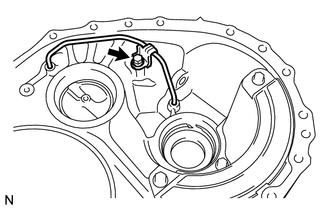
Install the differential gear lube apply tube to the transaxle housing.
- NOTICE:
-
Insert the differential gear lube apply tube into the transaxle housing until it makes contact with the stopper.
Install the clamp to the transaxle housing with the bolt.
- Torque:
- 22.7 N*m (231 kgf*cm, 17 ft.*lbf)
- NOTICE:
-
There should be clearance between the differential gear lube apply tube and clamp.
35111C
48.INSTALL TRANSAXLE HOUSING
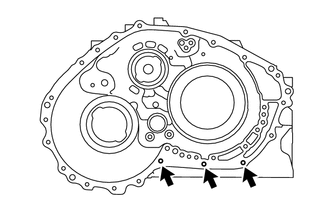
Clean and degrease the 3 bolts and installation holes in the transaxle case sub-assembly.
Remove any remaining seal packing from the contact surfaces of the transaxle housing and transaxle case sub-assembly.
- NOTICE:
-
Make sure that there is no ATF on the contact surfaces.
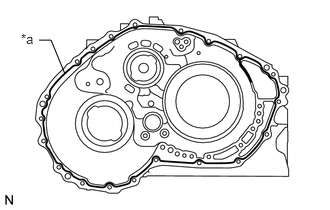
| *a | FIPG |
Apply FIPG to the transaxle case sub-assembly.
- FIPG:
Toyota Genuine Seal Packing 1281, Three Bond 1281 or equivalent
- NOTICE:
- ·
Apply FIPG in a continuous line (width 1.2 mm (0.0472 in.)) along the sealing surface of the transaxle case sub-assembly.
·After applying FIPG, install the transaxle housing to the transaxle case sub-assembly within 3 minutes and tighten the bolts within 20 minutes.
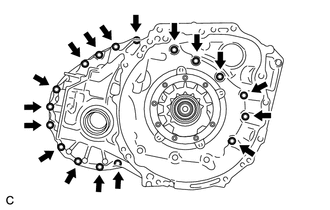
Install the transaxle housing to the transaxle case sub-assembly with the 17 bolts.
- Torque:
- 30.6 N*m (312 kgf*cm, 23 ft.*lbf)
| *a | Adhesive |
Apply adhesive to 2 or 3 threads on the ends of the 3 bolts.
- Adhesive:
Toyota Genuine Adhesive 1324, Three Bond 1324 or equivalent
- NOTICE:
-
In order to ensure proper sealing of the 3 bolts, apply adhesive to the 3 bolts and install them within 10 minutes of adhesive application.
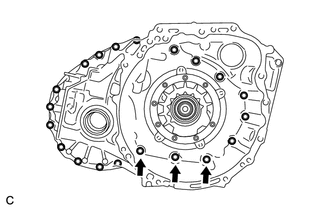
Install the 3 bolts.
- Torque:
- 22.7 N*m (231 kgf*cm, 17 ft.*lbf)
49.INSPECT CLEARANCE OF NO. 1 CLUTCH
35730
50.INSTALL REAR PLANETARY SUN GEAR ASSEMBLY
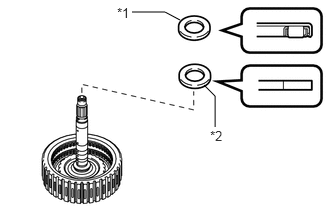
| *1 | Thrust Needle Roller Bearing |
| *2 | Thrust Bearing Race |
Coat the thrust needle roller bearing and thrust bearing race with Toyota Genuine ATF WS and install them to the rear multiple disc clutch assembly.
| - | Inside (mm (in.)) | Outside (mm (in.)) |
|---|---|---|
| Thrust needle roller bearing | 28 (1.10) | 47.1 (1.85) |
| Thrust bearing race | 26.1 (1.03) | 44 (1.73) |
- NOTICE:
-
Be sure to install the thrust needle roller bearing so that the temper colored side of the race is visible.
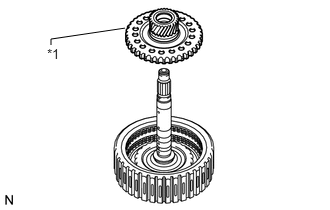
| *1 | Rear Planetary Sun Gear Assembly |
Install the rear planetary sun gear assembly to the rear multiple disc clutch assembly.
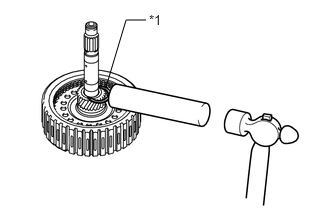
| *1 | Snap Ring |
Using a brass bar and a hammer, install the snap ring to the rear multiple disc clutch assembly.
- HINT:
-
Use a piece of cloth to keep the snap ring from flying off.
51.INSPECT CLEARANCE OF NO. 2 CLUTCH
35650
52.INSTALL REAR MULTIPLE DISC CLUTCH ASSEMBLY
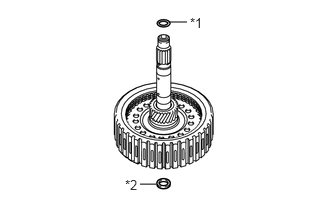
| *1 | O-ring |
| *2 | Oil Seal Ring |
Coat a new O-ring with Toyota Genuine ATF WS and install it to the rear multiple disc clutch assembly.
- NOTICE:
-
Ensure that the O-ring is not twisted.
Coat a new oil seal ring with Toyota Genuine ATF WS and install it to the rear multiple disc clutch assembly.
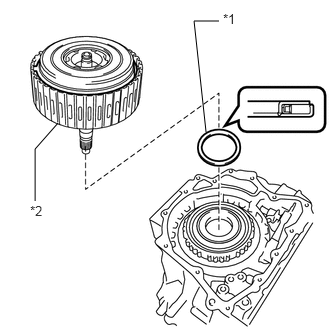
| *1 | Thrust Needle Roller Bearing |
| *2 | Rear Multiple Disc Clutch Assembly |
Coat the thrust needle roller bearing with Toyota Genuine ATF WS and install it to the transaxle case sub-assembly.
| - | Inside (mm (in.)) | Outside (mm (in.)) |
|---|---|---|
| Thrust needle roller bearing | 61.2 (2.41) | 79 (3.11) |
Install the rear multiple disc clutch assembly to the transaxle case sub-assembly.
53.INSPECT INTERMEDIATE SHAFT END PLAY
35102
54.INSTALL REAR TRANSAXLE COVER SUB-ASSEMBLY
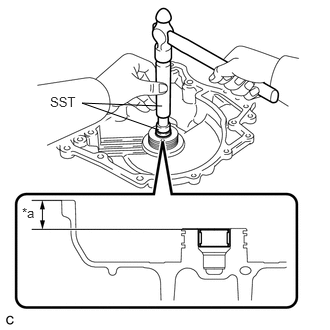
| *a | Depth |
Using SST and a hammer, install a new needle roller bearing to the rear transaxle cover sub-assembly.
- SST
- 09950-60011 (09951-00220)
09950-70010 (09951-07100)
- Standard Depth:
21.5 to 21.9 mm (0.846 to 0.862 in.)
Clean and degrease the 2 "TORX" screws and installation holes in the rear transaxle cover sub-assembly.
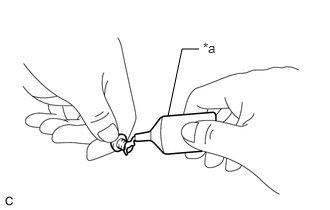
| *a | Adhesive |
Apply adhesive to 2 or 3 threads on the ends of the 2 "TORX" screws.
- Adhesive:
Toyota Genuine Adhesive 1324, Three Bond 1324 or equivalent
- NOTICE:
-
In order to ensure proper sealing of the 2 "TORX" screws, apply adhesive to the 2 "TORX" screws and install them within 10 minutes of adhesive application.
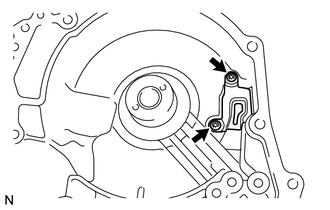
Using a T30 "TORX" socket wrench, install the rear transaxle cover plate to the rear transaxle cover sub-assembly with the 2 "TORX" screws.
- Torque:
- 7.5 N*m (76 kgf*cm, 66 in.*lbf)
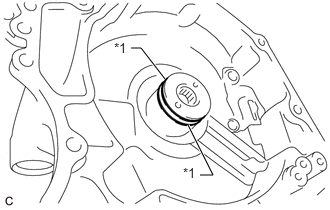
| *1 | Oil Seal Ring |
Coat 2 new oil seal rings with Toyota Genuine ATF WS and install them to the rear transaxle cover sub-assembly.
- NOTICE:
-
Confirm that the 2 oil seal rings are correctly located in the grooves of the rear transaxle cover sub-assembly.
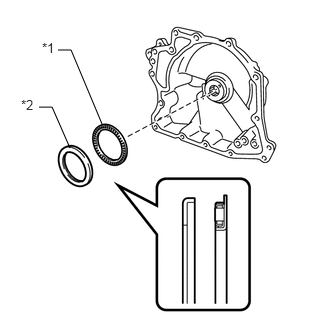
| *1 | Thrust Needle Roller Bearing |
| *2 | Thrust Bearing Race |
Coat the thrust needle roller bearing and thrust bearing race with MP grease and install them to the rear transaxle cover sub-assembly.
| - | Inside (mm (in.)) | Outside (mm (in.)) |
|---|---|---|
| Thrust needle roller bearing | 48.9 (1.93) | 72.0 (2.83) |
| Thrust bearing race | 52.2 (2.06) | 70.4 (2.77) |
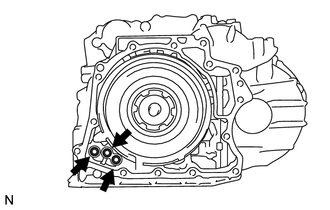
Coat 3 new O-rings with Toyota Genuine ATF WS and install them to the transaxle case sub-assembly.
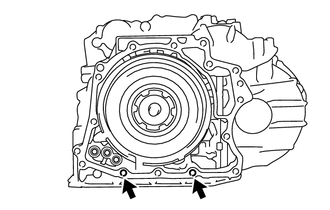
Clean and degrease the 2 bolts and installation holes in the transaxle case sub-assembly.
Remove any remaining seal packing from the contact surfaces of the rear transaxle cover sub-assembly and transaxle case sub-assembly.
- NOTICE:
-
Make sure that there is no ATF on the contact surfaces.
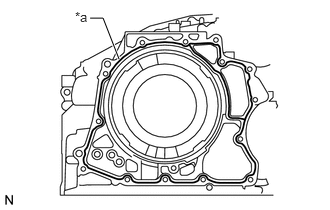
| *a | FIPG |
Apply FIPG to the transaxle case sub-assembly.
- FIPG:
Toyota Genuine Seal Packing 1281, Three Bond 1281 or equivalent
- NOTICE:
- ·
Apply FIPG in a continuous line (width 1.2 mm (0.0472 in.)) along the sealing surface of the transaxle case sub-assembly.
·After applying FIPG, install the rear transaxle cover sub-assembly to the transaxle case sub-assembly within 3 minutes and tighten the bolts within 20 minutes.
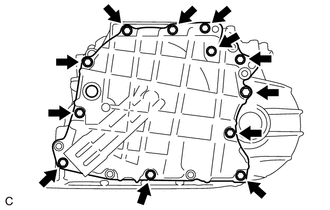
Install the rear transaxle cover sub-assembly to the transaxle case sub-assembly with the 12 bolts.
- Torque:
- 22.7 N*m (231 kgf*cm, 17 ft.*lbf)
| *a | Adhesive |
Apply adhesive to 2 or 3 threads on the ends of the 2 bolts.
- Adhesive:
Toyota Genuine Adhesive 1324, Three Bond 1324 or equivalent
- NOTICE:
-
In order to ensure proper sealing of the 2 bolts, apply adhesive to the 2 bolts and install them within 10 minutes of adhesive application.
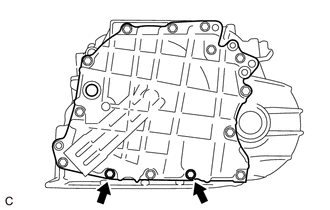
Install the 2 bolts.
- Torque:
- 16.9 N*m (172 kgf*cm, 12 ft.*lbf)
35102B
55.INSTALL REAR TRANSAXLE COVER PLUG
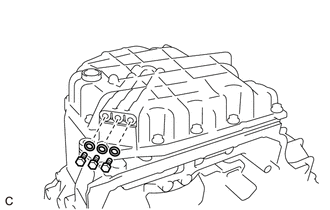
Coat 3 new O-rings with Toyota Genuine ATF WS and install them to the 3 rear transaxle cover plugs.
- NOTICE:
-
Ensure that the 3 O-rings are not twisted.
Install the 3 rear transaxle cover plugs to the rear transaxle cover sub-assembly.
- Torque:
- 7.4 N*m (75 kgf*cm, 65 in.*lbf)
35015S
56.INSTALL REFILL PLUG
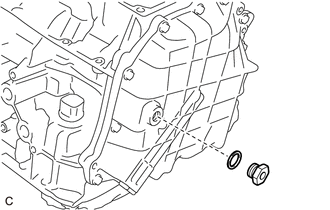
Install a new gasket to the refill plug.
Install the refill plug to the rear transaxle cover sub-assembly.
- Torque:
- 49 N*m (500 kgf*cm, 36 ft.*lbf)
57.INSPECT INPUT SHAFT SUB-ASSEMBLY END PLAY
35145C
58.INSTALL TRANSAXLE CASE GASKET
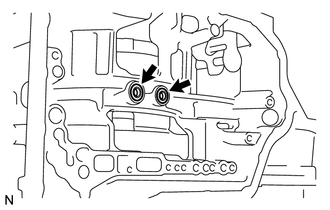
Coat 2 new transaxle case gaskets with Toyota Genuine ATF WS.
Install the 2 transaxle case gaskets to the transaxle case sub-assembly.
35410
59.INSTALL TRANSMISSION VALVE BODY ASSEMBLY
Coat the O-ring of the transmission wire with Toyota Genuine ATF WS.
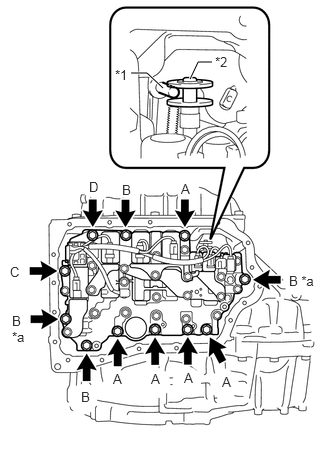
| *1 | Manual Valve Lever Shaft Sub-assembly Pin |
| *2 | Manual Valve |
| *a | Positioning Bolt |
Insert the manual valve lever shaft sub-assembly pin into the groove on the end of the manual valve as shown in the illustration and temporarily install the transmission valve body assembly to the transaxle case sub-assembly with the 11 bolts.
- NOTICE:
- ·
When installing the transmission valve body assembly, be careful not to allow the transmission revolution sensor and transaxle case sub-assembly to interfere with each other.
·Be sure to insert the manual valve lever shaft sub-assembly pin into the groove on the end of the manual valve.
| Bolt | Length (mm (in.)) |
|---|---|
| (A) | 25 (0.984) |
| (B) | 30 (1.18) |
| (C) and (D) | 35 (1.38) |
Fully tighten the 2 positioning bolts shown in the illustration.
- Torque:
- 10.8 N*m (110 kgf*cm, 8 ft.*lbf)
Fully tighten the 9 bolts to install the transmission valve body assembly.
- Torque:
- Bolt (A), (B), (C) : 10.8 N*m (110 kgf*cm, 8 ft.*lbf)
- Bolt (D) : 9.6 N*m (98 kgf*cm, 85 in.*lbf)
35330
60.INSTALL VALVE BODY OIL STRAINER ASSEMBLY
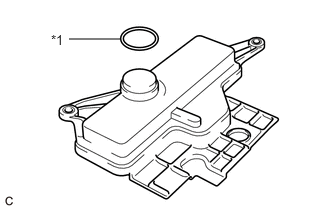
| *1 | O-ring |
Coat a new O-ring with Toyota Genuine ATF WS.
Install the O-ring to the valve body oil strainer assembly.
- NOTICE:
-
Ensure that the O-ring is not twisted.
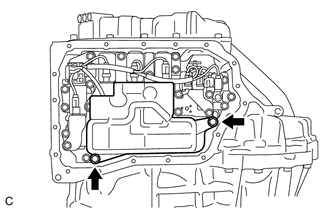
Install the valve body oil strainer assembly to the transmission valve body assembly with the 2 bolts.
- Torque:
- 9.6 N*m (98 kgf*cm, 85 in.*lbf)
35394
61.INSTALL TRANSMISSION OIL CLEANER MAGNET
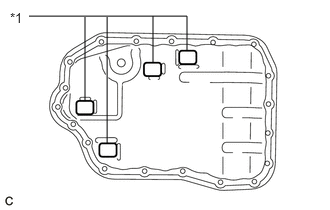
| *1 | Transmission Oil Cleaner Magnet |
Install the 4 transmission oil cleaner magnets to the automatic transaxle oil pan sub-assembly as shown in the illustration.
35168A
62.INSTALL AUTOMATIC TRANSAXLE OIL PAN GASKET
Install a new automatic transaxle oil pan gasket to the automatic transaxle oil pan sub-assembly.
35106D
63.INSTALL AUTOMATIC TRANSAXLE OIL PAN SUB-ASSEMBLY
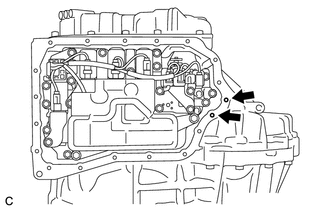
Clean and degrease the 2 bolts and installation holes in the transaxle case sub-assembly.
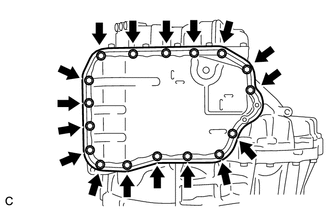
Install the automatic transaxle oil pan sub-assembly with automatic transaxle oil pan gasket to the transaxle case sub-assembly with the 17 bolts.
- Torque:
- 7.5 N*m (76 kgf*cm, 66 in.*lbf)
- NOTICE:
-
Completely remove any oil or grease from the contact surfaces of the transaxle case sub-assembly and automatic transaxle oil pan sub-assembly with automatic transaxle oil pan gasket before installation.
| *a | Adhesive |
Apply adhesive to 2 or 3 threads on the ends of the 2 bolts.
- Adhesive:
Toyota Genuine Adhesive 1324, Three Bond 1324 or equivalent
- NOTICE:
-
In order to ensure proper sealing of the 2 bolts, apply adhesive to the 2 bolts and install them within 10 minutes of adhesive application.
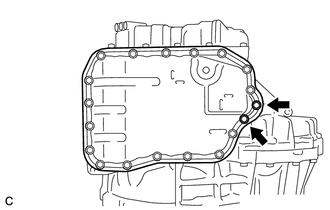
Install the 2 bolts.
- Torque:
- 7.0 N*m (71 kgf*cm, 62 in.*lbf)
35125C
64.INSTALL NO. 1 TRANSMISSION OIL FILLER TUBE
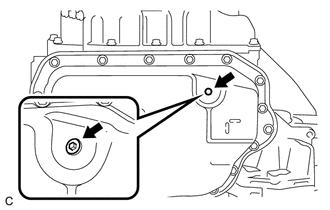
Using a 6 mm hexagon socket wrench, install the No. 1 transmission oil filler tube to the automatic transaxle oil pan sub-assembly.
- Torque:
- 0.8 N*m (8 kgf*cm, 7 in.*lbf)
35106A
65.INSTALL OVERFLOW PLUG
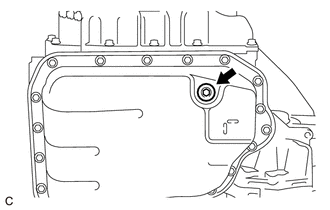
Using a 6 mm hexagon socket wrench, install the overflow plug and a new gasket to the automatic transaxle oil pan sub-assembly.
- Torque:
- 40 N*m (408 kgf*cm, 30 ft.*lbf)
43420H
66.INSTALL FRONT DRIVE SHAFT OIL SEAL LH
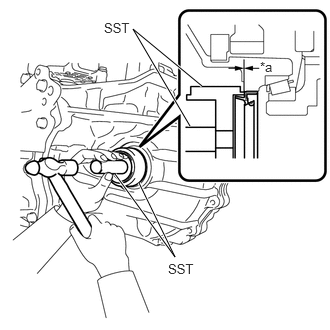
| *a | Depth |
Using SST and a hammer, install a new front drive shaft oil seal LH to the transaxle case sub-assembly.
- SST
- 09316-10010
09950-70010 (09951-07100)
- Standard Depth:
-0.5 to 0.5 mm (-0.0197 to 0.0197 in.)
- NOTICE:
- ·
Make sure that the front drive shaft oil seal LH is installed in the correct direction.
·Do not damage the lip of the front drive shaft oil seal LH.
43410M
67.INSTALL FRONT DRIVE SHAFT OIL SEAL RH
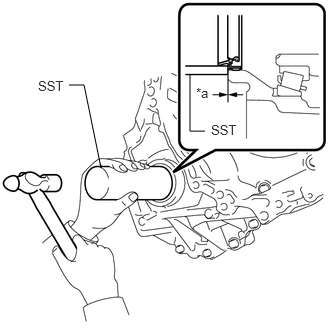
| *a | Depth |
Using SST and a hammer, install a new front drive shaft oil seal RH to the transaxle housing.
- SST
- 09316-60011 (09316-00011)
- Standard Depth:
-0.5 to 0.5 mm (-0.0197 to 0.0197 in.)
- NOTICE:
- ·
Make sure that the front drive shaft oil seal RH is installed in the correct direction.
·Do not damage the lip of the front drive shaft oil seal RH.
35102H
68.INSTALL NO. 2 TRANSAXLE CASE PLUG
Clean and degrease the 3 No. 2 transaxle case plugs and installation holes in the transaxle housing.
Install 3 new gaskets to the 3 No. 2 transaxle case plugs.
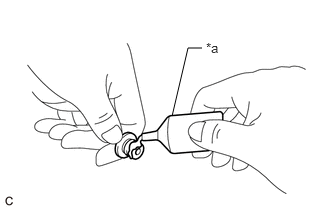
| *a | Adhesive |
Apply adhesive to 2 or 3 threads on the ends of the 3 No. 2 transaxle case plugs.
- Adhesive:
Toyota Genuine Adhesive 1324, Three Bond 1324 or equivalent
- NOTICE:
-
In order to ensure proper sealing of the 3 No. 2 transaxle case plugs, apply adhesive to the 3 No. 2 transaxle case plugs and install them within 10 minutes of adhesive application.
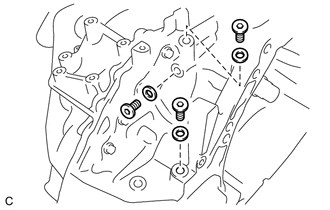
Using a 6 mm hexagon socket wrench, install the 3 No. 2 transaxle case plugs to the transaxle housing.
- Torque:
- 17 N*m (173 kgf*cm, 13 ft.*lbf)
35104Q
69.INSTALL NO. 1 TRANSAXLE CASE PLUG
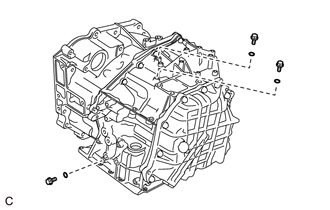
Coat 3 new O-rings with Toyota Genuine ATF WS and install them to the 3 No. 1 transaxle case plugs.
- NOTICE:
-
Ensure that the 3 O-rings are not twisted.
Install the 3 No. 1 transaxle case plugs to the transaxle case sub-assembly.
- Torque:
- 7.4 N*m (75 kgf*cm, 65 in.*lbf)
32921U
70.INSTALL OIL COOLER INLET ELBOW
Coat a new O-ring with Toyota Genuine ATF WS and install it to the oil cooler inlet elbow.
- NOTICE:
-
Ensure that the O-ring is not twisted.
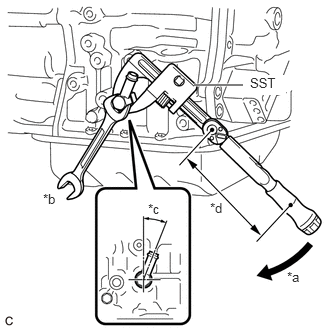
| *a | Turn |
| *b | Hold |
| *c | 20 to 24° |
| *d | Torque Wrench Fulcrum Length |
Using SST, install the oil cooler inlet elbow to the transaxle case sub-assembly so that it is positioned as shown in the illustration.
- SST
- 09922-10010
- Torque:
- Specified tightening torque : 27 N*m (275 kgf*cm, 20 ft.*lbf)
- HINT:
- ·
Calculate the torque wrench reading when changing the fulcrum length of the torque wrench.
Click hereGeneral>INTRODUCTION>REPAIR INSTRUCTION>PRECAUTION
·When using SST (fulcrum length of 137 mm (5.39 in.)) + torque wrench (fulcrum length of 180 mm (7.09 in.)): 15.3 N*m (156 kgf*cm, 11 ft.*lbf)
32901C
71.INSTALL OIL COOLER UNION SUB-ASSEMBLY
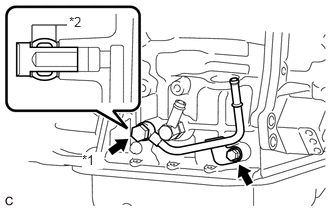
| *1 | Union Bolt |
| *2 | Gasket |
Temporarily install the oil cooler union sub-assembly to the transaxle case sub-assembly with the bolt.
Install the union bolt and 2 new gaskets to the transaxle case sub-assembly as shown in the illustration.
- Torque:
- 27 N*m (275 kgf*cm, 20 ft.*lbf)
Tighten the bolt.
- Torque:
- 12 N*m (122 kgf*cm, 9 ft.*lbf)
84540
72.INSTALL PARK/NEUTRAL POSITION SWITCH ASSEMBLY
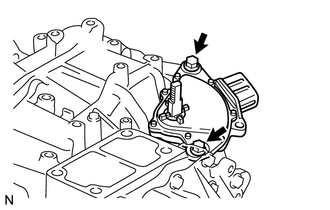
Temporarily install the park/neutral position switch assembly to the transaxle case sub-assembly with the 2 bolts.
- NOTICE:
-
Before installing the park/neutral position switch assembly, remove any dirt or rust on the manual valve lever shaft sub-assembly. Be sure to install the park/neutral position switch assembly straight along the manual valve lever shaft sub-assembly while being careful not to deform the plate spring that supports the manual valve lever shaft sub-assembly. If the plate spring is deformed, the park/neutral position switch assembly cannot be reinstalled correctly.
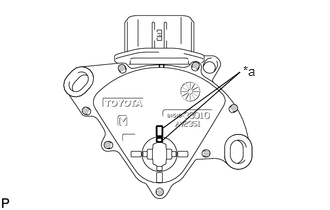
| *a | Protrusion |
Align the protrusions of the park/neutral position switch assembly as shown in the illustration.
Tighten the 2 bolts.
- Torque:
- 5.4 N*m (55 kgf*cm, 48 in.*lbf)
- NOTICE:
-
After installing the park/neutral position switch assembly, confirm that the 2 protrusions on the park/neutral position switch assembly are aligned.
35572A
73.INSTALL TRANSMISSION CONTROL SHAFT LEVER
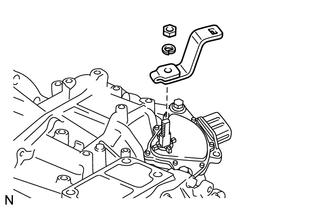
Install the transmission control shaft lever to the manual valve lever shaft sub-assembly with the washer and nut.
- Torque:
- 12.7 N*m (130 kgf*cm, 9 ft.*lbf)
35104V
74.INSTALL TRANSMISSION BREATHER HOSE SUB-ASSEMBLY
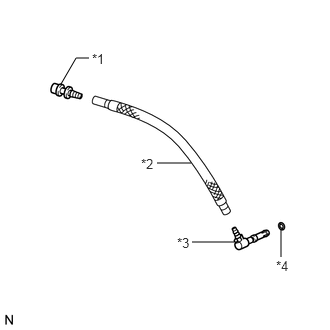
| *1 | No. 1 Breather Plug |
| *2 | Breather Plug Hose |
| *3 | No. 2 Breather Plug |
| *4 | O-ring |
Coat a new O-ring with Toyota Genuine ATF WS and install it to the No. 2 breather plug.
- NOTICE:
-
Ensure that the O-ring is not twisted.
Install the No. 2 breather plug to the breather plug hose.
Install the No. 1 breather plug to the breather plug hose.
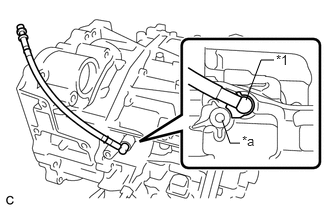
| *1 | No. 2 Breather Plug |
| *a | Boss |
Install the transmission breather hose sub-assembly to the transaxle case sub-assembly.
- NOTICE:
-
Make sure that the stopper of the No. 2 breather plug is in contact with the side of the boss on the transaxle case sub-assembly.