BRAKE CONTROL / DYNAMIC CONTROL SYSTEMS VEHICLE STABILITY CONTROL SYSTEM C1380 Stop Light Control Relay Malfunction
DESCRIPTION
When the skid control ECU (brake actuator assembly) applies the brakes after receiving a brake request signal from the pre-collision system, dynamic radar cruise control system, secondary collision brake system or brake hold control system, the skid control ECU (brake actuator assembly) operates the stop light control relay (stop light switch assembly) to illuminate the stop lights.
| DTC No. | Detection Item | DTC Detection Condition | Trouble Area |
|---|---|---|---|
| C1380 | Stop Light Control Relay Malfunction | Either condition is met:
·
When the voltage at the +BS terminal is between 10 V or more and the stop light control relay (stop light switch assembly) drive output (STPO) is on, a signal is not input to the STP terminal for 5 seconds or more. ·
When the voltage at the +BS terminal is between 10 V or more and the stop light control relay (stop light switch assembly) drive output (STPO) is off, the signal at the STP2 terminal is different from the input signal at the STP terminal for 5 seconds or more. |
·
Wire harness or connector ·
Stop light switch assembly ·
Skid control ECU (brake actuator assembly) ·
Rear combination light assembly LH ·
Rear combination light assembly RH ·
Center stop light (center stop light set) ·
Shift lock control ECU (shift lock control unit assembly) ·
Certification ECU (smart key ECU assembly) ·
ECM |
| Vehicle Condition | |||
|---|---|---|---|
| Pattern 1 | Pattern 2 | ||
| Diagnosis Condition | The voltage at the +BS terminal is between 10 V or more. | ○ | ○ |
| Malfunction Status | When the stop light control relay (stop light switch assembly) drive output (STPO) is on, a signal is not input to the STP terminal. | ○ | - |
| When the stop light control relay (stop light switch assembly) drive output (STPO) is off, the signal at the STP2 terminal is different from the input signal at the STP terminal. | - | ○ | |
| Detection Time | 5 seconds or more | 5 seconds or more | |
| Number of Trips | 1 trip | 1 trip | |
- HINT:
-
DTC will be output when conditions for either of the patterns in the table above are met.
WIRING DIAGRAM
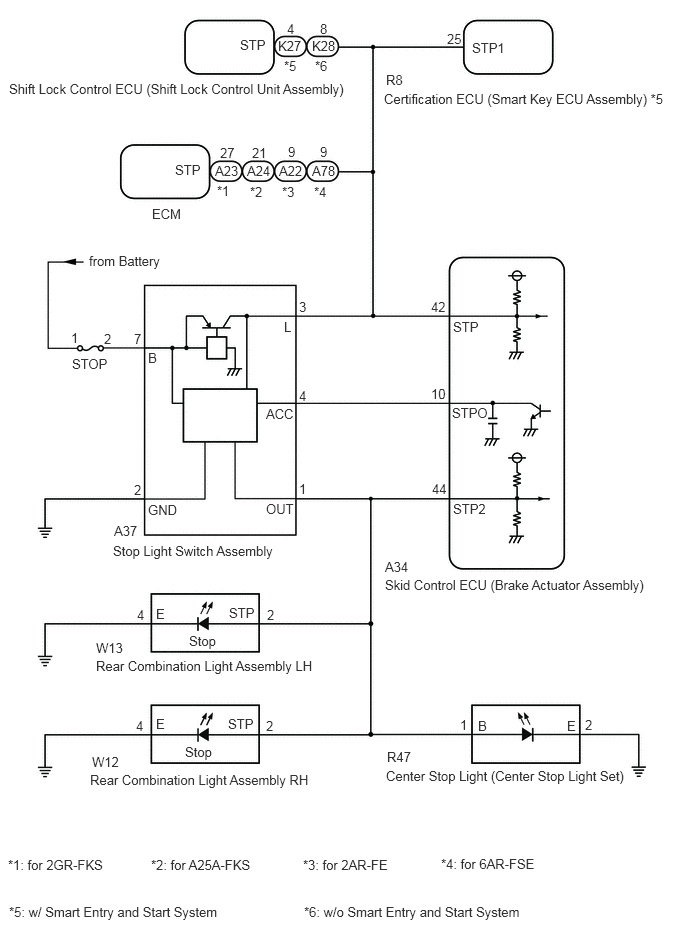
CAUTION / NOTICE / HINT
- NOTICE:
- ·
When replacing the skid control ECU (brake actuator assembly), perform system variant learning and acceleration sensor zero point calibration.
Click hereBrake>BRAKE CONTROL / DYNAMIC CONTROL SYSTEMS>VEHICLE STABILITY CONTROL SYSTEM>CALIBRATION
·Inspect the fuses for circuits related to this system before performing the following procedure.
·Before replacing the certification ECU (smart key ECU assembly), refer to Service Bulletin.
PROCEDURE
Connect the GTS to the DLC3.
Turn the ignition switch to ON.
Enter the following menus: Chassis / ABS/VSC/TRC / Data List.
- Chassis > ABS/VSC/TRC > Data List
-
Tester Display Measurement Item Range Normal Condition Diagnostic Note BS1 Voltage Value +BS voltage value Min.: 0.00 V, Max.: 20.00 V - Changes in proportion to battery voltage
- Chassis > ABS/VSC/TRC > Data List
-
Tester Display BS1 Voltage Value - 50003 105 273
Take a note of the +BS voltage value.
- HINT:
-
The noted +BS voltage value is used in a later step.
- Result:
Proceed to NEXT
NEXT
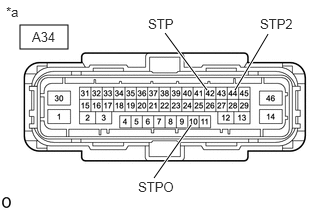
| *a | Front view of wire harness connector
(to Skid Control ECU (Brake Actuator Assembly)) |
Turn the ignition switch off.
Make sure that there is no looseness at the locking part and the connecting part of the connector.
- OK:
The connector is securely connected.
Disconnect the A34 skid control ECU (brake actuator assembly) connector.
Check both the connector case and the terminals for deformation and corrosion.
- OK:
No deformation or corrosion.
Measure the voltage according to the value(s) in the table below.
- Standard Voltage:
Tester Connection Condition Specified Condition A34-42 (STP) - Body ground Stop light switch assembly on (Brake pedal depressed) (+BS x 0.85) to 14 V* A34-42 (STP) - Body ground Stop light switch assembly off (Brake pedal released) Below 1.5 V A34-10 (STPO) - Body ground Always 11 to 14 V A34-44 (STP2) - Body ground Stop light switch assembly on (Brake pedal depressed) (+BS x 0.85) to 14 V* A34-44 (STP2) - Body ground Stop light switch assembly off (Brake pedal released) Below 1.5 V
- HINT:
-
*: The minimum voltage value varies depending on the +BS terminal voltage value. The minimum voltage is 85% or more of the +BS terminal voltage.
- Result:
Result Proceed to All terminal voltages are normal A Only STP terminal voltage abnormal B Only STPO terminal voltage abnormal C Only STP2 terminal voltage abnormal D STPO terminal and STP2 terminal voltage abnormal E
A
B
C
D
E
Reconnect the A34 skid control ECU (brake actuator assembly) connector.
Enter the following menus: Chassis / ABS/VSC/TRC / Active Test.
- Chassis > ABS/VSC/TRC > Active Test
-
Tester Display Measurement Item Control Range Diagnostic Note Stop Light Relay Stop light control relay (Stop light switch assembly) Relay OFF/ON Stop lights come on
- Chassis > ABS/VSC/TRC > Active Test
-
Tester Display Stop Light Relay - 50004 105 5
- OK:
Stop light turns ON/OFF in response to the GTS operation
- Result:
Proceed to OK NG
OK
NG
Clear the DTCs.
- Chassis > ABS/VSC/TRC > Clear DTCs
- 50002 105
Enter the following menus: Chassis / ABS/VSC/TRC / Active Test.
- Chassis > ABS/VSC/TRC > Active Test
-
Tester Display Measurement Item Control Range Diagnostic Note Stop Light Relay Stop light control relay (Stop light switch assembly) Relay OFF/ON Stop lights come on
- Chassis > ABS/VSC/TRC > Active Test
-
Tester Display Stop Light Relay - 50004 105 5
According to the display on the GTS, perform the Active Test.
Check if the same DTC is output.
- Chassis > ABS/VSC/TRC > Trouble Codes
- 50001 105
- Result:
Result Proceed to C1380 is output A C1380 is not output B
A
for LHD: Click hereBrake>BRAKE CONTROL / DYNAMIC CONTROL SYSTEMS>BRAKE ACTUATOR (for LHD)>REMOVAL
for RHD: Click hereBrake>BRAKE CONTROL / DYNAMIC CONTROL SYSTEMS>BRAKE ACTUATOR (for RHD)>REMOVAL
B
Click hereGeneral>INTRODUCTION>HOW TO TROUBLESHOOT ECU CONTROLLED SYSTEMS>HOW TO PROCEED WITH TROUBLESHOOTING
Enter the following menus: Chassis / ABS/VSC/TRC / Active Test.
- Chassis > ABS/VSC/TRC > Active Test
-
Tester Display Measurement Item Control Range Diagnostic Note Stop Light Relay Stop light control relay (Stop light switch assembly) Relay OFF/ON Stop lights come on
- Chassis > ABS/VSC/TRC > Active Test
-
Tester Display Stop Light Relay - 50004 105 5
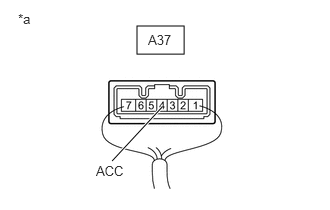
| *a | Component with harness connected
(Stop Light Switch Assembly) |
Measure the voltage according to the value(s) in the table below.
- Standard Voltage:
Tester Connection Condition Specified Condition A37-4 (ACC) - Body ground Active Test is on Below 1.5 V
- Result:
Proceed to OK NG
OK
NG
for LHD: Click hereBrake>BRAKE CONTROL / DYNAMIC CONTROL SYSTEMS>BRAKE ACTUATOR (for LHD)>REMOVAL
for RHD: Click hereBrake>BRAKE CONTROL / DYNAMIC CONTROL SYSTEMS>BRAKE ACTUATOR (for RHD)>REMOVAL
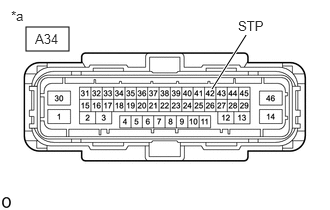
| *a | Front view of wire harness connector
(to Skid Control ECU (Brake Actuator Assembly)) |
Make sure that there is no looseness at the locking part and the connecting part of the connector.
- OK:
The connector is securely connected.
Disconnect the K27 shift lock control ECU (shift lock control unit assembly) connector (w/ Smart Entry and Start System).
Disconnect the K28 shift lock control ECU (shift lock control unit assembly) connector (w/o Smart Entry and Start System).
Check both the connector case and the terminals for deformation and corrosion.
- OK:
No deformation or corrosion.
Measure the voltage according to the value(s) in the table below.
- Standard Voltage:
Tester Connection Condition Specified Condition A34-42 (STP) - Body ground Stop light switch assembly on (Brake pedal depressed) (+BS x 0.85) to 14 V* A34-42 (STP) - Body ground Stop light switch assembly off (Brake pedal released) Below 1.5 V
- HINT:
-
*: The minimum voltage value varies depending on the +BS terminal voltage value. The minimum voltage is 85% or more of the +BS terminal voltage.
- Result:
Proceed to OK NG
OK
for UA80E: Click hereDrivetrain>UA80E (AUTOMATIC TRANSMISSION / TRANSAXLE)>SHIFT LEVER>DISASSEMBLY
for UB80E: Click hereDrivetrain>UB80E (AUTOMATIC TRANSMISSION / TRANSAXLE)>SHIFT LEVER>DISASSEMBLY
for U760E: Click hereDrivetrain>U760E (AUTOMATIC TRANSMISSION / TRANSAXLE)>SHIFT LEVER>DISASSEMBLY
for U761E: Click hereDrivetrain>U761E (AUTOMATIC TRANSMISSION / TRANSAXLE)>SHIFT LEVER>DISASSEMBLY
NG
| *a | Front view of wire harness connector
(to Skid Control ECU (Brake Actuator Assembly)) |
Make sure that there is no looseness at the locking part and the connecting part of the connector.
- OK:
The connector is securely connected.
Disconnect the A23 ECM connector (for 2GR-FKS).
Disconnect the A24 ECM connector (for A25A-FKS).
Disconnect the A22 ECM connector (for 2AR-FE).
Disconnect the A78 ECM connector (for 6AR-FSE).
Check both the connector case and the terminals for deformation and corrosion.
- OK:
No deformation or corrosion.
Measure the voltage according to the value(s) in the table below.
- Standard Voltage:
Tester Connection Condition Specified Condition A34-42 (STP) - Body ground Stop light switch assembly on (Brake pedal depressed) (+BS x 0.85) to 14 V* A34-42 (STP) - Body ground Stop light switch assembly off (Brake pedal released) Below 1.5 V
- HINT:
-
*: The minimum voltage value varies depending on the +BS terminal voltage value. The minimum voltage is 85% or more of the +BS terminal voltage.
- Result:
Result Proceed to OK A NG (w/ Smart Entry and Start System) B NG (w/o Smart Entry and Start System) C
A
for 2GR-FKS: Click hereEngine / Hybrid System>2GR-FKS (ENGINE CONTROL)>ECM>REMOVAL
for A25A-FKS: Click hereEngine / Hybrid System>A25A-FKS (ENGINE CONTROL)>ECM>REMOVAL
for 2AR-FE: Click hereEngine / Hybrid System>2AR-FE (ENGINE CONTROL)>ECM>REMOVAL
for 6AR-FSE: Click hereEngine / Hybrid System>6AR-FSE (ENGINE CONTROL)>ECM>REMOVAL
B
C
| *a | Front view of wire harness connector
(to Skid Control ECU (Brake Actuator Assembly)) |
Make sure that there is no looseness at the locking part and the connecting part of the connector.
- OK:
The connector is securely connected.
Disconnect the R8 certification ECU (smart key ECU assembly) connector.
Check both the connector case and the terminals for deformation and corrosion.
- OK:
No deformation or corrosion.
Measure the voltage according to the value(s) in the table below.
- Standard Voltage:
Tester Connection Condition Specified Condition A34-42 (STP) - Body ground Stop light switch assembly on (Brake pedal depressed) (+BS x 0.85) to 14 V* A34-42 (STP) - Body ground Stop light switch assembly off (Brake pedal released) Below 1.5 V
- HINT:
-
*: The minimum voltage value varies depending on the +BS terminal voltage value. The minimum voltage is 85% or more of the +BS terminal voltage.
- Result:
Proceed to OK NG
OK
NG
| *a | Front view of wire harness connector
(to Skid Control ECU (Brake Actuator Assembly)) |
Make sure that there is no looseness at the locking part and the connecting part of the connector.
- OK:
The connector is securely connected.
Disconnect the A37 stop light switch assembly connector.
Check both the connector case and the terminals for deformation and corrosion.
- OK:
No deformation or corrosion.
Measure the voltage according to the value(s) in the table below.
- Standard Voltage:
Tester Connection Condition Specified Condition A34-42 (STP) - Body ground Always Below 1.5 V
- Result:
Proceed to OK NG
OK
NG
Measure the resistance according to the value(s) in the table below.
- Standard Resistance:
Tester Connection Condition Specified Condition A34-42 (STP) - A37-3 (L) Always Below 1 Ω A34-42 (STP) or A37-3 (L) - Body ground Always 10 kΩ or higher
- Result:
Proceed to OK NG
OK
NG
Make sure that there is no looseness at the locking part and the connecting part of the connector.
- OK:
The connector is securely connected.
Disconnect the A37 stop light switch assembly connector.
Check both the connector case and the terminals for deformation and corrosion.
- OK:
No deformation or corrosion.
Measure the resistance according to the value(s) in the table below.
- Standard Resistance:
Tester Connection Condition Specified Condition A34-10 (STPO) - A37-4 (ACC) Always Below 1 Ω
- Result:
Proceed to OK NG
OK
NG
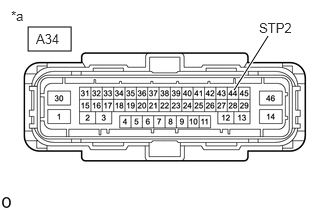
| *a | Front view of wire harness connector
(to Skid Control ECU (Brake Actuator Assembly)) |
Make sure that there is no looseness at the locking part and the connecting part of the connector.
- OK:
The connector is securely connected.
Disconnect the W13 rear combination light assembly LH connector.
Check both the connector case and the terminals for deformation and corrosion.
- OK:
No deformation or corrosion.
Measure the voltage according to the value(s) in the table below.
- Standard Voltage:
Tester Connection Condition Specified Condition A34-44 (STP2) - Body ground Stop light switch assembly on (Brake pedal depressed) (+BS x 0.85) to 14 V* A34-44 (STP2) - Body ground Stop light switch assembly off (Brake pedal released) Below 1.5 V
- HINT:
-
*: The minimum voltage value varies depending on the +BS terminal voltage value. The minimum voltage is 85% or more of the +BS terminal voltage.
- Result:
Proceed to OK NG
OK
NG
| *a | Front view of wire harness connector
(to Skid Control ECU (Brake Actuator Assembly)) |
Make sure that there is no looseness at the locking part and the connecting part of the connector.
- OK:
The connector is securely connected.
Disconnect the W12 rear combination light assembly RH connector.
Check both the connector case and the terminals for deformation and corrosion.
- OK:
No deformation or corrosion.
Measure the voltage according to the value(s) in the table below.
- Standard Voltage:
Tester Connection Condition Specified Condition A34-44 (STP2) - Body ground Stop light switch assembly on (Brake pedal depressed) (+BS x 0.85) to 14 V* A34-44 (STP2) - Body ground Stop light switch assembly off (Brake pedal released) Below 1.5 V
- HINT:
-
*: The minimum voltage value varies depending on the +BS terminal voltage value. The minimum voltage is 85% or more of the +BS terminal voltage.
- Result:
Proceed to OK NG
OK
NG
| *a | Front view of wire harness connector
(to Skid Control ECU (Brake Actuator Assembly)) |
Make sure that there is no looseness at the locking part and the connecting part of the connector.
- OK:
The connector is securely connected.
Disconnect the R47 center stop light (center stop light set) connector.
Check both the connector case and the terminals for deformation and corrosion.
- OK:
No deformation or corrosion.
Measure the voltage according to the value(s) in the table below.
- Standard Voltage:
Tester Connection Condition Specified Condition A34-44 (STP2) - Body ground Stop light switch assembly on (Brake pedal depressed) (+BS x 0.85) to 14 V* A34-44 (STP2) - Body ground Stop light switch assembly off (Brake pedal released) Below 1.5 V
- HINT:
-
*: The minimum voltage value varies depending on the +BS terminal voltage value. The minimum voltage is 85% or more of the +BS terminal voltage.
- Result:
Proceed to OK NG
OK
NG
| *a | Front view of wire harness connector
(to Skid Control ECU (Brake Actuator Assembly)) |
Make sure that there is no looseness at the locking part and the connecting part of the connector.
- OK:
The connector is securely connected.
Disconnect the A37 stop light switch assembly connector.
Check both the connector case and the terminals for deformation and corrosion.
- OK:
No deformation or corrosion.
Measure the voltage according to the value(s) in the table below.
- Standard Voltage:
Tester Connection Condition Specified Condition A34-44 (STP2) - Body ground Always Below 1.5 V
- Result:
Proceed to OK NG
OK
NG
Measure the resistance according to the value(s) in the table below.
- Standard Resistance:
Tester Connection Condition Specified Condition A37-1 (OUT) - A34-44 (STP2) Always Below 1 Ω A37-1 (OUT) or A34-44 (STP2) - Body ground Always 10 kΩ or higher
- Result:
Proceed to OK NG
OK
NG
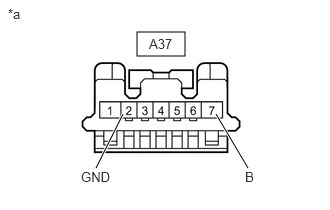
| *a | Front view of wire harness connector
(to Stop Light Switch Assembly) |
Make sure that there is no looseness at the locking part and the connecting part of the connector.
- OK:
The connector is securely connected.
Disconnect the A37 stop light switch assembly connector.
Check both the connector case and the terminals for deformation and corrosion.
- OK:
No deformation or corrosion.
Measure the resistance according to the value(s) in the table below.
- Standard Resistance:
Tester Connection Condition Specified Condition A37-2 (GND) - Body ground Always Below 1 Ω
Measure the voltage according to the value(s) in the table below.
- Standard Voltage:
Tester Connection Condition Specified Condition A37-7 (B) - Body ground Always 11 to 14 V
- Result:
Proceed to OK NG
OK
NG
Measure the resistance according to the value(s) in the table below.
- Standard Resistance:
Tester Connection Condition Specified Condition A34-10 (STPO) or A37-4 (ACC) - Body ground Always 10 kΩ or higher
- Result:
Proceed to OK NG
OK
NG