K120 CVT CONTINUOUSLY VARIABLE TRANSAXLE UNIT REASSEMBLY
CAUTION / NOTICE / HINT
- NOTICE:
- ·
Clean the work area, tools to be used, other equipment, etc., thoroughly before performing this procedure, as there is a possibility that a CVT malfunction, which may prevent the vehicle from being driven, may occur if dust or fine foreign matter enters the CVT.
·Do not use cotton work gloves, cloths, paper towels, etc., that may produce lint, dust or foreign matter.
·When cleaning parts, make sure that dust or foreign matter does not enter the CVT.
·When replacing any tapered roller bearing (inner race) or tapered roller bearing (outer race), replace both the tapered roller bearing (inner race) and tapered roller bearing (outer race) with new ones.
·When the tapered roller bearing (inner race) is removed, the tapered roller bearing (inner race) and tapered roller bearing (outer race) need to be replaced.
·When the tapered roller bearing (inner race) is not removed, the tapered roller bearing (inner race) and tapered roller bearing (outer race) can be reused.
- HINT:
-
Shift shock may increase after replacing the transmission valve body assembly or forward multiple disc clutch assembly. In this case, shift shock will reduce as the vehicle is driven.
PROCEDURE

 1. BEARING POSITION
Check the position and installation direction of each bearing.
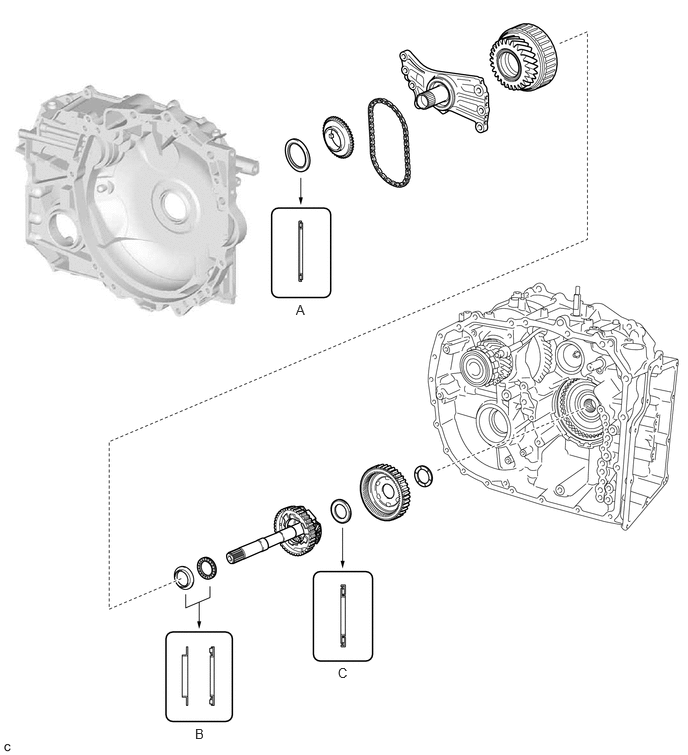
| Mark | Thrust Bearing Race Diameter Inside / Outside
mm (in.) |
Thrust Needle Roller Bearing Diameter Inside / Outside
mm (in.) |
|---|---|---|
| A | - | 47.75 (1.88) / 65.8 (2.59) |
| B | 26.38 (1.04) / 38.9 (1.53) | 24.9 (0.98) / 38.9 (1.53) |
| C | - | 29.7 (1.17) / 49.1 (1.93) |
2.INSTALL STRAIGHT PIN
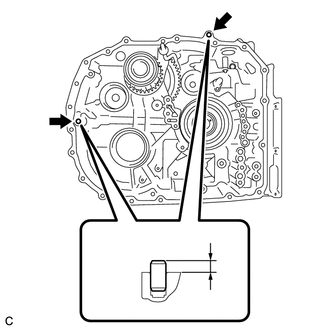
Install the 2 straight pins to the transaxle case sub-assembly.
- Protrusion Height:
7.0 to 8.0 mm (0.276 to 0.315 in.)
3.INSTALL DIFFERENTIAL CASE REAR TAPERED ROLLER BEARING (INNER RACE)
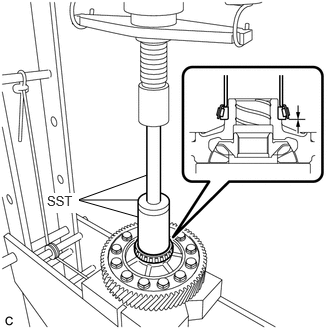
Using SST and a press, install a new differential case rear tapered roller bearing (inner race) to the differential case sub-assembly.
- SST
- 09523-36010
09950-60011 (09951-00560)
09950-70010 (09951-07150)
- NOTICE:
- ·
Do not damage the differential case rear tapered roller bearing (inner race) cage when installing the differential case rear tapered roller bearing (inner race).
·Be sure to install the differential case rear tapered roller bearing (inner race) so that there is no clearance between the differential case rear tapered roller bearing (inner race) and the differential case sub-assembly. If there is any clearance, the turning torque of the differential case sub-assembly cannot be measured correctly.
4.INSTALL DIFFERENTIAL CASE FRONT TAPERED ROLLER BEARING (INNER RACE)
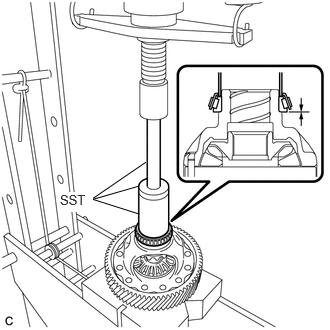
Using SST and a press, install a new differential case front tapered roller bearing (inner race) to the differential case sub-assembly.
- SST
- 09523-36010
09950-60011 (09951-00560)
09950-70010 (09951-07150)
- NOTICE:
- ·
Do not damage the differential case front tapered roller bearing (inner race) cage when installing the differential case front tapered roller bearing (inner race).
·Be sure to install the differential case front tapered roller bearing (inner race) so that there is no clearance between the differential case front tapered roller bearing (inner race) and the differential case sub-assembly. If there is any clearance, the turning torque of the differential case sub-assembly cannot be measured correctly.
5.INSTALL DIFFERENTIAL CASE REAR TAPERED ROLLER BEARING (OUTER RACE)
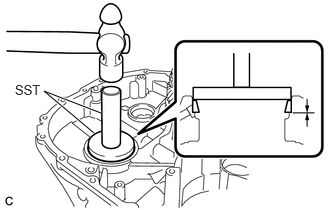
Using SST and a hammer, install a new differential case rear tapered roller bearing (outer race) to the transaxle case sub-assembly.
- SST
- 09950-60021 (09951-00790)
09950-70010 (09951-07100)
- NOTICE:
-
Be sure to install the differential case rear tapered roller bearing (outer race) so that there is no clearance between the differential case rear tapered roller bearing (outer race) and the transaxle case sub-assembly. If there is any clearance, the turning torque of the differential case sub-assembly cannot be measured correctly.
6.INSTALL DIFFERENTIAL CASE FRONT TAPERED ROLLER BEARING (OUTER RACE)
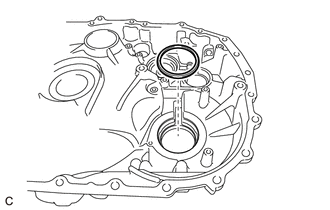
Install the shim to the transaxle housing.
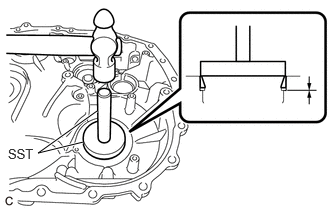
Using SST and a hammer, install a new differential case front tapered roller bearing (outer race) to the transaxle housing.
- SST
- 09950-60021 (09951-00730)
09950-70010 (09951-07100)
- NOTICE:
-
Be sure to install the differential case front tapered roller bearing (outer race) so that there is no clearance between the differential case front tapered roller bearing (outer race), shim and the transaxle housing. If there is any clearance, the turning torque of the differential case sub-assembly cannot be measured correctly.
7.ADJUST DIFFERENTIAL CASE TAPERED ROLLER BEARING PRELOAD
Remove any remaining seal packing from the contact surfaces of the transaxle housing and transaxle case sub-assembly.
- NOTICE:
-
Make sure that there is no Toyota Genuine CVT fluid FE on the contact surfaces.
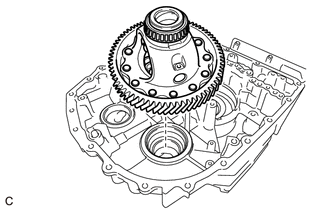
Install the differential case sub-assembly to the transaxle case sub-assembly.
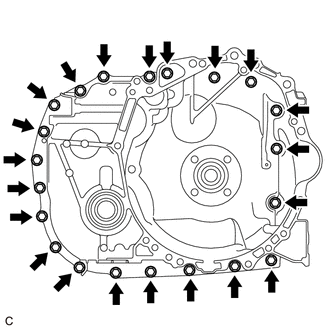
Install the transaxle housing to the transaxle case sub-assembly with the 21 bolts.
- Torque:
- 29.4 N*m (300 kgf*cm, 22 ft.*lbf)
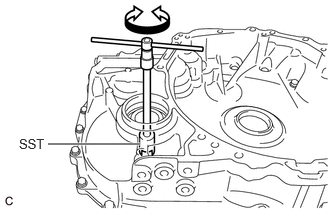
Using SST, turn the differential case sub-assembly right and left 2 or 3 times to settle the bearings.
- SST
- 09564-50010
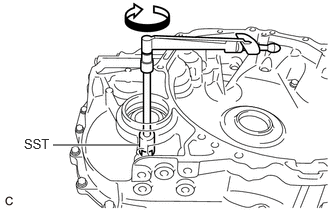
Using SST and a torque wrench, measure the turning torque of the differential case tapered roller bearing while rotating SST at 10 rpm.
- SST
- 09564-50010
- Standard Turning Torque:
1.65 to 2.66 N*m (17 to 27 kgf*cm, 15 to 23 in.*lbf)
If the turning torque is not within the specified range, refer to the table below to select a shim so that the turning torque is within the specified range.
- Shim Thickness:
Part Number Thickness
mm (in.)Mark 90564-66038 1.76 (0.0693) A 90564-66039 1.79 (0.0705) B 90564-66067 1.82 (0.0717) C 90564-66068 1.85 (0.0728) D 90564-66069 1.88 (0.0740) E 90564-66070 1.91 (0.0752) F 90564-66071 1.94 (0.0764) G 90564-66072 1.97 (0.0776) H 90564-66073 2.00 (0.0787) J 90564-66074 2.03 (0.0799) K 90564-66075 2.06 (0.0811) L 90564-66076 2.09 (0.0823) M 90564-66077 2.12 (0.0835) N 90564-66078 2.15 (0.0846) P 90564-66079 2.18 (0.0858) Q 90564-66080 2.21 (0.0870) R 90564-66081 2.24 (0.0882) S 90564-66082 2.27 (0.0894) T 90564-66083 2.30 (0.0906) U 90564-66084 2.33 (0.0917) V
Remove the 21 bolts and transaxle housing from the transaxle case sub-assembly.
Remove the differential case sub-assembly from the transaxle case sub-assembly.
8.INSTALL REDUCTION DRIVEN GEAR REAR TAPERED ROLLER BEARING (INNER RACE)
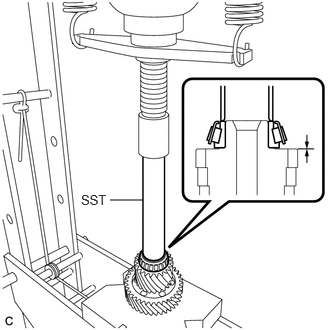
Using SST and a press, install a new reduction driven gear rear tapered roller bearing (inner race) to the reduction driven gear.
- SST
- 09330-50010
- NOTICE:
- ·
Do not damage the reduction driven gear rear tapered roller bearing (inner race) cage when installing the reduction driven gear rear tapered roller bearing (inner race).
·Be sure to install the reduction driven gear rear tapered roller bearing (inner race) so that there is no clearance between the reduction driven gear rear tapered roller bearing (inner race) and the reduction driven gear. If there is any clearance, the turning torque of the reduction driven gear cannot be measured correctly.
9.INSTALL REDUCTION DRIVEN GEAR FRONT TAPERED ROLLER BEARING (INNER RACE)
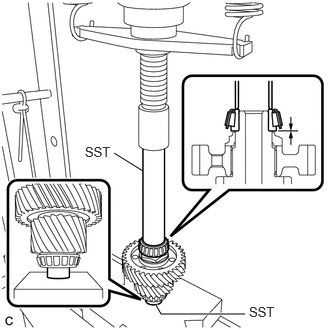
Using SST and a press, install a new reduction driven gear front tapered roller bearing (inner race) to the reduction driven gear.
- SST
- 09330-50010
09950-60011 (09951-00270)
- NOTICE:
- ·
Do not damage the reduction driven gear front tapered roller bearing (inner race) cage when installing the reduction driven gear front tapered roller bearing (inner race).
·Be sure to install the reduction driven gear front tapered roller bearing (inner race) so that there is no clearance between the reduction driven gear front tapered roller bearing (inner race) and the reduction driven gear. If there is any clearance, the turning torque of the reduction driven gear cannot be measured correctly.
10.INSTALL REDUCTION DRIVEN GEAR REAR TAPERED ROLLER BEARING (OUTER RACE)
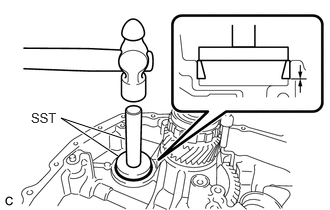
Using SST and a hammer, install a new reduction driven gear rear tapered roller bearing (outer race) to the transaxle case sub-assembly.
- SST
- 09950-60011 (09951-00560)
09950-70010 (09951-07100)
- NOTICE:
-
Be sure to install the reduction driven gear rear tapered roller bearing (outer race) so that there is no clearance between the reduction driven gear rear tapered roller bearing (outer race) and the transaxle case sub-assembly. If there is any clearance, the turning torque of the reduction driven gear cannot be measured correctly.
11.INSTALL REDUCTION DRIVEN GEAR FRONT TAPERED ROLLER BEARING (OUTER RACE)
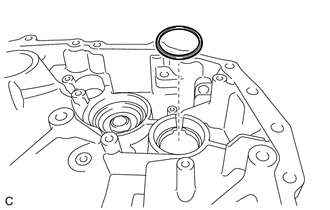
Install the shim to the transaxle housing.
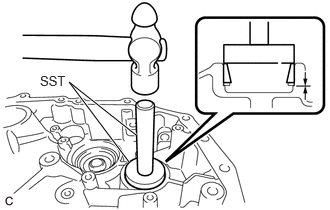
Using SST and a hammer, install a new reduction driven gear front tapered roller bearing (outer race) to the transaxle housing.
- SST
- 09950-60011 (09951-00500)
09950-70010 (09951-07100)
- NOTICE:
-
Be sure to install the reduction driven gear front tapered roller bearing (outer race) so that there is no clearance between the reduction driven gear front tapered roller bearing (outer race), shim and the transaxle housing. If there is any clearance, the turning torque of the reduction driven gear cannot be measured correctly.
12.ADJUST REDUCTION DRIVEN GEAR TAPERED ROLLER BEARING PRELOAD
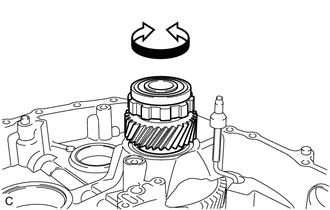
Turn the reduction driven gear right and left 2 or 3 times to settle the bearings.
Install SST.
Set SST to the parking lock gear as shown in the illustration.
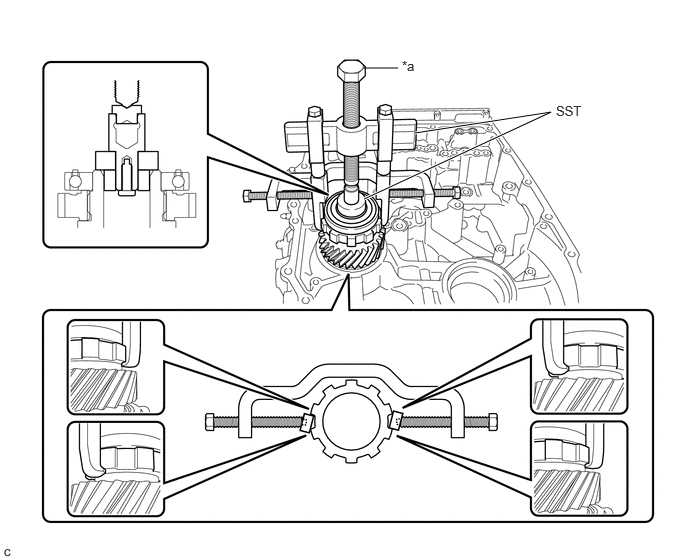
| *a | SST (Center Bolt) | - | - |
- SST
- 09950-40011 (09951-04010, 09952-04010, 09953-04020, 09954-04010, 09955-04071, 09957-04010, 09958-04011)
09950-60011 (09951-00360, 09951-00250, 09952-06010)
- NOTICE:
-
Do not tighten SST (center bolt) more than is necessary to hold SST in place or the parking lock gear or bearing may unseat.
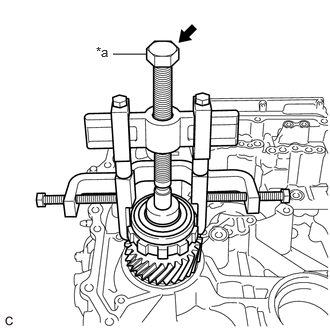
| *a | SST (Center Bolt) |
Tighten SST (center bolt).
- HINT:
-
Torque: 0.5 N*m (5 kgf*cm, 4 in.*lbf)
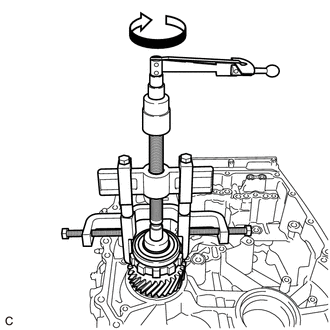
Using a torque wrench, measure and note the turning torque (T1) of the reduction driven gear while rotating SST at 10 rpm.
- HINT:
-
No specified range is provided for T1 as it is only used for calculating the total preload of the differential case sub-assembly and reduction driven gear.
Remove SST from the parking lock gear.
Install the differential case sub-assembly to the transaxle case sub-assembly.
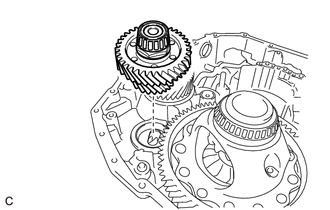
Install the reduction driven gear to the transaxle case sub-assembly.
Install the transaxle housing to the transaxle case sub-assembly with the 21 bolts.
- Torque:
- 29.4 N*m (300 kgf*cm, 22 ft.*lbf)
Using SST, turn the differential case sub-assembly right and left 2 or 3 times to settle the bearings.
- SST
- 09564-50010
Using a torque wrench, measure and note the turning torque (T2) of the differential case tapered roller bearing while rotating SST at 10 rpm.
- SST
- 09564-50010
Subtract T1 from T2 to calculate the total preload of the differential case sub-assembly and reduction driven gear.
- Standard Turning Torque:
Differential case tapered roller bearing preload + 3.21 to 6.11 N*m (33 to 62 kgf*cm, 29 to 54 in.*lbf)
If the turning torque is not within the specified range, refer to the table below to select a shim so that the turning torque is within the specified range.
- Shim Thickness:
Part Number Thickness
mm (in.)Mark 90564-44070 1.59 (0.0626) A 90564-44071 1.62 (0.0638) B 90564-44072 1.65 (0.0650) C 90564-44073 1.68 (0.0661) D 90564-44074 1.71 (0.0673) E 90564-44075 1.74 (0.0685) F 90564-44076 1.77 (0.0697) G 90564-44077 1.80 (0.0709) H 90564-44078 1.83 (0.0720) J 90564-44079 1.86 (0.0732) K 90564-44080 1.89 (0.0744) L 90564-44081 1.92 (0.0756) M 90564-44082 1.95 (0.0768) N 90564-44083 1.98 (0.0780) P 90564-44084 2.01 (0.0791) Q 90564-44085 2.04 (0.0803) R 90564-44086 2.07 (0.0815) S 90564-44087 2.10 (0.0827) T 90564-44088 2.13 (0.0839) U 90564-44089 2.16 (0.0850) V 90564-44090 2.19 (0.0862) W 90564-44091 2.22 (0.0874) X 90564-44092 2.25 (0.0886) Y
Remove the 21 bolts and transaxle housing from the transaxle case sub-assembly.
Remove the reduction driven gear from the transaxle case sub-assembly.
Remove the differential case sub-assembly from the transaxle case sub-assembly.
43420H
13.INSTALL FRONT DRIVE SHAFT OIL SEAL LH
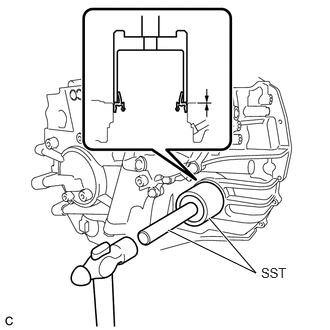
Using SST and a hammer, install a new front drive shaft oil seal LH to the transaxle case sub-assembly.
- SST
- 09950-70010 (09951-07150)
09649-17010
- Standard Depth:
-0.5 to 0.5 mm (-0.0197 to 0.0197 in.)
- NOTICE:
- ·
Make sure that the front drive shaft oil seal LH is installed in the correct direction.
·Make sure to install the front drive shaft oil seal LH as specified, otherwise malfunctions such as a fluid leak will occur.
·Do not damage the lip of the front drive shaft oil seal LH.
35623L
14.INSTALL REVERSE BRAKE PISTON
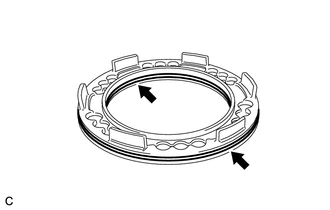
Coat 2 new O-rings with Toyota Genuine CVT fluid FE and install them to the reverse brake piston.
- NOTICE:
-
Ensure that the O-rings are not twisted.
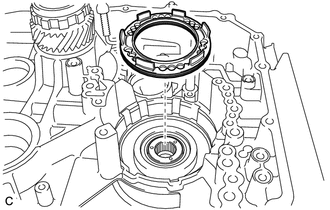
Install the reverse brake piston to the transaxle case sub-assembly.
35068E
15.INSTALL 1ST AND REVERSE BRAKE RETURN SPRING SUB-ASSEMBLY
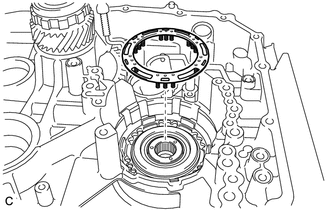
Install the 1st and reverse brake return spring sub-assembly to the transaxle case sub-assembly.
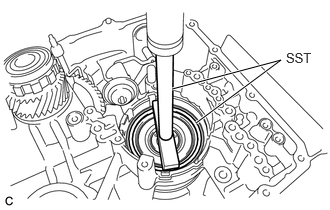
Place SST on the 1st and reverse brake return spring sub-assembly and compress it with a press.
- SST
- 09350-32014 (09351-32040)
09950-70010 (09951-07200)
- NOTICE:
-
Do not compress the 1st and reverse brake return spring sub-assembly excessively.
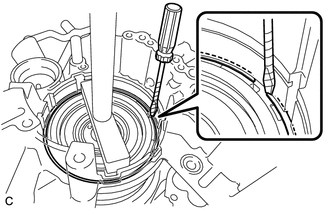
Using a screwdriver with its tip wrapped with protective tape, install the snap ring to the transaxle case sub-assembly.
- NOTICE:
-
Be careful not to damage the transaxle case sub-assembly.
35681B
16.INSTALL NO. 1 BRAKE DISC
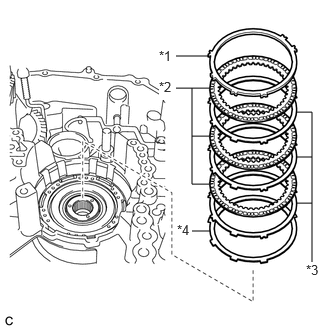
| *1 | Brake Flange |
| *2 | No. 1 Brake Disc |
| *3 | No. 1 Brake Plate |
| *4 | Brake Cushion Plate |
Install the brake flange, 3 No. 1 brake discs, 3 No. 1 brake plates and brake cushion plate to the transaxle case sub-assembly.
Using a screwdriver with its tip wrapped with protective tape, install the snap ring to the transaxle case sub-assembly.
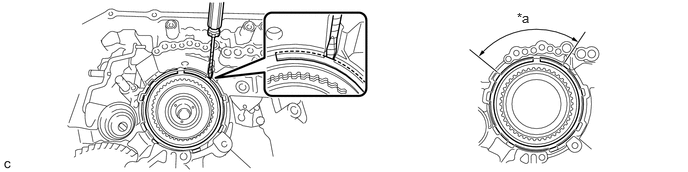
| *a | Snap ring opening within this area. | - | - |
- NOTICE:
-
Be careful not to damage the transaxle case sub-assembly.
35726A
17.INSTALL PLANETARY RING GEAR THRUST WASHER
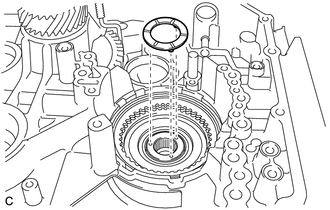
Install the planetary ring gear thrust washer to the transaxle case sub-assembly.
35075D
18.INSTALL FRONT PLANETARY RING GEAR SUB-ASSEMBLY
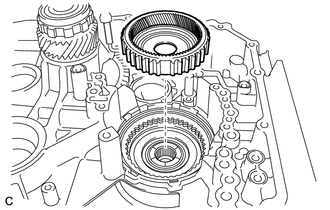
Install the front planetary ring gear sub-assembly to the transaxle case sub-assembly.
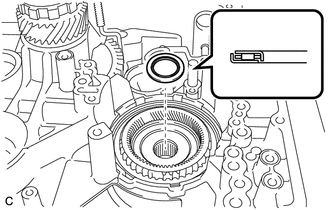
Coat the thrust needle roller bearing with Toyota Genuine CVT fluid FE and install it to the front planetary ring gear sub-assembly.
35720M
19.INSTALL PLANETARY GEAR ASSEMBLY
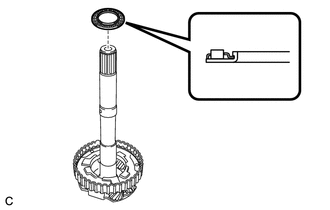
Coat the thrust needle roller bearing with Toyota Genuine CVT fluid FE and install it to the planetary gear assembly.
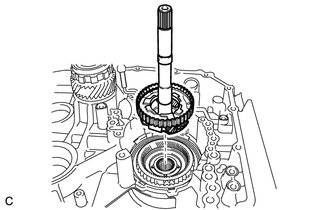
Install the planetary gear assembly to the front planetary ring gear sub-assembly.
35612D
20.INSTALL FORWARD CLUTCH PISTON
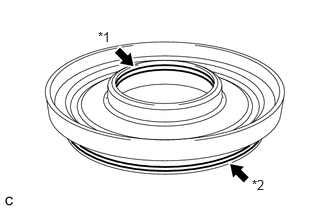
| *1 | O-Ring |
| *2 | D-Ring |
Coat a new O-ring and a new D-ring with Toyota Genuine CVT fluid FE and install them to the forward clutch piston.
- NOTICE:
-
Ensure that the O-ring and D-ring are not twisted.
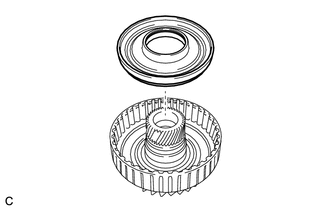
Install the forward clutch piston to the forward clutch drum sub-assembly.
35603E
21.INSTALL FORWARD CLUTCH RETURN SPRING SUB-ASSEMBLY
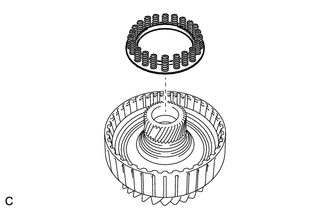
Install the forward clutch return spring sub-assembly to the forward clutch drum sub-assembly.
35668C
22.INSTALL NO. 1 CLUTCH BALANCER
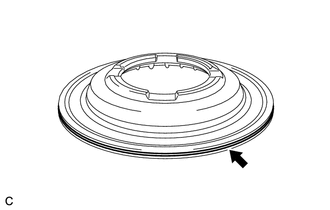
Coat a new D-ring with Toyota Genuine CVT fluid FE and install it to the No. 1 clutch balancer.
- NOTICE:
-
Ensure that the D-ring is not twisted.
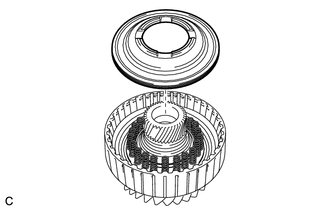
Install the No. 1 clutch balancer to the forward clutch drum sub-assembly.
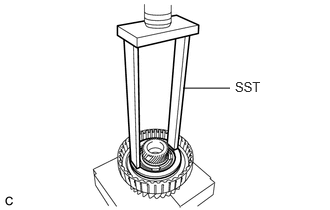
Place SST on the No. 1 clutch balancer and compress the forward clutch return spring sub-assembly with a press.
- SST
- 09387-00020
- NOTICE:
-
Do not compress the forward clutch return spring sub-assembly excessively.
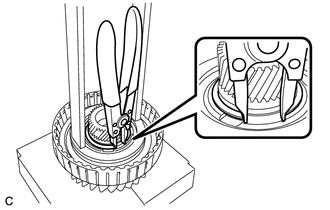
Using a snap ring expander, install the snap ring to the forward clutch drum sub-assembly.
35633H
23.INSTALL FORWARD MULTIPLE DISC CLUTCH CLUTCH DISC
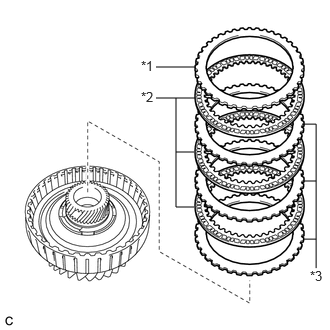
| *1 | Forward Clutch Flange |
| *2 | Forward Multiple Disc Clutch Clutch Disc |
| *3 | Forward Multiple Disc Clutch Clutch Plate |
Install the forward clutch flange, 3 forward multiple disc clutch clutch discs and 3 forward multiple disc clutch clutch plates to the forward clutch drum sub-assembly.
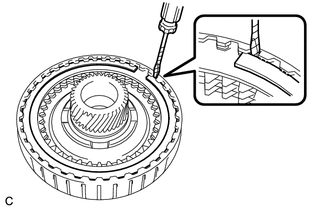
Using a screwdriver with its tip wrapped with protective tape, install the snap ring to the forward clutch drum sub-assembly.
- NOTICE:
-
Be careful not to damage the forward clutch drum sub-assembly.
35610A
24.INSTALL FORWARD MULTIPLE DISC CLUTCH ASSEMBLY
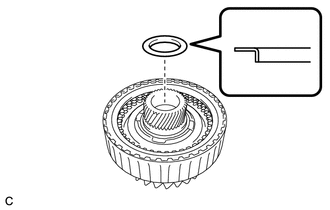
Install the thrust bearing race to the forward multiple disc clutch assembly.
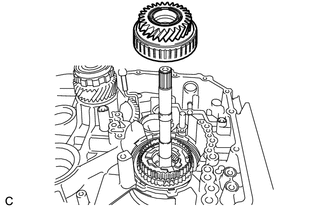
Install the forward multiple disc clutch assembly to the planetary gear assembly.
25.INSTALL STAY
Clean and degrease the bolt and installation hole in the No. 1 gear shift fork assembly.
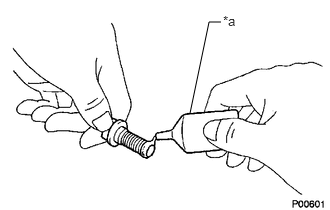
| *a | Adhesive |
Apply adhesive to 2 or 3 threads on the end of the bolt.
- Adhesive:
Toyota Genuine Adhesive 1324, Three Bond 1324 or equivalent
- NOTICE:
-
In order to ensure proper sealing of the bolt, apply adhesive to the bolt and install it within 10 minutes of adhesive application.
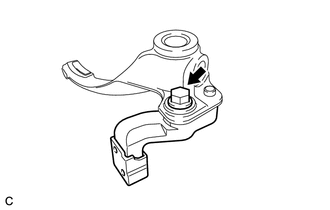
Install the stay to the No. 1 gear shift fork assembly with the bolt.
- Torque:
- 10.5 N*m (107 kgf*cm, 8 ft.*lbf)
33210A
26.INSTALL NO. 1 GEAR SHIFT FORK ASSEMBLY
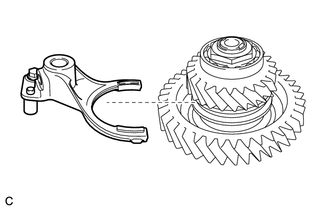
Install the No. 1 gear shift fork assembly to the 1st gear sub-assembly.
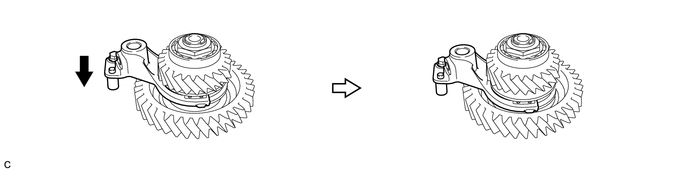
Move the No. 1 gear shift fork assembly as shown in the illustration.
33032
27.INSTALL 1ST GEAR SUB-ASSEMBLY
Clean and degrease the bolt and installation hole in the No. 1 gear shift fork shaft.
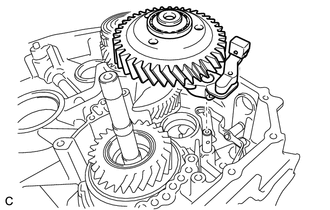
Install the 1st gear sub-assembly with the No. 1 gear shift fork assembly to the No. 1 gear shift fork shaft.
| *a | Adhesive |
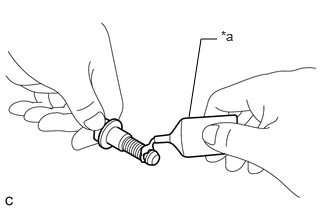
Apply adhesive to 2 or 3 threads on the end of the bolt.
- Adhesive:
Toyota Genuine Adhesive 1324, Three Bond 1324 or equivalent
- NOTICE:
-
In order to ensure proper sealing of the bolt, apply adhesive to the bolt and install it within 10 minutes of adhesive application.
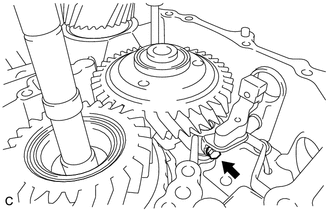
Install the bolt to connect the No. 1 gear shift fork assembly to the No. 1 gear shift fork shaft.
- Torque:
- 15.7 N*m (160 kgf*cm, 12 ft.*lbf)
28.INSTALL CLUTCH DRUM OIL SEAL RING
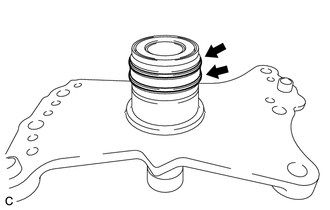
Install 2 new clutch drum oil seal rings to the stator (CVT) shaft assembly.
- NOTICE:
-
Do not expand the gap of the clutch drum oil seal ring excessively.
35370E
29.INSTALL STATOR (CVT) SHAFT ASSEMBLY
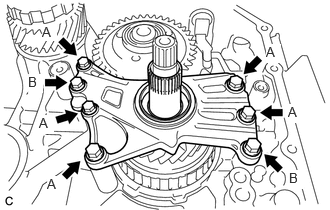
Install the stator (CVT) shaft assembly to the transaxle case sub-assembly with the 7 bolts.
- Torque:
- 29.4 N*m (300 kgf*cm, 22 ft.*lbf)
- Bolt Length:
Bolt (A) Bolt (B) 30 mm (1.18 in.) 40 mm (1.57 in.)
35174B
30.INSTALL OIL RESERVOIR LOCK PLATE
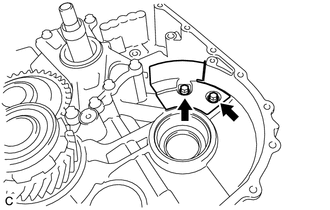
Install the oil reservoir lock plate to the transaxle case sub-assembly with the 2 bolts.
- Torque:
- 9.8 N*m (100 kgf*cm, 87 in.*lbf)
35016E
31.INSTALL TRANSMISSION CASE PLATE SUB-ASSEMBLY
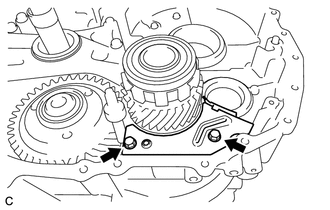
Install the transmission case plate sub-assembly to the transaxle case sub-assembly with the 2 bolts.
- Torque:
- 9.8 N*m (100 kgf*cm, 87 in.*lbf)
35330J
32.INSTALL OIL STRAINER ASSEMBLY
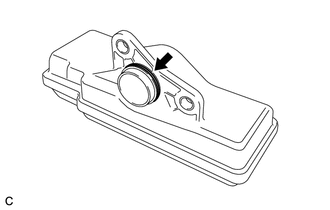
Coat a new O-ring with Toyota Genuine CVT fluid FE and install it to the oil strainer assembly.
- NOTICE:
-
Ensure that the O-ring is not twisted.
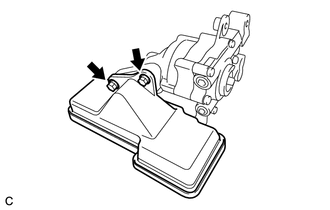
Install the oil strainer assembly to the front oil pump assembly with the 2 bolts.
- Torque:
- 9.8 N*m (100 kgf*cm, 87 in.*lbf)
35310A
33.INSTALL FRONT OIL PUMP ASSEMBLY
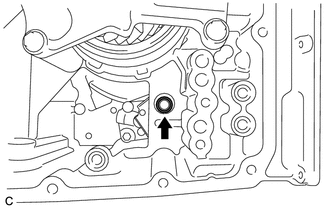
Coat a new front oil pump cover gasket with Toyota Genuine CVT fluid FE and install it to the transaxle case sub-assembly.
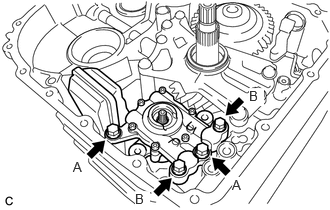
Install the front oil pump assembly to the transaxle case sub-assembly with the 4 bolts.
- Torque:
- 22.1 N*m (225 kgf*cm, 16 ft.*lbf)
- Bolt Length:
Bolt (A) Bolt (B) 30 mm (1.18 in.) 40 mm (1.57 in.)
35316A
34.INSTALL NO. 1 TRANSMISSION OIL PUMP SEPARATOR PLATE
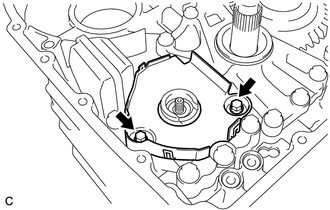
Install the No. 1 transmission oil pump separator plate to the front oil pump assembly with the 2 bolts.
- Torque:
- 9.8 N*m (100 kgf*cm, 87 in.*lbf)
35783N
35.INSTALL DRIVEN SPROCKET
Install the snap ring to the front oil pump assembly.
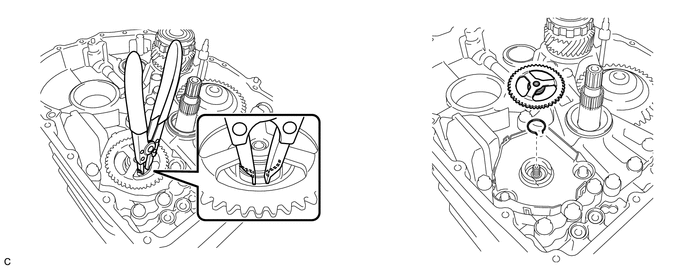
Using a snap ring expander, install the driven sprocket to the front oil pump assembly.
35782P
36.INSTALL DRIVE SPROCKET
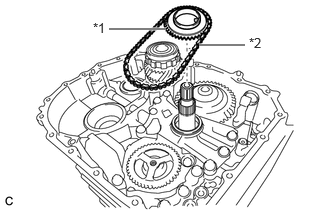
| *1 | Drive Sprocket |
| *2 | Transmission Drive Chain |
Install the drive sprocket and transmission drive chain.
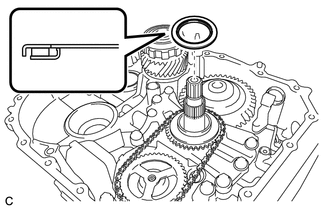
Install the thrust needle roller bearing to the drive sprocket.
35317A
37.INSTALL NO. 2 TRANSMISSION OIL PUMP SEPARATOR PLATE
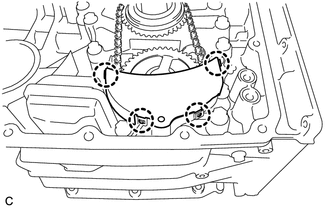
Engage the 4 claws to install the No. 2 transmission oil pump separator plate to the No. 1 transmission oil pump separator plate.
38.INSTALL DIFFERENTIAL CASE SUB-ASSEMBLY
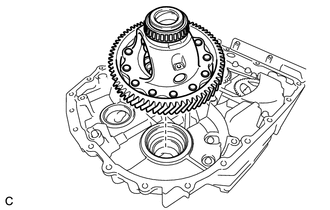
Install the differential case sub-assembly to the transaxle case sub-assembly.
35759A
39.INSTALL REDUCTION DRIVEN GEAR
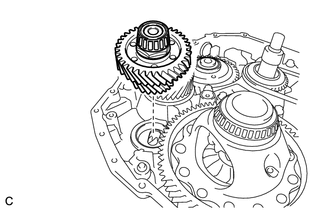
Install the reduction driven gear to the transaxle case sub-assembly.
40.INSTALL TRANSAXLE HOUSING TYPE T OIL SEAL
Coat the lip of a new transaxle housing type T oil seal with a small amount of MP grease.
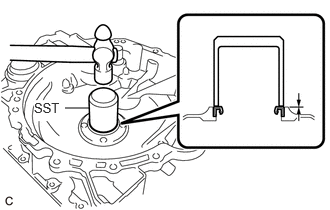
Using SST and a hammer, install the transaxle housing type T oil seal to the transaxle housing.
- SST
- 09223-00010
- Standard Depth:
-0.5 to 0.5 mm (-0.0197 to 0.0197 in.)
- NOTICE:
-
Make sure that the transaxle housing type T oil seal is installed in the correct direction.
43410M
41.INSTALL FRONT DRIVE SHAFT OIL SEAL RH
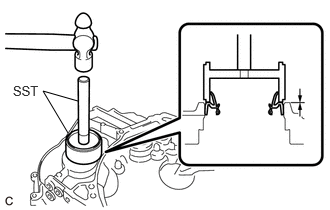
Using SST and a hammer, install a new front drive shaft oil seal RH to the transaxle housing.
- SST
- 09316-10010
09950-70010 (09951-07150)
- Standard Depth:
-0.5 to 0.5 mm (-0.0197 to 0.0197 in.)
- NOTICE:
- ·
Make sure that the front drive shaft oil seal RH is installed in the correct direction.
·Make sure to install the front drive shaft oil seal RH as specified, otherwise malfunctions such as a fluid leak will occur.
·Do not damage the lip of the front drive shaft oil seal RH.
35598B
42.INSTALL PARKING LOCK SLEEVE
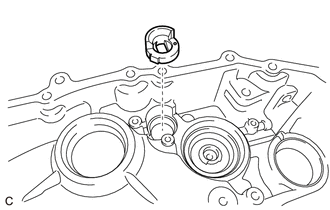
Install the parking lock sleeve to the transaxle housing.
35557C
43.INSTALL PARKING LOCK PAWL
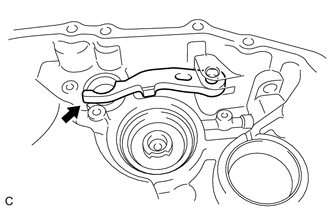
Install the parking lock pawl to the transaxle housing.
35556N
44.INSTALL PARKING LOCK PAWL SHAFT
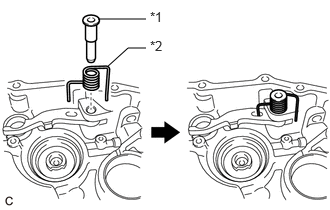
| *1 | Parking Lock Pawl Shaft |
| *2 | Torsion Spring |
Install the parking lock pawl shaft and torsion spring to the transaxle housing.
35593A
45.INSTALL CAM GUIDE SLEEVE
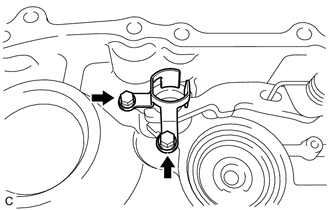
Install the cam guide sleeve to the transaxle housing with the 2 bolts.
- Torque:
- 9.8 N*m (100 kgf*cm, 87 in.*lbf)
35809
46.INSTALL C-2 CLUTCH PRESSURE APPLY TUBE SUB-ASSEMBLY
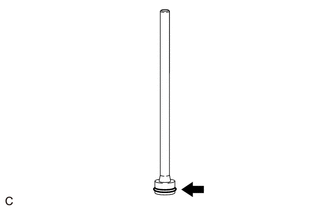
Coat a new O-ring with Toyota Genuine CVT fluid FE and install it to the C-2 clutch pressure apply tube sub-assembly.
- NOTICE:
-
Ensure that the O-ring is not twisted.
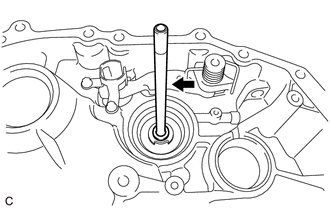
Install the C-2 clutch pressure apply tube sub-assembly to the transaxle housing.
35896A
47.INSTALL SECONDARY SHAFT LUBE APPLY TUBE
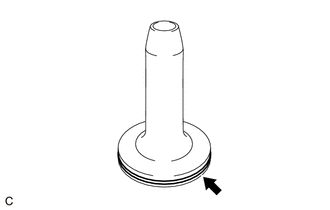
Coat a new O-ring with Toyota Genuine CVT fluid FE and install it to the secondary shaft lube apply tube.
- NOTICE:
-
Ensure that the O-ring is not twisted.
Install the secondary shaft lube apply tube to the transaxle housing.
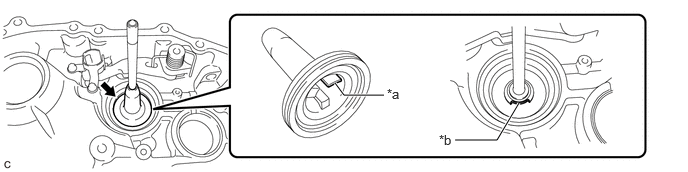
| *a | Protrusion | *b | Cutout |
- NOTICE:
-
Align the cutout of the transaxle housing with the protrusion of the secondary shaft lube apply tube.
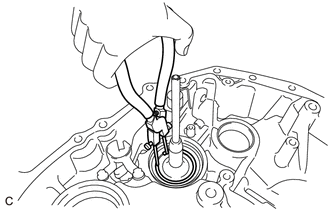
Using a snap ring plier, install the snap ring to the transaxle housing.
35882E
48.INSTALL DIFFERENTIAL GEAR LUBE APPLY TUBE
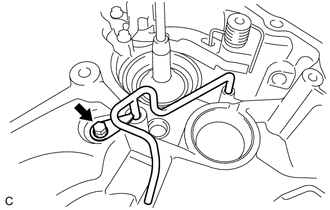
Install the differential gear lube apply tube to the transaxle housing with the bolt.
- Torque:
- 5.4 N*m (55 kgf*cm, 48 in.*lbf)
35394D
49.INSTALL OIL CLEANER (CVT) MAGNET
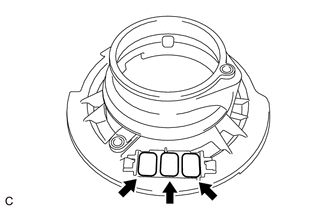
Install the 3 oil cleaner (CVT) magnets to the oil reservoir lock plate.
35174B
50.INSTALL OIL RESERVOIR LOCK PLATE
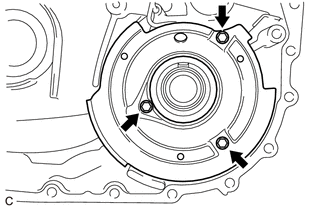
Install the oil reservoir lock plate to the transaxle housing with the 3 bolts.
- Torque:
- 9.8 N*m (100 kgf*cm, 87 in.*lbf)
35111C
51.INSTALL TRANSAXLE HOUSING
Clean and degrease the contact surfaces of the transaxle housing and transaxle case sub-assembly.
- NOTICE:
-
Make sure that there is no Toyota Genuine CVT fluid FE on the contact surfaces.
Clean and degrease the 21 bolts and installation holes of the transaxle case sub-assembly.
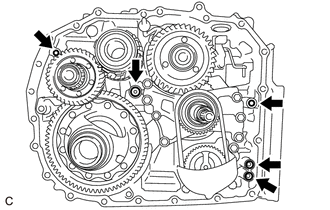
Coat 5 new O-rings with Toyota Genuine CVT fluid FE and install them to the transaxle case sub-assembly.
- NOTICE:
-
Ensure that the O-rings are not twisted.
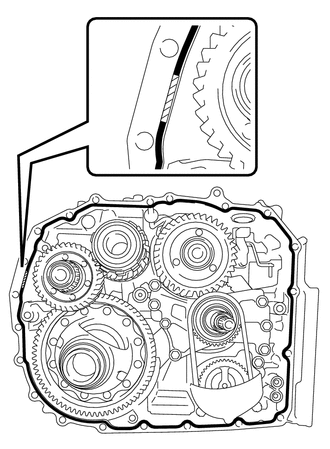

|
Seal Packing Start and End Point Range |
Apply seal packing to the transaxle case sub-assembly.
- Seal Packing:
Toyota Genuine Seal Packing 1281, Three Bond 1281 or equivalent
- Standard Seal Diameter:
1.2 mm (0.0472 in.)
- NOTICE:
- ·
Make sure to overlap the start and end points of the seal packing.
·Make sure that the start and end points of the seal packing are within the shaded area shown in the illustration.
·Apply seal packing in a continuous line (width 1.2 mm (0.0472 in.)) along the sealing surface.
·After applying seal packing, install the transaxle housing to the transaxle case sub-assembly within 3 minutes and tighten the bolts within 10 minutes.
Install the transaxle housing to the transaxle case sub-assembly with the 21 bolts.
- Torque:
- 29.4 N*m (300 kgf*cm, 22 ft.*lbf)
89413S
52.INSTALL TRANSMISSION REVOLUTION SENSOR (NC1)
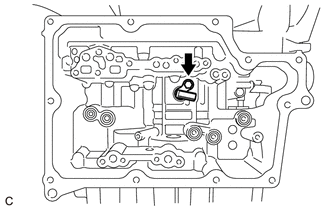
Install the transmission revolution sensor (NC1) to the transaxle case sub-assembly with the bolt.
- Torque:
- 5.4 N*m (55 kgf*cm, 48 in.*lbf)
82125M
53.INSTALL TRANSMISSION WIRE
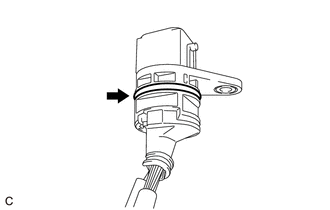
Coat the O-ring of the transmission wire with Toyota Genuine CVT fluid FE.
- NOTICE:
-
If reusing the transmission wire, check that the O-ring is not damaged.
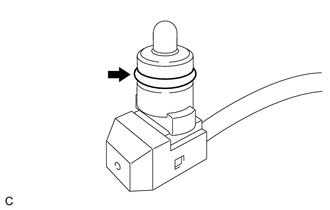
Coat a new O-ring with Toyota Genuine CVT fluid FE and install it to the temperature sensor.
- NOTICE:
-
Ensure that the O-ring is not twisted.
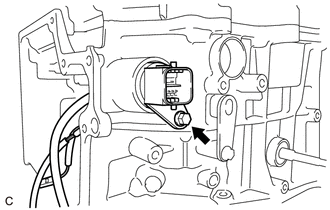
Install the transmission wire to the transaxle case sub-assembly with the bolt.
- Torque:
- 5.4 N*m (55 kgf*cm, 48 in.*lbf)
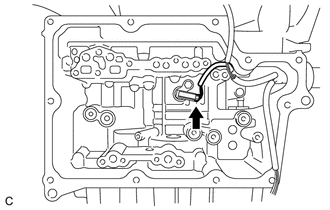
Connect the transmission revolution sensor (NC1) connector.
35410J
54.INSTALL TRANSMISSION VALVE BODY ASSEMBLY
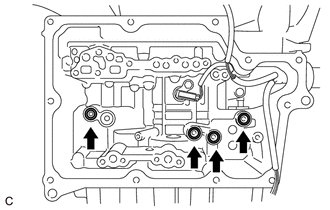
Coat 4 new transaxle case gaskets with Toyota Genuine CVT fluid FE and install them to the transaxle case sub-assembly.
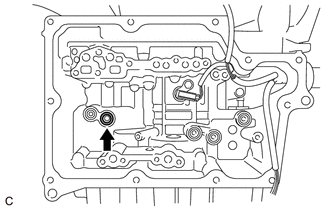
Coat a new front oil pump cover gasket with Toyota Genuine CVT fluid FE and install it to the transaxle case sub-assembly.
Align the slit portion of the manual valve and the manual valve link lever sub-assembly as shown in the illustration, and temporarily install the transmission valve body assembly to the transaxle case sub-assembly with the 2 bolts.
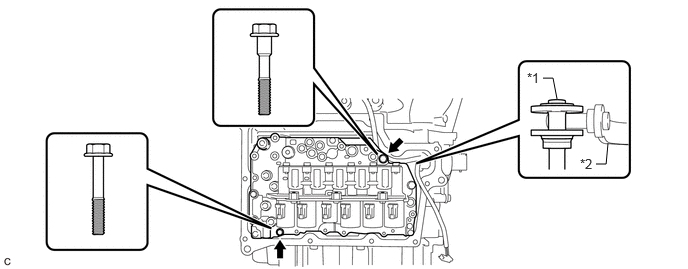
| *1 | Manual Valve | *2 | Manual Valve Link Lever Sub-assembly |
- Bolt Length:
40 mm (1.57 in.)
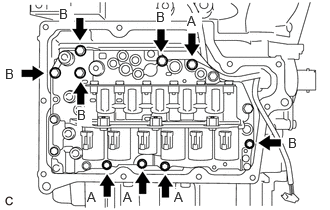
Temporarily install the 9 bolts.
- Bolt Length:
Bolt (A) Bolt (B) 40 mm (1.57 in.) 55 mm (2.17 in.)
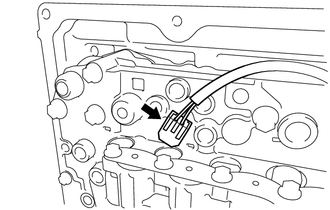
Connect the temperature sensor to the transmission valve body assembly.
- NOTICE:
-
To prevent it from being pinched between the transmission valve body assembly and the transaxle side cover sub-assembly, do not let the transmission wire ride up over the area shown in the illustration.
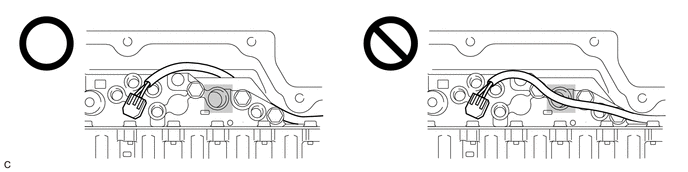 0,0 0,0 false

Do not let transmission wire protrude into this area. - -
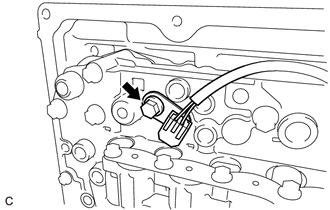
Temporarily install the temperature sensor clamp to the transmission valve body assembly with the bolt.
- Bolt Length:
55 mm (2.17 in.)
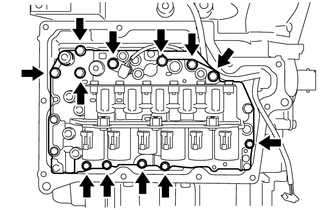
Fully tighten the 12 bolts.
- Torque:
- 10.8 N*m (110 kgf*cm, 8 ft.*lbf)
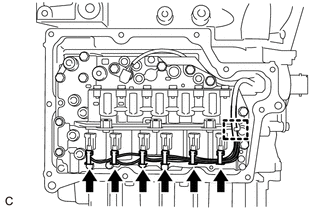
Connect the 6 solenoid valve connectors.
Engage the clamp to connect the transmission wire to the solenoid lock plate.
35015Y
55.INSTALL TRANSAXLE SIDE COVER SUB-ASSEMBLY
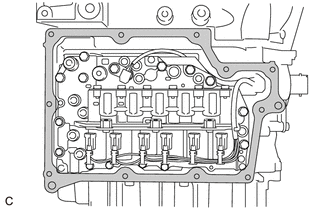
|
|
Area to be cleaned |
Clean the transaxle side cover sub-assembly installation surface of the transaxle case sub-assembly.
- NOTICE:
-
Completely remove any oil or grease from the contact surface of the transaxle case sub-assembly.
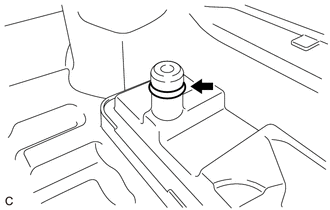
Coat a new O-ring with Toyota Genuine CVT fluid FE and install it to a new transaxle side cover sub-assembly.
- NOTICE:
-
Ensure that the O-ring is not twisted.
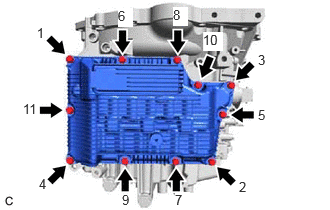
Temporarily install the transaxle side cover sub-assembly to the transaxle case sub-assembly with the 11 bolts.
Fully tighten the 11 bolts in the order shown in the illustration.
- Torque:
- 7.4 N*m (75 kgf*cm, 65 in.*lbf)
35125E
56.INSTALL OVERFLOW (CVT) TUBE
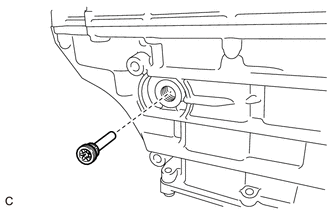
Using a 6 mm hexagon socket wrench, install the overflow (CVT) tube to the transaxle case sub-assembly.
- Torque:
- 0.8 N*m (8 kgf*cm, 7 in.*lbf)
57.INSTALL OVERFLOW PLUG
Coat a new gasket with Toyota Genuine CVT fluid FE and install it to the overflow plug.
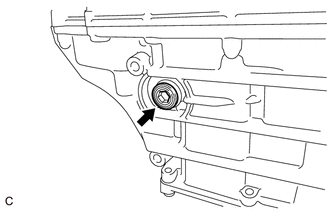
Using a 10 mm hexagon socket wrench, install the overflow plug to the transaxle case sub-assembly.
- Torque:
- 49 N*m (500 kgf*cm, 36 ft.*lbf)
58.INSTALL REFILL PLUG
Coat a new gasket with Toyota Genuine CVT fluid FE and install it to the refill plug.
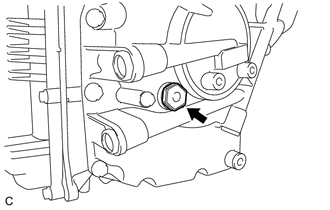
Install the refill plug to the rear transaxle case sub-assembly.
- Torque:
- 49 N*m (500 kgf*cm, 36 ft.*lbf)
89637K
59.INSTALL OIL PRESSURE SENSOR
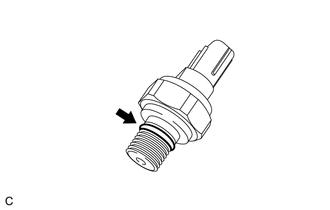
Coat the O-ring of the oil pressure sensor with Toyota Genuine CVT fluid FE.
- NOTICE:
-
If reusing the oil pressure sensor, check that the O-ring is not damaged.
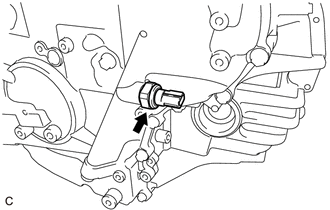
Using a 27 mm deep socket wrench, install the oil pressure sensor to the rear transaxle case sub-assembly.
- Torque:
- 20.6 N*m (210 kgf*cm, 15 ft.*lbf)
- NOTICE:
-
Be careful not to damage the O-ring.
89413T
60.INSTALL TRANSMISSION REVOLUTION SENSOR (NSS)
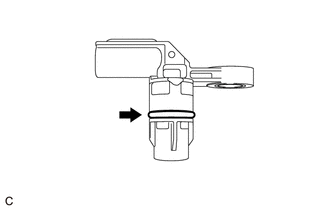
Coat a new O-ring with Toyota Genuine CVT fluid FE and install it to the transmission revolution sensor (NSS).
- NOTICE:
-
Ensure that the O-ring is not twisted.
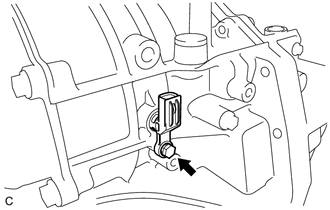
Install the transmission revolution sensor (NSS) to the transaxle case sub-assembly with the bolt.
- Torque:
- 5.4 N*m (55 kgf*cm, 48 in.*lbf)
- NOTICE:
-
Be careful not to damage the O-ring.
89413N
61.INSTALL TRANSMISSION REVOLUTION SENSOR (NT)
Coat a new O-ring with Toyota Genuine CVT fluid FE and install it to the transmission revolution sensor (NT).
- NOTICE:
-
Ensure that the O-ring is not twisted.
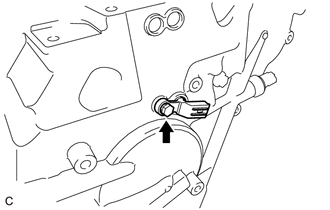
Install the transmission revolution sensor (NT) to the rear transaxle case sub-assembly with the bolt.
- Torque:
- 5.4 N*m (55 kgf*cm, 48 in.*lbf)
- NOTICE:
-
Be careful not to damage the O-ring.
89413M
62.INSTALL TRANSMISSION REVOLUTION SENSOR (NOUT)
Coat a new O-ring with Toyota Genuine CVT fluid FE and install it to the transmission revolution sensor (NOUT).
- NOTICE:
-
Ensure that the O-ring is not twisted.
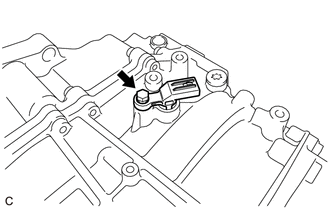
Install the transmission revolution sensor (NOUT) to the transaxle case sub-assembly with the bolt.
- Torque:
- 5.4 N*m (55 kgf*cm, 48 in.*lbf)
- NOTICE:
-
Be careful not to damage the O-ring.
89419B
63.INSTALL SHIFT STROKE SENSOR
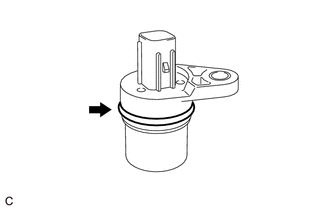
Coat the O-ring of the shift stroke sensor with Toyota Genuine CVT fluid FE.
- NOTICE:
-
If reusing the shift stroke sensor, check that the O-ring is not damaged.
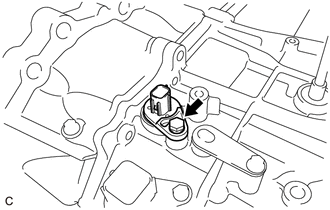
Install the shift stroke sensor to the transaxle case sub-assembly with the bolt.
- Torque:
- 5.4 N*m (55 kgf*cm, 48 in.*lbf)
- NOTICE:
-
Be careful not to damage the O-ring.
84540
64.INSTALL PARK/NEUTRAL POSITION SWITCH ASSEMBLY
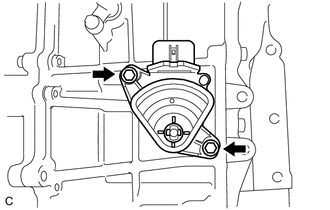
Temporarily install the park/neutral position switch assembly to the transaxle case sub-assembly with the 2 bolts.
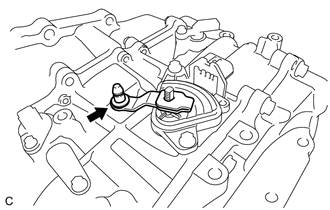
Temporarily install the transmission control shaft lever to the manual valve lever shaft.
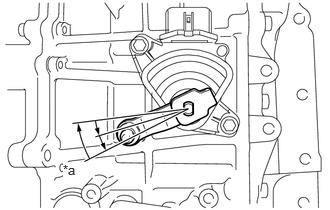
| *a | N |
Turn the transmission control shaft lever clockwise until it stops, then turn it counterclockwise 2 notches.
- NOTICE:
-
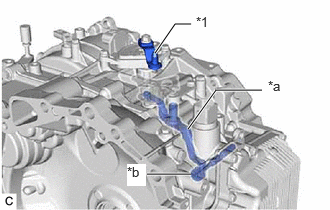 1.615,0.552 1.823,0.25 1.823,0.25 1.99,0.25 true 1.958,1.344 2.25,0.938 2.25,0.938 2.729,0.938 true 1.531,1.813 1.99,1.813 true 2.042,0.146 2.323,0.385 0.281,0.24 10 false *1 2.792,0.813 3.073,1.052 0.281,0.24 10 false *a 1.323,1.708 1.521,1.938 0.198,0.229 10 true *b
*1 Transmission Control Shaft Lever *a Manual Valve Link Lever Sub-assembly *b Manual Valve
-
If the transmission control shaft lever is turned counterclockwise more than necessary, manual valve link lever sub-assembly may separate from the manual valve.
Remove the transmission control shaft lever from the manual valve lever shaft.
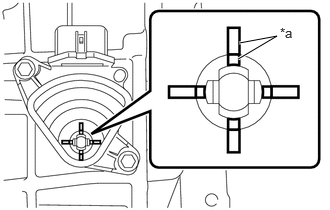
| *a | Protrusion |
Align the protrusions of the park/neutral position switch assembly as shown in the illustration.
Hold the park/neutral position switch assembly in that position and tighten the 2 bolts.
- Torque:
- 5.4 N*m (55 kgf*cm, 48 in.*lbf)
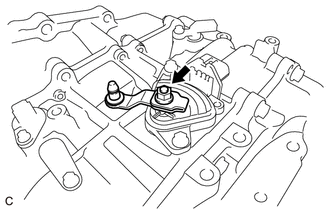
Install the transmission control shaft lever to the manual valve lever shaft with the washer and nut.
- Torque:
- 12.7 N*m (130 kgf*cm, 9 ft.*lbf)
- NOTICE:
-
Be careful of the direction of the transmission control shaft lever.
32901L
65.INSTALL OIL COOLER ELBOW SUB-ASSEMBLY
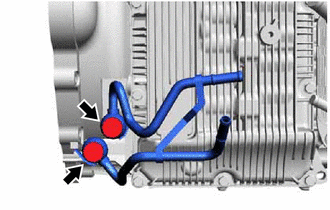
Install the oil cooler elbow sub-assembly and 2 gaskets to the transaxle housing with the 2 union bolts.
- Torque:
- 27.5 N*m (280 kgf*cm, 20 ft.*lbf)