K120 CVT CONTINUOUSLY VARIABLE TRANSAXLE SYSTEM P071512 Input/Turbine Speed Sensor "A" Circuit Short to Battery P071514 Input/Turbine Speed Sensor "A" Circuit Short to Ground or Open P071531 Input/Turbine Speed Sensor "A" No Signal
DESCRIPTION
The TCM uses signals from the transmission revolution sensor (NT) installed to the continuously variable transaxle to control the lock-up engagement pressure.
The transmission revolution sensor (NT) detects the input turbine speed and sends it to the TCM.
| DTC No. | Detection Item | DTC Detection Condition | Trouble Area | MIL | Memory | Note |
|---|---|---|---|---|---|---|
| P071512 | Input/Turbine Speed Sensor "A" Circuit Short to Battery | The transmission revolution sensor (NT) signal is normal but the transmission revolution sensor (NT) output voltage is higher than 1.8 V for 2 seconds or more (1-trip detection logic). | ·
Wire harness or connector ·
Transmission revolution sensor (NT) ·
TCM |
Comes on | DTC stored | SAE Code:
P07C0 |
| P071514 | Input/Turbine Speed Sensor "A" Circuit Short to Ground or Open | The transmission revolution sensor (NT) signal is normal but the transmission revolution sensor (NT) output voltage is less than 0.2 V for 2 seconds or more (1-trip detection logic). | ·
Wire harness or connector ·
Transmission revolution sensor (NT) ·
TCM |
Comes on | DTC stored | SAE Code:
P07BF |
| P071531 | Input/Turbine Speed Sensor "A" No Signal | When transmission revolution sensor (NSS) and (NOUT) signals both indicate 780 rpm or more, the transmission revolution sensor (NT) signal indicates less than 300 rpm for 5 seconds or more (1-trip detection logic). | ·
Wire harness or connector ·
Transmission revolution sensor (NT) ·
TCM |
Comes on | DTC stored | SAE Code:
P0717 |
MONITOR DESCRIPTION
The transmission revolution sensor (NT) is used to detect the input turbine speed. The TCM determines the necessary gear ratio based on a comparison of the transmission revolution sensor (NT) (input turbine speed) and transmission revolution sensor (NOUT) (output shaft speed) signals.
When the output shaft speed is higher than the expected value and the input turbine speed is less than 300 rpm while driving with the shift lever in D, the TCM will determine that the transmission revolution sensor (NT) is malfunctioning, illuminate the MIL and store a DTC.
CONFIRMATION DRIVING PATTERN
- CAUTION:
-
When performing the confirmation driving pattern, obey all speed limits and traffic laws.
- HINT:
-
After repairs have been completed, clear the DTCs and then check that the vehicle has returned to normal by performing the following All Readiness check procedure.
Connect the GTS to the DLC3.
Turn the ignition switch to ON and turn the GTS on.
Clear the DTCs (even if no DTCs are stored, perform the clear DTC procedure).
Turn the ignition switch off and wait for 2 minutes or more.
Turn the ignition switch to ON and turn the GTS on.
Start the engine.
Perform the D Position Shift Test inspection in Road Test.
Click hereDrivetrain>K120 (CVT)>CONTINUOUSLY VARIABLE TRANSAXLE SYSTEM>ROAD TEST
Stop the vehicle.
Enter the following menus: Powertrain / Transmission / Utility / All Readiness.
Input the DTC: P071512, P071514 or P071531.
Check the DTC judgment result.
| GTS Display | Description |
|---|---|
| NORMAL | ·
DTC judgment completed ·
System normal |
| ABNORMAL | ·
DTC judgment completed ·
System abnormal |
| INCOMPLETE | ·
DTC judgment not completed ·
Perform driving pattern after confirming DTC enabling conditions |
| N/A | ·
Unable to perform DTC judgment ·
Number of DTCs which do not fulfill DTC preconditions has reached ECU memory limit |
- HINT:
- ·
If the judgment result shows NORMAL, the system is normal.
·If the judgment result shows ABNORMAL, the system has a malfunction.
·If the judgment result shows INCOMPLETE or N/A, perform the Confirmation Driving Pattern and check the DTC judgment result again.
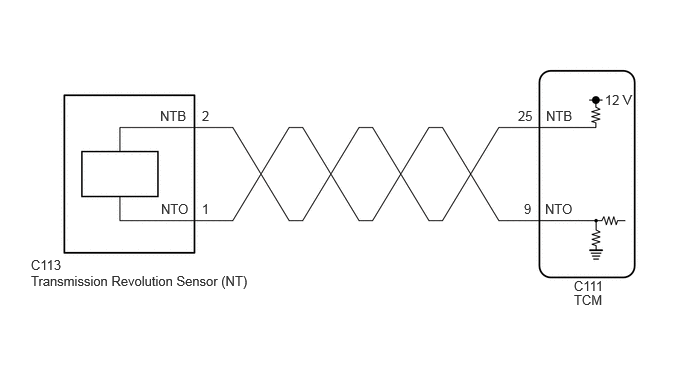
WIRING DIAGRAM
CAUTION / NOTICE / HINT
- CAUTION:
- ·
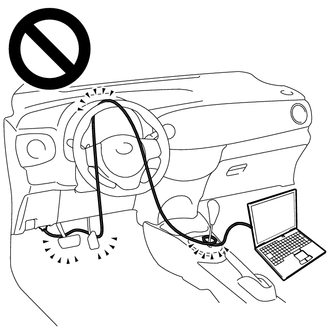
Strictly observe posted speed limits, traffic laws and road conditions.
·Do not drive the vehicle with the cable of the GTS contacting the pedals, shift lever or steering wheel.
·Driving the vehicle with the cable of the GTS contacting these areas could impede vehicle control, resulting in a serious accident.
- ·
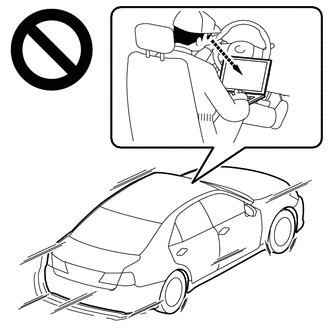
Do not operate the GTS while driving the vehicle.
·Operating the GTS while driving the vehicle will prevent you from paying sufficient attention to vehicle surroundings, and could result in a serious accident.
- NOTICE:
- ·
Perform registration and/or initialization when parts related to the continuously variable transaxle system are replaced.
Click hereDrivetrain>K120 (CVT)>CONTINUOUSLY VARIABLE TRANSAXLE SYSTEM>PRECAUTION
·Check that no DTCs are stored after performing initialization.
Click hereDrivetrain>K120 (CVT)>CONTINUOUSLY VARIABLE TRANSAXLE SYSTEM>DTC CHECK / CLEAR
PROCEDURE
Connect the GTS to the DLC3.
Turn the ignition switch to ON.
Turn the GTS on.
Enter the following menus: Powertrain / Transmission / Data List.
According to the display on the GTS, read the Data List.
- Powertrain > Transmission > Data List
-
Tester Display Measurement Item Range Normal Condition Diagnostic Note NT Sensor Speed Input turbine speed (NT) Min.: 0 rpm
Max.: 65535 rpm·Equal to engine speed (NE): Lock-up ON (After warming up engine)
·Nearly equal to engine speed (NE): Lock-up OFF (Engine idling with shift lever in P or N)
·0 rpm: Vehicle stopped with shift lever in R
- NT Sensor Voltage Transmission revolution sensor (NT) output voltage Min.: 0.000 V
Max.: 4.999 V0.2 to 1.8 V: Engine idling (Vehicle stopped with shift lever in P or N) -
- Powertrain > Transmission > Data List
-
Tester Display NT Sensor Speed NT Sensor Voltage - 50003 373 929,175
- Result:
Result Proceed to Data List values are normal A Data List values are not normal B
A
B
NEXT
for Registration: Click hereDrivetrain>K120 (CVT)>CONTINUOUSLY VARIABLE TRANSAXLE SYSTEM>REGISTRATION
for Initialization: Click hereDrivetrain>K120 (CVT)>CONTINUOUSLY VARIABLE TRANSAXLE SYSTEM>INITIALIZATION
Remove the transmission revolution sensor (NT).
Click hereDrivetrain>K120 (CVT)>REVOLUTION SENSOR (NT SENSOR)>REMOVAL
Connect the battery to the transmission revolution sensor (NT) as shown in the illustration.
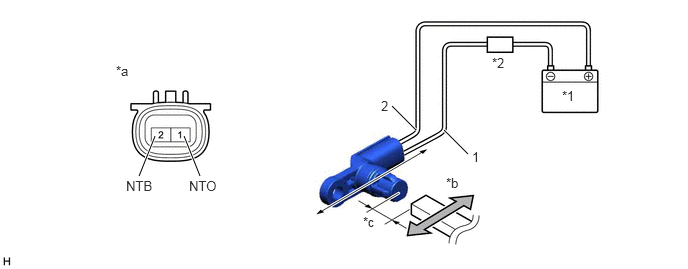
| *1 | Battery | *2 | Ammeter |
| *a | Component without harness connected
(Transmission Revolution Sensor (NT)) |
*b | Magnet |
| *c | 5 mm or less | - | - |
Wave a magnet left and right 5 mm (0.197 in.) or less from the tip of the transmission revolution sensor (NT) to output a high/low signal while measuring the current.
- NOTICE:
-
Make sure to wave the magnet during the inspection. The current will not change unless the magnet is moved as shown in the illustration.
Measure the current according to the value(s) in the table below.
- Standard Current:
Tester Connection Condition Specified Condition 1 (NTO) - 2 (NTB) Low signal 4 to 8 mA 1 (NTO) - 2 (NTB) High signal 12 to 16 mA
- Result:
Proceed to OK NG
OK
NG
Disconnect the C113 transmission revolution sensor (NT) connector.
Disconnect the C111 TCM connector.
Measure the resistance according to the value(s) in the table below.
- Standard Resistance:
Tester Connection Condition Specified Condition C113-2 (NTB) - C111-25 (NTB) Always Below 1 Ω C113-1 (NTO) - C111-9 (NTO) Always Below 1 Ω C113-2 (NTB) or C111-25 (NTB) - Body ground and other terminals Always 10 kΩ or higher C113-1 (NTO) or C111-9 (NTO) - Body ground and other terminals Always 10 kΩ or higher
Connect the C111 TCM connector.
Connect the C113 transmission revolution sensor (NT) connector.
- Result:
Proceed to OK NG
OK
NG
NEXT
for Registration: Click hereDrivetrain>K120 (CVT)>CONTINUOUSLY VARIABLE TRANSAXLE SYSTEM>REGISTRATION
for Initialization: Click hereDrivetrain>K120 (CVT)>CONTINUOUSLY VARIABLE TRANSAXLE SYSTEM>INITIALIZATION