PARK ASSIST / MONITORING PANORAMIC VIEW MONITOR SYSTEM CALIBRATION
ADJUST PANORAMIC VIEW MONITOR SYSTEM
This panoramic view monitor system can be set from the diagnostic screen of the radio and display receiver assembly.
If the following operations are performed, it is necessary to perform adjustments and checks on the diagnostic screen.
| Part Name | Operation | Adjustment Item | Proceed to |
|---|---|---|---|
|
*: When "!" is displayed on the panoramic view monitor screen, perform steering sensor zero point calibration. |
|||
| Steering sensor | ·
Removal and installation of the steering sensor ·
Removal and installation of the connector of the steering sensor ·
Replacement |
Steering angle neutral point (Initialize panoramic view monitor system)* | ( ) |
| Adjust steering angle | Procedure 9 | ||
| Television camera controller | Replacement | Television camera controller initialization | Procedure 2 |
| Procedure 7 | |||
| Procedure 8 | |||
| Adjust steering angle | Procedure 9 | ||
| Suspension, tires, etc. | The vehicle height changes because of suspension or tire replacement | Television camera controller initialization | Procedure 2 |
| Procedure 7 | |||
| Procedure 8 | |||
| Adjust steering angle | Procedure 9 | ||
| Rear television camera view adjustment (for Rear camera detection function) | Procedure 10 | ||
| Rear television camera assembly | ·
Replacement ·
Installation angle of the rear television camera changes because of the removal and installation of the rear television camera, etc. |
Rear television camera view adjustment | Procedure 2 |
| Procedure 4 | |||
| Procedure 8 | |||
| Rear television camera view adjustment (for Rear camera detection function) | Procedure 10 | ||
·
Front television camera assembly ·
Front bumper assembly ·
Radiator grille sub-assembly |
·
Replacement ·
Installation angle of the front television camera changes because of the removal and installation of the front television camera, etc. |
Front television camera view adjustment | Procedure 2 |
| Procedure 3 | |||
| Procedure 8 | |||
·
Side television camera assembly LH ·
Outer rear view mirror assembly LH |
·
Replacement ·
Installation angle of the side television camera changes because of the removal and installation of the side television camera, etc. |
Side television camera view adjustment | Procedure 2 |
| Procedure 5 | |||
| Procedure 8 | |||
·
Side television camera assembly RH ·
Outer rear view mirror assembly RH |
·
Replacement ·
Installation angle of the side television camera changes because of the removal and installation of the side television camera, etc. |
Side television camera view adjustment | Procedure 2 |
| Procedure 6 | |||
| Procedure 8 | |||
·
Front television camera assembly, front bumper assembly or radiator grille sub-assembly ·
Rear television camera assembly ·
Side television camera assembly LH or outer rear view mirror assembly LH ·
Side television camera assembly RH or outer rear view mirror assembly RH |
Replacement or removal and installation of 2 or more parts | Television camera view adjustment | Procedure 2 |
| Procedure 7 | |||
| Procedure 8 | |||
| Rear television camera view adjustment (for Rear camera detection function) | Procedure 10 | ||
- HINT:
-
The adjustment values stored while performing panoramic view monitor system calibration are stored in the television camera controller.
PROCEDURE 1: PRE-WORK CHECKS
Preliminary checks
- NOTICE:
- ·
Provide shadow to prevent back-up light from hitting the camera.
·Use string that does not stretch.
·Apply pieces of adhesive tape to serve as check markers. When placing the markers, make them 100 mm (3.94 in.) wide.
Perform the work at a wide, level location (There is approximately 2000 mm [6.56 ft.] all around the vehicle).
Park the vehicle on a flat surface with the steering wheel centered.
- NOTICE:
-
Before stopping the vehicle, move the vehicle backward and forward to ensure that both the steering wheel and the tires point straight ahead.
Adjust the tire pressure to the specified value(s).
Remove all luggage from the vehicle before starting work.
Marker locations
Secure the string to the locations required to make the checks and set markers as shown in the illustration.
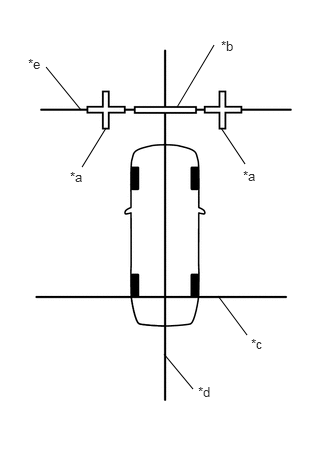
| *a | Cross Check Marker |
| *b | Check Marker |
| *c | String 1 |
| *d | String 2 |
| *e | String 3 |
Front camera adjustment only
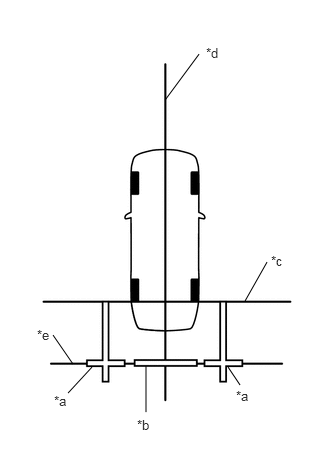
| *a | Cross Check Marker |
| *b | Check Marker |
| *c | String 1 |
| *d | String 2 |
| *e | String 4 |
Rear camera adjustment only
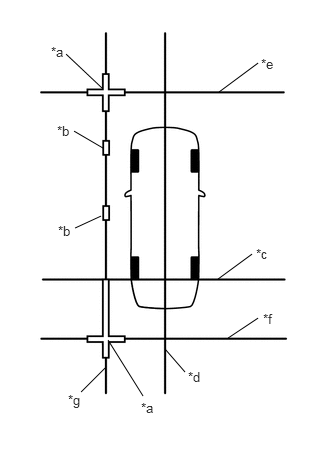
| *a | Cross Check Marker |
| *b | Check Marker |
| *c | String 1 |
| *d | String 2 |
| *e | String 3 |
| *f | String 4 |
| *g | String 5 |
Left camera adjustment only
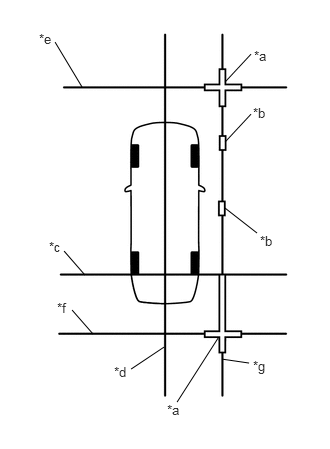
| *a | Cross Check Marker |
| *b | Check Marker |
| *c | String 1 |
| *d | String 2 |
| *e | String 3 |
| *f | String 4 |
| *g | String 6 |
Right camera adjustment only
Adjustment of 4 cameras
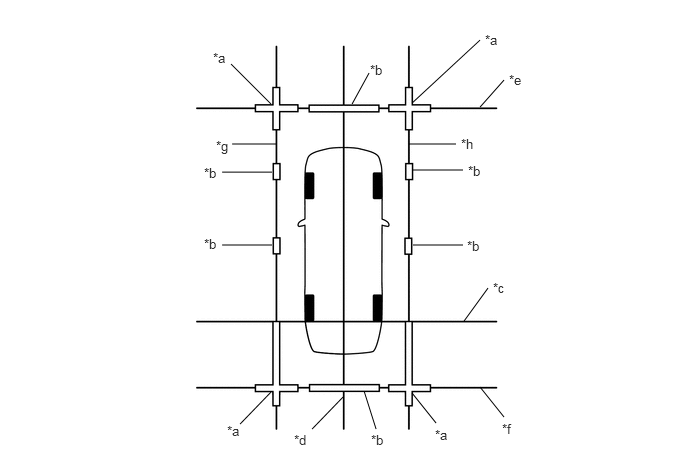
| *a | Cross Check Marker | *b | Check Marker |
| *c | String 1 | *d | String 2 |
| *e | String 3 | *f | String 4 |
| *g | String 5 | *h | String 6 |
Marker positions
Set the check markers at the positions shown in the illustration.
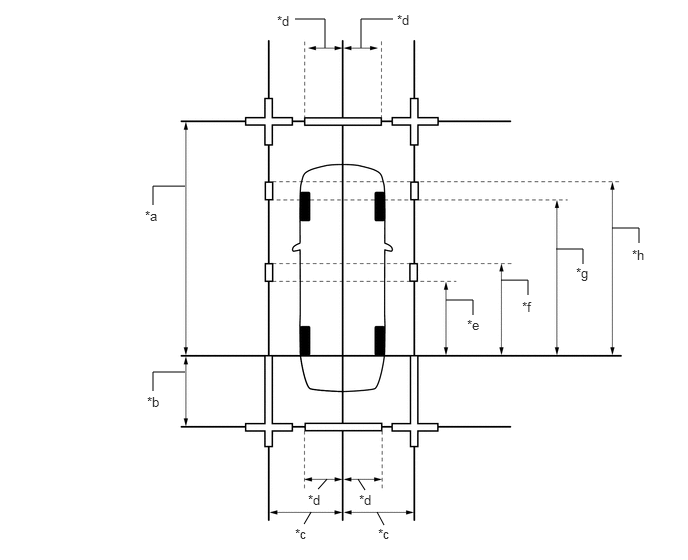
| *a | 4800 mm (15.74 ft.) (for Bar Type Radiator Grille)
4900 mm (16.07 ft.) (for Mesh Type Radiator Grille) |
*b | 1500 mm (4.92 ft.) |
| *c | 1400 mm (4.60 ft.) | *d | 693 mm (2.27 ft.) |
| *e | 1500 mm (4.92 ft.) | *f | 1700 mm (5.58 ft.) |
| *g | 3000 mm (9.84 ft.) | *h | 3200 mm (10.50 ft.) |
PROCEDURE 2: SET DATUM POINTS
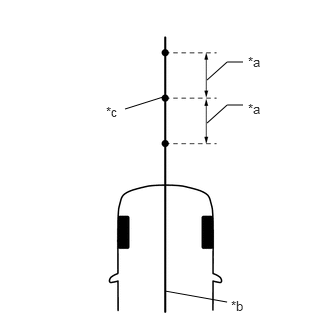
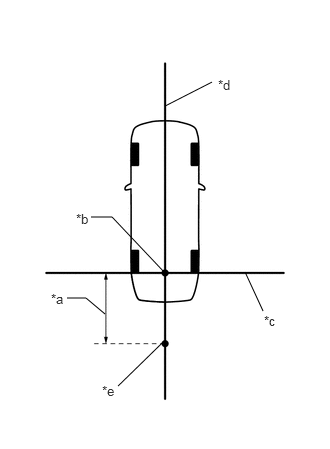
Extend the datum line (string 1).
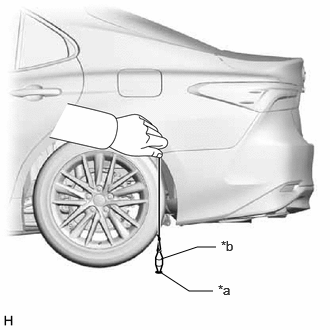
| *a | Mark A |
| *b | Weight |
Hang a weight with a pointed tip and accurately mark the center position on the road surface. (Mark A)
- NOTICE:
-
Make sure that the weight hangs straight down from the string.
Repeat the procedure to mark the right side. (Mark B)
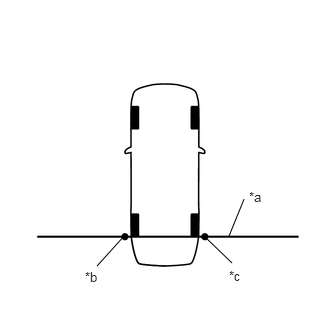
| *a | String 1 |
| *b | Mark A |
| *c | Mark B |
Secure string 1 so that it passes through marks A and B on the left and right sides.
- NOTICE:
-
When securing the string, check that there is no slack and the string is not twisted.
Extend the vehicle center line (string 2).
Hang a weight with a pointed tip so that it passes through the center of the front television camera assembly and accurately mark the center position on the road surface. (Mark C)
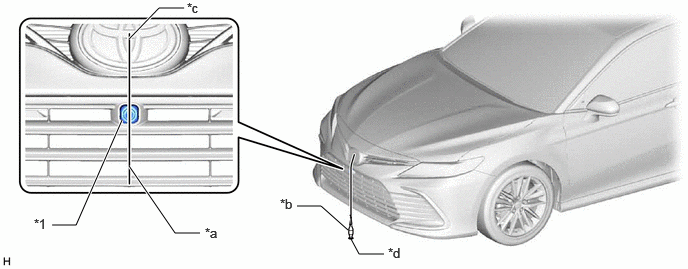
| *1 | Front Television Camera Assembly | - | - |
| *a | Center Point | *b | Weight |
| *c | String | *d | Mark C |
Hang a weight with a pointed tip from the center of the rear emblem and accurately mark the center position on the road surface. (Mark D)
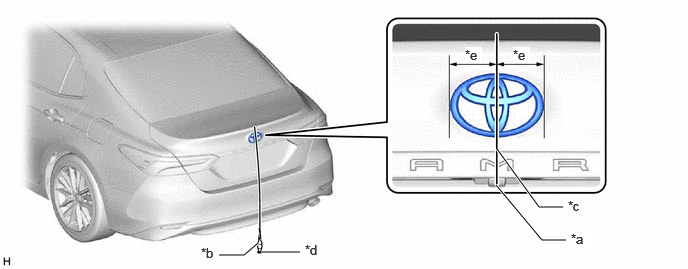
| *a | Center | *b | Weight |
| *c | String | *d | Mark D |
| *e | Equal on both sides | - | - |
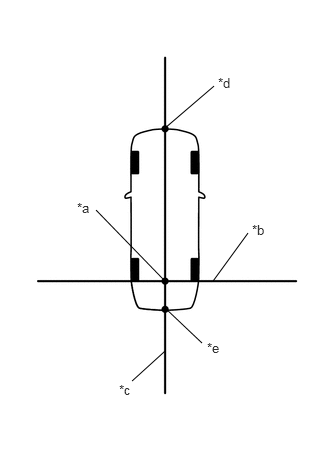
| *a | Datum Point |
| *b | String 1 |
| *c | String 2 |
| *d | Mark C |
| *e | Mark D |
Secure string 2 so that it passes through marks C and D at the front and rear of the vehicle.
- NOTICE:
-
When securing string 2, check that there is no slack and the string is not twisted.
- HINT:
-
Set the point where strings 1 and 2 intersect as the datum point.
PROCEDURE 3: SET MARKERS (when checking front)
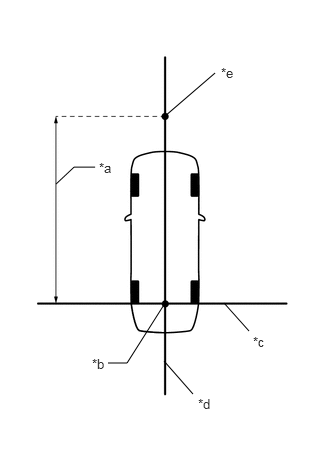
| *a | 4800 mm (15.74 ft.) (for Bar Type Radiator Grille)
4900 mm (16.07 ft.) (for Mesh Type Radiator Grille) |
| *b | Datum Point |
| *c | String 1 |
| *d | String 2 |
| *e | Mark E |
In front of the vehicle, extend string 3 perpendicular to the vehicle center line (string 2) and place a marker.
Mark the position on string 2 in front of the vehicle, 4800 mm (15.74 ft.)*1 or 4900 mm (16.07 ft.)*2 from the datum point. (Mark E)
*1: for Bar Type Radiator Grille
*2: for Mesh Type Radiator Grille
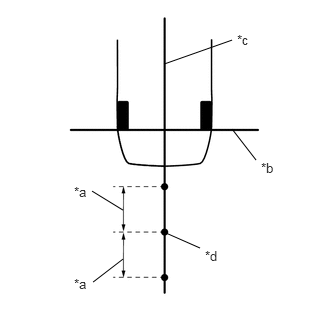
| *a | 400 mm (1.31 ft.) |
| *b | String 2 |
| *c | Mark E |
Secure the ends of 2 strings (800 mm [2.62 ft.] long) at 2 positions 400 mm (1.31 ft.) from mark E as shown in the illustration.
Move the free ends of the 2 strings and mark the point where the ends meet. (Marks F and G)
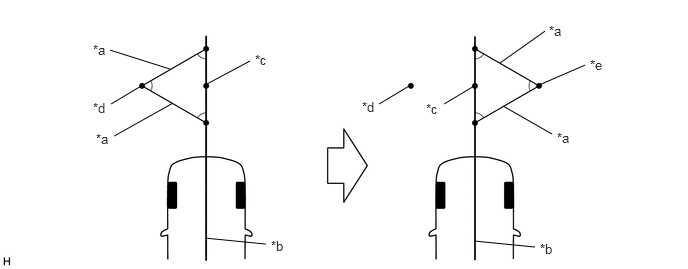
| *a | 800 mm (2.62 ft.) String | *b | String 2 |
| *c | Mark E | *d | Mark F |
| *e | Mark G | - | - |
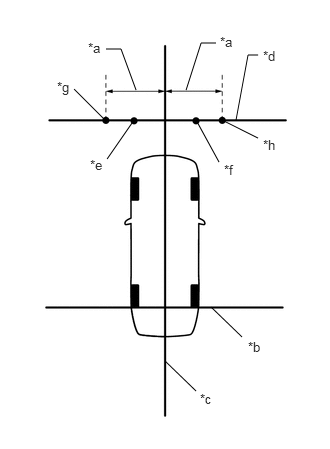
| *a | 1400 mm (4.60 ft.) |
| *b | String 1 |
| *c | String 2 |
| *d | String 3 |
| *e | Mark F |
| *f | Mark G |
| *g | Mark H |
| *h | Mark I |
Secure string 3 so that it passes through marks F and G as shown in the illustration.
- NOTICE:
-
When securing the string, check that there is no slack and the string is not twisted.
Mark positions on string 3, 1400 mm (4.60 ft.) to the left and right of the vehicle center line (string 2). (Marks H and I).
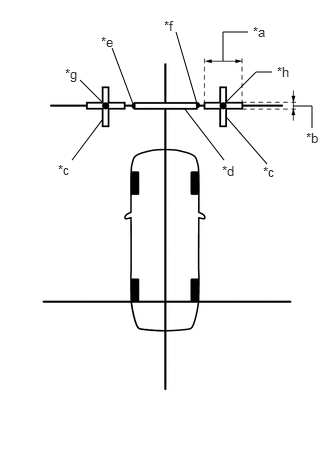
| *a | 800 mm (2.62 ft.) |
| *b | 100 mm (0.33 ft.) |
| *c | Cross Check Marker |
| *d | Check Marker |
| *e | Mark F |
| *f | Mark G |
| *g | Mark H |
| *h | Mark I |
Place and secure the cross check markers, centered on marks H and I.
- NOTICE:
- ·
Align the cross check markers perpendicular to the string.
·Make each arm of the cross check markers 800 mm (2.62 ft.) long and 100 mm (0.33 ft.) wide.
Place the check marker between marks F and G.
Perform camera view adjustment (calibration) (procedure 8).
PROCEDURE 4: SET MARKERS (When checking rear)
To the rear of the vehicle, extend string 4 perpendicular to the vehicle center line (string 2) and place a check marker.
| *a | 1500 mm (4.92 ft.) |
| *b | Datum Point |
| *c | String 1 |
| *d | String 2 |
| *e | Mark J |
Mark a position on string 2 to the rear of the vehicle, 1500 mm (4.92 ft.) from the datum point. (Mark J)
| *a | 400 mm (1.31 ft.) |
| *b | String 1 |
| *c | String 2 |
| *d | Mark J |
Secure the ends of 2 strings (800 mm [2.62 ft.]) at 2 positions 400 mm (1.31 ft.) from mark J as shown in the illustration.
Move the free ends of the 2 strings and mark the point where the ends meet. (Marks K and L)
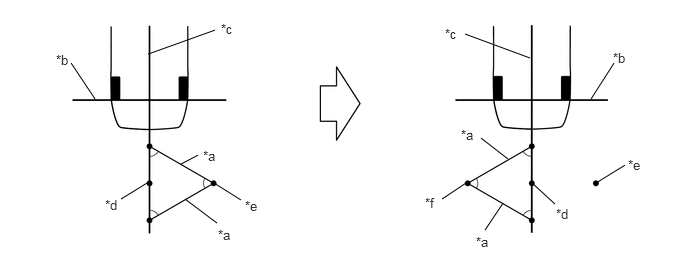
| *a | 800 mm (2.62 ft.) String | *b | String 1 |
| *c | String 2 | *d | Mark J |
| *e | Mark K | *f | Mark L |
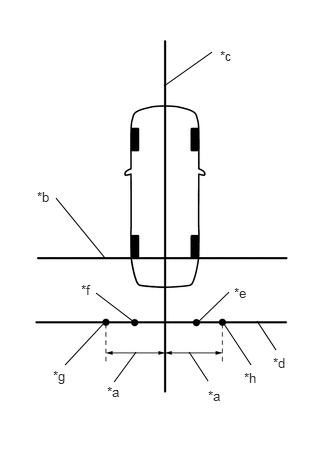
| *a | 1400 mm (4.60 ft.) |
| *b | String 1 |
| *c | String 2 |
| *d | String 4 |
| *e | Mark K |
| *f | Mark L |
| *g | Mark M |
| *h | Mark N |
Secure string 4 so that it passes through marks K and L as shown in the illustration.
- NOTICE:
-
When securing the string, check that there is no slack and the string is not twisted.
Mark positions on string 4, 1400 mm (4.60 ft.) to the left and right of the vehicle center line (string 2). (Marks M and N)
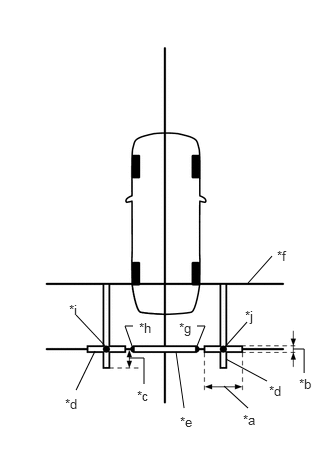
| *a | 800 mm (2.62 ft.) |
| *b | 100 mm (0.33 ft.) |
| *c | 400 mm (1.31 ft.) |
| *d | Cross Check Marker |
| *e | Check Marker |
| *f | String 1 |
| *g | Mark K |
| *h | Mark L |
| *i | Mark M |
| *j | Mark N |
Place and secure the cross check markers, centered on marks M and N.
- NOTICE:
- ·
Align the cross check markers perpendicular to the string.
·Make each arm of the cross check markers 800 mm (2.62 ft.) long and 100 mm (0.33 ft.) wide.
·Extend the rear cross check markers to string 1.
Place the check marker between marks K and L.
Perform camera view adjustment (calibration) (procedure 8).
PROCEDURE 5: SET MARKERS (When checking left side)
To the left side of the vehicle, extend string 5 parallel to the vehicle center line (string 2) and place a check marker.
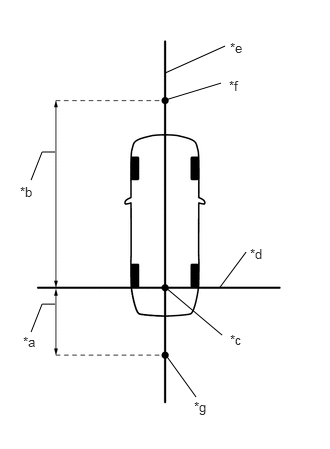
| *a | 1500 mm (4.92 ft.) |
| *b | 4800 mm (15.74 ft.) (for Bar Type Radiator Grille)
4900 mm (16.07 ft.) (for Mesh Type Radiator Grille) |
| *c | Datum Point |
| *d | String 1 |
| *e | String 2 |
| *f | Mark E |
| *g | Mark J |
Mark the position on string 2 in front of the vehicle, 4800 mm (15.74 ft.)*1 or 4900 mm (16.07 ft.)*2 from the datum point. (Mark E)
*1: for Bar Type Radiator Grille
*2: for Mesh Type Radiator Grille
Mark the position on string 2 to the rear of the vehicle, 1500 mm (4.92 ft.) from the datum point. (Mark J)
| *a | 400 mm (1.31 ft.) |
| *b | String 2 |
| *c | Mark E |
Secure the ends of 2 strings (800 mm [2.62 ft.] long) at 2 positions 400 mm (1.31 ft.) from mark E as shown in the illustration.
Move the free ends of the 2 strings and mark the point where the ends meet. (Marks F and G)
| *a | 800 mm (2.62 ft.) String | *b | String 2 |
| *c | Mark E | *d | Mark F |
| *e | Mark G | - | - |
| *a | 400 mm (1.31 ft.) |
| *b | String 1 |
| *c | String 2 |
| *d | Mark J |
Secure the ends of 2 strings (800 mm [2.62 ft.]) at 2 positions 400 mm (1.31 ft.) from mark J as shown in the illustration.
Move the free ends of the 2 strings and mark the point where the ends meet. (Marks K and L)
| *a | 800 mm (2.62 ft.) String | *b | String 1 |
| *c | String 2 | *d | Mark J |
| *e | Mark K | *f | Mark L |
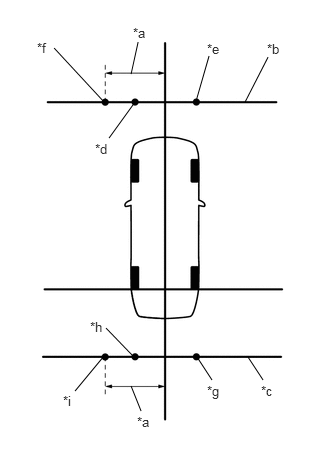
| *a | 1400 mm (4.60 ft.) |
| *b | String 3 |
| *c | String 4 |
| *d | Mark F |
| *e | Mark G |
| *f | Mark H |
| *g | Mark K |
| *h | Mark L |
| *i | Mark M |
Secure strings 3 and 4 so that they pass through marks F and G, marks K and L as shown in the illustration.
- NOTICE:
-
When securing the string, check that there is no slack and the string is not twisted.
Mark strings 3 and 4, 1400 mm (4.60 ft.) to the left of the vehicle center line (string 2). (Marks H and M)
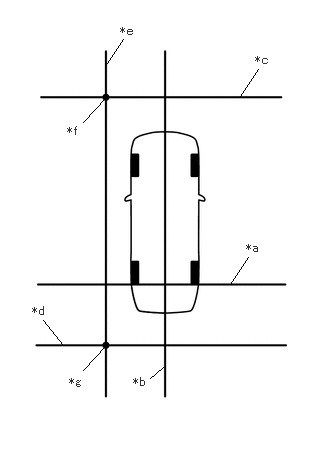
| *a | String 1 |
| *b | String 2 |
| *c | String 3 |
| *d | String 4 |
| *e | String 5 |
| *f | Mark H |
| *g | Mark M |
Secure string 5 so that it passes through marks H and M as shown in the illustration.
- NOTICE:
-
When securing the string, check that there is no slack and the string is not twisted.
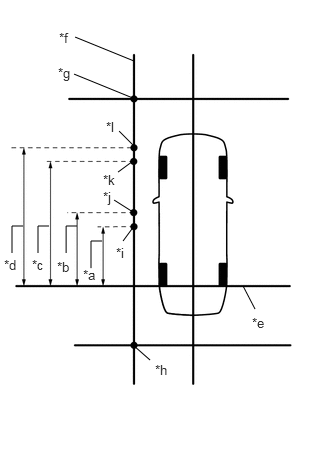
| *a | 1500 mm (4.92 ft.) |
| *b | 1700 mm (5.58 ft.) |
| *c | 3000 mm (9.84 ft.) |
| *d | 3200 mm (10.50 ft.) |
| *e | String 1 |
| *f | String 5 |
| *g | Mark H |
| *h | Mark M |
| *i | Mark O |
| *j | Mark P |
| *k | Mark Q |
| *l | Mark R |
Make marks on string 5 that are 1500 mm (4.92 ft.), 1700 mm (5.58 ft.), 3000 mm (9.84 ft.), and 3200 mm (10.50 ft.) from the datum line (string 1) as shown in the illustration. (Marks O, P, Q and R)
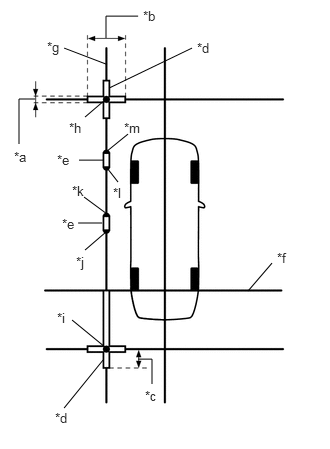
| *a | 100 mm (0.33 ft.) |
| *b | 800 mm (2.62 ft.) |
| *c | 400 mm (1.31 ft.) |
| *d | Cross Check Marker |
| *e | Check Marker |
| *f | String 1 |
| *g | String 5 |
| *h | Mark H |
| *i | Mark M |
| *j | Mark O |
| *k | Mark P |
| *l | Mark Q |
| *m | Mark R |
Place and secure the cross check markers, centered on marks H and M.
- NOTICE:
- ·
Align the cross check markers perpendicular to the string.
·Make each arm of the cross check markers 800 mm (2.62 ft.) long and 100 mm (0.33 ft.) wide.
·Extend the rear cross check markers to string 1.
Place check markers between marks O and P, and marks Q and R.
Perform camera view adjustment (calibration) (procedure 8).
PROCEDURE 6: SET MARKERS (When checking right side)
At the right side of the vehicle, extend string 6 parallel to the vehicle and place a marker.
| *a | 1500 mm (4.92 ft.) |
| *b | 4800 mm (15.74 ft.) (for Bar Type Radiator Grille)
4900 mm (16.07 ft.) (for Mesh Type Radiator Grille) |
| *c | Datum Point |
| *d | String 1 |
| *e | String 2 |
| *f | Mark E |
| *g | Mark J |
Mark the position on string 2 in front of the vehicle, 4800 mm (15.74 ft.)*1 or 4900 mm (16.07 ft.)*2 from the datum point. (Mark E)
*1: for Bar Type Radiator Grille
*2: for Mesh Type Radiator Grille
Mark the position on string 2 to the rear of the vehicle, 1500 mm (4.92 ft.) from the datum point. (Mark J)
| *a | 400 mm (1.31 ft.) |
| *b | String 2 |
| *c | Mark E |
Secure the ends of 2 strings (800 mm [2.62 ft.] long) at 2 positions 400 mm (1.31 ft.) from mark E as shown in the illustration.
Move the free ends of the 2 strings and mark the point where the ends meet. (Marks F and G)
| *a | 800 mm (2.62 ft.) String | *b | String 2 |
| *c | Mark E | *d | Mark F |
| *e | Mark G | - | - |
| *a | 400 mm (1.31 ft.) |
| *b | String 1 |
| *c | String 2 |
| *d | Mark J |
Secure the ends of 2 strings (800 mm [2.62 ft.]) at 2 positions 400 mm (1.31 ft.) from mark J as shown in the illustration.
Move the free ends of the 2 strings and mark the point where the ends meet. (Marks K and L)
| *a | 800 mm (2.62 ft.) String | *b | String 1 |
| *c | String 2 | *d | Mark J |
| *e | Mark K | *f | Mark L |
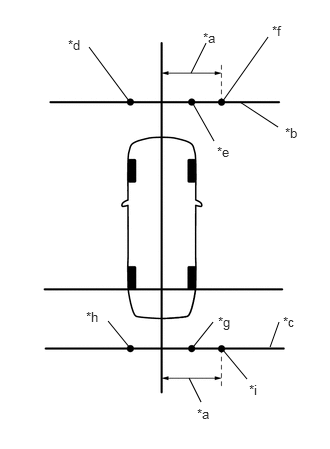
| *a | 1400 mm (4.60 ft.) |
| *b | String 3 |
| *c | String 4 |
| *d | Mark F |
| *e | Mark G |
| *f | Mark I |
| *g | Mark K |
| *h | Mark L |
| *i | Mark N |
Secure strings 3 and 4 so that they pass through marks F and G and marks K and L as shown in the illustration.
- NOTICE:
-
When securing the string, check that there is no slack and the string is not twisted.
Mark strings 3 and 4, 1400 mm (4.60 ft.) to the left of the vehicle center line (string 2). (Marks I and N)
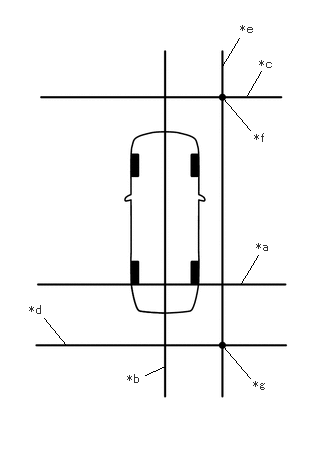
| *a | String 1 |
| *b | String 2 |
| *c | String 3 |
| *d | String 4 |
| *e | String 6 |
| *f | Mark I |
| *g | Mark N |
Secure string 6 so that it passes through marks I and N as shown in the illustration.
- NOTICE:
-
When securing the string, check that there is no slack and the string is not twisted.
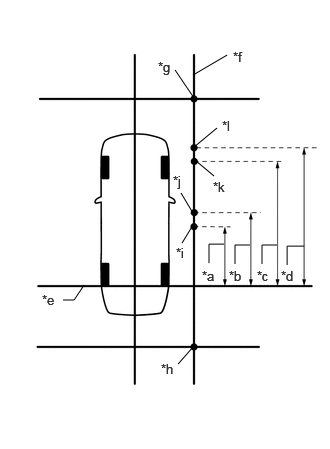
| *a | 1500 mm (4.92 ft.) |
| *b | 1700 mm (5.58 ft.) |
| *c | 3000 mm (9.84 ft.) |
| *d | 3200 mm (10.50 ft.) |
| *e | String 1 |
| *f | String 6 |
| *g | Mark I |
| *h | Mark N |
| *i | Mark S |
| *j | Mark T |
| *k | Mark U |
| *l | Mark V |
Make marks on string 6 that are 1500 mm (4.92 ft.), 1700 mm (5.58 ft.), 3000 mm (9.84 ft.), and 3200 mm (10.50 ft.) from the datum line (string 1) as shown in the illustration. (Marks S, T, U and V)
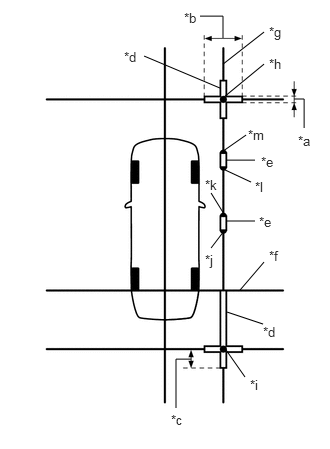
| *a | 100 mm (0.33 ft.) |
| *b | 800 mm (2.62 ft.) |
| *c | 400 mm (1.31 ft.) |
| *d | Cross Check Marker |
| *e | Check Marker |
| *f | String 1 |
| *g | String 6 |
| *h | Mark I |
| *i | Mark N |
| *j | Mark S |
| *k | Mark T |
| *l | Mark U |
| *m | Mark V |
Place and secure the cross check markers, centered on marks I and N.
- NOTICE:
- ·
Align the cross check markers perpendicular to the string.
·Make each arm of the cross check markers 800 mm (2.62 ft.) long and 100 mm (0.33 ft.) wide.
·Extend the rear cross check markers to string 1.
Place check markers between marks S and T, and marks U and V.
Perform camera view adjustment (calibration) (procedure 8).
PROCEDURE 7: SET MARKERS (When checking all cameras)
Set markers in every direction from the vehicle.
| *a | 1500 mm (4.92 ft.) |
| *b | 4800 mm (15.74 ft.) (for Bar Type Radiator Grille)
4900 mm (16.07 ft.) (for Mesh Type Radiator Grille) |
| *c | Datum Point |
| *d | String 1 |
| *e | String 2 |
| *f | Mark E |
| *g | Mark J |
Mark the position on string 2 in front of the vehicle, 4800 mm (15.74 ft.)*1 or 4900 mm (16.07 ft.)*2 from the datum point. (Mark E)
*1: for Bar Type Radiator Grille
*2: for Mesh Type Radiator Grille
Mark the position on string 2 to the rear of the vehicle, 1500 mm (4.92 ft.) from the datum point. (Mark J)
| *a | 400 mm (1.31 ft.) |
| *b | String 2 |
| *c | Mark E |
Secure the ends of 2 strings (800 mm [2.62 ft.] long) at 2 positions 400 mm (1.31 ft.) from mark E as shown in the illustration.
Move the free ends of the 2 strings and mark the point where the ends meet. (Marks F and G)
| *a | 800 mm (2.62 ft.) String | *b | String 2 |
| *c | Mark E | *d | Mark F |
| *e | Mark G | - | - |
| *a | 400 mm (1.31 ft.) |
| *b | String 1 |
| *c | String 2 |
| *d | Mark J |
Secure the ends of 2 strings (800 mm [2.62 ft.]) at 2 positions 400 mm (1.31 ft.) from mark J as shown in the illustration.
Move the free ends of the 2 strings and mark the point where the ends meet. (Marks K and L)
| *a | 800 mm (2.62 ft.) String | *b | String 1 |
| *c | String 2 | *d | Mark J |
| *e | Mark K | *f | Mark L |
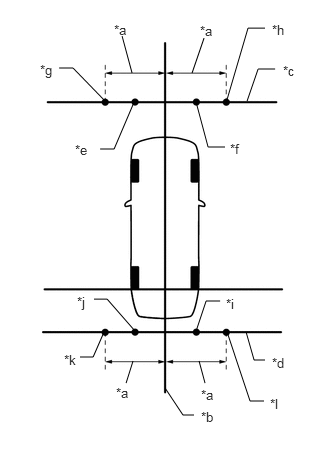
| *a | 1400 mm (4.60 ft.) |
| *b | String 2 |
| *c | String 3 |
| *d | String 4 |
| *e | Mark F |
| *f | Mark G |
| *g | Mark H |
| *h | Mark I |
| *i | Mark K |
| *j | Mark L |
| *k | Mark M |
| *l | Mark N |
Secure strings 3 and 4 so that they pass through marks F, G, K and L as shown in the illustration.
- NOTICE:
-
When securing the string, check that there is no slack and the string is not twisted.
Mark string 3, 1400 mm (4.60 ft.) to the left and right of the vehicle center line (string 2). (Marks H and I)
Mark string 4, 1400 mm (4.60 ft.) to the left and right of the vehicle center line (string 2). (Marks M and N)
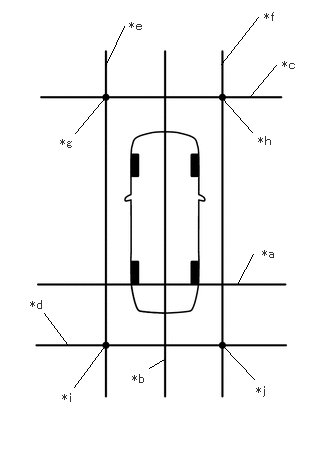
| *a | String 1 |
| *b | String 2 |
| *c | String 3 |
| *d | String 4 |
| *e | String 5 |
| *f | String 6 |
| *g | Mark H |
| *h | Mark I |
| *i | Mark M |
| *j | Mark N |
Secure strings 5 and 6 so that they pass through marks H, M, I and N as shown in the illustration.
- NOTICE:
-
When securing the string, check that there is no slack and the string is not twisted.
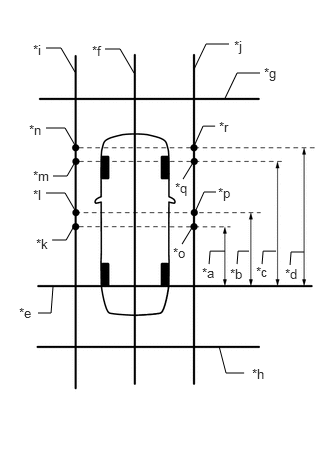
| *a | 1500 mm (4.92 ft.) |
| *b | 1700 mm (5.58 ft.) |
| *c | 3000 mm (9.84 ft.) |
| *d | 3200 mm (10.50 ft.) |
| *e | String 1 |
| *f | String 2 |
| *g | String 3 |
| *h | String 4 |
| *i | String 5 |
| *j | String 6 |
| *k | Mark O |
| *l | Mark P |
| *m | Mark Q |
| *n | Mark R |
| *o | Mark S |
| *p | Mark T |
| *q | Mark U |
| *r | Mark V |
Make marks on string 5 that are 1500 mm (4.92 ft.), 1700 mm (5.58 ft.), 3000 mm (9.84 ft.), and 3200 mm (10.50 ft.) from the datum line (string 1) as shown in the illustration. (Marks O, P, Q and R)
Make marks on string 6 that are 1500 mm (4.92 ft.), 1700 mm (5.58 ft.), 3000 mm (9.84 ft.), and 3200 mm (10.50 ft.) from the datum line (string 1) as shown in the illustration. (Marks S, T, U and V)
Place and secure the cross check markers, centered on marks H, I, M and N.
- NOTICE:
- ·
Align the cross check markers perpendicular to the string.
·Make each arm of the cross check markers 800 mm (2.62 ft.) long and 100 mm (0.33 ft.) wide.
·Extend the rear cross check markers to string 1.
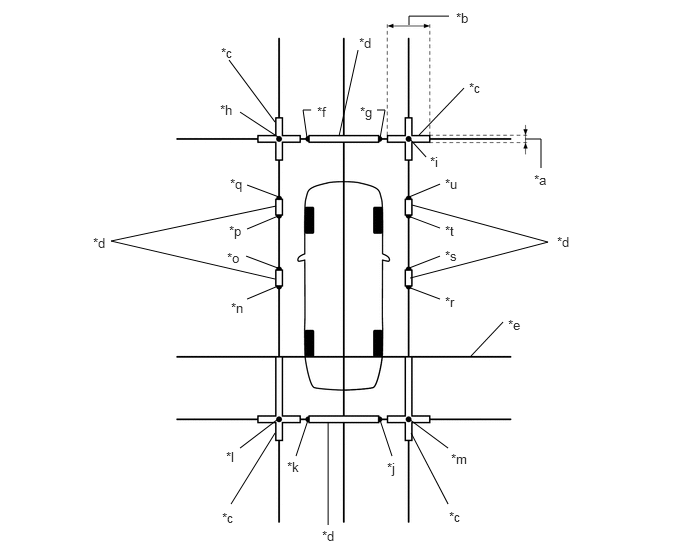
| *a | 100 mm (0.33 ft.) | *b | 800 mm (2.62 ft.) |
| *c | Cross Check Marker | *d | Check Marker |
| *e | String 1 | *f | Mark F |
| *g | Mark G | *h | Mark H |
| *i | Mark I | *j | Mark K |
| *k | Mark L | *l | Mark M |
| *m | Mark N | *n | Mark O |
| *o | Mark P | *p | Mark Q |
| *q | Mark R | *r | Mark S |
| *s | Mark T | *t | Mark U |
| *u | Mark V | - | - |
Place check markers between marks F and G, marks K and L, marks O and P, marks Q and R, marks S and T, and marks U and V.
Perform camera view adjustment (calibration) (procedure 8).
PROCEDURE 8: CAMERA VIEW ADJUSTMENT (CALIBRATION)
Enter diagnostic mode.
w/ Navigation System: Click hereAudio / Visual / Telematics>NAVIGATION / MULTI INFO DISPLAY>NAVIGATION SYSTEM>DTC CHECK / CLEAR
w/o Navigation System: Click hereAudio / Visual / Telematics>AUDIO / VIDEO>AUDIO AND VISUAL SYSTEM (for Radio and Display Type)>DTC CHECK / CLEAR
- NOTICE:
-
Adjustment must be performed with the engine running. Therefore, apply the parking brake, depress the brake pedal and move the shift lever to P to ensure that the vehicle does not begin moving unexpectedly.
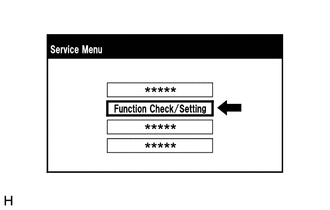
Select "Function Check/Setting" from the "Service Menu" screen.
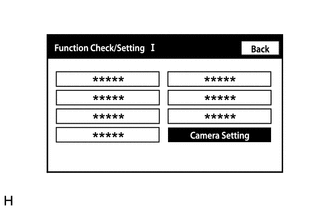
Select "Camera Setting" from the Function Check/Setting I screen to display the Mode Setting(*) screen.
- NOTICE:
-
If "Camera Setting" is not displayed on the screen, turn the ignition switch off, and then turn it ON again and enter the diagnostic mode.
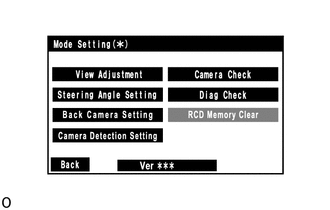
Select "View Adjustment" on the Mode Setting(*) screen to display the Signal Check(*) screen.
- HINT:
-
To select a grayed out item, select and hold the item for 2 seconds or more.
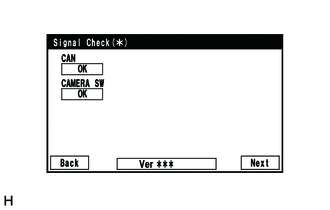
Select "Next" from the Signal Check(*) screen to display the adjustment screen.
- NOTICE:
- ·
When "CHK" (red) is displayed for an item on the Signal Check(*) screen, selecting "Next" will not change to the adjustment screen.
·Check the Signal Check(*) screen when "CHK" (red) is displayed for an item on the Signal Check(*) screen.
Perform the view adjustment.
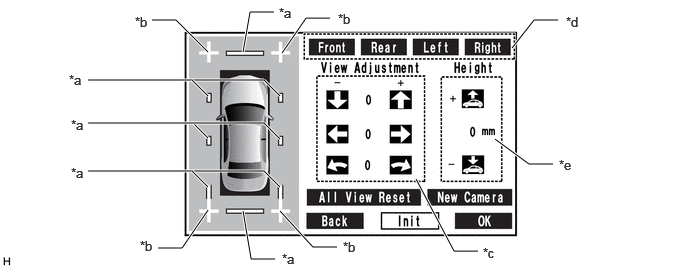
| *a | Red Line | *b | Cross Check Marker (for Connection Judgment) |
| *c | Adjustment Buttons | *d | Camera Select Buttons |
| *e | Vehicle Height Adjustment Buttons | - | - |
- NOTICE:
-
After replacing a camera, use the camera select buttons to select the replaced camera, and select "New Camera".
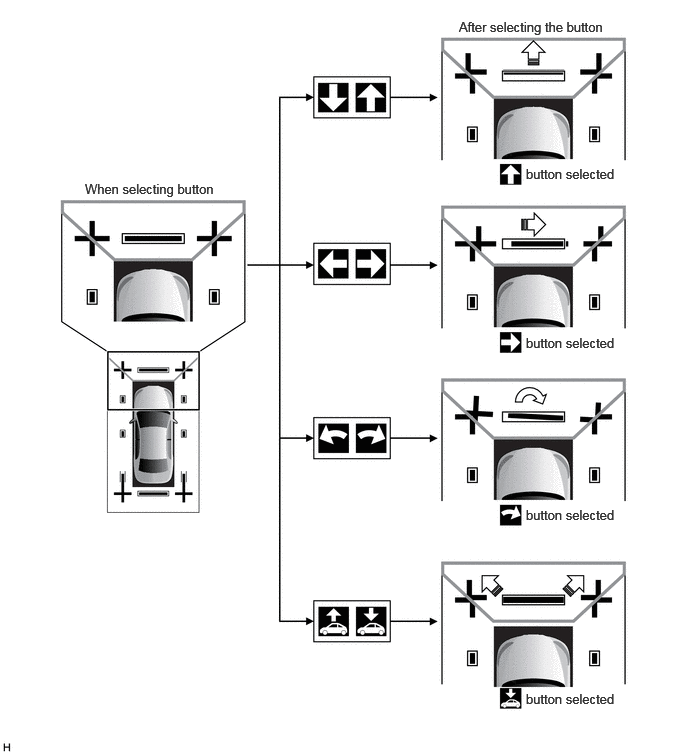
Check that the cross check markers displayed on the adjustment screen appear connected.
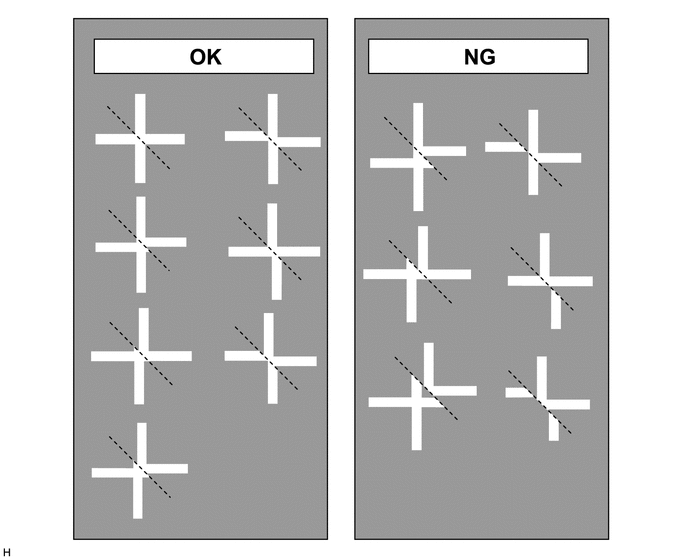
- NOTICE:
- ·
Before checking the markers on the adjustment screen, ensure that the cross target bars have been placed correctly.
·If a cross check marker appears displaced on the adjustment screen, use the camera select buttons to select the corresponding camera, and then use the adjustment buttons or vehicle height adjustment buttons to adjust the screen.
 4.781,0.198 6.604,0.448 1.823,0.25 10 false After selecting the button 5.479,1.729 6.844,1.969 1.365,0.24 10 false button selected 0.885,1.885 2.688,2.135 1.802,0.25 10 false When selecting button 5.479,3.49 6.896,3.719 1.417,0.229 10 false button selected 5.479,5.281 6.615,5.479 1.135,0.198 10 false button selected 5.479,7.198 6.969,7.375 1.49,0.177 10 false button selected
- HINT:
-
To repeat the adjustment, select "All View Reset" to return all adjustment values to their initial values.
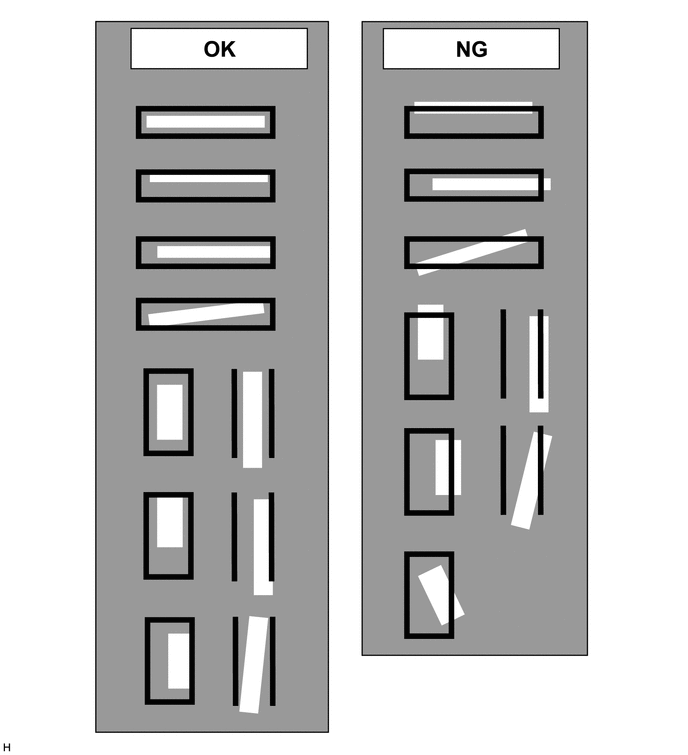
Check that the target bars do not protrude outside the red frames displayed on the adjustment screen.
- NOTICE:
- ·
Before checking the adjustment screen, ensure that the check markers have been placed correctly.
·If a target bar protrudes outside a red frame on the adjustment screen, use the camera select buttons to select the corresponding camera, and use the adjustment buttons or vehicle height adjustment buttons to adjust the screen.
4.781,0.198 6.604,0.448 1.823,0.25 10 false After selecting the button 5.479,1.729 6.844,1.969 1.365,0.24 10 false button selected 0.885,1.885 2.688,2.135 1.802,0.25 10 false When selecting button 5.479,3.49 6.896,3.719 1.417,0.229 10 false button selected 5.479,5.281 6.615,5.479 1.135,0.198 10 false button selected 5.479,7.198 6.969,7.375 1.49,0.177 10 false button selected
- HINT:
-
To repeat the adjustment, select "All View Reset" to return all adjustment values to their initial values.
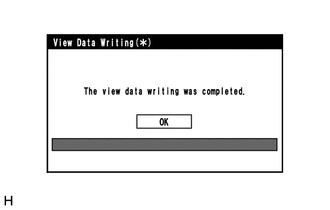
When all adjustments are completed, press "OK".
If data writing ends normally, "The view data writing was completed." is displayed.
Select "OK".
Cancel diagnostic mode.
Click hereAudio / Visual / Telematics>NAVIGATION / MULTI INFO DISPLAY>NAVIGATION SYSTEM>DTC CHECK / CLEAR
PROCEDURE 9: STEERING ANGLE SETTING
Preparation for adjustment
Park the vehicle with the steering wheel centered.
- HINT:
-
Before stopping the vehicle, move the vehicle slightly backward and forward to ensure that both the steering wheel and the tires point straight ahead.
Adjust the tire pressure to the specified value(s).
Enter diagnostic mode.
w/ Navigation System: Click hereAudio / Visual / Telematics>NAVIGATION / MULTI INFO DISPLAY>NAVIGATION SYSTEM>DTC CHECK / CLEAR
w/o Navigation System: Click hereAudio / Visual / Telematics>AUDIO / VIDEO>AUDIO AND VISUAL SYSTEM (for Radio and Display Type)>DTC CHECK / CLEAR
- NOTICE:
-
Adjustment must be performed with the engine running. Therefore, apply the parking brake, depress the brake pedal and move the shift lever to P to ensure that the vehicle does not begin moving unexpectedly.
Select "Function Check/Setting" on the "Service Menu" screen.
Select "Camera Setting" from the Function Check/Setting I screen to display the Mode Setting(*) screen.
- NOTICE:
-
If "Camera Setting" is not displayed on the screen, turn the ignition switch off, and then turn it ON again and enter the diagnostic mode.
Select "Steering Angle Setting" from the Mode Setting(*) screen to display the Signal Check(*) screen.
- HINT:
-
To select a grayed out item, select and hold the item for 2 seconds or more.
Select "Next" from the Signal Check(*) screen to display the Steering Angle Setting D (*) screen.
- NOTICE:
- ·
If "CHK" (red) is displayed for an item on the Signal Check(*) screen, selecting "Next" will not change to the Steering Angle Setting D (*) screen.
·Check the Signal Check(*) screen when "CHK" (red) is displayed for an item on the Signal Check(*) screen.
Adjust the steering angle
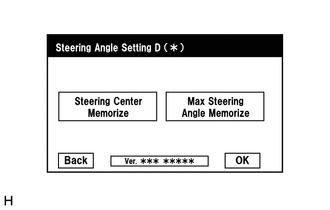
Check that the steering wheel is centered (approximately +/- 5 degrees or less) and then select "Steering Center Memorize".
After selecting "Steering Center Memorize", turn the steering angle fully to the left and fully to the right, and then select "Max Steering Angle Memorize". (Turning right and then left is OK)
When "Max Steering Angle Memorize" is selected, the steering angle setting values (steering neutral point and maximum steering angle) are stored and the system beeps for a long duration to notify the user that storing is complete before the Mode Setting(*) screen is displayed again.
- HINT:
- ·
A long beep will sound to confirm that the adjustment values have been stored.
·When all signals are input normally, the Mode Setting(*) screen is displayed automatically after the maximum steering angle is stored.
·When Steering Angle Setting is incomplete, "OK" is disabled.
·Even if no DTC is output, a steering sensor malfunction may disable the use of "Max Steering Angle Memorize".
·If selecting "Max Steering Angle Memorize" does not cause the adjustment value to be stored after adjusting the steering angle, replace the steering sensor.
Click hereBrake>BRAKE CONTROL / DYNAMIC CONTROL SYSTEMS>STEERING ANGLE SENSOR>REMOVAL
Cancel diagnostic mode.
w/ Navigation System: Click hereAudio / Visual / Telematics>NAVIGATION / MULTI INFO DISPLAY>NAVIGATION SYSTEM>DTC CHECK / CLEAR
w/o Navigation System: Click hereAudio / Visual / Telematics>AUDIO / VIDEO>AUDIO AND VISUAL SYSTEM (for Radio and Display Type)>DTC CHECK / CLEAR
Confirm steering angle adjustment.
- HINT:
-
After performing Steering Angle Setting, cancel diagnostic mode and perform Steering Angle Setting Check on the rear view screen.
Check on the rear view screen that the displayed estimated course lines move in synchronization with the steering wheel movements when the steering wheel is turned fully left or right.
- HINT:
-
If the estimated course line stops moving before the steering wheel is fully turned to either the left or right, the steering angle adjustment values have not been stored correctly. In this case, perform adjustment again.
PROCEDURE 10: REAR TELEVISION CAMERA VIEW ADJUSTMENT (for REAR CAMERA DETECTION FUNCTION)
- HINT:
- ·
Be sure to check for DTCs before performing this procedure.
Click hereAudio / Visual / Telematics>PARK ASSIST / MONITORING>PANORAMIC VIEW MONITOR SYSTEM>DTC CHECK / CLEAR
·Illustrations may differ from the actual vehicle screen depending on the device settings and options. Therefore, some detailed areas may not be shown exactly the same as on the actual vehicle screen.
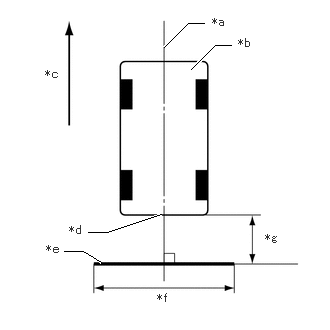
| *a | Vehicle Center |
| *b | Vehicle |
| *c | Front |
| *d | Vehicle End |
| *e | Target Bar for Back Camera Adjustment |
| *f | 1995 to 2005 mm (6.54 to 6.58 ft.) |
| *g | A |
Preparation for adjustment
Park the vehicle with the steering wheel centered.
Set a target bar behind the vehicle for optical axis adjustment of the rear television camera assembly (back camera position setting).
- HINT:
-
Create a target bar for adjustment only when adjusting the optical axis of the rear television camera assembly.
- Dimension:
Area Specification A 1000 mm (3.28 ft.)
- HINT:
- ·
Set a piece of tape on the ground as the target bar for adjustment. Its width and length should be 100 mm (0.33 ft.) and 1995 to 2005 mm (6.54 to 6.58 ft.), respectively. Check the color on the multi-display and choose a tape color which can be easily seen.
·Before parking the vehicle, be sure to move the vehicle forward and in reverse to check that the tires are facing straight ahead with the steering wheel centered.
·Check that the luggage compartment door is fully closed.
Start diagnostic mode.
w/ Navigation System: Click hereAudio / Visual / Telematics>NAVIGATION / MULTI INFO DISPLAY>NAVIGATION SYSTEM>DTC CHECK / CLEAR
w/o Navigation System: Click hereAudio / Visual / Telematics>AUDIO / VIDEO>AUDIO AND VISUAL SYSTEM (for Radio and Display Type)>DTC CHECK / CLEAR
- NOTICE:
-
Adjustment must be performed with the engine running. Therefore, apply the parking brake, depress the brake pedal and move the shift lever to P to ensure that the vehicle does not begin moving unexpectedly.
Select "Function Check/Setting" on the "Service Menu" screen.
Select "Camera Setting" on the "Function Check/Setting I" screen.
- NOTICE:
-
If the "Camera Setting" selection screen is not displayed, turn the ignition switch off and enter the diagnosis screen after turning the ignition switch to ON once again.
Select "Back Camera Setting" on the "Mode Setting (*)" screen.
- HINT:
-
To select a grayed out item, select and hold the item for 2 seconds or more.
Select "Next" on the "Signal Check (*)" screen.
- NOTICE:
- ·
When "CHK" (red) is displayed for any items on the "Signal Check (*)" screen, selecting "Next" will not change the screen to the "Back Camera Position Setting D (*)" screen.
·When "CHK" (red) is displayed for any items on the "Signal Check (*)" screen, perform inspections using the "Signal Check (*)" screen.
Click hereAudio / Visual / Telematics>PARK ASSIST / MONITORING>PANORAMIC VIEW MONITOR SYSTEM>DIAGNOSIS SYSTEM
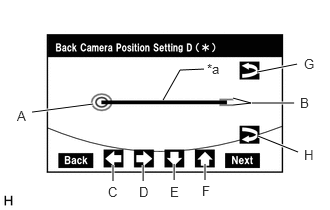
| *a | Target Bar for Back Camera Position Setting |
Back Camera Position Setting (Both Ends of Target Bar)
- HINT:
- ·
When the luggage compartment door is open, the "You can not calibrate the camera when the door is open. Please close the door." message will be displayed and camera position setting will not be possible.
·If the "You can not calibrate the camera when the door is open. Please close the door." message is displayed even when the luggage compartment door is closed, perform inspections according to Problem Symptoms Table (When adjusting the camera optical axis, "You can not calibrate the camera when the door is open. Please close the door." is displayed even after the luggage compartment door has been closed).
Perform vertical and horizontal position adjustment.
Move the circle (A) left, right, up and down by selecting the buttons (C), (D), (E) and (F) so that the left end of Target Bar for Back Camera Position Setting is positioned within the center of the circle (A) (center of the inner red circle).
Perform roll angle adjustment.
Rotate the bar (B) by selecting the buttons (G) or (H) so that the bar (B) becomes parallel to target bar for back camera position setting.
Select "Next" on the "Back Camera Position Setting D (*)" screen.
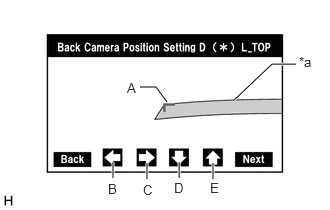
| *a | Target Bar for Back Camera Position Setting |
Back Camera Position Setting (Upper Left Corner of Target Bar)
- HINT:
- ·
When the luggage compartment door is open, the "You can not calibrate the camera when the door is open. Please close the door." message will be displayed and camera position setting will not be possible.
·If the "You can not calibrate the camera when the door is open. Please close the door." message is displayed even when the luggage compartment door is closed, perform inspections according to Problem Symptoms Table (When adjusting the camera optical axis, "You can not calibrate the camera when the door is open. Please close the door." is displayed even after the luggage compartment door has been closed).
Perform camera optical axis adjustment (high accuracy adjustment).
Move the adjustment mark (A) using the left, right, down and up buttons (B), (C), (D) and (E) to align the corner of the mark (A) with the upper left corner of the target bar.
- Standard:
The outer corner of the mark (A) is aligned with the upper left corner of the target bar.
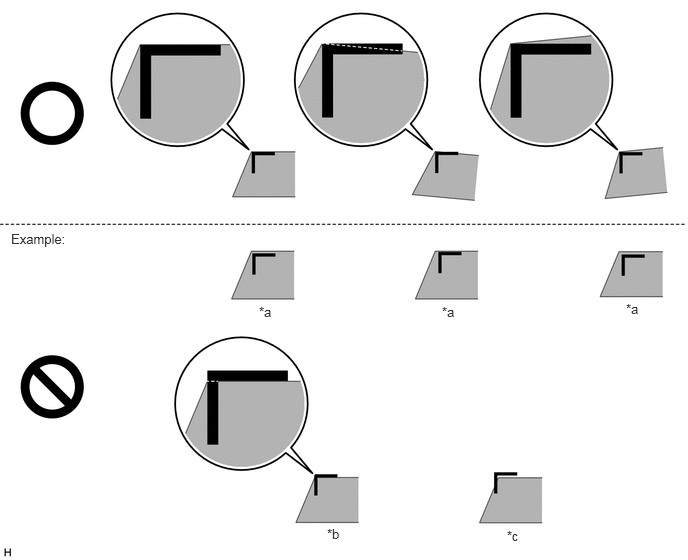
| *a | Too Far Inside | *b | Inner Corner Contacting |
| *c | Too Far Outside | - | - |
Select "Next" on the "Back Camera Position Setting D (*) L_TOP" screen.
| *a | Target Bar for Back Camera Position Setting |
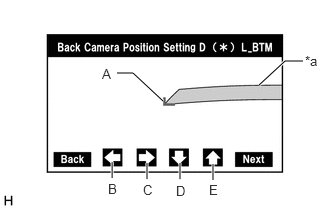
Back Camera Position Setting (Lower Left Corner of Target Bar)
- HINT:
- ·
When the luggage compartment door is open, the "You can not calibrate the camera when the door is open. Please close the door." message will be displayed and camera position setting will not be possible.
·If the "You can not calibrate the camera when the door is open. Please close the door." message is displayed even when the luggage compartment door is closed, perform inspections according to Problem Symptoms Table (When adjusting the camera optical axis, "You can not calibrate the camera when the door is open. Please close the door." is displayed even after the luggage compartment door has been closed).
Perform camera optical axis adjustment (high accuracy adjustment).
Move the mark (A) using the left, right, down and up buttons (B), (C), (D) and (E) to align the outer corner of the mark (A) with the lower left corner of the target bar.
- Standard:
The outer corner of the mark (A) is aligned with the lower left corner of the target bar.
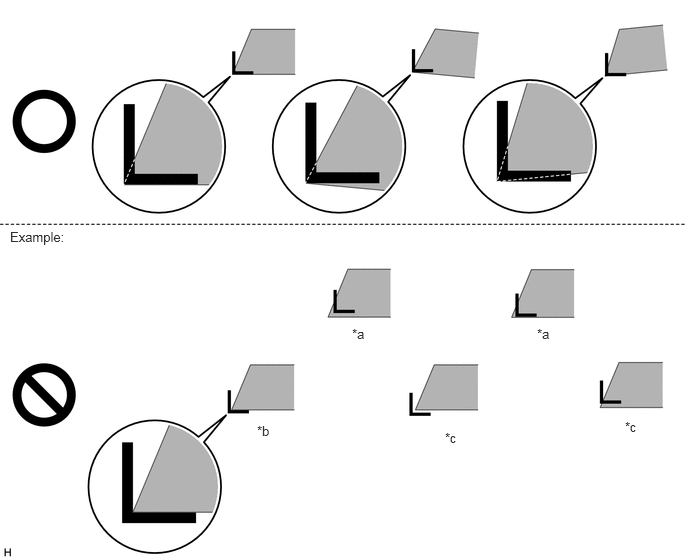
| *a | Too Far Inside | *b | Inner Corner Contacting |
| *c | Too Far Outside | - | - |
Select "Next" on the "Back Camera Position Setting D (*) L_BTM" screen.
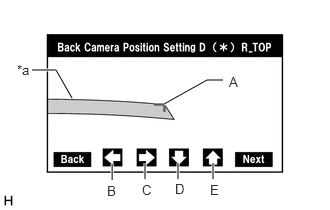
| *a | Target Bar for Back Camera Position Setting |
Back Camera Position Setting (Upper Right Corner of Target Bar)
- HINT:
- ·
When the luggage compartment door is open, the "You can not calibrate the camera when the door is open. Please close the door." message will be displayed and camera position setting will not be possible.
·If the "You can not calibrate the camera when the door is open. Please close the door." message is displayed even when the luggage compartment door is closed, perform inspections according to Problem Symptoms Table (When adjusting the camera optical axis, "You can not calibrate the camera when the door is open. Please close the door." is displayed even after the luggage compartment door has been closed).
Perform camera optical axis adjustment (high accuracy adjustment).
Move the mark (A) using the left, right, down and up buttons (B), (C), (D) and (E) to align the outer corner of the mark (A) with the upper right corner of the target bar.
- Standard:
The outer corner of the mark (A) is aligned with the upper right corner of the target bar.
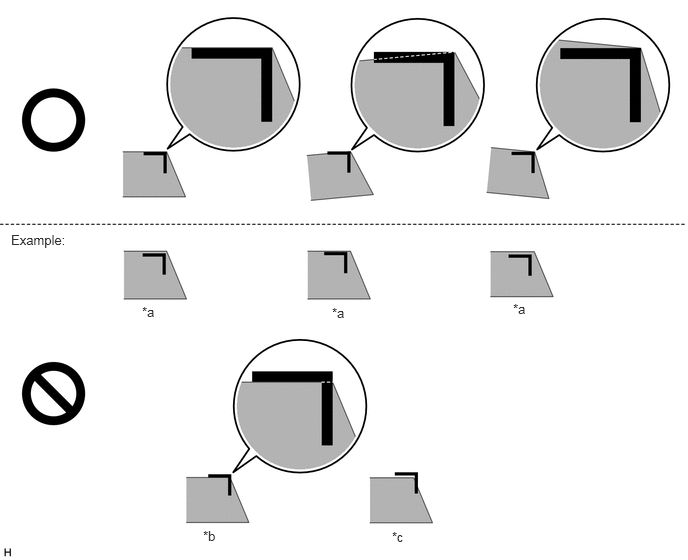
| *a | Too Far Inside | *b | Inner Corner Contacting |
| *c | Too Far Outside | - | - |
Select "Next" on the "Back Camera Position Setting D (*) R_TOP" screen.
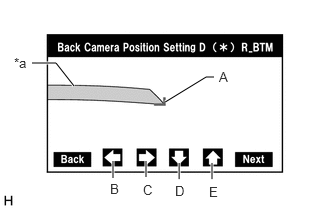
| *a | Target Bar for Back Camera Position Setting |
Back Camera Position Setting (Lower Right Corner of Target Bar)
- HINT:
- ·
When the luggage compartment door is open, the "You can not calibrate the camera when the door is open. Please close the door." message will be displayed and camera position setting will not be possible.
·If the "You can not calibrate the camera when the door is open. Please close the door." message is displayed even when the luggage compartment door is closed, perform inspections according to Problem Symptoms Table (When adjusting the camera optical axis, "You can not calibrate the camera when the door is open. Please close the door." is displayed even after the luggage compartment door has been closed).
Perform camera optical axis adjustment (high accuracy adjustment).
Move the mark (A) using the left, right, down and up buttons (B), (C), (D) and (E) to align the outer corner of the mark (A) with the lower right corner of the target bar.
- Standard:
The outer corner of the mark (A) is aligned with the lower right corner of the target bar.
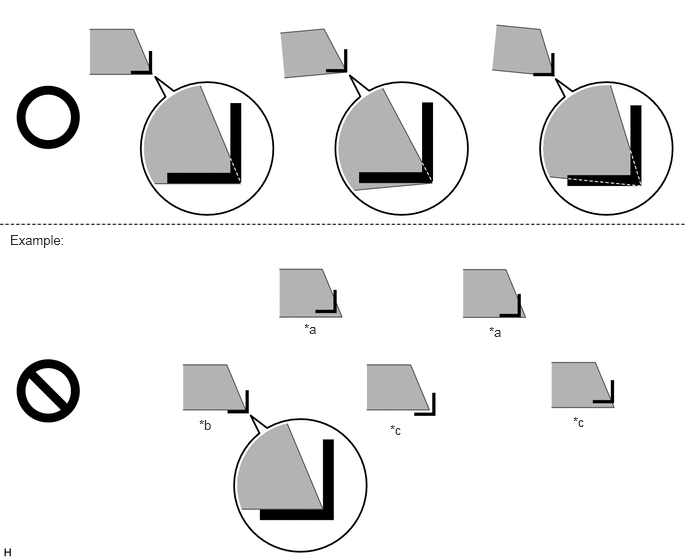
| *a | Too Far Inside | *b | Inner Corner Contacting |
| *c | Too Far Outside | - | - |
Select "Next" on the "Back Camera Position Setting D (*) R_BTM" screen.
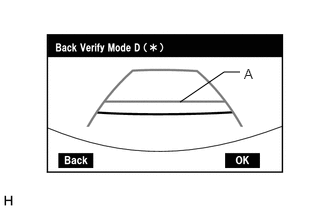
Back Verify Mode
Check that (A) and the target adjustment bar are overlapping.
If the lines are not aligned, perform the "Steering Center Memorize" and "Max Steering Angle Memorize" operations.
If (A) and the target adjustment bar are not aligned even if the tires are aligned straight ahead, perform the back camera position setting operation.
Select "OK" to return to the "Mode Setting (*)" screen and complete the adjustment.
- HINT:
- ·
The update is not completed until "OK" is selected.
·When "OK" is selected, a beep will sound to confirm that the adjustment values have been stored.
·The adjustment values are not stored until the beep has sounded.
Finish diagnostic mode.
w/ Navigation System: Click hereAudio / Visual / Telematics>NAVIGATION / MULTI INFO DISPLAY>NAVIGATION SYSTEM>DTC CHECK / CLEAR
w/o Navigation System: Click hereAudio / Visual / Telematics>AUDIO / VIDEO>AUDIO AND VISUAL SYSTEM (for Radio and Display Type)>DTC CHECK / CLEAR