MIRROR (EXT) POWER MIRROR CONTROL SYSTEM(w/ Memory) TERMINALS OF ECU
CHECK OUTER MIRROR CONTROL ECU ASSEMBLY (DRIVER DOOR)
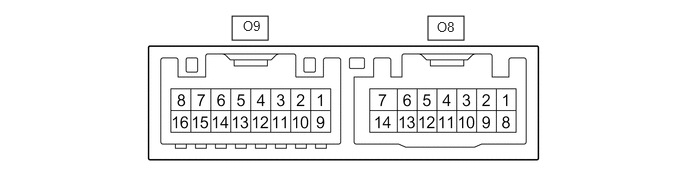
Disconnect the O8 outer mirror control ECU assembly (driver door) connector.
Measure the voltage and resistance according to the value(s) in the table below.
- HINT:
-
Measure the values on the wire harness side with the connector disconnected.
| Terminal No. (Symbol) | Wiring Color | Terminal Description | Condition | Specified Condition |
|---|---|---|---|---|
| O8-14 (BDR) - Body ground | GR - Body ground | +B power supply | Always | 11 to 14 V |
| O8-6 (CPUB) - Body ground | LA-L - Body ground | +B power supply | Always | 11 to 14 V |
| O8-5 (SIG) - Body ground | LA-B - Body ground | Ignition power supply | Engine switch off → on (IG) | Below 1 V → 11 to 14 V |
| O8-7 (GND) - Body ground | W-B - Body ground | Ground | Always | Below 1 Ω |
Reconnect the O8 outer mirror control ECU assembly (driver door) connector.
Measure the voltage according to the value(s) in the table below.
| Terminal No. (Symbol) | Wiring Color | Terminal Description | Condition | Specified Condition |
|---|---|---|---|---|
| O9-3 (MR+) - Body ground | B - Body ground | Power retract mirror motor drive voltage | Outer rear view mirror assembly (driver door) being retracted | 11 to 14 V |
| Outer rear view mirror assembly (driver door) stopped | Below 1 V | |||
| O9-11 (MR-) - Body ground | L - Body ground | Power retract mirror motor drive voltage | Outer rear view mirror assembly (driver door) returning | 11 to 14 V |
| Outer rear view mirror assembly (driver door) stopped | Below 1 V | |||
| O9-1 (LMVR) - O9-10 (LM+R) | BR - V | Vertical mirror motor drive voltage | Driver door mirror surface moving upward → stopped | 11 to 14 V → Below 1 V |
| O9-10 (LM+R) - O9-1 (LMVR) | V - BR | Vertical mirror motor drive voltage | Driver door mirror surface moving downward → stopped | 11 to 14 V → Below 1 V |
| O9-10 (LM+R) - O9-9 (LMHR) | V - LG | Horizontal mirror motor drive voltage | Driver door mirror surface moving right → stopped | 11 to 14 V → Below 1 V |
| O9-9 (LMHR) - O9-10 (LM+R) | LG - V | Horizontal mirror motor drive voltage | Driver door mirror surface moving left → stopped | 11 to 14 V → Below 1 V |
| O9-4 (HTR+) - O9-12 (HTR-) | LG - W | Mirror heater relay drive voltage | Mirror heater switch (rear window defogger switch) on | 11 to 14 V |
| O9-5 (LVC) - O9-14 (LE1) | G - BR | Mirror position sensor power supply | Engine switch on (IG) | 4.55 to 5.45 V |
| Engine switch off | Below 1 V | |||
| O9-6 (VSSR) - O8-7 (GND) | V - W-B | Mirror position sensor signal | Engine switch on (IG) | 0 to 5 V |
| O9-13 (HSSR) - O8-7 (GND) | GR - W-B | Mirror position sensor signal | Engine switch on (IG) | 0 to 5 V |
| O8-3 (M2) - O8-7 (GND) | R - W-B | M2 switch signal for seat memory switch | M2 switch on | Below 1 V |
| M2 switch off | 11 to 14 V | |||
| O8-2 (M1) - O8-7 (GND) | BR - W-B | M1 switch signal for seat memory switch | M1 switch on | Below 1 V |
| M1 switch off | 11 to 14 V | |||
| O8-1 (MM) - O8-7 (GND) | GR - W-B | SET switch signal for seat memory switch | SET switch on | Below 1 V |
| SET switch off | 11 to 14 V |
CHECK OUTER MIRROR CONTROL ECU ASSEMBLY (FRONT PASSENGER DOOR)
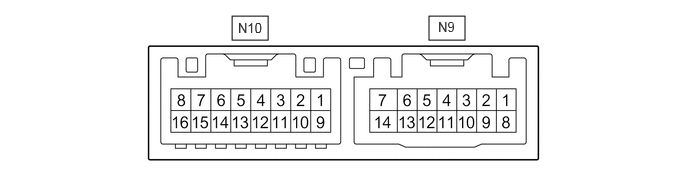
Disconnect the N9 outer mirror control ECU assembly (front passenger door) connector.
Measure the voltage and resistance according to the value(s) in the table below.
- HINT:
-
Measure the values on the wire harness side with the connector disconnected.
| Terminal No. (Symbol) | Wiring Color | Terminal Description | Condition | Specified Condition |
|---|---|---|---|---|
| N9-14 (BDR) - Body ground | GR - Body ground | +B power supply | Always | 11 to 14 V |
| N9-6 (CPUB) - Body ground | LA-L - Body ground | +B power supply | Always | 11 to 14 V |
| N9-5 (SIG) - Body ground | LA-B - Body ground | Ignition power supply | Engine switch off → on (IG) | Below 1 V → 11 to 14 V |
| N9-7 (GND) - Body ground | W-B - Body ground | Ground | Always | Below 1 Ω |
Reconnect the N9 outer mirror control ECU assembly (front passenger door) connector.
Measure the voltage according to the value(s) in the table below.
| Terminal No. (Symbol) | Wiring Color | Terminal Description | Condition | Specified Condition |
|---|---|---|---|---|
| N10-3 (MR+) - Body ground | B - Body ground | Power retract mirror motor drive voltage | Outer rear view mirror assembly (front passenger door) being retracted | 11 to 14 V |
| Outer rear view mirror assembly (front passenger door) stopped | Below 1 V | |||
| N10-11 (MR-) - Body ground | P - Body ground | Power retract mirror motor drive voltage | Outer rear view mirror assembly (front passenger door) returning | 11 to 14 V |
| Outer rear view mirror assembly (front passenger door) stopped | Below 1 V | |||
| N10-1 (RMVR) - N10-10 (RM+R) | BR - V | Vertical mirror motor drive voltage | Front passenger door mirror surface moving upward → stopped | 11 to 14 V → Below 1 V |
| N10-10 (RM+R) - N10-1 (RMVR) | V - BR | Vertical mirror motor drive voltage | Front passenger door mirror surface moving downward → stopped | 11 to 14 V → Below 1 V |
| N10-10 (RM+R) - N10-9 (RMHR) | V - LG | Horizontal mirror motor drive voltage | Front passenger door mirror surface moving right → stopped | 11 to 14 V → Below 1 V |
| N10-9 (RMHR) - N10-10 (RM+R) | LG - V | Horizontal mirror motor drive voltage | Front passenger door mirror surface moving left → stopped | 11 to 14 V → Below 1 V |
| N10-4 (HTR+) - N10-12 (HTR-) | LG - W | Mirror heater relay drive voltage | Mirror heater switch (rear window defogger switch) on | 11 to 14 V |
| N10-5 (RVC) - N10-14 (RE1) | G - BR | Mirror position sensor power supply | Engine switch on (IG) | 4.55 to 5.45 V |
| Engine switch off | Below 1 V | |||
| N10-6 (VSSR) - N9-7 (GND) | V - W-B | Mirror position sensor signal | Engine switch on (IG) | 0 to 5 V |
| N10-13 (HSSR) - N9-7 (GND) | GR - W-B | Mirror position sensor signal | Engine switch on (IG) | 0 to 5 V |
CHECK MAIN BODY ECU (MULTIPLEX NETWORK BODY ECU) AND INSTRUMENT PANEL JUNCTION BLOCK ASSEMBLY
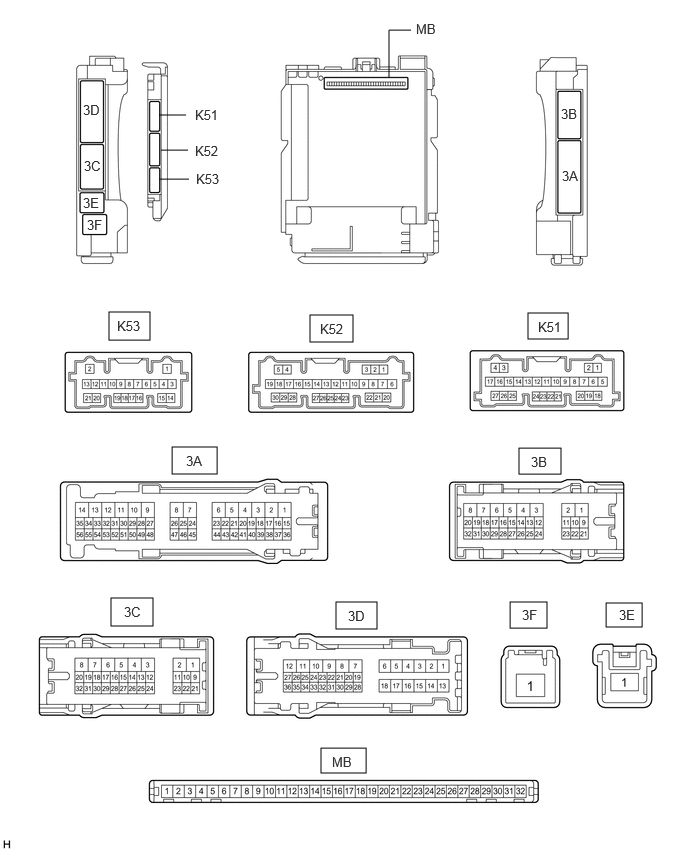
Disconnect the instrument panel junction block assembly and main body ECU (multiplex network body ECU) connectors.
Click herePower Source / Network>POWER DISTRIBUTION>MAIN BODY ECU>REMOVAL
Reconnect the instrument panel junction block assembly connectors.
Measure the voltage and resistance according to the value(s) in the table below.
- HINT:
-
Measure the values on the wire harness side with the connector disconnected.
| Terminal No. (Symbol) | Wiring Color | Terminal Description | Condition | Specified Condition |
|---|---|---|---|---|
| MB-31 (BECU) - Body ground | - | Battery power supply | Always | 11 to 14 V |
| MB-32 (IG) - Body ground | - | Ignition power supply (IG signal) | Engine switch on (IG) | 11 to 14 V |
| Engine switch off | Below 1 V | |||
| MB-30 (ACC) - Body ground | - | Ignition power supply (ACC signal) | Engine switch on (ACC) | 11 to 14 V |
| Engine switch off | Below 1 V | |||
| MB-11 (GND1) - Body ground | - | Ground | Always | Below 1 Ω |
Connect the main body ECU (multiplex network body ECU) connectors.
Measure the voltage according to the value(s) in the table below.
| Tester Connection | Wiring Color | Terminal Description | Condition | Specified Condition |
|---|---|---|---|---|
| K53-7 (MIRB) - K53-9 (MIRE) | L - W | Mirror surface adjust switch signal | ·
Engine switch on (ACC) ·
Mirror surface adjust switch up |
Below 1.7 V |
·
Engine switch on (ACC) ·
Mirror surface adjust switch right |
Below 2.7 V | |||
·
Engine switch on (ACC) ·
Mirror surface adjust switch down |
Below 3.5 V | |||
·
Engine switch on (ACC) ·
Mirror surface adjust switch left |
Below 4 V | |||
·
Engine switch on (ACC) ·
Mirror surface adjust switch off |
3.8 to 5 V | |||
| K53-8 (MIRS) - K53-9 (MIRE) | GR - W | Mirror select switch signal | ·
Engine switch on (ACC) ·
Mirror select switch L |
Below 2 V |
·
Engine switch on (ACC) ·
Mirror select switch R |
Below 1 V | |||
·
Engine switch on (ACC) ·
Mirror select switch off |
3.8 to 5.0 V | |||
| K53-16 (RET) - K53-9 (MIRE) | B - W | Mirror retract switch signal | ·
Engine switch on (ACC) ·
Retractable outer mirror switch not in retracted position |
11 to 14 V |
·
Engine switch on (ACC) ·
Retractable outer mirror switch in retracted position |
Below 1 V | |||
| K53-6 (AMR) - K53-9 (MIRE) | BE - W | Mirror retract switch signal | ·
Engine switch on (ACC) ·
Retractable outer mirror switch not in auto position |
11 to 14 V |
·
Engine switch on (ACC) ·
Retractable outer mirror switch in auto position |
Below 1 V |
CHECK AIR CONDITIONING AMPLIFIER ASSEMBLY
Click hereVehicle Exterior>WINDOW / GLASS>WINDOW DEFOGGER SYSTEM>TERMINALS OF ECU
CHECK AIR CONDITIONING CONTROL ASSEMBLY
Click hereVehicle Exterior>WINDOW / GLASS>WINDOW DEFOGGER SYSTEM>TERMINALS OF ECU