EXTERIOR PANELS / TRIM REAR DOOR BELT MOULDING INSTALLATION
CAUTION / NOTICE / HINT
- HINT:
- ·
Use the same procedure for the RH side and LH side.
·The following procedure is for the LH side.
PROCEDURE

 75740
1.INSTALL REAR DOOR BELT MOULDING ASSEMBLY
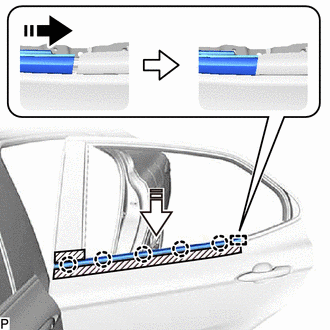

|
Install in this Direction (1) |

|
Install in this Direction (2) |
Engage the guide and 5 claws to install a new rear door belt moulding assembly as shown in the illustration.
68104
2.INSTALL REAR DOOR GLASS SUB-ASSEMBLY
68124B
3.INSTALL REAR DOOR QUARTER WINDOW GLASS
67408F
4.INSTALL REAR DOOR REAR LOWER WINDOW FRAME SUB-ASSEMBLY
67872
5.CONNECT REAR DOOR WEATHERSTRIP
68152C
6.INSTALL REAR DOOR GLASS RUN
67858B
7.INSTALL REAR DOOR PANEL PROTECTOR
67848A
8.INSTALL REAR DOOR NO. 1 VENT SEAL
67842E
9.INSTALL REAR DOOR SERVICE HOLE COVER
67844A
10.INSTALL REAR DOOR NO. 2 SERVICE HOLE COVER
68174A
11.INSTALL REAR DOOR INNER GLASS WEATHERSTRIP
67604
12.INSTALL REAR DOOR TRIM BOARD SUB-ASSEMBLY
74260
13.INSTALL REAR ARMREST ASSEMBLY
14.INSTALL REAR POWER WINDOW REGULATOR SWITCH ASSEMBLY WITH REAR DOOR UPPER ARMREST BASE PANEL
74038B
15.INSTALL REAR DOOR ARMREST COVER SUB-ASSEMBLY
16.CONNECT CABLE TO NEGATIVE BATTERY TERMINAL
for A25A-FKS:
Click hereGeneral>MAINTENANCE>A25A-FKS BATTERY>INSTALLATION
for 2GR-FKS:
Click hereGeneral>MAINTENANCE>2GR-FKS BATTERY>INSTALLATION
for M20A-FKS:
17.INITIALIZE POWER WINDOW CONTROL SYSTEM
18.INSPECT POWER WINDOW OPERATION