HEATING / AIR CONDITIONING AIR CONDITIONING SYSTEM B1423 Open in Pressure Sensor Circuit / Abnormal Refrigerant Pressure
DESCRIPTION
This DTC is stored if refrigerant pressure on the high pressure side is extremely low (0.176 MPaG (1.8 kgf/cm2, 26 psi) or less) or extremely high (3.025 MPaG (30.8 kgf/cm2, 439 psi) or more). The air conditioner pressure sensor, which is installed to the high pressure side pipe to detect refrigerant pressure, sends a refrigerant pressure signal to the air conditioning amplifier assembly. The air conditioning amplifier assembly converts this signal to a pressure value according to the sensor characteristics and uses it to control the compressor.
| DTC No. | Detection Item | DTC Detection Condition | Trouble Area | Memory |
|---|---|---|---|---|
| B1423 | Open in Pressure Sensor Circuit / Abnormal Refrigerant Pressure | ·
Open or short in air conditioner pressure sensor circuit ·
Refrigerant pressure on high pressure side is extremely low (0.176 MPaG (1.8 kgf/cm2, 26 psi) or less) or extremely high (3.025 MPaG (30.8 kgf/cm2, 439 psi) or more) |
·
Air conditioner pressure sensor ·
Harness or connector ·
Air conditioning amplifier assembly ·
Cooler expansion valve (blocked, stuck) ·
Cooler condenser assembly (blocked, deterioration of cooling capacity due to dirt) ·
Cooler dryer (moisture in the refrigerant cycle cannot be absorbed) ·
Cooling fan system (cooler condenser assembly cannot be cooled down) ·
Air conditioning system (leaks, blocked) ·
Refrigerant volume (excessive, low) |
- |
WIRING DIAGRAM
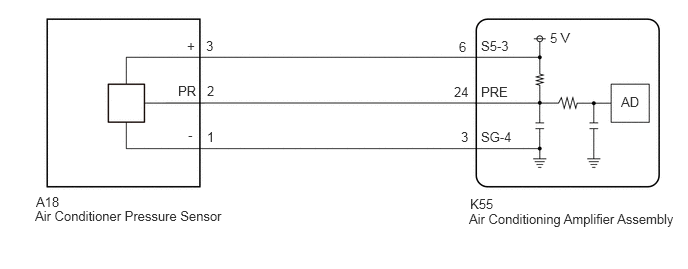
CAUTION / NOTICE / HINT
- NOTICE:
- ·
Be sure to check the refrigerant volume first when this DTC is output because this DTC can also be stored if there is no refrigerant in the cycle.
Click hereVehicle Interior>HEATING / AIR CONDITIONING>REFRIGERANT>REPLACEMENT
·If DTC B1423 and B14B8 are output at the same time, troubleshoot for DTC B14B8 first.
Click hereVehicle Interior>HEATING / AIR CONDITIONING>AIR CONDITIONING SYSTEM>B14B8
- HINT:
-
Make sure that the connector is properly connected. If it is not, securely connect it and check for DTCs again.
PROCEDURE
Check for DTCs.
- Body Electrical > Air Conditioner > Trouble Codes
- 50001 121
- Result:
Result Proceed to B14B8 is not output A B14B8 is output B
A
B
Connect the GTS to the DLC3.
Turn the power switch on (IG).
Turn the GTS on.
Enter the following menus: Body Electrical / Air Conditioner / Data List.
Read the Data List according to the display on the GTS.
- Body Electrical > Air Conditioner > Data List
-
Tester Display Measurement Item Range Normal Condition Diagnostic Note Regulator Pressure Sensor Air conditioner pressure sensor Min.: -0.4566 MPaG
Max.: 3.2943 MPaGActual refrigerant pressure displayed ·Refrigerant line (gas leak etc.)
·Air conditioner pressure sensor circuit malfunction
- Body Electrical > Air Conditioner > Data List
-
Tester Display Regulator Pressure Sensor - 50003 121 52
Install a manifold gauge set.
Click hereVehicle Interior>HEATING / AIR CONDITIONING>REFRIGERANT>ON-VEHICLE INSPECTION
Compare the values displayed in the Data List and on the manifold gauge set.
- Result:
Result Proceed to Data List value and manifold gauge set value do not match and Data List value: 0.176 MPaG (1.8 kgf/cm2, 26 psi) or less A Data List value and manifold gauge set value do not match and Data List value: 3.025 MPaG (30.8 kgf/cm2, 439 psi) or more B Data List value matches manifold gauge set value C
A
B
C
Connect the GTS to the DLC3.
Turn the power switch on (IG).
Turn the GTS on.
Enter the following menus: Body Electrical / Air Conditioner / Data List.
Read the Data List according to the display on the GTS.
- Body Electrical > Air Conditioner > Data List
-
Tester Display Measurement Item Range Normal Condition Diagnostic Note Regulator Pressure Sensor Air conditioner pressure sensor Min.: -0.4566 MPaG
Max.: 3.2943 MPaGActual refrigerant pressure displayed ·Refrigerant line (gas leak etc.)
·Air conditioner pressure sensor circuit malfunction
- Body Electrical > Air Conditioner > Data List
-
Tester Display Regulator Pressure Sensor - 50003 121 52
- OK:
Disconnecting the A18 connector of the air conditioner pressure sensor causes the Data List value to change.
- Result:
Result Proceed to Regulator pressure sensor value changes A Regulator pressure sensor value does not change B
A
B
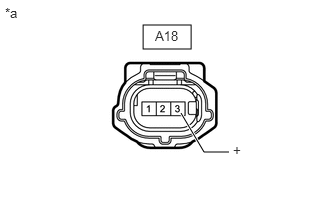
| *a | Front view of wire harness connector
(to Air Conditioner Pressure Sensor) |
Measure the voltage according to the value(s) in the table below.
- Standard Voltage:
Tester Connection Condition Specified Condition A18-3 (+) - Body ground Power switch on (IG) 4.75 to 5.25 V
- Result:
Proceed to OK NG
OK
NG
Disconnect the K55 air conditioning amplifier assembly connector.
Measure the resistance according to the value(s) in the table below.
- Standard Resistance:
Tester Connection Condition Specified Condition A18-3 (+) - K55-6 (S5-3) Always Below 1 Ω
- Result:
Proceed to OK NG
OK
NG
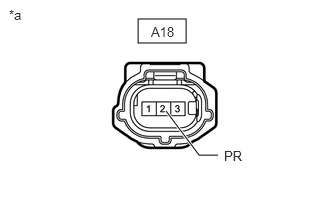
| *a | Front view of wire harness connector
(to Air Conditioner Pressure Sensor) |
Measure the voltage according to the value(s) in the table below.
- Standard Voltage:
Tester Connection Condition Specified Condition A18-2 (PR) - Body ground Power switch on (IG) 3.0 to 5.25 V
- Result:
Proceed to OK NG
OK
NG
Disconnect the K55 air conditioning amplifier assembly connector.
Measure the resistance according to the value(s) in the table below.
- Standard Resistance:
Tester Connection Condition Specified Condition A18-2 (PR) or K55-24 (PRE) - Other terminals and body ground Always 10 kΩ or higher
- Result:
Proceed to OK NG
OK
NG
Disconnect the A18 air conditioner pressure sensor connector.
Measure the resistance according to the value(s) in the table below.
- Standard Resistance:
Tester Connection Condition Specified Condition A18-1 (-) - Body ground Always Below 1 Ω
- Result:
Proceed to OK NG
OK
NG
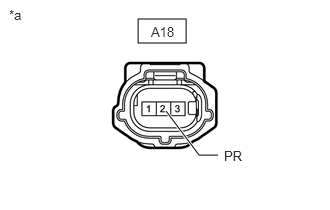
| *a | Front view of wire harness connector
(to Air Conditioner Pressure Sensor) |
Measure the voltage according to the value(s) in the table below.
- Standard Voltage:
Tester Connection Condition Specified Condition A18-2 (PR) - Body ground Power switch on (IG) 3.0 to 5.25 V
- Result:
Result Proceed to 5.25 V or higher A 3.0 to 5.25 V B Below 3.0 V C
A
B
C
Disconnect the K55 air conditioning amplifier assembly connector.
Measure the resistance according to the value(s) in the table below.
- Standard Resistance:
Tester Connection Condition Specified Condition A18-2 (PR) or K55-24 (PRE) - Other terminals Always 10 kΩ or higher
- Result:
Proceed to OK NG
OK
NG
Measure the resistance according to the value(s) in the table below.
- Standard Resistance:
Tester Connection Condition Specified Condition A18-3 (+) - A18-2 (PR) Power switch off 180 to 220 kΩ
- HINT:
-
After turning the power switch off, wait at least 30 seconds before performing the measurement.
- Result:
Proceed to OK NG
OK
NG
Disconnect the K55 air conditioning amplifier assembly connector.
Measure the resistance according to the value(s) in the table below.
- Standard Resistance:
Tester Connection Condition Specified Condition A18-2 (PR) or K55-24 (PRE) - A18-3 (+) or K55-6 (S5-3) Always 10 kΩ or higher
- Result:
Proceed to OK NG
OK
NG
Disconnect the K55 air conditioning amplifier assembly connector.
Measure the resistance according to the value(s) in the table below.
- Standard Resistance:
Tester Connection Condition Specified Condition A18-2 (PR) - K55-24 (PRE) Always Below 1 Ω
- Result:
Proceed to OK NG
OK
NG
Disconnect the K55 air conditioning amplifier assembly connector.
Measure the resistance according to the value(s) in the table below.
- Standard Resistance:
Tester Connection Condition Specified Condition A18-1 (-) - K55-3 (SG-4) Always Below 1 Ω
- Result:
Proceed to OK NG
OK
NG