INTERIOR PANELS / TRIM REAR SUNSHADE SYSTEM TERMINALS OF ECU
CHECK INSTRUMENT PANEL JUNCTION BLOCK ASSEMBLY AND MAIN BODY ECU (MULTIPLEX NETWORK BODY ECU)
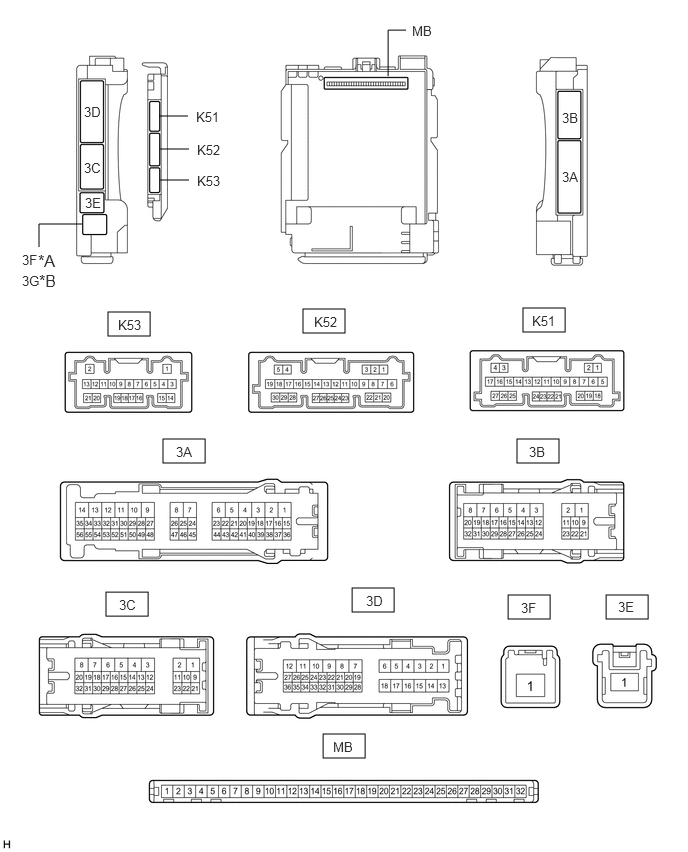
| *A | for LHD | *B | for RHD |
Remove the main body ECU (multiplex network body ECU) from the instrument panel junction block assembly.
Click herePower Source / Network>POWER DISTRIBUTION>MAIN BODY ECU>REMOVAL
Reconnect the instrument panel junction block assembly connectors.
Measure the voltage and resistance according to the value(s) in the table below.
- HINT:
-
Measure the values on the wire harness side with the connector disconnected.
| Terminal No. (Symbol) | Wiring Color | Terminal Description | Condition | Specified Condition |
|---|---|---|---|---|
| MB-11 (GND1) - Body ground | - | Ground | Always | Below 1 Ω |
| MB-31 (BECU) - Body ground | - | Auxiliary battery power supply | Power switch off | 11 to 14 V |
| MB-32 (IG) - Body ground | - | IG power supply | Power switch off | Below 1 V |
| Power switch on (IG) | 11 to 14 V | |||
| MB-30 (ACC) - Body ground | - | ACC power supply | Power switch off | Below 1 V |
| Power switch on (ACC) | 11 to 14 V |
Install the main body ECU (multiplex network body ECU) to the instrument panel junction block assembly.
Click herePower Source / Network>POWER DISTRIBUTION>MAIN BODY ECU>INSTALLATION
Measure the voltage according to the value(s) in the table below.
| Terminal No. (Symbol) | Wiring Color | Terminal Description | Condition | Specified Condition |
|---|---|---|---|---|
| K51-6 (REV) - Body ground | B - Body ground | Reverse signal | Power switch on (IG), shift lever in any position other than R | 11 to 14 V |
| Power switch on (IG), shift lever in R | Below 1 V |
CHECK REAR WINDOW SHADE ASSEMBLY

Disconnect the R64 rear window shade assembly connector.
Measure the voltage and resistance according to the value(s) in the table below.
- HINT:
-
Measure the values on the wire harness side with the connector disconnected.
| Terminal No. (Symbol) | Wiring Color | Terminal Description | Condition | Specified Condition |
|---|---|---|---|---|
| R64-8 (B) - Body ground | LA-G - Body ground | Auxiliary battery power supply | Power switch off | 11 to 14 V |
| R64-7 (IG) - Body ground | B - Body ground | IG power supply | Power switch off | Below 1 V |
| Power switch on (IG) | 11 to 14 V | |||
| R64-1 (E) - Body ground | LA - Body ground | Ground | Always | Below 1 Ω |
Reconnect the R64 rear window shade assembly connector.
Measure the voltage according to the value(s) in the table below.
| Terminal No. (Symbol) | Wiring Color | Terminal Description | Condition | Specified Condition |
|---|---|---|---|---|
| R64-3 (REV) - R64-1 (E) | LG - LA | Reverse signal | Power switch on (IG), shift lever in any position other than R | 11 to 14 V |
| Power switch on (IG), shift lever in R | Below 1 V | |||
| R64-5 (SW) - R64-1 (E) | GR - LA | Rear window shade assembly operation signal | Procedure:
1.
Power switch on (IG) 2.
Select Open or Close on the rear sunshade screen of the multi-information display. |
5.5 V or higher → Below 1 V → 5.5 V or higher |
| R64-4 (RSW) - R64-1 (E)* | BE - LA | Rear window shade assembly operation signal | Power switch on (IG), rear sunshade switch (cooler control switch assembly) not touched | 5.5 V or higher |
| Power switch on (IG), rear sunshade switch (cooler control switch assembly) touched | 5.5 V or higher → Below 1 V → 5.5 V or higher |
*: w/ Cooler Control Switch Assembly
CHECK COMBINATION METER ASSEMBLY
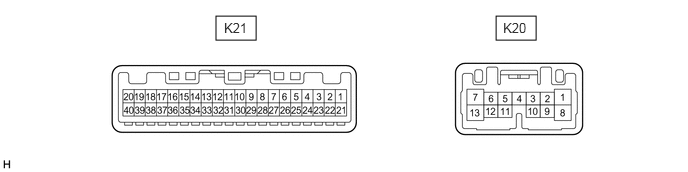
Disconnect the K21 combination meter assembly connector.
Measure the voltage and resistance according to the value(s) in the table below.
- HINT:
-
Measure the values on the wire harness side with the connector disconnected.
| Terminal No. (Symbol) | Wiring Color | Terminal Description | Condition | Specified Condition |
|---|---|---|---|---|
| K21-40 (B) - Body ground | LA-B - Body ground | Auxiliary battery power supply | Power switch off | 11 to 14 V |
| K21-39 (IG+) - Body ground | LA-GR - Body ground | IG power supply | Power switch off | Below 1 V |
| Power switch on (IG) | 11 to 14 V | |||
| K21-21 (ES) - Body ground | W-B - Body ground | Ground | Always | Below 1 Ω |
Reconnect the K21 combination meter assembly connector.
Measure the voltage according to the value(s) in the table below.
| Terminal No. (Symbol) | Wiring Color | Terminal Description | Condition | Specified Condition |
|---|---|---|---|---|
| K21-22 (ECU) - Body ground | BE - Body ground | Rear window shade assembly operation signal | Procedure:
1.
Power switch on (IG) 2.
Select Open or Close on the rear sunshade screen of the multi-information display. |
5.5 V or higher → Below 1 V → 5.5 V or higher |