SEAT FRONT SEAT ASSEMBLY(for Manual Seat) INSTALLATION
CAUTION / NOTICE / HINT
- CAUTION:
- ·
Be sure to read Precaution thoroughly before servicing.
Click hereVehicle Interior>SUPPLEMENTAL RESTRAINT SYSTEMS>AIRBAG SYSTEM>PRECAUTION
·Wear protective gloves. Sharp areas on the parts may injure your hands.
PROCEDURE

 1.INSTALL FRONT SEAT ASSEMBLY RH
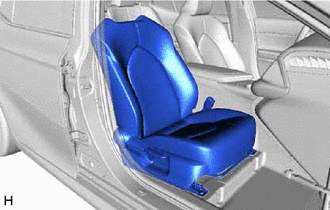
Place the front seat assembly RH in the cabin.
- NOTICE:
-
Be careful not to damage the vehicle body.
Connect the front seat airbag assembly RH connector under the front seat assembly RH.
Before connecting the connector, check that the position of the housing lock is correct as shown in the illustration.
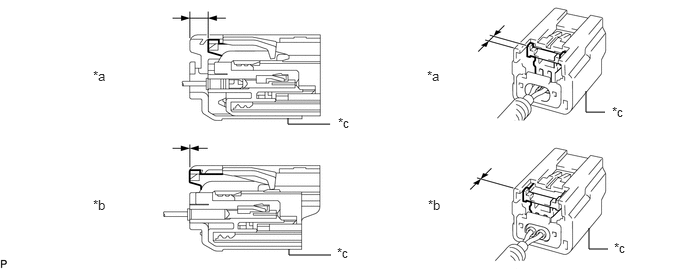
| *a | Correct | *b | Incorrect |
| *c | Yellow CPA | - | - |
Be sure to engage the connectors until they are locked (when locking, make sure that a click sound can be heard).
- NOTICE:
- ·
When connecting any airbag connector, take care not to damage the airbag wire harness.
- ·
When engaged, the white housing lock will slide. Be sure not to hold the white housing lock and upper part of the yellow CPA, as it may result in an insecure fit.
Connect each connector and engage each clamp under the front seat assembly RH.
Temporarily install the front seat assembly RH with the 4 bolts.
Operate the seat track adjusting handle and move the front seat assembly RH to the rearmost position.
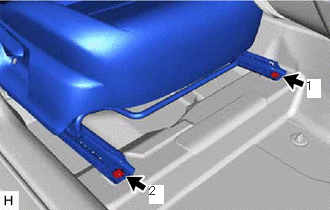
Using a T50 "TORX" socket wrench, tighten the 2 bolts on the front side of the front seat assembly RH.
- Torque:
- 37 N*m (377 kgf*cm, 27 ft.*lbf)
- NOTICE:
-
Tighten the bolts in the order shown in the illustration.
Operate the seat track adjusting handle and move the front seat assembly RH to the foremost position.
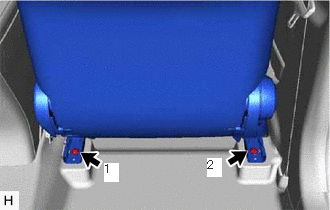
Using a T50 "TORX" socket wrench, tighten the 2 bolts on the rear side of the front seat assembly RH.
- Torque:
- 37 N*m (377 kgf*cm, 27 ft.*lbf)
- NOTICE:
-
Tighten the bolts in the order shown in the illustration.
2.INSPECT SEAT SLIDE ADJUSTER LOCK
While performing a sliding operation of the front seat assembly RH, check that the left and right adjusters move together smoothly and lock simultaneously. If the seat adjusters do not lock simultaneously, loosen the front seat assembly RH installation bolts and adjust the adjuster position.
72157F
3.INSTALL REAR INNER SEAT TRACK BRACKET COVER RH
Operate the seat track adjusting handle and move the front seat assembly RH to the foremost position.
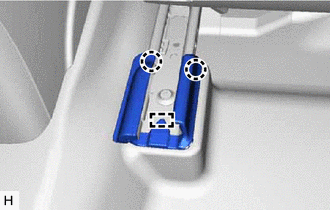
Engage the 2 claws and guide to install the rear inner seat track bracket cover RH.
72137T
4.INSTALL REAR OUTER SEAT TRACK BRACKET COVER RH
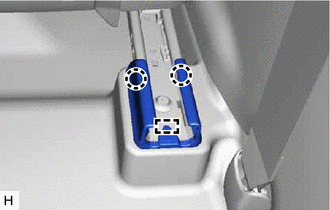
Engage the 2 claws and guide to install the rear outer seat track bracket cover RH.
72123E
5.INSTALL FRONT INNER SEAT TRACK BRACKET COVER RH
Operate the seat track adjusting handle and move the front seat assembly RH to the rearmost position.
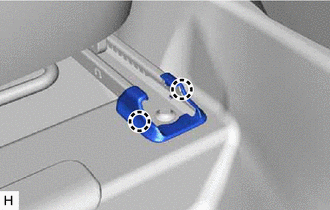
Engage the 2 claws to install the front inner seat track bracket cover RH.
72123A
6.INSTALL FRONT OUTER SEAT TRACK BRACKET COVER RH
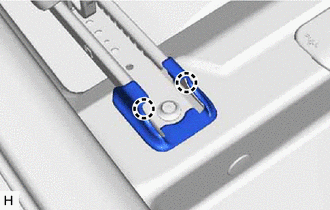
Engage the 2 claws to install the front outer seat track bracket cover RH.
71910A
7.INSTALL FRONT SEAT HEADREST ASSEMBLY
Install the front seat headrest assembly to the front seat assembly RH.
8.CONNECT CABLE TO NEGATIVE AUXILIARY BATTERY TERMINAL
Click hereGeneral>MAINTENANCE>AUXILIARY BATTERY>INSTALLATION
- NOTICE:
-
When disconnecting the cable, some systems need to be initialized after the cable is reconnected.
-
Click hereGeneral>INTRODUCTION>REPAIR INSTRUCTION>INITIALIZATION
64718C
9.INSTALL LUGGAGE TRIM SERVICE HOLE COVER
10. PERFORM DIAGNOSTIC SYSTEM CHECK
11. PERFORM ZERO POINT CALIBRATION AND SENSITIVITY CHECK