DOOR LOCK WIRELESS DOOR LOCK CONTROL SYSTEM No Answer-Back
DESCRIPTION
In some cases, wireless door lock control functions are normal but the hazard warning light and wireless door lock buzzer answer-back function* do not operate. In such cases, hazard warning light and wireless door lock buzzer* signal outputs from the main body ECU (multiplex network body ECU) may be malfunctioning.
*: w/ Wireless Door Lock Buzzer Answer-back Function
WIRING DIAGRAM
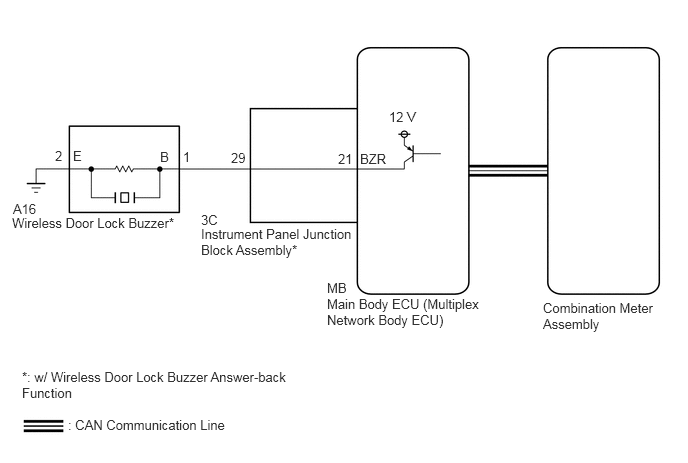
CAUTION / NOTICE / HINT
- NOTICE:
- ·
The wireless door lock control system uses the CAN communication system. Inspect the communication function by following How to Proceed with Troubleshooting. Troubleshoot the wireless door lock control system after confirming that the communication system is functioning properly.
Click hereVehicle Interior>DOOR LOCK>WIRELESS DOOR LOCK CONTROL SYSTEM>HOW TO PROCEED WITH TROUBLESHOOTING
·Before replacing the main body ECU (multiplex network body ECU), refer to Service Bulletin.
·Before performing the inspection, check that DTC B1242 is not output.
PROCEDURE
Connect the GTS to the DLC3.
Turn the power switch on (IG).
Turn the GTS on.
Enter the following menus: Customize Setting / Wireless Door Lock.
Select the setting by referring to the table below.
- Wireless Door Lock
-
Tester Display Description Default Setting ECU Hazard Answer Back Function that flashes the hazard warning lights once when the doors are locked by wireless operation and twice when the doors are unlocked by wireless operation ON 0:OFF,1:ON Main body ECU (Multiplex network body ECU) Wireless Buzzer Resp Function that enables/disables the wireless door lock buzzer response* ON 0:OFF,1:ON Main body ECU (Multiplex network body ECU) Wireless Buzzer Vol Function that adjusts the wireless door lock buzzer volume* Level5 0000:Level7,0001:Level6,0010:Level5,0011:Level4,0100:Level3,0101:Level2,0110:Level1,0111:Level0 Main body ECU (Multiplex network body ECU) - 50006 1
*: w/ Wireless Door Lock Buzzer Answer-back Function
- Result:
Result Proceed to All settings are ON and other than Level0 A A setting is OFF or Level0 B
A
B
Check the wireless door lock control function using the electrical key transmitter sub-assembly.
Click hereVehicle Interior>DOOR LOCK>WIRELESS DOOR LOCK CONTROL SYSTEM>OPERATION CHECK
- Result:
Result Proceed to Wireless door lock/unlock operates properly. A Wireless door lock/unlock does not operate properly. B
A
B
Connect the GTS to the DLC3.
Turn the power switch on (IG).
Turn the GTS on.
Enter the following menus: Body Electrical / Main Body / Data List.
Read the Data List according to the display on the GTS.
- Body Electrical > Main Body > Data List
-
Tester Display Measurement Item Range Normal Condition Diagnostic Note FR Door Lock Pos Front door RH unlock detection switch signal LOCK or UNLOCK LOCK: Front door RH locked
UNLOCK: Front door RH unlocked- FL Door Lock Pos Front door LH unlock detection switch signal LOCK or UNLOCK LOCK: Front door LH locked
UNLOCK: Front door LH unlocked- RR-Door Lock Pos SW Rear door RH unlock detection switch signal OFF or ON OFF: Rear door RH locked
ON: Rear door RH unlocked- RL-Door Lock Pos SW Rear door LH unlock detection switch signal OFF or ON OFF: Rear door LH locked
ON: Rear door LH unlocked-
- Body Electrical > Main Body > Data List
-
Tester Display FR Door Lock Pos FL Door Lock Pos RR-Door Lock Pos SW RL-Door Lock Pos SW - 50003 123 196,198,51,52
- OK:
The GTS display changes correctly in response to the lock/unlock operation.
- Result:
Proceed to OK NG
OK
NG
Check the wireless answer-back operation using the electrical key transmitter sub-assembly.
Click hereVehicle Interior>DOOR LOCK>WIRELESS DOOR LOCK CONTROL SYSTEM>OPERATION CHECK
- Result:
Result Proceed to Only wireless door lock buzzer answer-back does not occur. (w/ Wireless Door Lock Buzzer Answer-back Function) A Only hazard warning light answer-back does not occur. B
A
B
Connect the GTS to the DLC3.
Turn the power switch on (IG).
Turn the GTS on.
Enter the following menus: Body Electrical / Main Body / Data List.
Perform the Active Test according to the display on the GTS.
- Body Electrical > Main Body > Active Test
-
Tester Display Measurement Item Control Range Diagnostic Note Wireless Buzzer Wireless door lock buzzer OFF/ON -
- Body Electrical > Main Body > Active Test
-
Tester Display Wireless Buzzer - 50004 123 12
- Result:
Result Proceed to Wireless door lock buzzer does not sound A Wireless door lock buzzer sounds B
A
B
Disconnect the A16 wireless door lock buzzer connector.
Perform the Active Test according to the display on the GTS.
- Body Electrical > Main Body > Active Test
-
Tester Display Measurement Item Control Range Diagnostic Note Wireless Buzzer Wireless door lock buzzer OFF/ON -
- Body Electrical > Main Body > Active Test
-
Tester Display Wireless Buzzer - 50004 123 12
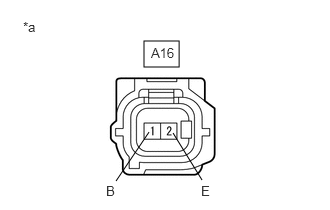
| *a | Front view of wire harness connector
(to Wireless Door Lock Buzzer) |
Measure the voltage according to the value(s) in the table below.
- Standard Voltage:
Tester Connection Condition Specified Condition A16-1 (B) - A16-2 (E) Active Test Wireless Buzzer is OFF Below 1 V Active Test Wireless Buzzer is ON Pulse generation
(frequency: 2 kHz, high voltage: 11 to 14 V, low voltage: below 1 V)
- Result:
Proceed to OK NG
OK
NG
Remove the main body ECU (multiplex network body ECU) from the instrument panel junction block assembly.
Click herePower Source / Network>POWER DISTRIBUTION>MAIN BODY ECU>REMOVAL
Reconnect the instrument panel junction block assembly connectors.
Measure the resistance according to the value(s) in the table below.
- Standard Resistance:
Tester Connection Condition Specified Condition A16-1 (B) - MB-21 (BZR) Always Below 1 Ω A16-2 (E) - Body ground Always Below 1 Ω A16-1 (B) or MB-21 (BZR) - Other terminals and body ground Always 10 kΩ or higher
- Result:
Proceed to OK NG
OK
NG
Disconnect the 3C instrument panel junction block assembly connector.
Measure the resistance according to the value(s) in the table below.
- Standard Resistance:
Tester Connection Condition Specified Condition A16-1 (B) - 3C-29 Always Below 1 Ω A16-1 (B) or 3C-29 - Other terminals and body ground Always 10 kΩ or higher
- Result:
Proceed to OK NG
OK
NG
Check that the hazard warning lights blink when the hazard warning signal switch is pressed.
- OK:
Hazard warning lights blink.
- Result:
Result Proceed to OK A NG (w/ Automatic Headlight Beam Level Control System) B NG (w/o Automatic Headlight Beam Level Control System) C
A
B
C