Home › Vehicle Interior › INTERIOR PANELS / TRIM › ROOF HEADLINING › from 2021.02
RM33C0E _58 Vehicle Interior _065466 INTERIOR PANELS / TRIM _0328285 ROOF HEADLINING A

INTERIOR PANELS / TRIM  ROOF HEADLINING  REASSEMBLY  


PROCEDURE

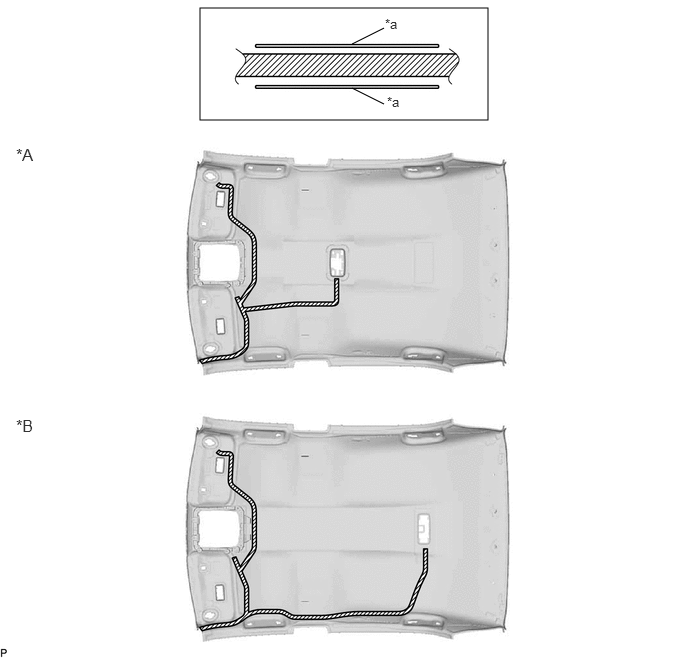
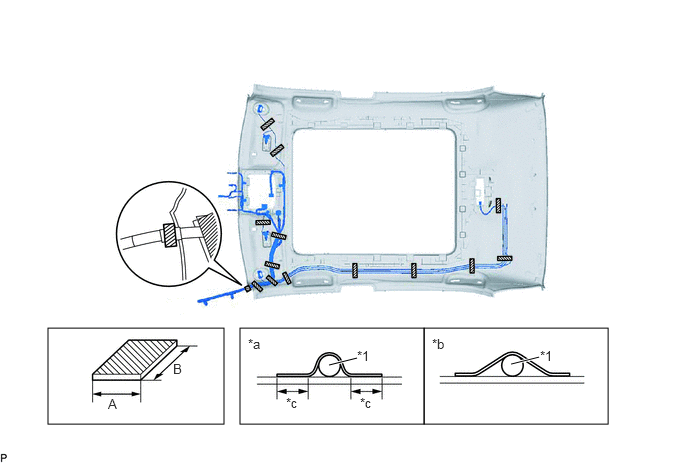
Hide 82171 1.INSTALL NO. 1 ROOF WIRE (for Normal Roof)

a.

Apply butyl tape as shown in the illustration.
B481820C01
2.083,0.083 5.083,1.25 3,1.167 4,1.083 3.667,0.917 false 4,0.292 3.667,0.458 false 0.167,1.51 0.542,1.75 0.375,0.24 12 false *A 0.167,4.333 0.542,4.573 0.375,0.24 12 false *B 4.031,0.979 4.344,1.177 0.313,0.198 10 false *a 4.01,0.167 4.323,0.365 0.313,0.198 10 false *a
*A w/ Room Light Assembly *B w/ Spot Light Assembly
*a Marking - -
V100155

Butyl Tape - -


NOTICE:

Securely attach the butyl tape.


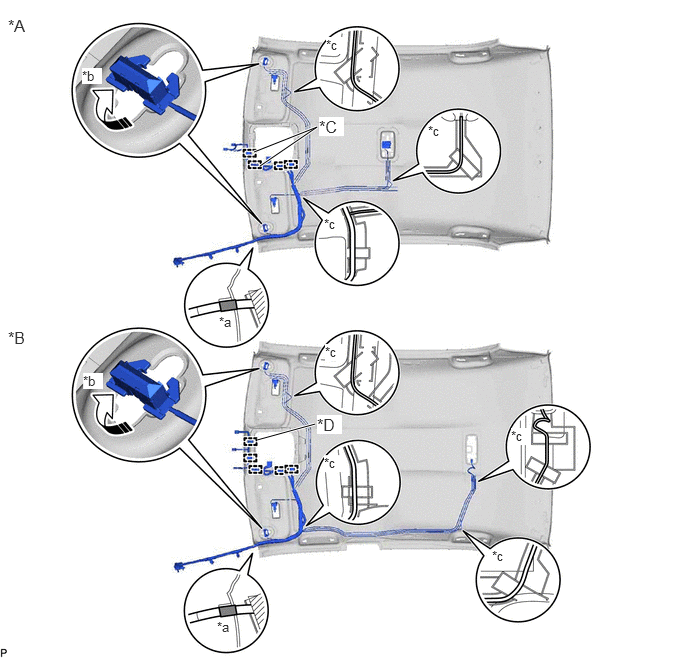
b.

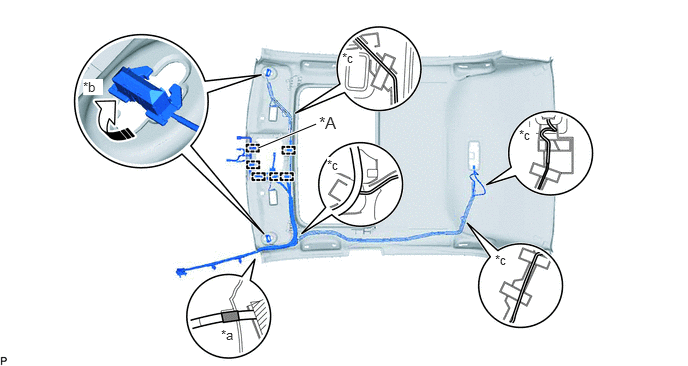
Align the marking tape on the No. 1 roof wire with the tab on the front side of the roof headlining.
B521171C01
2.646,1.583 3.302,1.323 3.302,1.323 2.708,1.729 true 2.677,4.583 3.281,4.417 true 0.083,0.167 0.479,0.573 0.396,0.406 12 false *A 0.083,3.417 0.417,3.75 0.333,0.333 12 false *B 2.281,3.271 2.594,3.427 0.313,0.156 10 false *a 0.854,0.708 1.063,0.875 0.208,0.167 10 true *b 3.396,0.385 3.604,0.563 0.208,0.177 10 true *c 4.458,1.281 4.667,1.458 0.208,0.177 10 true *c 3.375,2.25 3.583,2.427 0.208,0.177 10 true *c 3.385,3.583 3.594,3.76 0.208,0.177 10 true *c 5.323,4.458 5.531,4.635 0.208,0.177 10 true *c 3.375,4.74 3.583,4.917 0.208,0.177 10 true *c 5.125,5.708 5.333,5.885 0.208,0.177 10 true *c 2.26,6.448 2.573,6.604 0.313,0.156 10 false *a 0.865,3.885 1.073,4.052 0.208,0.167 10 true *b 3.323,1.219 3.583,1.417 0.26,0.198 12 true *C 3.302,4.323 3.563,4.521 0.26,0.198 12 true *D
*A w/ Room Light Assembly *B w/ Spot Light Assembly
*C w/ EC Mirror or Pre-collision System *D for LHD with Rain Sensor
*a Marking Tape *b 90°
*c Adjustment Area - -
V113147

Rotation Direction - -


c.

Engage each clamp.


d.

Turn the 2 visor connectors clockwise approximately 90° to install them to the roof headlining.


e.

Attach the No. 1 roof wire with the butyl tape.

NOTICE:
·

Securely attach the No. 1 roof wire.

·

If any of the No. 1 roof wire is left loose, it will cause an abnormal noise.

·

Make sure to attach the No. 1 roof wire without leaving any of it loose.


HINT:

Secure the extra length of the No. 1 roof wire in the adjustment area.


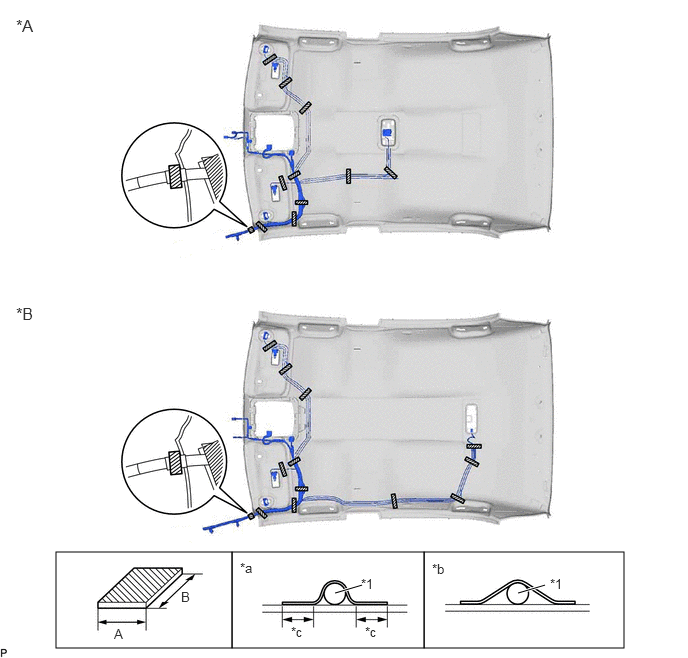
f.

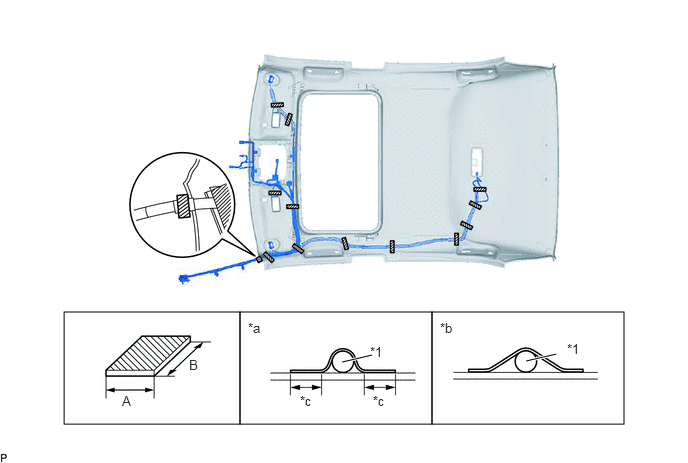
Install the No. 1 roof wire to the roof headlining with adhesive tape.
B481824C02
0.583,5.75 2.417,6.75 1.833,1 2.417,5.75 4.417,6.75 2,1 4.417,5.75 6.5,6.75 2.083,1 3.49,6.177 3.771,6.094 true 5.396,6.177 5.677,6.094 true 0.167,0.167 0.583,0.5 0.417,0.333 12 false *A 0.167,3.167 0.583,3.5 0.417,0.333 12 false *B 3.76,6 4.073,6.156 0.313,0.156 10 false *1 2.5,5.833 2.813,5.99 0.313,0.156 10 false *a 4.5,5.844 4.813,6 0.313,0.156 10 false *b 3.031,6.5 3.344,6.656 0.313,0.156 10 false *c 5.729,6 6.042,6.156 0.313,0.156 10 false *1 3.802,6.5 4.115,6.656 0.313,0.156 10 false *c 1.188,6.521 1.5,6.677 0.313,0.156 10 false A 1.885,6.135 2.198,6.292 0.313,0.156 10 false B
*A w/ Room Light Assembly *B w/ Spot Light Assembly
*1 No. 1 Roof Wire - -
*a Correct *b Incorrect
*c 10 mm (0.394 in.) or more - -
V100155

Adhesive Tape - -


Adhesive Tape Size
Area Dimension Area Dimension
A 20 mm (0.787 in.) B 80 mm (3.15 in.) or more

NOTICE:
·

Apply the tape securely in place.

·

Do not touch the adhesive surface when applying the tape to prevent adhesion failure.


Hide 82171 2.INSTALL NO. 1 ROOF WIRE (for Moon Roof)

a.

Apply butyl tape as shown in the illustration.
B490032C01
1.917,0.167 5.083,1.333 3.167,1.167 3.51,0.531 3.927,0.375 false 3.531,0.979 3.896,1.156 false 3.927,1.063 4.24,1.26 0.313,0.198 10 false *a 3.948,0.281 4.26,0.479 0.313,0.198 10 false *a
*a Marking - -
V100155

Butyl Tape - -


NOTICE:

Securely attach the butyl tape.


b.

Align the marking tape on the No. 1 roof wire with the tab on the front side of the roof headlining.
B490033C01
2.688,1.542 3.292,1.292 true 3.323,1.177 3.74,1.458 0.417,0.281 12 false *A 2.302,3.406 2.615,3.563 0.313,0.156 10 false *a 0.865,0.823 1.073,0.99 0.208,0.167 10 true *b 3.406,1.635 3.583,1.802 0.177,0.167 10 true *c 5.156,2.625 5.333,2.792 0.177,0.167 10 true *c 5.406,1.323 5.583,1.49 0.177,0.167 10 true *c 3.563,0.521 3.74,0.688 0.177,0.167 10 true *c
*A for LHD with Rain Sensor - -
*a Marking Tape *b 90°
*c Adjustment Area - -
V113147

Rotation Direction - -


c.

Engage each clamp.


d.

Turn the 2 visor connectors clockwise approximately 90° to install them to the roof headlining.


e.

Attach the No. 1 roof wire with the butyl tape.

NOTICE:
·

Securely attach the No. 1 roof wire.

·

If any of the No. 1 roof wire is left loose, it will cause an abnormal noise.

·

Make sure to attach the No. 1 roof wire without leaving any of it loose.


HINT:

Secure the extra length of the No. 1 roof wire in the adjustment area.


f.

Install the No. 1 roof wire to the roof headlining with adhesive tape.
B490034C01
0.667,3.25 2.5,4.417 1.833,1.167 2.5,3.25 4.5,4.417 2,1.167 4.5,3.25 6.5,4.417 2,1.167 3.563,3.771 3.875,3.698 true 5.479,3.76 5.792,3.688 true 3.854,3.583 4.167,3.74 0.313,0.156 10 false *1 2.583,3.333 2.896,3.49 0.313,0.156 10 false *a 4.583,3.333 4.896,3.49 0.313,0.156 10 false *b 3.125,4.094 3.438,4.25 0.313,0.156 10 false *c 3.885,4.094 4.198,4.25 0.313,0.156 10 false *c 5.906,3.552 6.219,3.708 0.313,0.156 10 false *1 1.271,4.094 1.427,4.292 0.156,0.198 10 false A 1.969,3.719 2.125,3.917 0.156,0.198 10 false B
*1 No. 1 Roof Wire - -
*a Correct *b Incorrect
*c 10 mm (0.394 in.) or more - -
V100155

Adhesive Tape - -


Adhesive Tape Size
Area Dimension Area Dimension
A 20 mm (0.787 in.) B 80 mm (3.15 in.) or more

NOTICE:
·

Apply the tape securely in place.

·

Do not touch the adhesive surface when applying the tape to prevent adhesion failure.


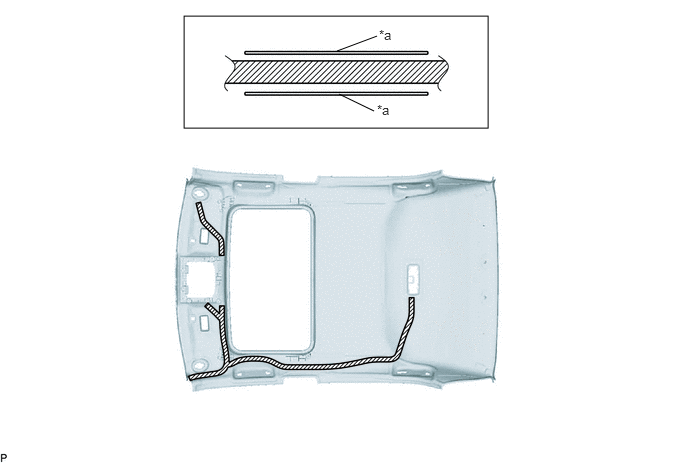
Hide 82171 3.INSTALL NO. 1 ROOF WIRE (for Panoramic Moon Roof)

a.

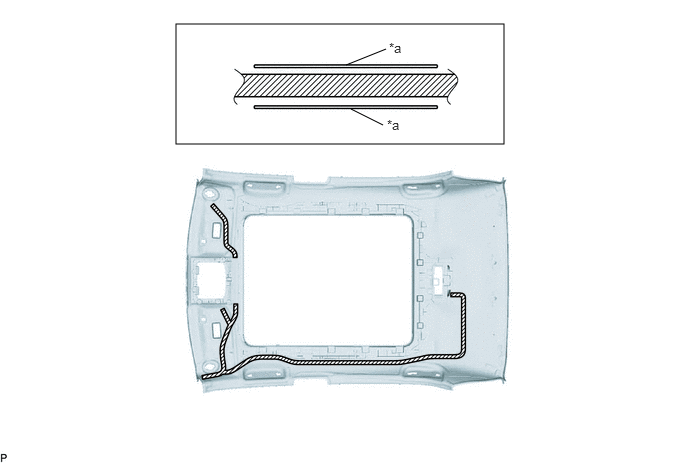
Apply butyl tape as shown in the illustration.
B484971C01
1.833,0.25 5.25,1.5 3.417,1.25 3.604,0.677 4.021,0.51 false 3.656,1.135 3.99,1.302 false 4.052,0.417 4.365,0.573 0.313,0.156 10 false *a 4.031,1.219 4.344,1.375 0.313,0.156 10 false *a
*a Marking - -
V100155

Butyl Tape - -


NOTICE:

Securely attach the butyl tape.


b.

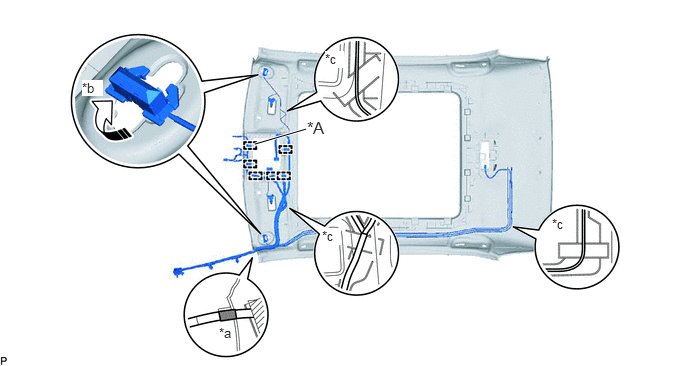
Align the marking tape on the No. 1 roof wire with the tab on the front side of the roof headlining.
B484972C01
2.656,1.5 3.188,1.344 true 3.198,1.229 3.646,1.531 0.448,0.302 12 false *A 2.281,3.385 2.594,3.542 0.313,0.156 10 false *a 0.854,0.833 1.073,1 0.219,0.167 10 true *b 5.75,2.25 6.063,2.406 0.313,0.156 10 false *c 3.354,2.375 3.552,2.552 0.198,0.177 10 true *c 3.385,0.531 3.583,0.708 0.198,0.177 10 true *c
*A for LHD with Rain Sensor - -
*a Marking Tape *b 90°
*c Adjustment Area - -
V113147

Rotation Direction - -


c.

Engage each clamp.


d.

Turn the 2 visor connectors clockwise approximately 90° to install them to the roof headlining.


e.

Attach the No. 1 roof wire with the butyl tape.

NOTICE:
·

Securely attach the No. 1 roof wire.

·

If any of the No. 1 roof wire is left loose, it will cause an abnormal noise.

·

Make sure to attach the No. 1 roof wire without leaving any of it loose.


HINT:

Secure the extra length of the No. 1 roof wire in the adjustment area.


f.

Install the No. 1 roof wire to the roof headlining with adhesive tape.
B484973C01
0.5,3.417 2.333,4.417 1.833,1 2.5,3.417 4.417,4.417 1.917,1 4.417,3.417 6.333,4.417 1.917,1 3.427,3.802 3.719,3.729 true 5.323,3.792 5.615,3.719 true 3.719,3.625 4.031,3.781 0.313,0.156 10 false *1 2.583,3.5 2.896,3.656 0.313,0.156 10 false *a 4.5,3.5 4.813,3.656 0.313,0.156 10 false *b 2.979,4.115 3.292,4.271 0.313,0.156 10 false *c 3.75,4.115 4.063,4.271 0.313,0.156 10 false *c 5.625,3.625 5.938,3.781 0.313,0.156 10 false *1 1.125,4.125 1.438,4.281 0.313,0.156 10 false A 1.802,3.76 2.115,3.917 0.313,0.156 10 false B
*1 No. 1 Roof Wire - -
*a Correct *b Incorrect
*c 10 mm (0.394 in.) or more - -
V100155

Adhesive Tape - -


Adhesive Tape Size
Area Dimension Area Dimension
A 20 mm (0.787 in.) B 80 mm (3.15 in.) or more

NOTICE:
·

Apply the tape securely in place.

·

Do not touch the adhesive surface when applying the tape to prevent adhesion failure.


Hide 86101J 4.INSTALL NO. 2 ANTENNA CORD SUB-ASSEMBLY

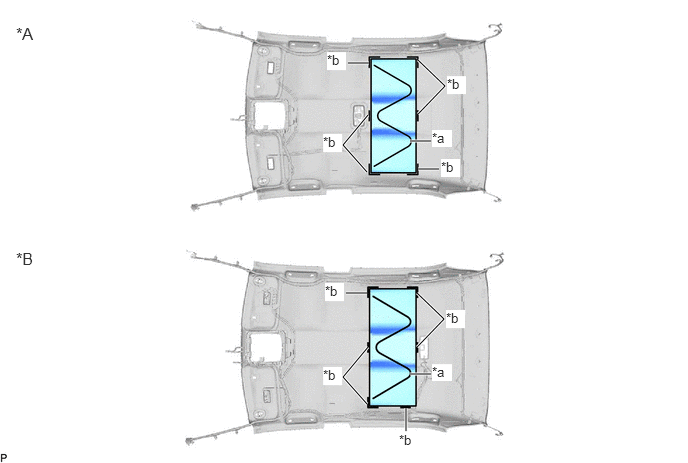
Hide 63344A 5.INSTALL NO. 4 ROOF SILENCER (for Normal Roof)

a.

Align the No. 4 roof silencer with the markings on the roof headlining and install it using hot-melt glue as shown in the illustration.
B481828C01
4.271,1.469 4.49,1.469 true 4.271,3.896 4.49,3.896 true 4.354,1.76 4.573,1.76 true 4.229,4.25 4.229,4.49 true 4.344,3.052 4.625,3.323 4.625,3.323 4.344,3.615 true 4.354,0.625 4.635,0.896 4.635,0.896 4.354,1.188 true 3.833,3.615 3.573,3.927 3.573,3.927 3.823,4.208 true 3.833,1.198 3.573,1.51 3.573,1.51 3.823,1.792 true 3.625,0.656 3.844,0.656 true 3.604,3.052 3.823,3.052 true 0.167,0.25 0.667,0.75 0.5,0.5 12 false *A 0.167,2.594 0.583,3 0.417,0.406 12 false *B 4.5,1.354 4.708,1.531 0.208,0.177 10 true *a 4.646,3.229 4.844,3.417 0.198,0.188 10 true *b 4.5,3.792 4.708,3.969 0.208,0.177 10 true *a 4.594,1.656 4.792,1.844 0.198,0.188 10 true *b 3.365,1.396 3.563,1.583 0.198,0.188 10 true *b 4.656,0.792 4.854,0.979 0.198,0.188 10 true *b 4.156,4.5 4.354,4.688 0.198,0.188 10 true *b 3.365,3.823 3.563,4.01 0.198,0.188 10 true *b 3.385,2.948 3.583,3.135 0.198,0.188 10 true *b 3.406,0.542 3.604,0.729 0.198,0.188 10 true *b
*A w/ Room Light Assembly *B w/ Spot Light Assembly
*a Hot-melt Glue *b Marking


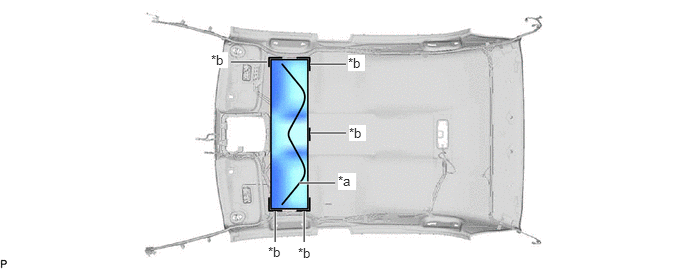
Hide 63342A 6.INSTALL NO. 2 ROOF SILENCER (for Normal Roof)

a.

Align the No. 2 roof silencer with the markings on the roof headlining and install it using hot-melt glue as shown in the illustration.
B480162C01
3.229,0.667 3.604,0.667 true 3.229,1.385 3.604,1.385 true 3.115,1.906 3.49,1.906 true 2.406,0.646 2.781,0.646 true 2.865,2.198 2.865,2.521 true 3.167,2.198 3.167,2.521 true 3.521,1.802 3.708,1.979 0.188,0.177 10 true *a 3.104,2.552 3.417,2.708 0.313,0.156 10 false *b 2.792,2.542 3.104,2.698 0.313,0.156 10 false *b 3.635,1.302 3.813,1.469 0.177,0.167 10 true *b 3.625,0.573 3.802,0.74 0.177,0.167 10 true *b 2.198,0.542 2.375,0.708 0.177,0.167 10 true *b
*a Hot-melt Glue *b Marking