1HZ ENGINE MECHANICAL TIMING BELT INSTALLATION
PROCEDURE

 13523P
1.INSTALL NO.1 CAMSHAFT TIMING PULLEY
Install the set key to the key groove of the camshaft.
Align the pulley set key with the key groove of the No.1camshaft timing pulley, and slide the No.1 camshaft timing pulley.
Temporarily install the pulley bolt.
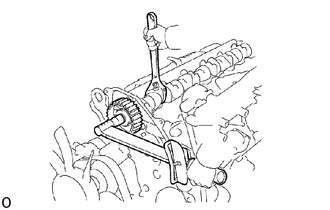
Hold the hexagon wrench head portion of the camshaft with a wrench, and tighten the pulley bolt.
- Torque:
98 N*m (1,000 kgf*cm, 72 ft*lbf)
11201
2.INSTALL CYLINDER HEAD COVER
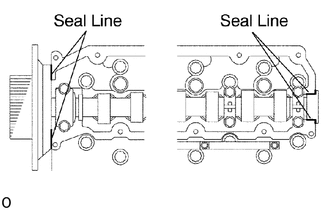
Remove any old seal packing (FIPG) material.
Apply seal packing to the cylinder head as shown in illustration.
- Seal packing:
Part No. 08826-00080 or equivalent
Install the gasket to the cylinder head cover.
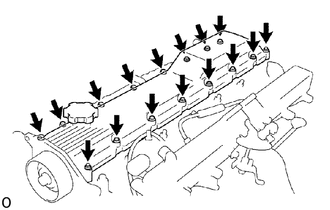
Install the cylinder head cover with the 14 bolts and 2 nuts.
- Torque:
6.4 N*m (65 kgf*cm, 57 in.*lbf)
17113
3.INSTALL INTAKE PIPE
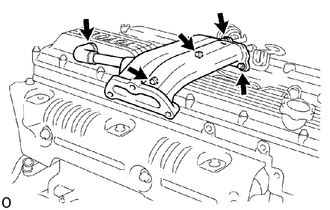
Install a new gasket and intake pipe with the 4 bolts.
- Torque:
19.6 N*m (200 kgf*cm, 14 ft*lbf)
Connect the PCV hose.
17861
4.INSTALL INTAKE AIR CONNECTOR
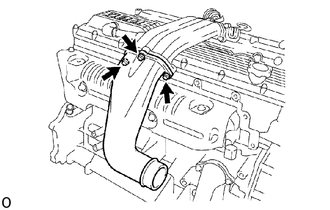
Install a new gasket and intake air connector with 3 bolts.
13586
5.INSTALL NO.2 CAMSHAFT TIMING PULLEY
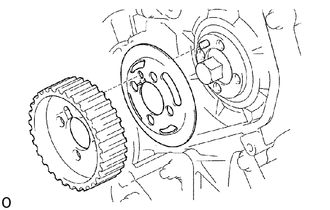
Align the knock pin on the injection pump drive gear with the knock pin hole of the No.1 flange and the knock pin groove of the No.2 camshaft timing pulley.
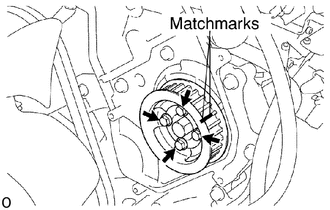
Align the matchmarks of the No.2 camshaft timing pulley and No.2 flange, and install and tighten the 4 bolts.
- Torque:
31 N*m (315 kgf*cm, 23 ft*lbf)
13505
6.INSTALL IDLER PULLEY
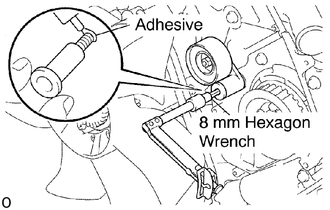
Apply adhesive 2 or 3 threads of the pivot bolt.
- Adhesive:
Part No. 08833-00080, THREE BOND 1344, LOCTITE 242 or equivalent.
Using an 8 mm hexagon wrench, install the plate washerand idler pulley with the pivot bolt.
- Torque:
34.5 N*m (350 kgf*cm, 25 ft*lbf)
Check that the idler pulley moves smoothly.
7. SET NO.1 CYLINDER TO BDC/COMPRESSION
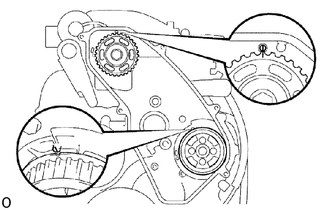
Check that the timing mark of the No.2 camshaft timing pulley with the BDC mark.
- NOTICE:
-
Do not turn the crankshaft pulley. The valve heads will hit against the piston top.
Align the timing mark of the No.1 camshaft timing pulley with the BDC mark.
13568
8.INSTALL TIMING BELT
- NOTICE:
-
The engine should be cold.
- HINT:
-
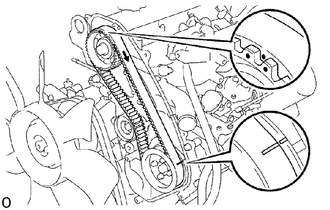
-
If re-using timing belt, align the points marked during removal, and install the timing belt with the arrow pointing in the direction of engine revolution.
Remove any oil or water on the pulleys, and keep them clean.
- NOTICE:
-
Only wipe the pulleys; do not use any cleansing agent.
Install the timing belt under tension between the No.1 and No.2 camshaft timing pulleys.
13540
9.SET TIMING BELT TENSIONER
Using a press slowly press in the push rod using 981 - 9,807 N (100 - 1,000 kgf, 220 - 2,205 lbf) of force.
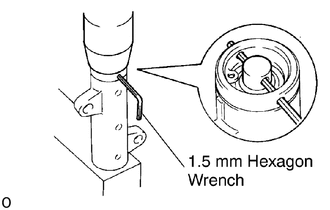
Align the holes of the push rod and housing, pass a 1.5 mm hexagon wrench through the holes to keep the setting position of the push rod.
Release the press.
13540
10.INSTALL TIMING BELT TENSIONER
Temporarily install the timing belt tensioner with the 2 bolts while pushing the pulley toward the timing belt.
Alternately tighten the 2 bolts.
- Torque:
13 N*m (130 kgf*cm, 10 ft*lbf)
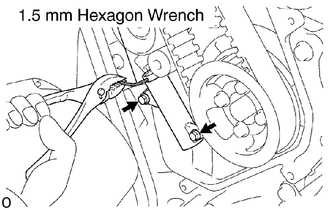
Remove the 1.5 mm hexagon wrench.
11.CHECK VALVE TIMING
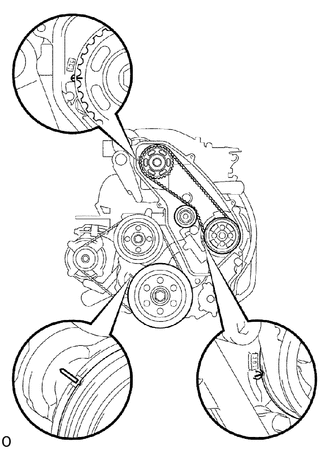
Turn the crankshaft pulley clockwise and check that each pulley timing mark aligns with the TDC marks.
If the marks do not align, remove the timing belt and reinstall it.
11322A
12.INSTALL TIMING BELT COVER
Remove any old seal packing (FIPG) material.
Apply seal packing to the camshaft oil seal retainer and timing gear cover as shown in the illustration.
- Seal packing:
Part No. 08826-00080 or equivalent
Check that timing belt cover gasket have clacks or peeling, etc.
If the gasket has cracks or peeling, etc. replace it using these steps:
Using a screwdriver and gasket scraper, remove all the old gasket material.
Thoroughly clean all components to remove all the loose material.
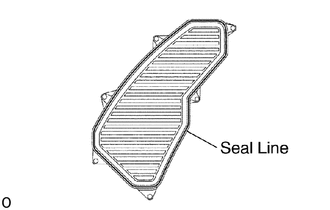
Remove the backing paper from a new gasket and install the gasket evenly to the part of the timing belt cover shaded black in the illustration.
- NOTICE:
-
Do not leave a gap between them. Cut off any excess gasket.
After installing the gasket, press down on it so that the adhesive firmly sticks to the timing belt cover.
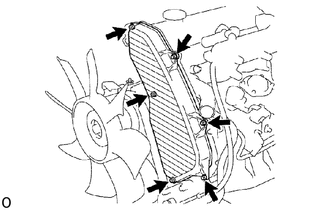
Install the timing belt cover with the 6 seal washers and 6 bolts.