N04C-UH ENGINE MECHANICAL ENGINE UNIT INSPECTION
PROCEDURE

 1.INSPECT VALVE ROCKER ARM OIL CLEARANCE
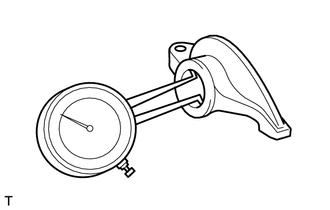
Using a caliper gauge, measure the inside diameter of the rocker arm bush.
- Standard Bush Inside Diameter:
22.023 to 22.052 mm (0.867 to 0.868 in.)
- Maximum Bush Inside Diameter:
22.08 mm (0.869 in.)
If the inside diameter is greater than the maximum, replace the bush.
- NOTICE:
-
When installing a bush into the rocker arm, align the bush correctly with the 2 oil holes on the rocker arm.
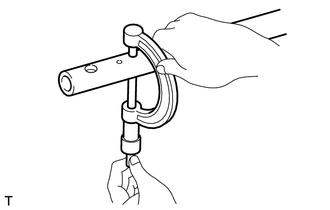
Using a micrometer, measure the outside diameter of the rocker arm shaft.
- Standard Shaft Diameter:
21.959 to 21.980 mm (0.8645 to 0.8653 in.)
- Minimum Shaft Diameter:
21.92 mm (0.863 in.)
If the outside diameter is less than the minimum, replace the rocker arm shaft and rocker arm.
Subtract the valve rocker arm inside diameter measurement from the valve rocker shaft outside diameter measurement.
- Standard Oil Clearance:
0.043 to 0.093 mm (0.00169 to 0.00366 in.)
- Maximum Oil Clearance:
0.15 mm (0.00591 in.)
If the oil clearance is greater than the maximum, replace the rocker arm shaft and rocker arm bush.
13781
2.INSPECT VALVE PUSH ROD
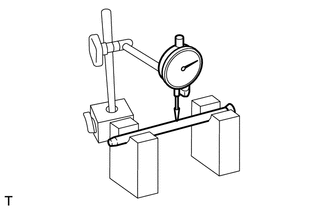
Place the push rod on V-blocks.
Using a dial indicator, measure the circle runout at the center of the push rod.
- Maximum Circle Runout:
0.30 mm (0.0118 in.)
If the circle runout is greater than the maximum, replace the push rod.
11101A
3.INSPECT CYLINDER HEAD SET BOLT
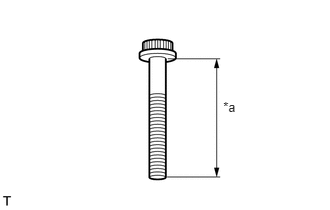
| *a | Measurement Length |
Measure the length of the M12 head bolts (No. 1 to No. 18).
- Maximum Length:
129 mm (5.08 in.)
If the length is greater than the maximum, replace the applicable bolts.
4.INSPECT NO. 2 IDLE GEAR OIL CLEARANCE
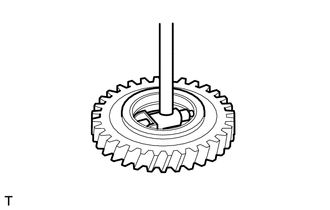
Using a cylinder gauge, measure the inside diameter of the No. 2 idle gear.
- Standard Idle Gear Inside Diameter:
50.000 to 50.025 mm (1.9685 to 1.9695 in.)
- Maximum Idle Gear Inside Diameter:
50.05 mm (1.9704 in.)
If the diameter is greater than the maximum, replace the No. 2 idle gear.
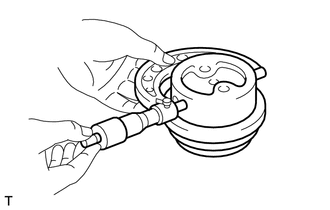
Using a micrometer, measure the diameter of the No. 2 idle gear shaft.
- Standard Idle Gear Shaft Diameter:
49.950 to 49.975 mm (1.9665 to 1.9675 in.)
- Minimum Idle Gear Shaft Diameter:
49.95 mm (1.9665 in.)
If the diameter is less than the minimum, replace the No. 2 idle gear shaft.
Subtract the No. 2 idle gear inside diameter measurement from the No. 2 idle gear shaft diameter measurement.
- Standard Oil Clearance:
0.0125 to 0.0375 mm (0.000492 to 0.00148 in.)
- Maximum Oil Clearance:
0.10 mm (0.00394 in.)
If the clearance is greater than the maximum, replace the No. 2 idle gear and No. 2 idle gear shaft.
5.INSPECT NO. 1 IDLE GEAR OIL CLEARANCE
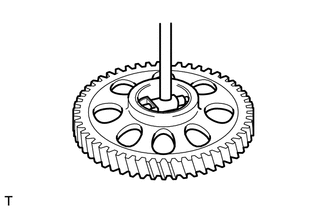
Using a cylinder gauge, measure the inside diameter of the No. 1 idle gear.
- Standard Idle Gear Inside Diameter:
50.000 to 50.025 mm (1.9685 to 1.9695 in.)
- Maximum Idle Gear Inside Diameter:
50.05 mm (1.9704 in.)
If the diameter is greater than the maximum, replace the No. 1 idle gear.
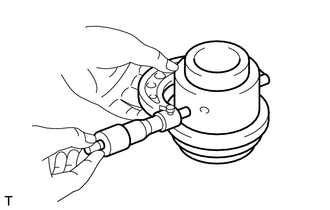
Using a micrometer, measure the diameter of the No. 1 idle gear shaft.
- Standard Idle Gear Shaft Diameter:
49.950 to 49.975 mm (1.9665 to 1.9675 in.)
- Minimum Idle Gear Shaft Diameter:
49.95 mm (1.9665 in.)
If the diameter is less than the minimum, replace the No. 1 idle gear shaft.
Subtract the No. 1 idle gear inside diameter measurement from the No. 1 idle gear shaft outside diameter measurement.
- Standard Oil Clearance:
0.0125 to 0.0370 mm (0.000492 to 0.00146 in.)
- Maximum Oil Clearance:
0.10 mm (0.00394 in.)
If the clearance is greater than the maximum, replace the No. 1 idle gear and No. 1 idle gear shaft.
13265
6.INSPECT CONNECTING ROD BOLT
| *a | Measurement Length |
Using a vernier caliper, measure the length of the connecting rod bolt.
- Standard Bolt Length:
59.00 mm (2.323 in.)
- Maximum Bolt Length:
61.5 mm (2.421 in.)
If the diameter is greater than the maximum, replace the connecting rod bolt.
11462
7.INSPECT CYLINDER LINER
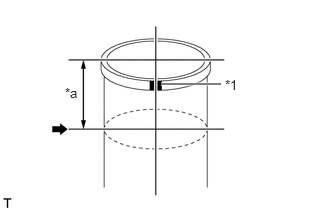
| *1 | Symbol |
| *1 | 20 mm (0.787 in.) |

|
Measuring Point |
Using a micrometer, measure the outside diameter of the cylinder liner.
- Standard Diameter:
Symbols Outside Diameter If the diameter is less than the standard, replace the cylinder liner.
A 106.982 to 106.989 mm (4.2119 to 4.2122 in.) B 106.990 to 106.995 mm (4.2122 to 4.2124 in.) C 106.996 to 107.004 mm (4.2124 to 4.2128 in.)
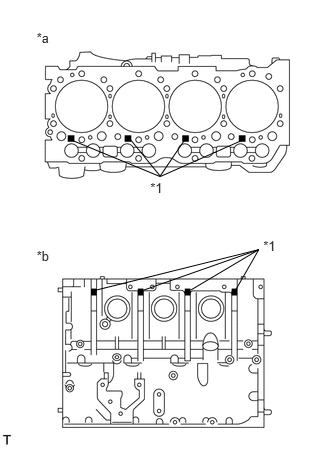
Using a cylinder gauge, measure the inside diameter of the cylinder block.
| *1 | Symbol |
| *a | Cylinder Block Side |
| *b | Intake Manifold Side |
- Standard Diameter:
Symbols Inside Diameter If the diameter is greater than the standard, replace the cylinder block.
A 107.000 to 107.008 mm (4.2126 to 4.2129 in.) B 107.008 to 107.014 mm (4.2129 to 4.2131 in.) C 107.014 to 107.022 mm (4.2131 to 4.2135 in.)
8.INSPECT CYLINDER BLOCK FOR WARPAGE
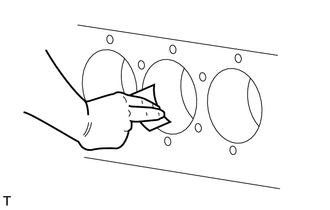
- HINT:
-
Before the measurement, remove carbon deposits from the upper end inside the cylinder liner with a scraper or emery paper (recommended: No. 150), working in a circular direction. Make sure that there are no scratches inside the cylinder liner.
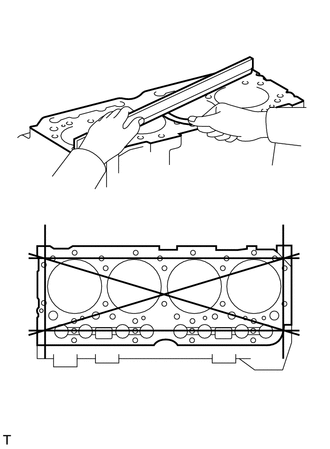
Using a precision straightedge and feeler gauge, measure the warpage of the surface which contacts the cylinder head.
- Maximum Warpage:
0.10 mm (0.00394 in.)
If the warpage is greater than the maximum, replace the cylinder block.
Visually check the cylinders for vertical scratches.
If deep scratches are found, rebore all 4 cylinders. If necessary, replace the cylinder block.
9.INSPECT CYLINDER BORE
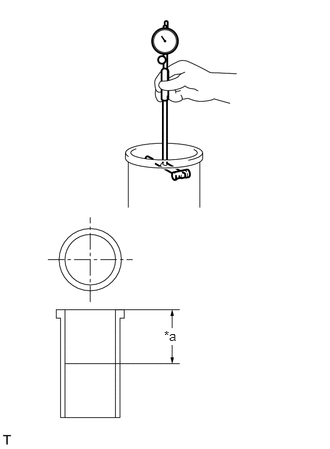
| *a | Measurement Point (80 mm (3.15 in.)) |
Using a cylinder gauge, measure the cylinder liner inside diameter at the 4 points shown in the illustration.
- Standard Inside Diameter:
104.012 to 104.036 mm (4.0950 to 4.0959 in.)
- Maximum Inside Diameter:
104.15 mm (4.1004 in.)
If the diameter is greater than the maximum, replace the cylinder liner with a new one.
10.INSPECT PISTON
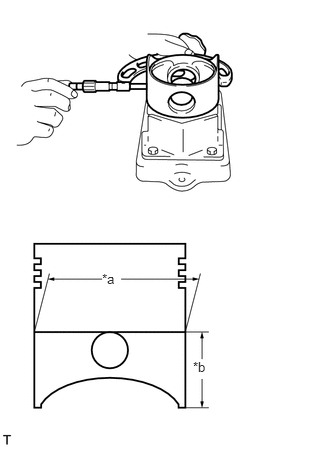
| *a | Diameter |
| *b | Measurement Point (20 mm (0.787 in.)) |
Using a micrometer, measure the piston diameter at the point in the illustration.
- Standard Piston Diameter:
103.936 to 103.952 mm (4.0920 to 4.0926 in.)
If the diameter is less than the standard, replace the piston with a new one.
11.INSPECT PISTON OIL CLEARANCE
Subtract the piston diameter measurement from the cylinder liner inside diameter measurement.
- Standard Oil Clearance:
0.06 to 0.10 mm (0.00236 to 0.00394 in.)
If the clearance is outside the specified range, replace the cylinder liner and/or piston with a new one.
- HINT:
-
Apply the value measured at the most worn point to the cylinder liner inside diameter.
12.INSPECT RING GROOVE CLEARANCE
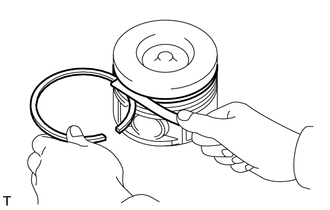
Insert the piston ring into the piston ring groove.
Using a feeler gauge, measure the clearance between the piston ring and piston ring groove.
- Standard Groove Clearance:
Item Specified Condition 1st 0.11 to 0.15 mm (0.00433 to 0.00591 in.) 2nd 0.07 to 0.11 mm (0.00276 to 0.00433 in.) Oil 0.02 to 0.06 mm (0.000787 to 0.00236 in.)
- Maximum Groove Clearance:
0.30 mm (0.0118 in.)
If the clearance is greater than the maximum, measure the width of the piston ring and piston ring groove individually and replace any parts that do not meet the specified range with new ones.
Using a feeler gauge, measure the dimension of each groove.
- Standard Groove Width:
Item Specified Condition 1st 2.58 to 2.60 mm (0.1016 to 0.1024 in.) 2nd 2.06 to 2.08 mm (0.0811 to 0.0819 in.) Oil 4.01 to 4.03 mm (0.1579 to 0.1587 in.)
- Maximum Groove Width:
Item Specified Condition If the dimension is greater than the maximum, replace the piston and piston rings as a set.
1st 3.10 mm (0.1220 in.) 2nd 2.20 mm (0.0866 in.) Oil 4.08 mm (0.1606 in.)
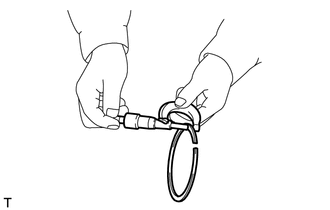
Using a micrometer, measure the piston ring thickness.
- Standard Ring Thickness:
Item Specified Condition 1st 2.47 to 2.49 mm (0.0972 to 0.0980 in.) 2nd 1.97 to 1.99 mm (0.0776 to 0.0783 in.) Oil 3.97 to 3.99 mm (0.1563 to 0.1570 in.)
- Minimum Ring Thickness:
Item Specified Condition If the thickness is less than the minimum, replace the piston ring.
1st 2.32 mm (0.0913 in.) 2nd 1.82 mm (0.0717 in.) Oil 3.95 mm (0.1555 in.)
13.INSPECT CONNECTING ROD SUB-ASSEMBLY
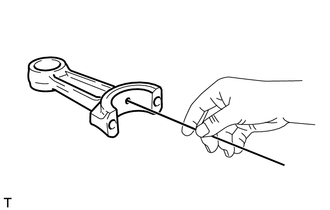
Check that there is no clogging in the lubrication passage to the connecting rod small end.
If there is any clogging, blow air through the lubrication passage using an air gun, or clean by inserting a wire.
13411
14.INSPECT CRANKSHAFT
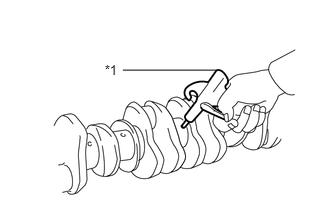
| *1 | Air Gun |
- HINT:
-
Before the inspection, clean the crankshaft with a commercial cleaning agent and clean the lubrication passage using an air gun.
Performing the dye penetrant test, check the crankshaft for cracks.
- HINT:
-
Pay special attention to the finished R section and oil hole of the crankshaft journal and crankshaft pin.
Visually check the crankshaft journal and pin for damage or wear.
If any damage is found, replace the crankshaft with a new one.
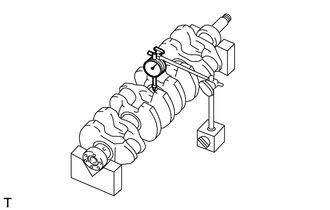
Inspect for runout.
Place the crankshaft on V-blocks.
Using a dial gauge, measure the circle runout of the crankshaft at the center journal.
- Maximum Runout:
0.04 mm (0.00157 in.)
If the circle runout is greater than the maximum, replace the crankshaft with a new one.
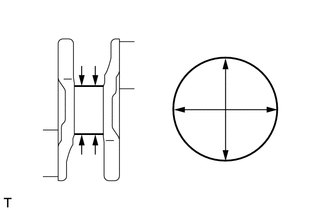
Using a micrometer, measure the main journal outside diameter.
- Standard Journal Diameter:
72.94 to 72.96 mm (2.8717 to 2.8724 in.)
- Minimum Journal Diameter:
Item Specified Condition If the diameter is less than the minimum, replace the crankshaft with a new one.
New 72.74 mm (2.8638 in.) Old 71.76 mm (2.8252 in.)
Check each main journal for taper and out-of-round.
- Maximum Taper and Out-of-Round:
0.01 mm (0.000394 in.)
If the taper and out-of-round are greater than the maximum, replace the crankshaft.
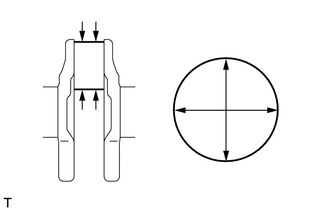
Using a micrometer, measure the crankshaft pin outside diameter.
- Standard Journal Diameter:
61.94 to 61.96 mm (2.4386 to 2.4394 in.)
- Minimum Journal Diameter:
Item Specified Condition If the diameter is less than the minimum, replace the crankshaft with a new one.
New 61.74 mm (2.4307 in.) Old 60.76 mm (2.3921 in.)
Check each crankshaft pin for taper and out-of-round.
- Maximum Taper and Out-of-Round:
0.01 mm (0.000394 in.)
If the taper and out-of-round are greater than the maximum, replace the crankshaft.
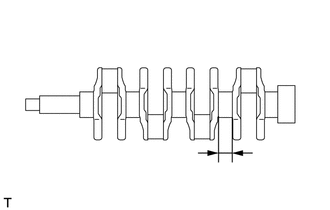
Using a vernier caliper, measure the dimension of the crankshaft No. 4 journal.
- Standard Journal Dimension:
34.00 to 34.08 mm (1.3386 to 1.3417 in.)
- Maximum Journal Dimension:
34.48 mm (1.3574 in.)
If the dimension is greater than the maximum, replace the crankshaft.
Visually check if there are any cracks on the crankshaft.
Check if the oil hole of the crankshaft is blocked.
If any blockage is found, replace the crankshaft.
11416
15.INSPECT CRANKSHAFT BEARING CAP SET BOLT
| *a | Measurement Length |
Using a vernier caliper, measure the bearing cap bolt length.
- Standard Bolt Length:
92.80 to 93.80 mm (3.6535 to 3.6929 in.)
- Maximum Bolt Length:
95.00 mm (3.7401 in.)
If the length is longer than the maximum, replace the bolt.
16.INSPECT CRANKSHAFT BEARING CAP
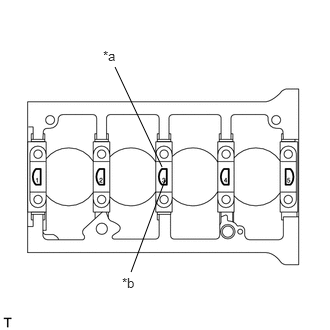
| *a | Front Mark |
| *b | Journal Number |
Install the bearing caps onto the cylinder block.
Apply a light coat of engine oil to the threads of the bearing cap bolts.
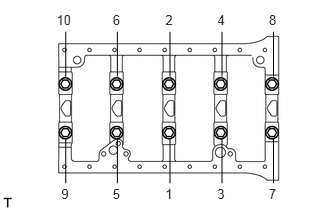
Uniformly tighten the 10 bolts, in several steps, in the order shown in the illustration.
- Torque:
60 N*m (612 kgf*cm, 44 ft.*lbf)
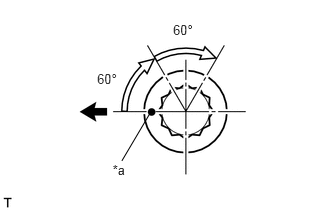
Mark the front side of the bolts with paint.
| *a | Paint Mark |
|
|
Front |
Retighten the bolts by 60° in the same order as step (c).
Perform step (e) again.
Check that each painted mark is now at a 120° angle to the front.
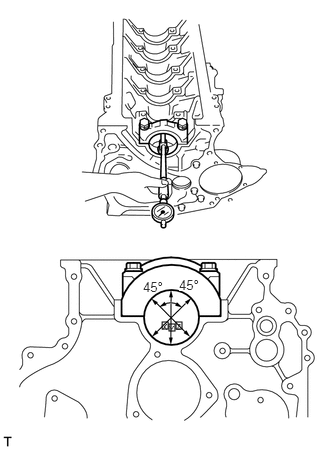
Using a cylinder gauge, measure the crankshaft bearing cap inside diameter at 3 points (X, Y, Z in the illustration).
- Standard Crankshaft Bearing Cap Inside Diameter:
77.985 to 78.00 mm (3.0703 to 3.0709 in.)
- Maximum Crankshaft Bearing Cap Inside Diameter:
78.20 mm (3.0787 in.)
If the inside diameter is greater than the maximum, carry out boring after overlay welding or replace the cylinder block with a new one.
- HINT:
-
When installing the main bearing caps, return them to their original locations according to the number stamped on the caps.
17.INSPECT CRANKSHAFT OIL CLEARANCE
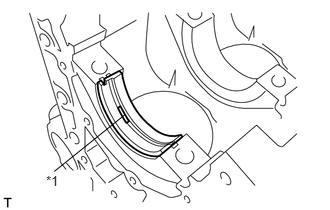
- HINT:
-
The upper bearings have an oil groove and oil hole, however, the lower bearings do not.
Align the claw of the bearing with the claw groove of the cylinder block, and push in the upper bearing.
| *1 | Oil Hole |
- NOTICE:
-
Do not apply engine oil to the bearing and its contact surface.
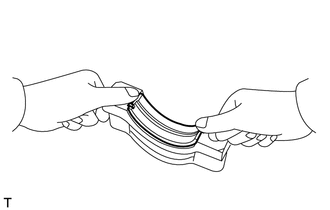
Align the claw of the bearing with the claw groove of the main bearing cap, and push in the lower bearing.
- NOTICE:
-
Do not apply engine oil to the bearing and its contact surface.
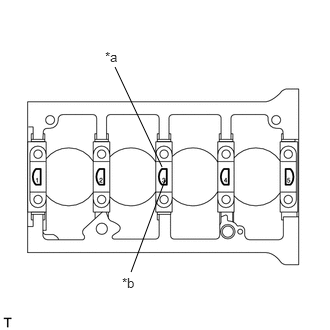
Install the bearing cap onto the cylinder block.
| *a | Front Mark |
| *b | Journal No. |
Apply a light coat of engine oil to the threads of the bearing cap bolt.
Uniformly tighten the 10 bolts, in several steps, in the order shown in the illustration.
- Torque:
60 N*m (612 kgf*cm, 44 ft.*lbf)
Mark the front side of the bolts with paint.
| *a | Paint Mark |
|
|
Front |
Retighten the bolts by 60° in the same order as step (e).
Perform step (g) again.
Check that each painted mark is now at a 120° angle to the front.
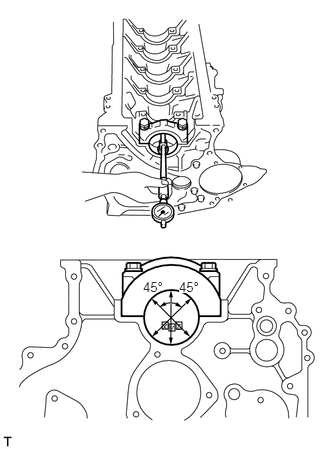
Using a cylinder gauge, measure the crankshaft bearing inside diameter at 3 points (X, Y, Z in the illustration).
- Standard Crankshaft Bearing Inside Diameter:
73.01 to 73.04 mm (2.8744 to 2.8756 in.)
- Maximum Crankshaft Bearing Inside Diameter:
73.30 mm (2.8858 in.)
- NOTICE:
-
Do not damage the crankshaft bearing.
If the inside diameter is greater than the maximum, replace the bearing with a new one.
- HINT:
-
When installing the bearing caps, return them to their original locations according to the number stamped on the caps.
Subtract the crankshaft journal diameter measurement from the bearing inside diameter measurement.
- Standard Oil Clearance:
0.051 to 0.102 mm (0.00201 to 0.00402 in.)
- Maximum Oil Clearance:
0.20 mm (0.00787 in.)
If the oil clearance is greater than the maximum, use an undersize bearing and correct or regrind the crankshaft so that the oil clearance becomes 0.20 mm (0.0078 in.) or less.
- Under Size Bearing Diameter:
Item Specified Condition STD 72.94 to 72.96 mm (2.8717 to 2.8724 in.) U/S 0.25 72.69 to 72.71 mm (2.8618 to 2.8626 in.) U/S 0.50 72.44 to 72.46 mm (2.8520 to 2.8528 in.) U/S 0.75 72.19 to 72.21 mm (2.8421 to 2.8429 in.) U/S 1.00 71.94 to 71.96 mm (2.8323 to 2.8330 in.)
- HINT:
-
Replace the upper and lower main bearings as one set.
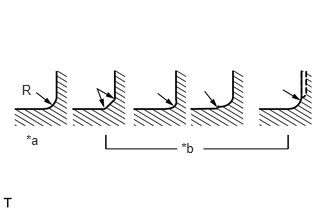
Machined dimension of file R
| *a | CORRECT |
| *b | INCORRECT |
- Main Crankshaft Journal:
3.00 to 3.50 mm (0.1181 to 0.1378 in.)
18.INSPECT CONNECTING ROD BEARING OIL CLEARANCE
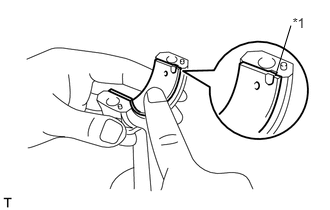
| *1 | Claw |
Align the claw of the bearing with the claw grooves of the connecting rod and connecting cap.
- NOTICE:
-
Clean the back side of the bearing and the bearing surface of the connecting rod. The surface should be free of dust and oil.
Tighten the connecting rod bolts.
Install the bearing caps.
- NOTICE:
-
Be careful of the installation direction of the bearing caps.
Uniformly tighten the bolts in several steps.
Retighten the connecting rod bolts.
- Torque:
30 N*m (300 kgf*cm, 22 ft.*lbf)
Mark the front side of the bolts with paint.
| *a | Paint Mark |
|
|
Front |
Retighten the bolts by 60° in the same order as step (b-2).
Perform step (c) again.
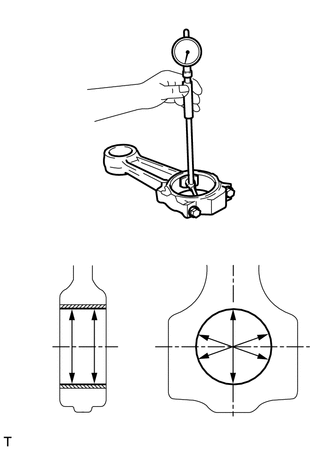
Using a cylinder gauge, measure the connecting rod big end inside diameter.
- Standard Big End Inside Diameter (w/ Bearing):
61.991 to 62.022 mm (2.4406 to 2.4418 in.)
- Maximum Big End Inside Diameter (w/ Bearing):
62.06 mm (2.4433 in.)
If the result is greater than the maximum, replace the connecting rod bearing.
Subtract the inside diameter measurement of the connecting rod from the diameter measurement of the crankshaft pin.
- Standard Oil Clearance:
0.031 to 0.082 mm (0.0012 to 0.0032 in.)
- Maximum Oil Clearance:
0.20 mm (0.0079 in.)
If the result is greater than the maximum, use an undersize bearing and correct or regrind the crankshaft so that the oil clearance becomes 0.2 mm (0.0079 in.) or less.
- Under Size Bearing Diameter:
Item Specified Condition STD 61.94 to 61.96 mm (2.4386 to 2.4394 in.) U/S 0.25 61.69 to 61.71 mm (2.4287 to 2.4295 in.) U/S 0.50 61.44 to 61.46 mm (2.4189 to 2.4197 in.) U/S 0.75 61.19 to 61.21 mm (2.4090 to 2.4098 in.) U/S 1.00 60.94 to 60.96 mm (2.3992 to 2.4000 in.)
Machined dimension of file R
| *a | CORRECT |
| *b | INCORRECT |
- Crankshaft Pin:
3.50 to 4.00 mm (0.1378 to 0.1575 in.)