WINDOW / GLASS BACK DOOR GLASS(for RH Side) INSTALLATION
PROCEDURE

 68131
1.CLEAN BACK DOOR GLASS
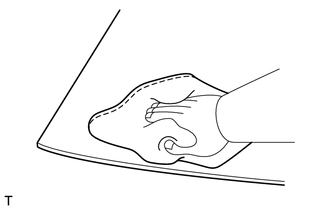
Clean the outer edge of the back door glass with non-residue solvent.
- NOTICE:
- ·
Do not touch the back door glass surface after cleaning it.
·Do not damage the glass.
·Even if using a new back door glass, clean the back door glass with non-residue solvent.
64828A
2.INSTALL BACK WINDOW GLASS CLIP LH
Using non-residue solvent, clean the back window glass clip LH installation surface of the back door glass.
Install the glass primer to the back window glass clip LH installation surface of the back door glass.
- NOTICE:
- ·
Do not apply too much primer.
·Allow the primer to dry for 3 minutes or more.
Remove the peeling paper from a new back window glass clip LH.
- HINT:
-
After removing the peeling paper, keep the exposed adhesive free from foreign matter.
Install the 2 back window glass clips LH to the back door glass as shown in the illustration.
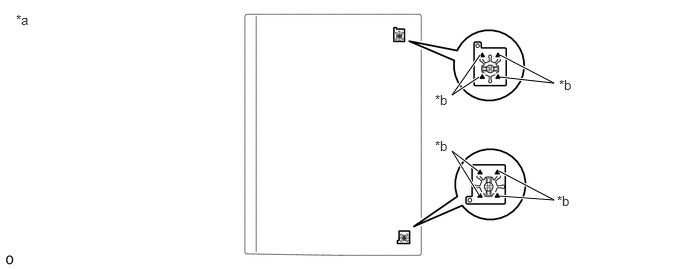
| *a | Back Side | *b | Ceramic Notch |
64827B
3.INSTALL BACK WINDOW GLASS CLIP RH
Using non-residue solvent, clean the back window glass clip RH installation surface of the back door glass.
Install the glass primer to the back window glass clip RH installation surface of the back door glass.
- NOTICE:
- ·
Do not apply too much primer.
·Allow the primer to dry for 3 minutes or more.
Remove the peeling paper from a new back window glass clip RH.
- HINT:
-
After removing the peeling paper, keep the exposed adhesive free from foreign matter.
Install the 2 back window glass clips RH to the back door glass as shown in the illustration.
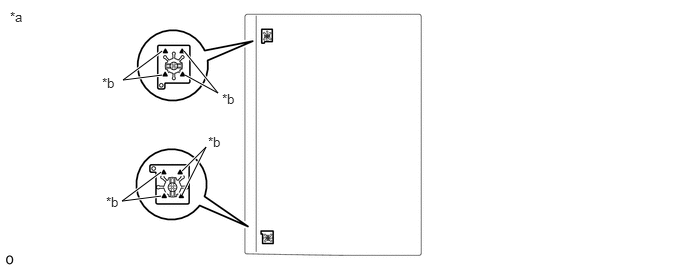
| *a | Back Side | *b | Ceramic Notch |
68294A
4.INSTALL BACK DOOR GLASS ADHESIVE DAM
Using non-residue solvent, clean the back door glass adhesive dam installation surface of the back door glass.
Install the glass primer to the back door glass adhesive dam installation surface of the back door glass.
- NOTICE:
- ·
Do not apply too much primer.
·Allow the primer to dry for 3 minutes or more.
Remove the peeling paper from a new back door glass adhesive dam.
- HINT:
-
After removing the peeling paper, keep the exposed adhesive free from foreign matter.
Install the 3 back door glass adhesive dams to the back door glass as shown in the illustration.
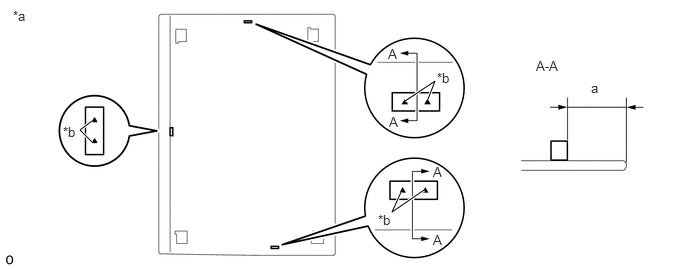
| *a | Back Side | *b | Ceramic Notch |
- Standard:
Area Specified Condition a 19.0 mm (0.748 in.)
64813B
5.INSTALL BACK WINDOW GLASS ADHESIVE DAM
Using non-residue solvent, clean the back window glass adhesive dam installation surface of the back door glass.
Install the glass primer to the back window glass adhesive dam installation surface of the back door glass.
- NOTICE:
- ·
Do not apply too much primer.
·Allow the primer to dry for 3 minutes or more.
Remove the peeling paper from a new back window glass adhesive dam.
- HINT:
-
After removing the peeling paper, keep the exposed adhesive free from foreign matter.
Install the back window glass adhesive dam to the back door glass as shown in the illustration.
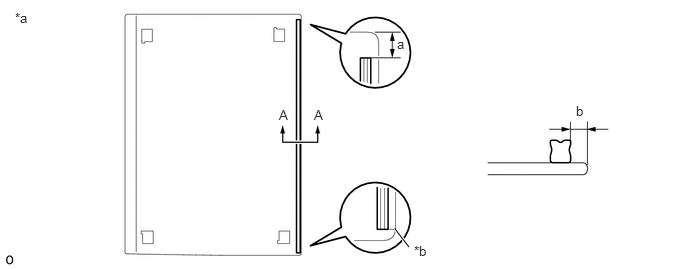
| *a | Back Side | *b | R End |
- Standard:
Area Specified Condition a 14.5 mm (0.571 in.) b 4.5 mm (0.177 in.)
75573C
6.INSTALL BACK WINDOW OUTSIDE MOULDING
Using non-residue solvent, clean the back window outside moulding installation surface of the back door glass.
Install the glass primer to the back window outside moulding installation surface of the back door glass.
- NOTICE:
- ·
Do not apply too much primer.
·Allow the primer to dry for 3 minutes or more.
Remove the peeling paper from a new back window outside moulding.
- HINT:
-
After removing the peeling paper, keep the exposed adhesive free from foreign matter.
Install the back window outside moulding to the back door glass as shown in the illustration.
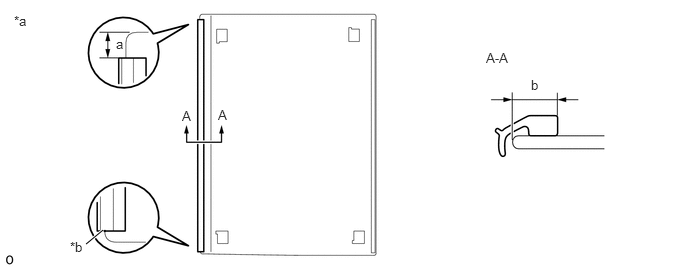
| *a | Back Side | *b | R End |
- Standard:
Area Specified Condition a 14.5 mm (0.571 in.) b 11.2 mm (0.441 in.)
68131
7.INSTALL BACK DOOR GLASS
Clean and shape the contact surface of the door panel.
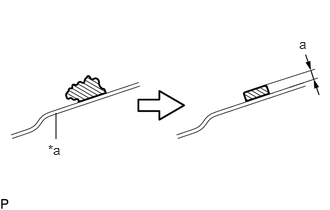
On the contact surface of the door panel, use a knife to cut away excess adhesive as shown in the illustration.
- Standard:
Area Specified Condition a 1.0 mm (0.0394 in.) to 3.0 mm (0.118 in.)
Clean the contact surface of the door panel with non-residue solvent.
| *a | Door Panel |

|
Adhesive |
Position the back door glass.
Using suction cups, place the back door glass in the correct position.
Check that the entire contact surface of the glass rim is perfectly even.
Using suction cups, remove the back door glass.
Using a brush or sponge, apply body primer to the exposed part of the door panel.
- NOTICE:
- ·
Do not apply too much primer.
·Do not apply primer to the adhesive.
·When applying the primer, take care of the seams of the panel and spot welds.
Using a brush or sponge, apply glass primer to the contact surface of the glass.
- NOTICE:
- ·
Do not apply too much primer.
·Allow the primer to dry for 3 minutes or more.
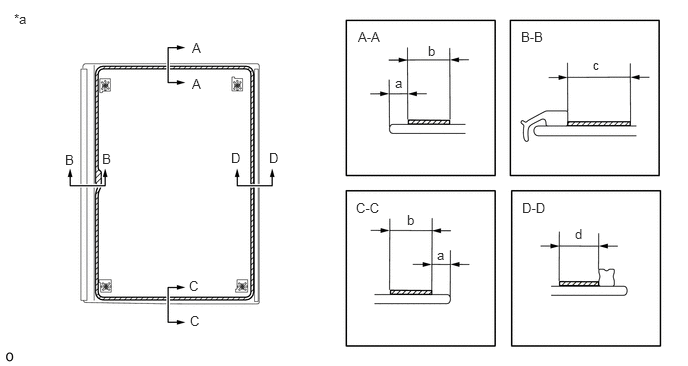
| *a | Back Side | - | - |
|
|
Glass Primer Application Area | - | - |
- Standard:
Area Specified Condition a 6.0 mm (0.236 in.) b 14.0 mm (0.551 in.) c 21.0 mm (0.827 in.) d 13.0 mm (0.512 in.)
Apply adhesive to the back door glass.
- Adhesive:
Toyota Genuine Windshield Glass Adhesive or Equivalent
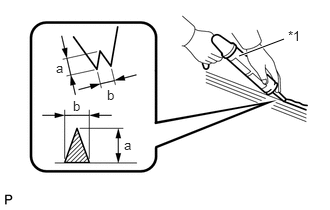
Cut off the tip of the cartridge nozzle as shown in the illustration.
- Standard:
Area Specified Condition a 12.0 mm (0.472 in.) b 8.0 mm (0.315 in.)
| *1 | Sealer Gun |
- HINT:
-
After cutting off the tip, use all adhesive within the time written in the table below.
Load the sealer gun with the cartridge.
Apply adhesive to the glass as shown in the illustration.
- NOTICE:
-
Allow the primer to dry for 3 minutes or more.
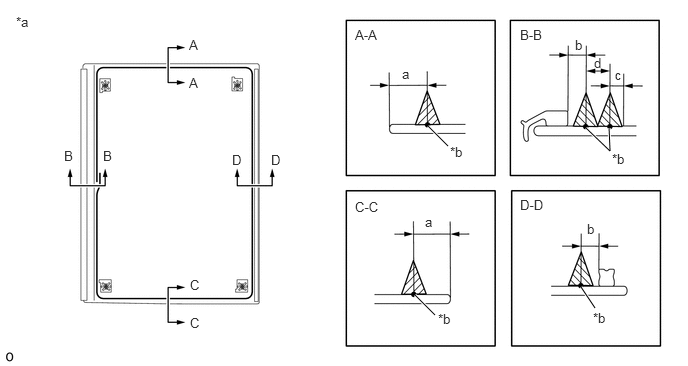
| *a | Back Side | *b | Adhesive Center |
|
|
Adhesive | - | - |
- Standard:
Area Specified Condition a 113.0 mm (0.512 in.) b 6.0 mm (0.236 in.) c 4.0 mm (0.157 in.) d 8.0 mm (0.315 in.)
Install the back door glass to the door panel.
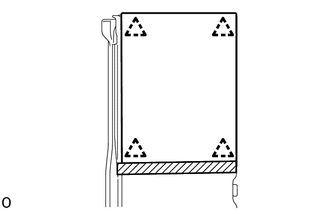
Using suction cups, attach the 2 back window glass clip LH and 2 back window glass clip RH and install the back door glass.
Press it in gently along the rim.
- NOTICE:
- ·
Check that the clips are attached to the door panel correctly.
·Check that the door panel and glass have a small gap between them.
- HINT:
-
Press the glass with force of 98 N (10 kgf, 22.0 lbf) or more.
Using a scraper, remove any excess or protruding adhesive.
- NOTICE:
-
Apply adhesive to the glass rim.
8.INSPECT FOR LEAKS AND REPAIR
After the adhesive has hardened, apply water from the outside of the vehicle. Check that no water leaks into the cabin.
If water leaks into the cabin, allow the water to dry and add adhesive.
Remove the protective tape.
67754
9.INSTALL BACK DOOR TRIM MOULDING
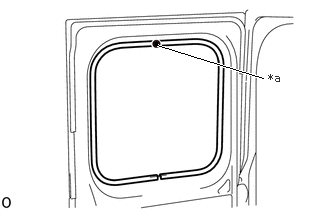
Align the installation mark on the back door trim moulding to the cutout of the door panel and install it.
| *a | Installation Mark (Paint) |
62384P
10.INSTALL SIDE WINDOW CLIP CAP
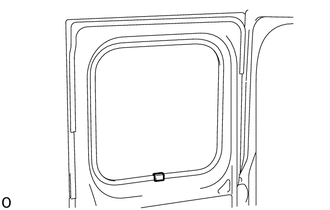
Install the side window clip cap.